Table of Contents for
Python: Penetration Testing for Developers
 Python: Penetration Testing for Developers
Published by
Packt Publishing, 2016
Python: Penetration Testing for Developers
Published by
Packt Publishing, 2016
- Cover
- Table of Contents
- Python: Penetration Testing for Developers
- Python: Penetration Testing for Developers
- Python: Penetration Testing for Developers
- Credits
- Preface
- What you need for this learning path
- Who this learning path is for
- Reader feedback
- Customer support
- 1. Module 1
- 1. Understanding the Penetration Testing Methodology
- Understanding what penetration testing is not
- Assessment methodologies
- The penetration testing execution standard
- Penetration testing tools
- Summary
- 2. The Basics of Python Scripting
- Python – the good and the bad
- A Python interactive interpreter versus a script
- Environmental variables and PATH
- Understanding dynamically typed languages
- The first Python script
- Developing scripts and identifying errors
- Python formatting
- Python variables
- Operators
- Compound statements
- Functions
- The Python style guide
- Arguments and options
- Your first assessor script
- Summary
- 3. Identifying Targets with Nmap, Scapy, and Python
- Understanding Nmap
- Nmap libraries for Python
- The Scapy library for Python
- Summary
- 4. Executing Credential Attacks with Python
- Identifying the target
- Creating targeted usernames
- Testing for users using SMTP VRFY
- Summary
- 5. Exploiting Services with Python
- Understanding the chaining of exploits
- Automating the exploit train with Python
- Summary
- 6. Assessing Web Applications with Python
- Identifying hidden files and directories with Python
- Credential attacks with Burp Suite
- Using twill to walk through the source
- Understanding when to use Python for web assessments
- Summary
- 7. Cracking the Perimeter with Python
- Understanding the link between accounts and services
- Cracking inboxes with Burp Suite
- Identifying the attack path
- Gaining access through websites
- Summary
- 8. Exploit Development with Python, Metasploit, and Immunity
- Understanding the Windows memory structure
- Understanding memory addresses and endianness
- Understanding the manipulation of the stack
- Understanding immunity
- Understanding basic buffer overflow
- Writing a basic buffer overflow exploit
- Understanding stack adjustments
- Understanding the purpose of local exploits
- Understanding other exploit scripts
- Reversing Metasploit modules
- Understanding protection mechanisms
- Summary
- 9. Automating Reports and Tasks with Python
- Understanding how to create a Python class
- Summary
- 10. Adding Permanency to Python Tools
- Understanding the difference between multithreading and multiprocessing
- Building industry-standard tools
- Summary
- 2. Module 2
- 1. Python with Penetration Testing and Networking
- Approaches to pentesting
- Introducing Python scripting
- Understanding the tests and tools you'll need
- Learning the common testing platforms with Python
- Network sockets
- Server socket methods
- Client socket methods
- General socket methods
- Moving on to the practical
- Summary
- 2. Scanning Pentesting
- What are the services running on the target machine?
- Summary
- 3. Sniffing and Penetration Testing
- Implementing a network sniffer using Python
- Learning about packet crafting
- Introducing ARP spoofing and implementing it using Python
- Testing the security system using custom packet crafting and injection
- Summary
- 4. Wireless Pentesting
- Wireless attacks
- Summary
- 5. Foot Printing of a Web Server and a Web Application
- Introducing information gathering
- Information gathering of a website from SmartWhois by the parser BeautifulSoup
- Banner grabbing of a website
- Hardening of a web server
- Summary
- 6. Client-side and DDoS Attacks
- Tampering with the client-side parameter with Python
- Effects of parameter tampering on business
- Introducing DoS and DDoS
- Summary
- 7. Pentesting of SQLI and XSS
- Types of SQL injections
- Understanding the SQL injection attack by a Python script
- Learning about Cross-Site scripting
- Summary
- 3. Module 3
- 1. Gathering Open Source Intelligence
- Gathering information using the Shodan API
- Scripting a Google+ API search
- Downloading profile pictures using the Google+ API
- Harvesting additional results from the Google+ API using pagination
- Getting screenshots of websites with QtWebKit
- Screenshots based on a port list
- Spidering websites
- 2. Enumeration
- Performing a ping sweep with Scapy
- Scanning with Scapy
- Checking username validity
- Brute forcing usernames
- Enumerating files
- Brute forcing passwords
- Generating e-mail addresses from names
- Finding e-mail addresses from web pages
- Finding comments in source code
- 3. Vulnerability Identification
- Automated URL-based Directory Traversal
- Automated URL-based Cross-site scripting
- Automated parameter-based Cross-site scripting
- Automated fuzzing
- jQuery checking
- Header-based Cross-site scripting
- Shellshock checking
- 4. SQL Injection
- Checking jitter
- Identifying URL-based SQLi
- Exploiting Boolean SQLi
- Exploiting Blind SQL Injection
- Encoding payloads
- 5. Web Header Manipulation
- Testing HTTP methods
- Fingerprinting servers through HTTP headers
- Testing for insecure headers
- Brute forcing login through the Authorization header
- Testing for clickjacking vulnerabilities
- Identifying alternative sites by spoofing user agents
- Testing for insecure cookie flags
- Session fixation through a cookie injection
- 6. Image Analysis and Manipulation
- Hiding a message using LSB steganography
- Extracting messages hidden in LSB
- Hiding text in images
- Extracting text from images
- Enabling command and control using steganography
- 7. Encryption and Encoding
- Generating an MD5 hash
- Generating an SHA 1/128/256 hash
- Implementing SHA and MD5 hashes together
- Implementing SHA in a real-world scenario
- Generating a Bcrypt hash
- Cracking an MD5 hash
- Encoding with Base64
- Encoding with ROT13
- Cracking a substitution cipher
- Cracking the Atbash cipher
- Attacking one-time pad reuse
- Predicting a linear congruential generator
- Identifying hashes
- 8. Payloads and Shells
- Extracting data through HTTP requests
- Creating an HTTP C2
- Creating an FTP C2
- Creating an Twitter C2
- Creating a simple Netcat shell
- 9. Reporting
- Converting Nmap XML to CSV
- Extracting links from a URL to Maltego
- Extracting e-mails to Maltego
- Parsing Sslscan into CSV
- Generating graphs using plot.ly
- A. Bibliography
- Index
There are two different ways in which simultaneous requests can be executed within Python: multithreading and multiprocessing. Often, these two items are confused with each other, and when you read about them, you will see similar responses on blogs and newsgroups. If you are speaking about using multiple processors and processing cores, you are talking about multiprocessing. If you are staying within the same memory block but not using multiple cores or processes, then you are talking about multithreading. Multithreading, in turn, runs concurrent code but does not execute tasks in parallel due to the Python interpreter's design.
Tip
If you review Chapter 8, Exploit Development with Python, Metasploit, and Immunity, and look at the defined areas of the Windows memory, you will gain a better understanding of how threads and processes work within the Windows memory structure. Keep in mind that the manner in which other Operating Systems (OS) handle these memory locations is different.
To understand the limitations of multithreading, you have to understand the Python interpreter. The Python interpreter uses a Global Interpreter Lock (GIL), which means that when byte code is executed by a thread, it is done by a thread at a time.
Note
To better understand GIL, view the documentation at https://docs.python.org/2/glossary.html#term-global-interpreter-lock.
This prevents problems related to data structure manipulation by more than one thread at a time. Think about data being written to a dictionary and you referencing different pieces of data by the same key in concurrent threads. You would clobber some of the data that you intended to write to the dictionary.
Note
For multithreaded Python applications, you will hear a term called thread safe. This means, "Can something be modified by a thread without impacting the integrity or availability of the data or not?" Even if something is not considered thread safe, you can use locks, which is described later, to control the data entry as necessary.
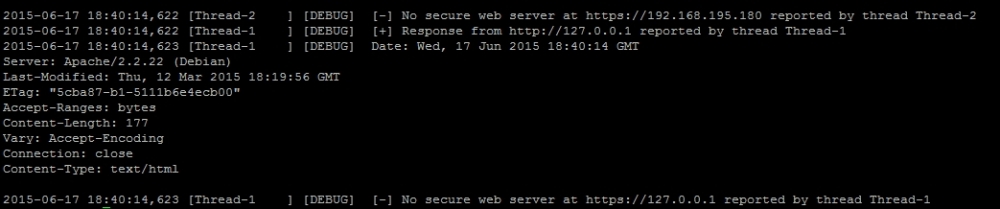
We are going to use the head_request.py script we previously created in Chapter 6, Assessing Web Applications with Python, and we are going to mature it as a new script. This script will use a queue to hold all the tasks that need to be processed, which will be assigned dynamically during execution. This queue is built by reading values from a file and storing them for later processing. We will incorporate the new logger library to output the details to a results.log file as the script executes. The following screenshot shows the results of this new script after execution:

Additionally, the following highlighted log file contains the detailed execution of the script and the concurrent thread's output:
Note
This script can be found at https://raw.githubusercontent.com/funkandwagnalls/pythonpentest/master/multi_threaded.py.
Now, with the goal in sight, we begin with what libraries need to be imported and configure two global variables. The first variable holds our queued workload, and the second is used to lock the thread for a moment so that data can be printed on the screen:
Note
Remember the following: concurrent processing means that items are processed. The details are provided as executed, and displaying this can come out garbled at the console. To combat this, we use a lock to pause the execution sufficiently to return the necessary details. The logger is a thread-safe library, but print is not and other libraries may not be either. As such, use locks where appropriate.
import urllib2, argparse, sys, threading, logging, Queue, time
queue = Queue.Queue()
lock = threading.Lock()
After this, we need to create the class that will spawn threads, with the only new constructor concept being threading.Thread.__init__(self):
class Agent(threading.Thread):
    def __init__(self, queue, logger, verbose):
        threading.Thread.__init__(self)
        self.queue = queue
        self.logger = logger
        self.verbose = verbose
Then, we need to create a function that will process the actual data in each of these threads. The function starts off by defining the initial values, and as you can see, these values are extracted from the queue. They represent an Internet Protocol (IP) address that was loaded into the queue from a file:
    def run(self):
        while True:
            host = self.queue.get()
            print("[*] Testing %s") % (str(host))
            target = "http://" + host
            target_secure = "https://" + host
From here, we are going to process both insecure and secure versions of the host's potential websites. The following code, which is for the insecure portion of the website, does a job similar to the script highlighted in Chapter 6, Assessing Web Applications with Python. The only difference is that we have added the new logger functions to print the details to a results log file. As you can see in following code, writing the details to the logger is almost identical to writing a print statement. You will also notice that we have used the with statement to lock the thread processes so that the details can be printed. This is not necessary for I/O, but it would be difficult to read otherwise:
            try:
                request = urllib2.Request(target)
                request.get_method = lambda : 'HEAD'
                response = urllib2.urlopen(request)
            except:
                with lock:
                    self.logger.debug("[-] No web server at %s
                        reported by thread %s" % (str(target), str
                            (threading.current_thread().name)))
                    print("[-] No web server at %s reported by thread %s") %
                        (str(target), str(threading.current_thread().name))
                response = None
            if response != None:
                with lock:
                    self.logger.debug("[+] Response from %s reported by
                        thread %s" % (str(target), str(threading.current_thread().
                          name)))
                    print("[*] Response from insecure service on %s reported by
                        thread %s") % (str(target), str(threading.current_thread().name))
                self.logger.debug(response.info())
The secure portion of the request-response instructions is almost identical to the non-secure portion of the code, as shown here:
            try:
                target_secure = urllib2.urlopen(target_secure)
                request_secure.get_method = lambda : 'HEAD'
                response_secure = urllib2.urlopen(request_secure)
            except:
                with lock:
                    self.logger.debug("[-] No secure web server at %s reported by
                        thread %s" % (str(target_secure), str(threading.current_thread().name)))
                    print("[-] No secure web server at %s reported by
                        thread %s") % (str(target_secure), str(threading.current_thread().name))
                response_secure = None
            if response_secure != None:
                with lock:
                    self.logger.debug("[+] Secure web server at %s reported by
                        thread %s" % (str(target_secure), str(threading.current_thread().name)))
                    print("[*] Response from secure service on %s reported by thread %s")
                        % (str(target_secure), str(threading.current_thread().name))
                self.logger.debug(response_secure.info())
Finally, this function lists the task that was provided as done:
self.queue.task_done()
As highlighted before, the arguments and options are configured very similarly to other scripts. So, for the sake of brevity, these have been omitted, but they can be found in the aforementioned link. What has changed, however, is the configuration of the logger. We set up a variable that can have a log file's name passed by argument. We then configure the logger so that it is at the appropriate level for outputting to a file, and the format stamps the output of the thread to include the time, thread name, logging level, and actual message. Finally, we configure the object that will be used as a reference for all logging operations:
    log = args.log                                                                                    # Configure the log output file
    if ".log" not in log:
        log = log + ".log"
    level = logging.DEBUG                                                                             # Logging level
    format = logging.Formatter("%(asctime)s [%(threadName)-12.12s]
      [%(levelname)-5.5s]  %(message)s")
    logger_obj = logging.getLogger()                                                                  # Getter for logging agent
    file_handler = logging.FileHandler(args.log)
    targets_list = []
    # Configure logger formats for STDERR and output file
    file_handler.setFormatter(format)
    # Configure logger object
    logger_obj.addHandler(file_handler)
    logger_obj.setLevel(level)
With the logger all set up, we can actually set up the final lines of code necessary to make the script multithreaded. We load all the targets into a list from the file, then parse the list into the queue. We could have done this a little tighter, but the following format is easier to read. We then generate workers and set setDaemon to True so that the script terminates after the main thread completes, which prevents the script from hanging:
    # Load the targets into a list and remove trailing "\n"
    with open(targets) as f:
        targets_list = [line.rstrip() for line in f.readlines()]
    # Spawn workers to access site
    for thread in range(0, threads):
        worker = Agent(queue, logger_obj, verbose)
        worker.setDaemon(True)
        worker.start()
    # Build queue of work
    for target in targets_list:
        queue.put(target)
    # Wait for the queue to finish processing
    queue.join()
if __name__ == '__main__':
    main()
The preceding details create a functional multithreaded Python script, but there are problems. Python multithreading is very error-prone. Even with a well-written script, you can have different errors returned on each iteration. Additionally, it takes a significant amount of code to accomplish relatively minute tasks, as shown in the preceding code. Finally, depending on the situation and the OS that your script is being executed on, threading may not improve the processing performance. Another solution is to use multiprocessing instead of multithreading, which is easier to code, is less error-prone, and (again) can use more than one core or processor.
Note
Python has a number of libraries that can support concurrency to make coding easier. As an example, handling URLs with currency can be done with simple-requests (http://pythonhosted.org/simple-requests/), which has been built at http://www.gevent.org/. The preceding code example was for showing how a concurrent script can be modified to include multithreaded support. When maturing a script, you should see whether other libraries can enable better functionality directly so as to improve your personal knowledge and create scripts that remain relevant.
Before getting into creating a multiprocessing script in Python, you should understand the pitfalls that most people run into. This will help you in the future as you attempt to mature your tool sets. There are four major issues that you will run into with multiprocessing scripts in Python:
When writing a multiprocessing script in Python, the biggest hurdle is dealing with serialization (known as pickling) and deserialization (known as unpickling) of objects. When you are writing your own code related to multiprocessing, you may see reference errors to the pickle library. This means that you have run into an issue related to the way your data is being serialized.
As you can imagine, just like concurrent code, writing and reading of data to a singular file or some other Input/Output (I/O) resource will cause issues. This is because each core or processor is crunch data at the same time, and for the most part, this is handled without the other processes being aware of it. So, if you are writing code that needs to output the details, you can lock the processes so that the details can be handled appropriately. This capability is handled through the use of the multiprocessing.Lock() function.
Besides I/O, there is also an additional problem of shared memory used between processes. Since these processes run relatively independently (depending on the implementation), malleable data that would be referenced in memory can be problematic. Thankfully, the multiprocessing library provides a number of tools to help us. The basic solution is to use multiprocessing.Values() and multiprocessing.Arrays(), which can be shared across processes.
Note
Additional details about shared memory and multiprocessing can be found at https://docs.python.org/2/library/multiprocessing.html#module-multiprocessing.sharedctypes.
All OSes are not created equal when it comes to process and memory management. Understanding how these different operating systems work at these levels is necessary for system engineers and developers alike. As assessors, we have the same need when developing more advanced tools and creating exploits, as previously highlighted.
Think about how many times you see a new tool or script come out of and it has only been tested on one OS or distribution; when you use it, the product does not work elsewhere. Multiprocessing scripts are no different, and when you are writing these scripts, keep the final goal in mind. If you have no intention of making your script run anywhere other than on Kali, then make sure you test there. If you are going to run it on Windows, you need to verify that the same method of script design works there as well. Specifically, the entry point for the multiprocessing code needs to be within the main() function or, in essence, below the check to see whether __name__ is equal to '__main__':. If it is not, you may be creating a fork bomb, or an infinite loop of spawning processes that eventually crashes the system.
Note
To gain a better understanding of Windows' restrictions on the forking of processes and Python multiprocessing, you can refer to https://docs.python.org/2/library/multiprocessing.html#windows.
The final consideration is the translation of established scripts into multiprocessing scripts. Though there are a large number of demos on the Internet that show a user taking a threaded or nonthreaded script and translating it into a multiprocessing script, they are usually good for demos only. Translating functional code into a multiprocessing script that is both stable and useful typically requires rewriting. This is because of the points noted earlier, which highlight the challenges you will have to overcome.
So what did you learn from all this?
- The function that will be executed in parallel must be pickable
- Locks may need to be incorporated while dealing with I/O, and shared memory requires specific functions from the multiprocessing library
- The main entry point to parallel processes needs to be protected
- Scripts do not easily translate from threaded or unthreaded formats to multiprocessing formats, and as such, some thought should go into redesigning them
Note
The details of the arguments and options have been removed for brevity, but the full details can be found at https://raw.githubusercontent.com/funkandwagnalls/pythonpentest/master/multi_process.py.
With all of this in mind, we can now rewrite the head_request.py script so as to accommodate multiple multiprocessing. The run() function's code is largely rewritten in order to accommodate the objects so that they can be pickled. This is because the host_request function is what is run by each subprocess. The urllib2 request and responses are objects that are not picklable, and as such, the data needs to be converted to a string prior to passing. Additionally, with multiprocessing scripts, a logger has to be handled instead of being called directly. In this way, the subprocesses know what to write to, using a universal filename reference.
This format prevents the file from being written to at the same time by multiple processes. To begin with, we create a timestamp, which will be used for reference when the log handler is grabbed. The following code highlights the configuration of the initial values and the insecure service request and response instructions:
import multiprocessing, urllib2, argparse, sys, logging, datetime, time
def host_request(host):
    print("[*] Testing %s") % (str(host))
    target = "http://" + host
    target_secure = "https://" + host
    timenow = time.time()
    record = datetime.datetime.fromtimestamp(timenow).strftime
      ('%Y-%m-%d %H:%M:%S')
    logger = logging.getLogger(record)
    try:
        request = urllib2.Request(target)
        request.get_method = lambda : 'HEAD'
        response = urllib2.urlopen(request)
        response_data = str(response.info())
        logger.debug("[*] %s" % response_data)
        response.close()
    except:
        response = None
        response_data = None
Following the insecure request and response instructions are the secure service request and response instructions, as shown here:
    try:
        request_secure = urllib2.urlopen(target_secure)
        request_secure.get_method = lambda : 'HEAD'
        response_secure = str(urllib2.urlopen(request_secure).read())
        response_secure_data = str(response.info())
        logger.debug("[*] %s" % response_secure_data)
        response_secure.close()
    except:
        response_secure = None
        response_secure_data = None
After the request and response details have been captured, the details are returned and logged appropriately:
    if response_data != None and response_secure_data != None:
        r = "[+] Insecure webserver detected at %s reported by %s" %
          (target, str(multiprocessing.Process().name))
        rs = "[+] Secure webserver detected at %s reported by %s" %
          (target_secure, str(multiprocessing.Process().name))
        logger.debug("[+] Insecure web server detected at %s and reported
          by process %s" % (str(target), str(multiprocessing.Process().name)))
        logger.debug("[+] Secure web server detected at %s and reported by process
          %s" % (str(target_secure), str(multiprocessing.Process().name)))
        return(r, rs)
    elif response_data == None and response_secure_data == None:
        r = "[-] No insecure webserver at %s reported by %s" % (target,
          str(multiprocessing.Process().name))
        rs = "[-] No secure webserver at %s reported by %s" % (target_secure,
          str(multiprocessing.Process().name))
        logger.debug("[-] Insecure web server was not detected at %s and reported
          by process %s" % (str(target), str(multiprocessing.Process().name)))
        logger.debug("[-] Secure web server was not detected at %s and reported
          by process %s" % (str(target_secure), str(multiprocessing.Process().name)))
        return(r, rs)
    elif response_data != None and response_secure_data == None:
        r = "[+] Insecure webserver detected at %s reported by %s" %
          (target, str(multiprocessing.Process().name))
        rs = "[-] No secure webserver at %s reported by %s" % (target_secure,
          str(multiprocessing.Process().name))
        logger.debug("[+] Insecure web server detected at %s and reported by
          process %s" % (str(target), str(multiprocessing.Process().name)))
        logger.debug("[-] Secure web server was not detected at %s and reported
          by process %s" % (str(target_secure), str(multiprocessing.Process().name)))
        return(r, rs)
    elif response_secure_data != None and response_data == None:
        response = "[-] No insecure webserver at %s reported by %s" %
          (target, str(multiprocessing.Process().name))
        rs = "[+] Secure webserver detected at %s reported by %s" % (target_secure,
          str(multiprocessing.Process().name))
        logger.debug("[-] Insecure web server was not detected at %s and reported by
          process %s" % (str(target), str(multiprocessing.Process().name)))
        logger.debug("[+] Secure web server detected at %s and reported by process %s"
          % (str(target_secure), str(multiprocessing.Process().name)))
        return(r, rs)
    else:
        logger.debug("[-] No results were recorded for %s or %s" % (str(target), str(target_secure)))
As mentioned earlier, the logger uses a handler and we accomplish this by creating a function that defines the logger's design. This function will then be called by each subprocess using the initializer parameter within multiprocessing.map. This means that we have full control over the logger across processes, and this prevents problems with unpickable objects requiring to be passed:
def log_init(log):
    level = logging.DEBUG
    format = logging.Formatter("%(asctime)s [%(threadName)-12.12s] [%(levelname)-5.5s]  %(message)s") # Log format
    logger_obj = logging.getLogger()
    file_handler = logging.FileHandler(log)
    targets_list = []
    # Configure logger formats for STDERR and output file
    file_handler.setFormatter(format)
    # Configure logger object
    logger_obj.addHandler(file_handler)
    logger_obj.setLevel(level)
Now, with all of these details in the main() function, we define the Command-line Interface (CLI) for the arguments and options. Then we generate the data that will be tested from the target's file and the argument variables:
    # Set Constructors
    targets = args.targets
    verbose = args.verbose
    processes = args.multiprocess
    log = args.log
    if ".log" not in log:
        log = log + ".log"
    # Load the targets into a list and remove trailing "\n"
    with open(targets) as f:
        targets_list = [line.rstrip() for line in f.readlines()]
Finally, the following code uses the map function, which calls the host_request function as it iterates through the list of targets. The map function allows a multiprocessing script to queue work in a manner similar to the previous multithreaded script. We can then use the processes variable loaded by the CLI argument to define the number of subprocesses to spawn, which allows us to dynamically control the number of processes that are forked. This is a very much guess-and-check method of process control.
# Establish pool list
pool = multiprocessing.Pool(processes=threads,
initializer=log_init(log))
# Queue up the targets to assess
results = pool.map(host_request, targets_list)
for result in results:
for value in result:
print(value)
if __name__ == '__main__':
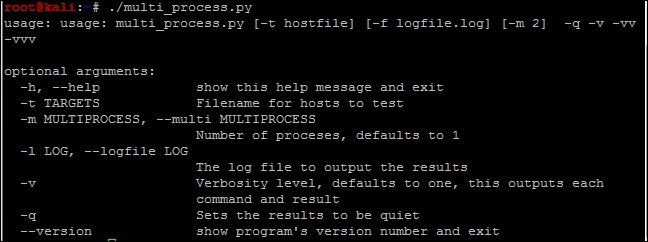
main()With the code generated, we can output the help file to decide how the script needs to be run, as shown in the following screenshot:
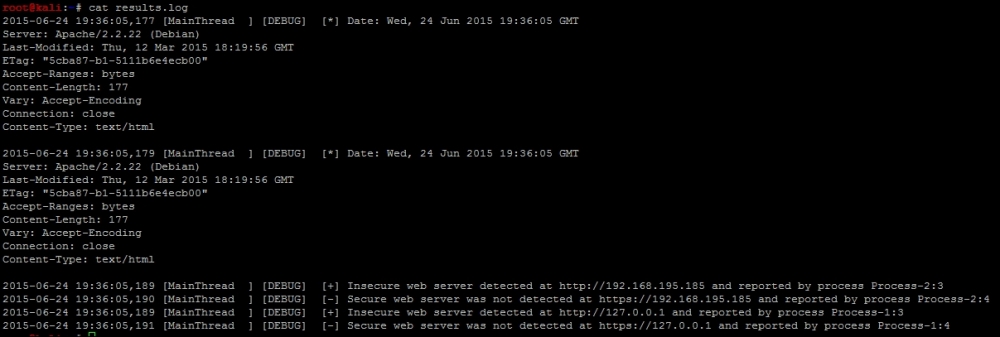
When the script is run, the output itemizes the request successes, failures, and relevant processes, as shown in the following screenshot:

Finally, the results.log file contains the details related to the activity produced by the script as shown in the following screenshot:
We have now finished our multiprocessing script, which can handle logging in a controlled manner. This is the step in the right direction for creating industry-standard tools. With additional time, we could attach this script to the nmap_parser.py script that we created in the last chapter and even generate detailed reports using the nmap_doc_generator.py script as an example. The combination of these capabilities would make the tool even more useful.