Table of Contents for
Python: Penetration Testing for Developers
 Python: Penetration Testing for Developers
Published by
Packt Publishing, 2016
Python: Penetration Testing for Developers
Published by
Packt Publishing, 2016
- Cover
- Table of Contents
- Python: Penetration Testing for Developers
- Python: Penetration Testing for Developers
- Python: Penetration Testing for Developers
- Credits
- Preface
- What you need for this learning path
- Who this learning path is for
- Reader feedback
- Customer support
- 1. Module 1
- 1. Understanding the Penetration Testing Methodology
- Understanding what penetration testing is not
- Assessment methodologies
- The penetration testing execution standard
- Penetration testing tools
- Summary
- 2. The Basics of Python Scripting
- Python – the good and the bad
- A Python interactive interpreter versus a script
- Environmental variables and PATH
- Understanding dynamically typed languages
- The first Python script
- Developing scripts and identifying errors
- Python formatting
- Python variables
- Operators
- Compound statements
- Functions
- The Python style guide
- Arguments and options
- Your first assessor script
- Summary
- 3. Identifying Targets with Nmap, Scapy, and Python
- Understanding Nmap
- Nmap libraries for Python
- The Scapy library for Python
- Summary
- 4. Executing Credential Attacks with Python
- Identifying the target
- Creating targeted usernames
- Testing for users using SMTP VRFY
- Summary
- 5. Exploiting Services with Python
- Understanding the chaining of exploits
- Automating the exploit train with Python
- Summary
- 6. Assessing Web Applications with Python
- Identifying hidden files and directories with Python
- Credential attacks with Burp Suite
- Using twill to walk through the source
- Understanding when to use Python for web assessments
- Summary
- 7. Cracking the Perimeter with Python
- Understanding the link between accounts and services
- Cracking inboxes with Burp Suite
- Identifying the attack path
- Gaining access through websites
- Summary
- 8. Exploit Development with Python, Metasploit, and Immunity
- Understanding the Windows memory structure
- Understanding memory addresses and endianness
- Understanding the manipulation of the stack
- Understanding immunity
- Understanding basic buffer overflow
- Writing a basic buffer overflow exploit
- Understanding stack adjustments
- Understanding the purpose of local exploits
- Understanding other exploit scripts
- Reversing Metasploit modules
- Understanding protection mechanisms
- Summary
- 9. Automating Reports and Tasks with Python
- Understanding how to create a Python class
- Summary
- 10. Adding Permanency to Python Tools
- Understanding the difference between multithreading and multiprocessing
- Building industry-standard tools
- Summary
- 2. Module 2
- 1. Python with Penetration Testing and Networking
- Approaches to pentesting
- Introducing Python scripting
- Understanding the tests and tools you'll need
- Learning the common testing platforms with Python
- Network sockets
- Server socket methods
- Client socket methods
- General socket methods
- Moving on to the practical
- Summary
- 2. Scanning Pentesting
- What are the services running on the target machine?
- Summary
- 3. Sniffing and Penetration Testing
- Implementing a network sniffer using Python
- Learning about packet crafting
- Introducing ARP spoofing and implementing it using Python
- Testing the security system using custom packet crafting and injection
- Summary
- 4. Wireless Pentesting
- Wireless attacks
- Summary
- 5. Foot Printing of a Web Server and a Web Application
- Introducing information gathering
- Information gathering of a website from SmartWhois by the parser BeautifulSoup
- Banner grabbing of a website
- Hardening of a web server
- Summary
- 6. Client-side and DDoS Attacks
- Tampering with the client-side parameter with Python
- Effects of parameter tampering on business
- Introducing DoS and DDoS
- Summary
- 7. Pentesting of SQLI and XSS
- Types of SQL injections
- Understanding the SQL injection attack by a Python script
- Learning about Cross-Site scripting
- Summary
- 3. Module 3
- 1. Gathering Open Source Intelligence
- Gathering information using the Shodan API
- Scripting a Google+ API search
- Downloading profile pictures using the Google+ API
- Harvesting additional results from the Google+ API using pagination
- Getting screenshots of websites with QtWebKit
- Screenshots based on a port list
- Spidering websites
- 2. Enumeration
- Performing a ping sweep with Scapy
- Scanning with Scapy
- Checking username validity
- Brute forcing usernames
- Enumerating files
- Brute forcing passwords
- Generating e-mail addresses from names
- Finding e-mail addresses from web pages
- Finding comments in source code
- 3. Vulnerability Identification
- Automated URL-based Directory Traversal
- Automated URL-based Cross-site scripting
- Automated parameter-based Cross-site scripting
- Automated fuzzing
- jQuery checking
- Header-based Cross-site scripting
- Shellshock checking
- 4. SQL Injection
- Checking jitter
- Identifying URL-based SQLi
- Exploiting Boolean SQLi
- Exploiting Blind SQL Injection
- Encoding payloads
- 5. Web Header Manipulation
- Testing HTTP methods
- Fingerprinting servers through HTTP headers
- Testing for insecure headers
- Brute forcing login through the Authorization header
- Testing for clickjacking vulnerabilities
- Identifying alternative sites by spoofing user agents
- Testing for insecure cookie flags
- Session fixation through a cookie injection
- 6. Image Analysis and Manipulation
- Hiding a message using LSB steganography
- Extracting messages hidden in LSB
- Hiding text in images
- Extracting text from images
- Enabling command and control using steganography
- 7. Encryption and Encoding
- Generating an MD5 hash
- Generating an SHA 1/128/256 hash
- Implementing SHA and MD5 hashes together
- Implementing SHA in a real-world scenario
- Generating a Bcrypt hash
- Cracking an MD5 hash
- Encoding with Base64
- Encoding with ROT13
- Cracking a substitution cipher
- Cracking the Atbash cipher
- Attacking one-time pad reuse
- Predicting a linear congruential generator
- Identifying hashes
- 8. Payloads and Shells
- Extracting data through HTTP requests
- Creating an HTTP C2
- Creating an FTP C2
- Creating an Twitter C2
- Creating a simple Netcat shell
- 9. Reporting
- Converting Nmap XML to CSV
- Extracting links from a URL to Maltego
- Extracting e-mails to Maltego
- Parsing Sslscan into CSV
- Generating graphs using plot.ly
- A. Bibliography
- Index
When targeting organizations, especially at the perimeter, the easiest way in is to compromise an account. This means that you get at least the basic level of access of that person and can find ways to elevate your privileges. To do that, you need to identify realistic usernames for an organization. The multiple ways to do this include researching of people who work for the organization through sites like http://www.data.com/, https://www.facebook.com/, https://www.linkedin.com/hp/, and http://vault.com/. You can automate some of this with tools like the Harvester.py and Recon-ng, which source Internet exposures and repositories.
This initial research is good, but the amount of time you typically have to do this is limited, unlike malicious actors. So what you can do to supplement the data you find is generate usernames and then verify them against a service port like SMTP with VRFY enabled or Finger. If you find these ports open, especially on the Internet for the target organization, the first thing I do is verify my username list. This means I can cut down my attack list for the next step, which we will cover in Chapter 5, Exploiting Services with Python.
For years, the U.S. Government and other countries survey the countries populace for details. This information is available to law abiding citizens, as well as malicious actors. These details can be used for anything from social engineering attacks, sales research, and even telemarketers. Some details are harder to find than others, but our favorite bit is the surname list. This list produced in 2000, provides us the top 1000 surnames in the U.S. populace.
If you have ever looked at the components of most organization's usernames, it is the first letter of their first name and the entire last name. When these two components are combined, it creates a username. Using the U.S. Census top 1000 list, we can cheat the creation method by downloading the list extracting the surnames and prepending every letter in the alphabet to create 26 usernames for each surname. This process will produce a list of 26,000 usernames not including the details of publically sourced information.
When you combine the username list created by searching social media, and using tools to identify e-mail addresses, you could have a substantial list. So you would need to trim it down. In this example, we are going to show you how to extract details from an Excel spreadsheet using Python, and then verify the usernames created and combined by other lists against the SMTP service with VRFY running.
Tip
Westernized Governments often produce similar lists, so make sure you look where you are trying to assess and use the information relevant to the organization's location. In addition to that, states such as U.S. territories, Alaska and Hawaii have vastly different surnames than the rest of the continental U.S. Build your list to compensate for these differences.
The first step to this process is downloading the excel spreadsheet, which can be found here http://www.census.gov/topics/population/genealogy/data/2000_surnames.html. You can download the specific file directly from the console using wget as shown following. Keep in mind that you should only download the file; never assess an organization or website unless you have permission. The following command does the equivalent of visiting the site and clicking the link to download the file:
wget http://www2.census.gov/topics/genealogy/2000surnames/Top1000.xls
Now open up the Excel file and see how it is formatted, so that we know how to develop the script to pull the details out.

As you can see, there are 11 columns that define the features of the spreadsheet. The two we care about are the name and the rank. The name is the surname we will create our username list from, and the rank is the order of occurrence in the U.S. Before we build a function to parse the census file, we need to develop a means to get the data into the script.
The argparser library allows you to develop command line options and arguments quickly and effectively. The xlrd library will be used to analyze the Excel spreadsheet, and the string library will be used to develop a list of alphabetical characters. The os library will confirm what Operating System (OS) the script is being run from, so filename formatting can be handled internally. Finally, the collections library will provide the means to organize the data in memory pulled out of the Excel spreadsheet. The only library that is not native to your Python instance is the xlrd one, which can be installed with pip.
#!/usr/bin/env python
import sys, string, argparse, os
from collections import namedtuple
try:
    import xlrd
except:
    sys.exit("[!] Please install the xlrd library: pip install xlrd")
Now that you have your libraries situated, you can now build out the functions to do the work. This script will include the ability to have its level of verbosity increased or decreased as well. This is a relatively easy feature to include, and it is done by setting the verbose variable to an integer value; the higher the value, the more verbose. We will default to a value of 1 and support up to a value of 3. Anything more than that will be treated as a 3. This function will accept the name of the file being passed as well, as you never know it may change in the future.
We are going to use a form of a tuple called a named tuple to accept each row of the spreadsheet. A named tuple allows you to reference the details by coordinates or field name depending on how it is defined. As you can guess, this is perfect for a spreadsheet or database data. To make this easy for us, we are going to define this the same way as the spreadsheet.
defcensus_parser(filename, verbose):
    # Create the named tuple
    CensusTuple = namedtuple('Census', 'name, rank, count, prop100k, cum_prop100k, pctwhite, pctblack, pctapi, pctaian, pct2prace, pcthispanic')
Now, develop the variables to hold the workbook, spreadsheet by the name, and the total rows and the initial row of the spreadsheet.
    worksheet_name = "top1000"
    #Define work book and work sheet variables
    workbook = xlrd.open_workbook(filename)
    spreadsheet = workbook.sheet_by_name(worksheet_name)
    total_rows = spreadsheet.nrows - 1
    current_row = -1
Then, develop the initial variables to hold the resulting values and the actual alphabet.
    # Define holder for details
    username_dict = {}
    surname_dict = {}
    alphabet = list(string.ascii_lowercase)
Next, each row of the spreadsheet will be iterated through. The surname_dict holds the raw data from the spreadsheet cells. The username_dict will hold the username and the rank converted to strings. Each time a point is not detected in the rank value, it means that the value is not a float and is therefore empty. This means the row itself does not contain real data, and it should be skipped.
    while current_row<total_rows:
        row = spreadsheet.row(current_row)
        current_row += 1
        entry = CensusTuple(*tuple(row)) #Passing the values of the row as a tuple into the namedtuple
        surname_dict[entry.rank] = entry
        cellname = entry.name
        cellrank = entry.rank
        for letter in alphabet:
            if "." not in str(cellrank.value):
                if verbose > 1:
                    print("[-] Eliminating table headers")
                break
            username = letter + str(cellname.value.lower())
            rank = str(cellrank.value)
            username_dict[username] = rank
Remember, dictionaries store values referenced by key, but unordered. So what we can do is take the values stored in the dictionary and order them by the key, which was the rank of the value or the surname. To do this, we are going to take a list and have it accept the sorted details returned by a function. Since this is a relatively simple function, we can create a nameless function with lambda, which uses the optional sorted parameter key to call it as it processes the code. Effectively, sorted creates an ordered list based on the dictionary key for each value in the dictionary. Finally, this function returns the username_list and both dictionaries if they would be needed in the future.
    username_list = sorted(username_dict, key=lambda key: username_dict[key])
    return(surname_dict, username_dict, username_list)
The good news is that is the most complex function in the entire script. The next function is a well-known design that takes in a list removes duplicates. The function uses the list comprehension, which reduces the size of simple loops used to create ordered lists. This expression within the function could have been written as the following:
for item in liste_sort:
    if not noted.count(item):
        noted.append(item)
To reduce the size of this simple execution and to improve readability, we instead change it to a list comprehension, as shown in the following excerpt:
defunique_list(list_sort, verbose):
    noted = []
    if verbose > 0:
        print("[*] Removing duplicates while maintaining order")
    [noted.append(item) for item in list_sort if not noted.count(item)] # List comprehension
    return noted
One of the goals from this script is to combine research from other sources into the same file that contains usernames. The user can pass a file that can be prepended or appended to the details of the census file outputs. When this script is run, the user can supply the file as a prepended value or an appended value. The script determines which one it is, and then reads in each line stripping new line character from each entry. The script then determines if it needs to be added to the end or front of the census username list and sets the variable value for put_where. Finally, both the list and values for put_where are returned.
defusername_file_parser(prepend_file, append_file, verbose):
    if prepend_file:
        put_where = "begin"
        filename = prepend_file
    elif append_file:
        put_where = "end"
        filename = append_file
    else:
        sys.exit("[!] There was an error in processing the supplemental username list!")
    with open(filename) as file:
        lines = [line.rstrip('\n') for line in file]
    if verbose > 1:
        if "end" in put_where:
            print("[*] Appending %d entries to the username list") % (len(lines))
        else:
            print("[*] Prepending %d entries to the username list") % (len(lines))
    return(lines, put_where)
All that is needed is a function that combines the two user lists together. This function will either prepend the data with a simple split that sticks the new user list in front of the census list or appends the data with the extend function. The function will then call previous function that was created, which reduces non-unique values to unique values. It would be bad to know a password lockout limit for a function, and then call the same user accounts more than once, locking out the account. The final item returned is the new combined username list.
defcombine_usernames(supplemental_list, put_where, username_list, verbose):
    if "begin" in put_where:
        username_list[:0] = supplemental_list #Prepend with a slice
    if "end" in put_where:
    username_list.extend(supplemental_list)
    username_list = unique_list(username_list, verbose)
    return(username_list)
The last function in this script writes the details to a file. To further improve the capabilities of this script, we can create two different types of username files: one that includes the domain like an e-mail address and the other a standard username list. The supplemental username list with the domain will be treated as optional.
This function deletes the contents of the files as necessary and iterates through the list. If the list is to be a domain list, it simply applies the @ and the domain name to each username as it writes it to the file.
defwrite_username_file(username_list, filename, domain, verbose):
    open(filename, 'w').close() #Delete contents of file name
    if domain:
        domain_filename = filename + "_" + domain
        email_list = []
        open(domain_filename, 'w').close()
    if verbose > 1:
        print("[*] Writing to %s") % (filename)
    with open(filename, 'w') as file:
         file.write('\n'.join(username_list))
    if domain:
        if verbose > 1:
            print("[*] Writing domain supported list to %s") % (domain_filename)
        for line in username_list:
            email_address = line + "@" + domain
            email_list.append(email_address)
        with open(domain_filename, 'w') as file:
            file.write('\n'.join(email_list))
    return
Now that the functions have been defined, we can develop the main part of the script and properly introduce arguments and options.
The argparse library provides you the ability to setup both short and long options that can accept a number of values defined by types. These are then presented into a variable you have defined with dest.
Each of these arguments can have specific capabilities defined with the action parameter to include storage of values counting and others. Additionally, each of these arguments can have default values set with the default parameter as necessary. The other feature that is useful is the help parameter, which provides feedback in usage and improves documentation. We do not use every script that we create on every engagement or every day. See the following example on how to add an argument for the census file.
parser.add_argument("-c", "--census", type=str, help="The census file that will be used to create usernames, this can be retrieved like so:\n wget http://www2.census.gov/topics/genealogy/2000surnames/Top1000.xls", action="store", dest="census_file")With these simple capabilities understood, we can develop the requirements for arguments to be passed to the script. First, we verify that this is part of the main function, and then we instantiate the argeparse as parser. The simple usage statement shows what would need to be called to execute the script. The %(prog)s is functionally equivalent to positing 0 in argv, as it represents the script name.
if __name__ == '__main__':
    # If script is executed at the CLI
    usage = '''usage: %(prog)s [-c census.xlsx] [-f output_filename] [-a append_filename] [-p prepend_filename] [-ddomain_name] -q -v -vv -vvv'''
    parser = argparse.ArgumentParser(usage=usage)
Now that we have defined the instance in parser, we need to add each argument into the parser. Then, we define the variable args, which will hold the publically referenced values of each stored argument or option.
    parser.add_argument("-c", "--census", type=str, help="The census file that will be used to create usernames, this can be retrieved like so:\n wget http://www2.census.gov/topics/genealogy/2000surnames/Top1000.xls", action="store", dest="census_file")
    parser.add_argument("-f", "--filename", type=str, help="Filename for output the usernames", action="store", dest="filename")
    parser.add_argument("-a","--append", type=str, action="store", help="A username list to append to the list generated from the census", dest="append_file")
    parser.add_argument("-p","--prepend", type=str, action="store", help="A username list to prepend to the list generated from the census", dest="prepend_file")
    parser.add_argument("-d","--domain", type=str, action="store", help="The domain to append to usernames", dest="domain_name")
    parser.add_argument("-v", action="count", dest="verbose", default=1, help="Verbosity level, defaults to one, this outputs each command and result")
    parser.add_argument("-q", action="store_const", dest="verbose", const=0, help="Sets the results to be quiet")
    parser.add_argument('--version', action='version', version='%(prog)s 0.42b')
    args = parser.parse_args()
With your arguments defined, you are going to want to validate that they were set by the user and that they are easy to reference through your script.
    # Set Constructors
    census_file = args.census_file   # Census
    filename = args.filename         # Filename for outputs
    verbose = args.verbose           # Verbosity level
    append_file = args.append_file   # Filename for the appending usernames to the output file
    prepend_file = args.prepend_file # Filename to prepend to the usernames to the output file
    domain_name = args.domain_name   # The name of the domain to be appended to the username list
    dir = os.getcwd()                # Get current working directory
    # Argument Validator
    if len(sys.argv)==1:
        parser.print_help()
        sys.exit(1)
  if append_file and prepend_file:
      sys.exit("[!] Please select either prepend or append for a file not both")
Similar to an argument validator, you are going to want to make sure that an output file is set. If it is not set, you can have a default value ready to be used as needed. You are going to want to be OS agnostic, so it needs to be setup to run in either a Linux/UNIX system or a Windows system. The easiest way to determine that is by the direction of the \ or /. Remember that the \ is used to escape characters in scripts, so make sure to put two to cancel out the effect.
    if not filename:
        if os.name != "nt":
             filename = dir + "/census_username_list"
        else:
             filename = dir + "\\census_username_list"
    else:
        if filename:
            if "\\" or "/" in filename:
                if verbose > 1:
                    print("[*] Using filename: %s") % (filename)
        else:
            if os.name != "nt":
                filename = dir + "/" + filename
            else:
                filename = dir + "\\" + filename
                if verbose > 1:
                    print("[*] Using filename: %s") % (filename)
The remaining components that need to be defined are your working variables as the functions are called.
    # Define working variables
    sur_dict = {}
    user_dict = {}
    user_list = []
    sup_username = []
    target = []
    combined_users = []
Following all those details, you can finally get to the meat of the script, which is the calling of the activity to create the username file:
    # Process census file
    if not census_file:
        sys.exit("[!] You did not provide a census file!")
    else:
        sur_dict, user_dict, user_list = census_parser(census_file, verbose)
    # Process supplemental username file
    if append_file or prepend_file:
        sup_username, target = username_file_parser(prepend_file, append_file, verbose)
        combined_users = combine_usernames(sup_username, target, user_list, verbose)
    else:
        combined_users = user_list
    write_username_file(combined_users, filename, domain_name, verbose)
The following screenshot demonstrates how the script could output a help file:
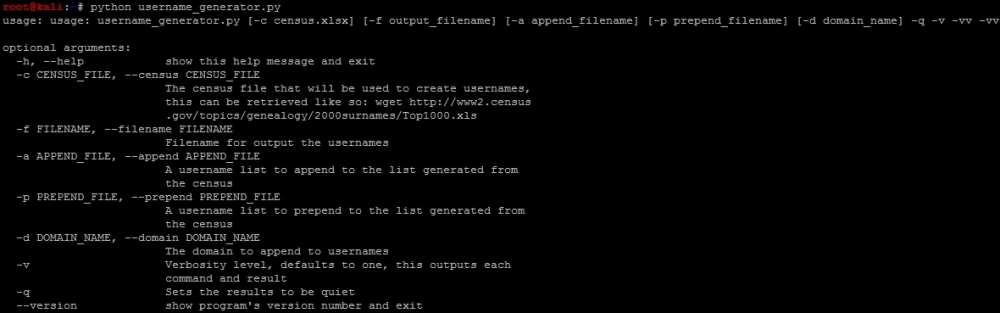
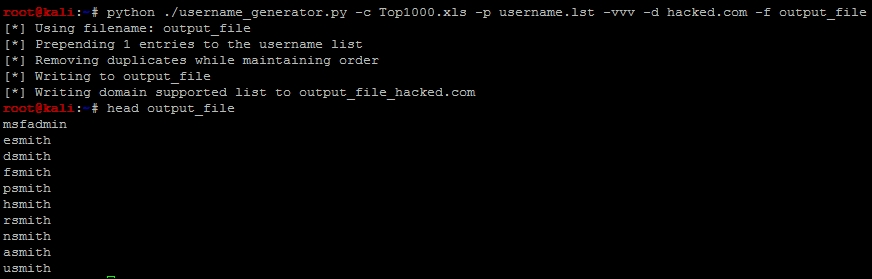
An example of how to run the script and the output can be found here, with the prepending of a username.lst with the username msfadmin in it.
Tip
This script can be downloaded from https://raw.githubusercontent.com/funkandwagnalls/pythonpentest/master/username_generator.py.
We have our username generator, and we include the name msfadmin because we have done some initial research on the test box Metasploitable. We know that is a standard default account, and we are going to want to verify if it is actually in the system. When you initially scan a system and you identify open ports and services, and then verify what you are getting ready to attack, this is a normal part of research. That research should include looking for default and known accounts as well.
Tip
When executing these types of attacks, it is normal to exclude built in accounts for systems that are known like root. On the Windows systems, you should still test the Administrator account because that one may be renamed. You should also avoid testing for root logins during Double Blind or Red Team exercise at first. This will often elicit an alert for security administrative staff.