Table of Contents for
Node.js 8 the Right Way
 Node.js 8 the Right Way
Published by
Pragmatic Bookshelf, 2018
Node.js 8 the Right Way
Published by
Pragmatic Bookshelf, 2018
- Title Page
- Node.js 8 the Right Way
- Node.js 8 the Right Way
- Node.js 8 the Right Way
- Node.js 8 the Right Way
- Acknowledgments
- Preface
- Why Node.js the Right Way?
- What’s in This Book
- What This Book Is Not
- Code Examples and Conventions
- Online Resources
- Part I. Getting Up to Speed on Node.js 8
- 1. Getting Started
- Thinking Beyond the web
- Node.js’s Niche
- How Node.js Applications Work
- Aspects of Node.js Development
- Installing Node.js
- 2. Wrangling the File System
- Programming for the Node.js Event Loop
- Spawning a Child Process
- Capturing Data from an EventEmitter
- Reading and Writing Files Asynchronously
- The Two Phases of a Node.js Program
- Wrapping Up
- 3. Networking with Sockets
- Listening for Socket Connections
- Implementing a Messaging Protocol
- Creating Socket Client Connections
- Testing Network Application Functionality
- Extending Core Classes in Custom Modules
- Developing Unit Tests with Mocha
- Wrapping Up
- 4. Connecting Robust Microservices
- Installing ØMQ
- Publishing and Subscribing to Messages
- Responding to Requests
- Routing and Dealing Messages
- Clustering Node.js Processes
- Pushing and Pulling Messages
- Wrapping Up
- Node.js 8 the Right Way
- Part II. Working with Data
- 5. Transforming Data and Testing Continuously
- Procuring External Data
- Behavior-Driven Development with Mocha and Chai
- Extracting Data from XML with Cheerio
- Processing Data Files Sequentially
- Debugging Tests with Chrome DevTools
- Wrapping Up
- 6. Commanding Databases
- Introducing Elasticsearch
- Creating a Command-Line Program in Node.js with Commander
- Using request to Fetch JSON over HTTP
- Shaping JSON with jq
- Inserting Elasticsearch Documents in Bulk
- Implementing an Elasticsearch Query Command
- Wrapping Up
- Node.js 8 the Right Way
- Part III. Creating an Application from the Ground Up
- 7. Developing RESTful Web Services
- Advantages of Express
- Serving APIs with Express
- Writing Modular Express Services
- Keeping Services Running with nodemon
- Adding Search APIs
- Simplifying Code Flows with Promises
- Manipulating Documents RESTfully
- Emulating Synchronous Style with async and await
- Providing an Async Handler Function to Express
- Wrapping Up
- 8. Creating a Beautiful User Experience
- Getting Started with webpack
- Generating Your First webpack Bundle
- Sprucing Up Your UI with Bootstrap
- Bringing in Bootstrap JavaScript and jQuery
- Transpiling with TypeScript
- Templating HTML with Handlebars
- Implementing hashChange Navigation
- Listing Objects in a View
- Saving Data with a Form
- Wrapping Up
- 9. Fortifying Your Application
- Setting Up the Initial Project
- Managing User Sessions in Express
- Adding Authentication UI Elements
- Setting Up Passport
- Authenticating with Facebook, Twitter, and Google
- Composing an Express Router
- Bringing in the Book Bundle UI
- Serving in Production
- Wrapping Up
- Node.js 8 the Right Way
- 10. BONUS: Developing Flows with Node-RED
- Setting Up Node-RED
- Securing Node-RED
- Developing a Node-RED Flow
- Creating HTTP APIs with Node-RED
- Handling Errors in Node-RED Flows
- Wrapping Up
- A1. Setting Up Angular
- A2. Setting Up React
- Node.js 8 the Right Way
Handling Errors in Node-RED Flows
Although it’s great when everything goes according to plan, sometimes it doesn’t. One of the downsides of programming with Node-RED is that it can be difficult to track down problems when they occur. In this section, we’ll explore a few ways the book-search API from the last section might fail and how you can investigate and mitigate these failures.
Triggering an Error
To begin, let’s see what happens when the API caller omits the q query parameter. In your terminal, use curl with the -i and -v flags like so to include HTTP headers and produce verbose output:
| | $ curl -i -v localhost:1880/search |
| | * Trying 127.0.0.1... |
| | * Connected to localhost (127.0.0.1) port 1880 (#0) |
| | > GET /search HTTP/1.1 |
| | > Host: localhost:1880 |
| | > User-Agent: curl/7.47.0 |
| | > Accept: */* |
| | > |
From this output, we can see that Node-RED, listening on port 1880, received the underlying TCP connection and then curl issued an HTTP request for /search. But after that, we hear nothing back from Node-RED, not even HTTP headers. What’s going on?
To find out, head back to your web browser and take a look in the Debug tab on the right-hand side. You should see an error reading, "TypeError: Cannot read property ’hits’ of undefined". When you hover over this error, the node that produced it, the function node, will have an orange dashed outline in the flow editor.
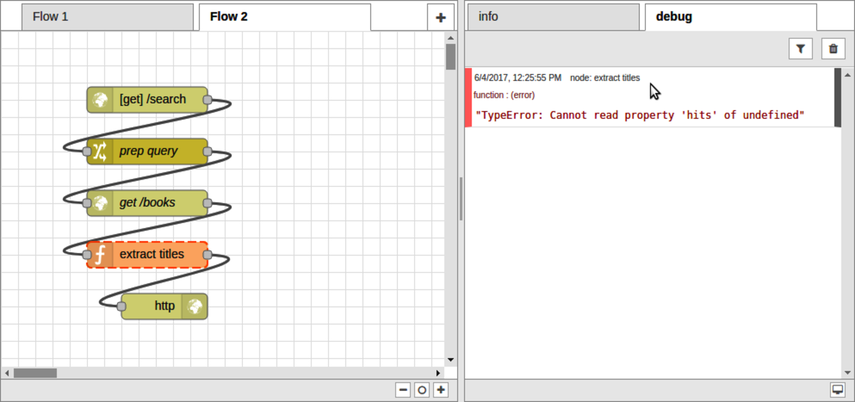
The problem seems to be with the input coming into the function node. From the error text, it seems like there’s a problem in some part of the expression msg.payload.hits.hits. Let’s use a debug node to investigate.
Investigating an Error
To investigate the error triggered in the last section, grab a debug node from the nodes panel and drag it onto the flow editor. Attach the debug node to the output of the Elasticsearch HTTP request node.
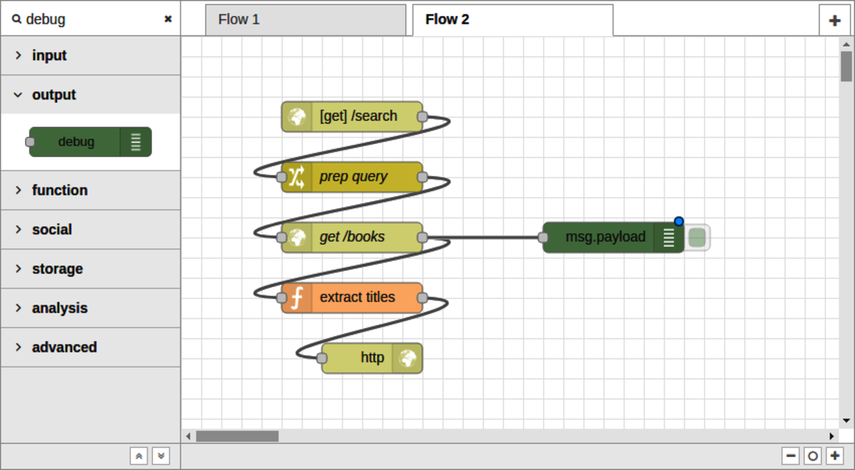
This will log to the Debug tab what’s in the payload the next time Node-RED receives a request. Deploy this flow, then head back to your terminal.
Use Ctrl-C to kill the previous curl command, and then run it again. It should produce the same behavior as before, but now when you switch back to your web browser, you should see an expandable payload object in the Debug tab.
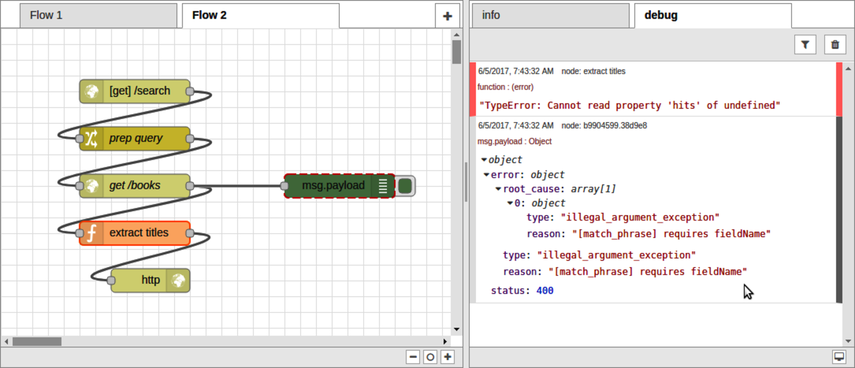
When you hover over the debug output with your mouse, the debug node will have a dashed red outline. Digging into the msg.payload object in the debug console, you’ll find that there is no payload.hits field at all. Instead, the payload has an error field with a type of illegal_argument_exception and a reason of [match_phrase] requires fieldName.
That’s strange because, as you’ll recall, part of the prep query node’s job is to set the match_phrase.title field. Let’s attach the debug node to the prep query output and take a look at that next. You’ll probably want to clear the debug output by clicking the trash can button in the top right.
After you deploy the change, run curl again, then flip back to the web browser. You should see more debug output this time, including an entry for the output of the prep query node.
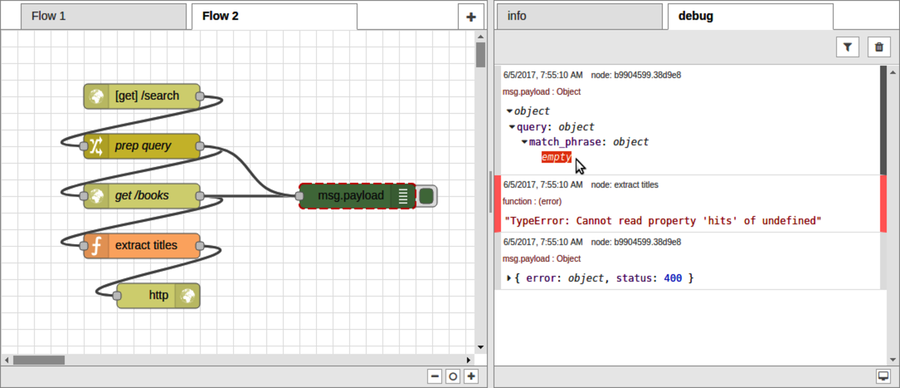
Expanding the prep query output, notice that the match_phrase field is an empty object. Its title field is missing!
And here’s one of the nitty-gritty details about working with Node-RED. The prep query change node you created earlier has two rules. The first rule succeeds in setting the msg.payload.query object to the JSON {"match_query":{}}. But the second rule fails to move the msg.payload.q property because that property doesn’t exist!
So let’s fix it.
Handling Errors Generically
At this point, your HTTP flow fails when the request lacks a q parameter, and by debugging it you have a pretty good idea of the root cause. There are a few ways to mitigate the problem:
-
Detect the absence of a q parameter early and inform the API caller with an HTTP 400 Bad Request response.
-
Detect the absence of a hits field in the Elasticsearch results and skip the extract-titles step.
-
Detect any error at all and return an HTTP 500 Server Error response to the API caller.
These approaches aren’t mutually exclusive. Let’s start with the most general approach—returning a 500 Server Error.
In the nodes panel, find the catch node under inputs. Drag one onto the flow editor. Next, drag an HTTP response node onto the editor and connect it to the catch node.
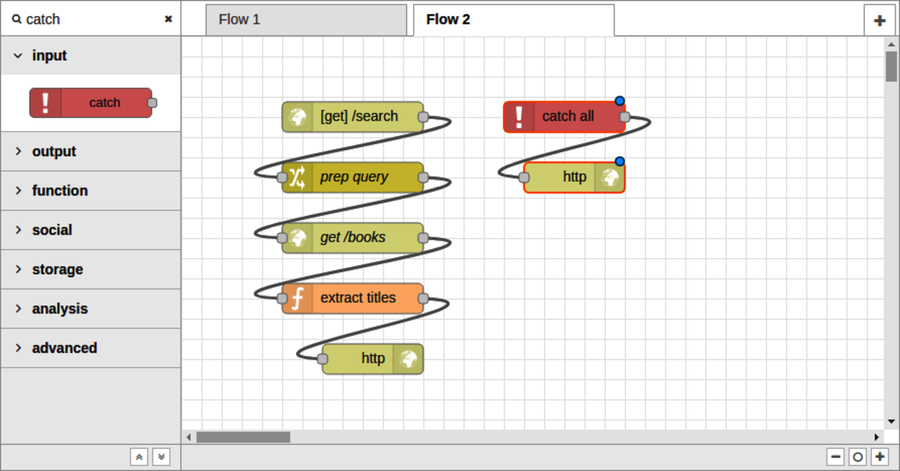
Strictly speaking, you could reuse the existing HTTP response node rather than bringing in a new one. But I find it more aesthetically pleasing to have individual HTTP response nodes for each different way the flow could terminate.
Once you deploy the flow, any unhandled error condition in the flow will trigger the catch node. If the msg object has an HTTP response object associated with it, then the attached HTTP response node will reply to the API caller.
Let’s try it out in the terminal. This time, let’s pipe the output of curl into jq. If you need a refresher on jq, flip back to Shaping JSON with jq.
| | $ curl -s localhost:1880/search | jq '.' |
| | { |
| | "error": { |
| | "root_cause": [ |
| | { |
| | "type": "illegal_argument_exception", |
| | "reason": "[match_phrase] requires fieldName" |
| | } |
| | ], |
| | "type": "illegal_argument_exception", |
| | "reason": "[match_phrase] requires fieldName" |
| | }, |
| | "status": 400 |
| | } |
Great! At least the call to curl no longer hangs indefinitely.
Let’s make one more improvement to the flow by detecting a bad request before handing it over to Elasticsearch.
Catching Errors Early
At this point, your flow no longer hangs indefinitely if the caller omits the q parameter. This is a big improvement, but we can do even better.
If the API caller didn’t supply a q parameter, then there’s no reason to reach all the way out to Elasticsearch for results. We should be able to report an HTTP 400 Bad Request response to the API caller directly.
To do this, make some room in your flow by splitting the [get] /search input node into its own column. This will leave space below for the q-parameter-checking nodes.
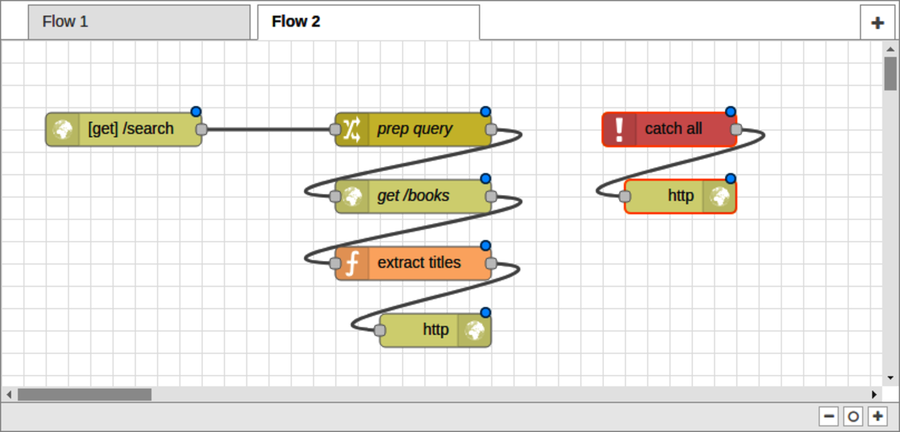
Next, in the nodes panel, find the switch node in the function section. Drag a switch node onto the flow editor under the [get] /search node. The switch node can be used to route a message along different paths, much like a switch statement in JavaScript.
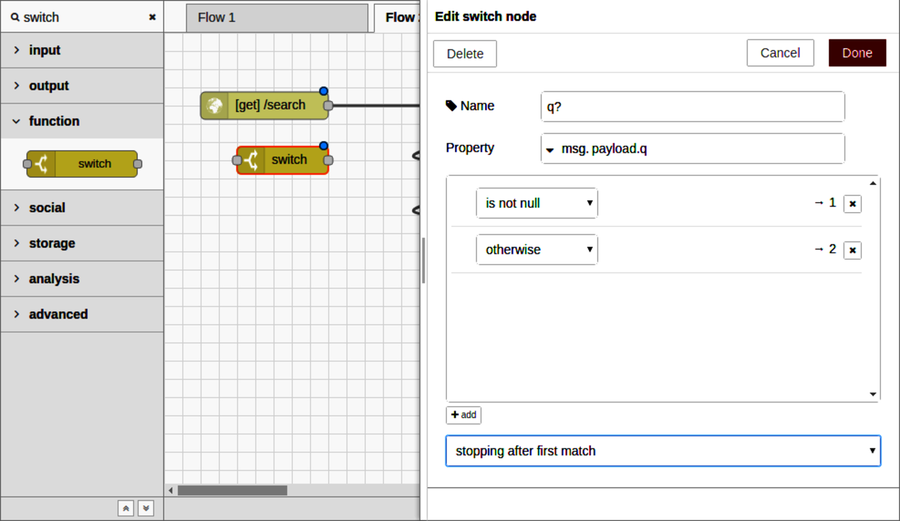
To configure it, double-click the switch node to open the Edit dialog. Set the Name field to q? to indicate that we’re testing for the q parameter. For the Property field, set it to msg.payload.q.
Below the Name and Property fields is an area where you can specify routing rules. In the first rule, click the drop-down and select is not null.
Next, click the +add button to insert a second rule. For this rule, click the drop-down and select otherwise.
Lastly, in the final drop-down at the bottom, choose stopping after first match. When you’re done, the Edit dialog should look like this:
After you click Done, the switch node should now have two output ports—one for each of the two conditions, in order from top to bottom. Since the first output was for the is not null case, we want to wire that into the prep query node. The input to the switch node should be the output of the HTTP input node above it.
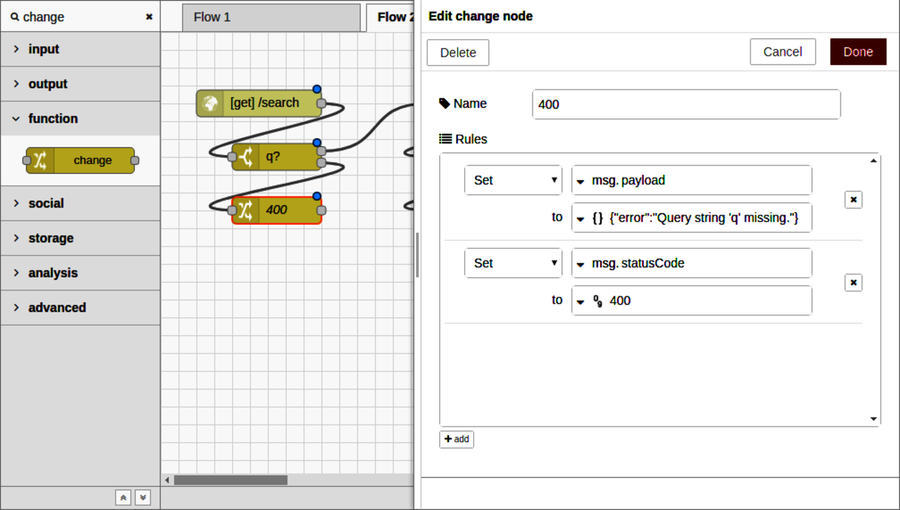
For the other switch case, we’ll need a few more nodes, starting with a change node to set up the HTTP 400 Bad Request response. Drag a change node onto the flow under the switch node, connect its input to the second switch output, then double-click the change node to open the Edit dialog.
Set the change node’s name to 400. In the Rules section, first set the msg.payload to the JSON string {"error":"Query string ’q’ missing."}. Then add a second rule and set the msg.statusCode to be the number 400. The HTTP response node will use this to return a 400 Bad Request status code.
When you’re finished, the node editor should look like the following:
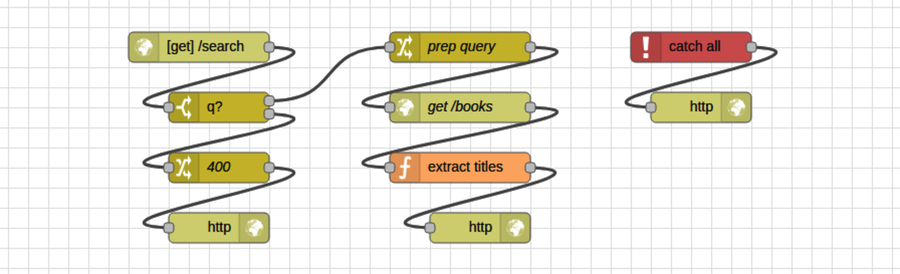
After you click Done to dismiss the dialog, all that remains is to add another HTTP response node underneath the 400 change node and wire it up. When you deploy the flow, it should look like the following:
Time to try it all out. In your terminal, use curl to see how the flow deals with a missing q parameter.
| | $ curl -s localhost:1880/search | jq '.' |
| | { |
| | "error": "Query string 'q' missing." |
| | } |
Success! Now let’s reconfirm that it still returns results for expected queries.
| | $ curl -s localhost:1880/search?q=juliet | jq '.' |
| | [ |
| | "Romeo and Juliet", |
| | "The Indifference of Juliet", |
| | "Romeo and Juliet", |
| | "Romeo and Juliet", |
| | "Romeo and Juliet", |
| | "The Tragedy of Romeo and Juliet", |
| | "Shakespeare's Tragedy of Romeo and Juliet" |
| | ] |
At this point you have a functioning and error-resistant HTTP API endpoint. Now let’s wrap up.