Table of Contents for
Node.js 8 the Right Way
 Node.js 8 the Right Way
Published by
Pragmatic Bookshelf, 2018
Node.js 8 the Right Way
Published by
Pragmatic Bookshelf, 2018
- Title Page
- Node.js 8 the Right Way
- Node.js 8 the Right Way
- Node.js 8 the Right Way
- Node.js 8 the Right Way
- Acknowledgments
- Preface
- Why Node.js the Right Way?
- What’s in This Book
- What This Book Is Not
- Code Examples and Conventions
- Online Resources
- Part I. Getting Up to Speed on Node.js 8
- 1. Getting Started
- Thinking Beyond the web
- Node.js’s Niche
- How Node.js Applications Work
- Aspects of Node.js Development
- Installing Node.js
- 2. Wrangling the File System
- Programming for the Node.js Event Loop
- Spawning a Child Process
- Capturing Data from an EventEmitter
- Reading and Writing Files Asynchronously
- The Two Phases of a Node.js Program
- Wrapping Up
- 3. Networking with Sockets
- Listening for Socket Connections
- Implementing a Messaging Protocol
- Creating Socket Client Connections
- Testing Network Application Functionality
- Extending Core Classes in Custom Modules
- Developing Unit Tests with Mocha
- Wrapping Up
- 4. Connecting Robust Microservices
- Installing ØMQ
- Publishing and Subscribing to Messages
- Responding to Requests
- Routing and Dealing Messages
- Clustering Node.js Processes
- Pushing and Pulling Messages
- Wrapping Up
- Node.js 8 the Right Way
- Part II. Working with Data
- 5. Transforming Data and Testing Continuously
- Procuring External Data
- Behavior-Driven Development with Mocha and Chai
- Extracting Data from XML with Cheerio
- Processing Data Files Sequentially
- Debugging Tests with Chrome DevTools
- Wrapping Up
- 6. Commanding Databases
- Introducing Elasticsearch
- Creating a Command-Line Program in Node.js with Commander
- Using request to Fetch JSON over HTTP
- Shaping JSON with jq
- Inserting Elasticsearch Documents in Bulk
- Implementing an Elasticsearch Query Command
- Wrapping Up
- Node.js 8 the Right Way
- Part III. Creating an Application from the Ground Up
- 7. Developing RESTful Web Services
- Advantages of Express
- Serving APIs with Express
- Writing Modular Express Services
- Keeping Services Running with nodemon
- Adding Search APIs
- Simplifying Code Flows with Promises
- Manipulating Documents RESTfully
- Emulating Synchronous Style with async and await
- Providing an Async Handler Function to Express
- Wrapping Up
- 8. Creating a Beautiful User Experience
- Getting Started with webpack
- Generating Your First webpack Bundle
- Sprucing Up Your UI with Bootstrap
- Bringing in Bootstrap JavaScript and jQuery
- Transpiling with TypeScript
- Templating HTML with Handlebars
- Implementing hashChange Navigation
- Listing Objects in a View
- Saving Data with a Form
- Wrapping Up
- 9. Fortifying Your Application
- Setting Up the Initial Project
- Managing User Sessions in Express
- Adding Authentication UI Elements
- Setting Up Passport
- Authenticating with Facebook, Twitter, and Google
- Composing an Express Router
- Bringing in the Book Bundle UI
- Serving in Production
- Wrapping Up
- Node.js 8 the Right Way
- 10. BONUS: Developing Flows with Node-RED
- Setting Up Node-RED
- Securing Node-RED
- Developing a Node-RED Flow
- Creating HTTP APIs with Node-RED
- Handling Errors in Node-RED Flows
- Wrapping Up
- A1. Setting Up Angular
- A2. Setting Up React
- Node.js 8 the Right Way
Listening for Socket Connections
Networked services exist to do two things: connect endpoints and transmit information between them. No matter what kind of information is transmitted, a connection must first be made.
In this section, you’ll learn how to create socket-based services using Node.js. We’ll develop an example application that sends data to connected clients, then we’ll connect to this service using standard command-line tools. By the end, you’ll have a good idea of how Node.js does the client/server pattern.
Binding a Server to a TCP Port
TCP socket connections consist of two endpoints. One endpoint binds to a numbered port while the other endpoint connects to a port.
This is a lot like a telephone system. One phone binds a given phone number for a long time. A second phone places a call—it connects to the bound number. Once the call is answered, information (sound) can travel both ways.
In Node.js, the bind and connect operations are provided by the net module. Binding a TCP port to listen for connections looks like this:
| | 'use strict'; |
| | const |
| | net = require('net'), |
| | server = net.createServer(connection => { |
| | // Use the connection object for data transfer. |
| | }); |
| | server.listen(60300); |
The net.createServer method takes a callback function and returns a Server object. Node.js will invoke the callback function whenever another endpoint connects. The connection parameter is a Socket object that you can use to send or receive data.
The callback function defined here is an arrow-function expression, the same kind we used extensively in Chapter 2, Wrangling the File System.
Calling server.listen binds the specified port. In this case, we’re binding TCP port number 60300. To get an idea of the setup, take a look at the figure.
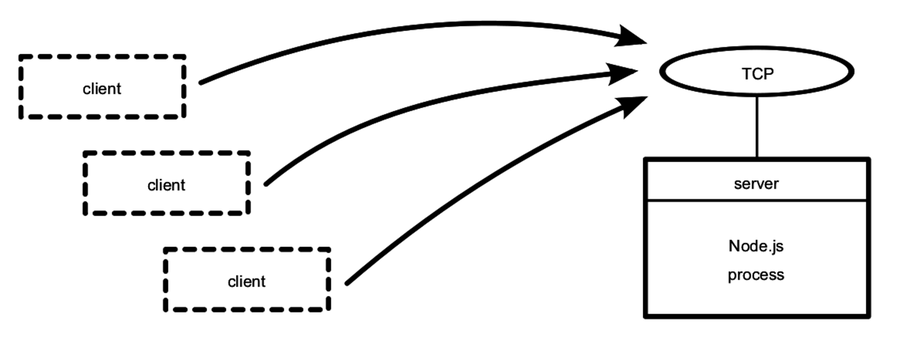
The figure shows our one Node.js process whose server binds a TCP port. Any number of clients—which may or may not be Node.js processes—can connect to that bound port.
Our server program doesn’t do anything with the connection yet. Let’s fix that by using it to send some useful information to the client.
Writing Data to a Socket
In Chapter 2, Wrangling the File System, we developed some simple file utilities that would take action whenever a target file changed. Let’s reuse the file changes as a source of information for our example networked service. This will give us something to code against as we dig into aspects of Node.js development.
To begin, create a directory named networking to hold the code you’ll be writing. Then open your favorite text editor and enter this:
| | 'use strict'; |
| | const fs = require('fs'); |
| | const net = require('net'); |
| | const filename = process.argv[2]; |
| | |
| | if (!filename) { |
| | throw Error('Error: No filename specified.'); |
| | } |
| | |
| | net.createServer(connection => { |
| | // Reporting. |
| | console.log('Subscriber connected.'); |
| | connection.write(`Now watching "${filename}" for changes...\n`); |
| | |
| | // Watcher setup. |
| | const watcher = |
| | fs.watch(filename, () => connection.write(`File changed: ${new Date()}\n`)); |
| | |
| | // Cleanup. |
| | connection.on('close', () => { |
| | console.log('Subscriber disconnected.'); |
| | watcher.close(); |
| | }); |
| | }).listen(60300, () => console.log('Listening for subscribers...')); |
Save this file in your networking directory as net-watcher.js. At the top, we pull in the Node.js core modules fs and net.
The name of the file to watch, if supplied, will be the third (index 2) argument in process.argv. If the user didn’t supply a target file to watch, then we throw a custom Error. Uncaught errors like this will cause the Node.js process to halt after sending a stacktrace to standard error.
Now let’s take a look inside the callback function given to createServer. This callback function does three things:
-
It reports that the connection has been established (both to the client with connection.write and to the console).
-
It begins listening for changes to the target file, saving the returned watcher object. This callback sends change information to the client using connection.write.
-
It listens for the connection’s close event so it can report that the subscriber has disconnected and stop watching the file, with watcher.close.
Finally, notice the callback passed into server.listen at the end. Node.js invokes this function after it has successfully bound port 60300 and is ready to start receiving connections.
Connecting to a TCP Socket Server with Netcat
Now let’s run the net-watcher program and confirm that it behaves the way we expect. This will require a little terminal juggling.
To run and test the net-watcher program, you’ll need three terminal sessions: one for the service itself, one for the client, and one to trigger changes to the watched file.
In your first terminal, use the watch command to touch the target file at one-second intervals:
| | $ watch -n 1 touch target.txt |
With that running, in a second terminal, run the net-watcher program:
| | $ node net-watcher.js target.txt |
| | Listening for subscribers... |
This program creates a service listening on TCP port 60300. To connect to it, we’ll use netcat, a socket utility program. Open a third terminal and use the nc command like so:
| | $ nc localhost 60300 |
| | Now watching "target.txt" for changes... |
| | File changed: Wed Dec 16 2015 05:56:14 GMT-0500 (EST) |
| | File changed: Wed Dec 16 2015 05:56:19 GMT-0500 (EST) |
If you’re on a system that doesn’t have nc, you can use telnet:
| | $ telnet localhost 60300 |
| | Trying 127.0.0.1... |
| | Connected to localhost. |
| | Escape character is '^]'. |
| | Now watching "target.txt" for changes... |
| | File changed: Wed Dec 16 2015 05:56:14 GMT-0500 (EST) |
| | File changed: Wed Dec 16 2015 05:56:19 GMT-0500 (EST) |
| | ^] |
| | telnet> quit |
| | Connection closed. |
Back in the net-watcher terminal, you should see this:
| | Subscriber connected. |
You can kill the nc session by typing Ctrl-C. If you’re using telnet, you’ll need to disconnect with Ctrl-] and then type quit Enter. When you do, you’ll see the following line appear in the net-watcher terminal:
| | Subscriber disconnected. |
To terminate the net-watcher service or the watch command, type Ctrl-C from their terminals.
The following figure outlines the setup we just created. The net-watcher process (box) binds a TCP port and watches a file—both resources are shown as ovals.
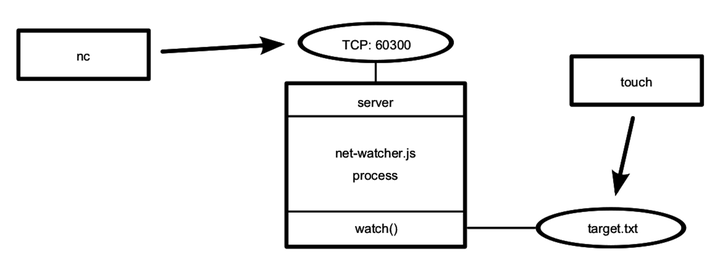
Multiple subscribers can connect and receive updates simultaneously. If you open additional terminals and connect to port 60300 with nc, they’ll all receive updates when the target file changes.
TCP sockets are useful for communicating between networked computers. But if you need processes on the same computer to communicate, Unix sockets offer a more efficient alternative. The net module can create this kind of socket as well, which we’ll look at next.
Listening on Unix Sockets
To see how the net module uses Unix sockets, let’s modify the net-watcher program to use this kind of communication channel. Keep in mind that Unix sockets work only on Unix-like environments.
Open the net-watcher.js program and change the .listen call at the end to this:
| | .listen('/tmp/watcher.sock', () => console.log('Listening for subscribers...')); |
Save the file as net-watcher-unix.js, then run the program as before:
| | $ node net-watcher-unix.js target.txt |
| | Listening for subscribers... |
Note that if you get an error containing EADDRINUSE, you may have to delete the watcher.sock before running the program again.
To connect a client, we can use nc as before, but this time specifying the -U flag to use the socket file.
| | $ nc -U /tmp/watcher.sock |
| | Now watching target.txt for changes... |
Unix sockets can be faster than TCP sockets because they don’t require invoking network hardware. However, by nature they’re confined to the machine.
That concludes the basics of creating network socket servers in Node. We discovered how to create socket servers and connect to them using the common client utility program nc. This framework will supply the backdrop for the rest of the examples in the chapter.
Next, we’ll beef up our service by transforming the data into a parsable format. This will put us in position to develop custom client applications.