Table of Contents for
Node.js 8 the Right Way
 Node.js 8 the Right Way
Published by
Pragmatic Bookshelf, 2018
Node.js 8 the Right Way
Published by
Pragmatic Bookshelf, 2018
- Title Page
- Node.js 8 the Right Way
- Node.js 8 the Right Way
- Node.js 8 the Right Way
- Node.js 8 the Right Way
- Acknowledgments
- Preface
- Why Node.js the Right Way?
- What’s in This Book
- What This Book Is Not
- Code Examples and Conventions
- Online Resources
- Part I. Getting Up to Speed on Node.js 8
- 1. Getting Started
- Thinking Beyond the web
- Node.js’s Niche
- How Node.js Applications Work
- Aspects of Node.js Development
- Installing Node.js
- 2. Wrangling the File System
- Programming for the Node.js Event Loop
- Spawning a Child Process
- Capturing Data from an EventEmitter
- Reading and Writing Files Asynchronously
- The Two Phases of a Node.js Program
- Wrapping Up
- 3. Networking with Sockets
- Listening for Socket Connections
- Implementing a Messaging Protocol
- Creating Socket Client Connections
- Testing Network Application Functionality
- Extending Core Classes in Custom Modules
- Developing Unit Tests with Mocha
- Wrapping Up
- 4. Connecting Robust Microservices
- Installing ØMQ
- Publishing and Subscribing to Messages
- Responding to Requests
- Routing and Dealing Messages
- Clustering Node.js Processes
- Pushing and Pulling Messages
- Wrapping Up
- Node.js 8 the Right Way
- Part II. Working with Data
- 5. Transforming Data and Testing Continuously
- Procuring External Data
- Behavior-Driven Development with Mocha and Chai
- Extracting Data from XML with Cheerio
- Processing Data Files Sequentially
- Debugging Tests with Chrome DevTools
- Wrapping Up
- 6. Commanding Databases
- Introducing Elasticsearch
- Creating a Command-Line Program in Node.js with Commander
- Using request to Fetch JSON over HTTP
- Shaping JSON with jq
- Inserting Elasticsearch Documents in Bulk
- Implementing an Elasticsearch Query Command
- Wrapping Up
- Node.js 8 the Right Way
- Part III. Creating an Application from the Ground Up
- 7. Developing RESTful Web Services
- Advantages of Express
- Serving APIs with Express
- Writing Modular Express Services
- Keeping Services Running with nodemon
- Adding Search APIs
- Simplifying Code Flows with Promises
- Manipulating Documents RESTfully
- Emulating Synchronous Style with async and await
- Providing an Async Handler Function to Express
- Wrapping Up
- 8. Creating a Beautiful User Experience
- Getting Started with webpack
- Generating Your First webpack Bundle
- Sprucing Up Your UI with Bootstrap
- Bringing in Bootstrap JavaScript and jQuery
- Transpiling with TypeScript
- Templating HTML with Handlebars
- Implementing hashChange Navigation
- Listing Objects in a View
- Saving Data with a Form
- Wrapping Up
- 9. Fortifying Your Application
- Setting Up the Initial Project
- Managing User Sessions in Express
- Adding Authentication UI Elements
- Setting Up Passport
- Authenticating with Facebook, Twitter, and Google
- Composing an Express Router
- Bringing in the Book Bundle UI
- Serving in Production
- Wrapping Up
- Node.js 8 the Right Way
- 10. BONUS: Developing Flows with Node-RED
- Setting Up Node-RED
- Securing Node-RED
- Developing a Node-RED Flow
- Creating HTTP APIs with Node-RED
- Handling Errors in Node-RED Flows
- Wrapping Up
- A1. Setting Up Angular
- A2. Setting Up React
- Node.js 8 the Right Way
Listing Objects in a View
Using the webpack dev server, it’s easy to quickly see the rendered output of statically served content. But how do you access web services like those we implemented in the last chapter?
Ideally, we’d have one Node.js server that serves the front-end static content and handles the API requests. We’ll achieve that in the next chapter, when we pull it all together, but for now they’re two separate things.
Fortunately, the webpack dev server has a capability that can help us. By configuring proxies in the webpack.config.js file, we can have the webpack dev server reach out to API endpoints and forward the results.
Configuring a webpack-dev-server Proxy
Web browsers have strict rules about the conditions under which a page can connect to a service. A proxy is an endpoint that acts as a passthrough to another service. For development purposes, configuring a webpack-dev-server proxy is a convenient way to provide access to services before the whole system is ready end to end.
To configure the proxies, start by opening your webpack.config.js file for editing. In the module.exports, under the devServer configuration, add a proxy object to make it look like the following:
| | devServer: { |
| | contentBase: distDir, |
| | port: 60800, |
| | proxy: { |
| | '/api': 'http://localhost:60702', |
| | '/es': { |
| | target: 'http://localhost:9200', |
| | pathRewrite: {'^/es' : ''}, |
| | } |
| | }, |
| | }, |
This specifies that requests to /api should be sent as is to the localhost service running on port 60702—that is, the Express server we developed in Writing Modular Express Services.
It also exposes requests directly to Elasticsearch through the endpoint /es. We haven’t developed APIs that work for specific users yet, so we need to bypass the API layer and go directly to Elasticsearch for some things. This is a temporary workaround that we won’t need in the next chapter, when we create a consolidated server and fill in the authenticated user APIs.
Elasticsearch APIs begin at the root, so we need to strip off the leading /es, which is what the pathRewrite setting is for. You could use this same technique to proxy requests to other services as well, but you should be careful with what you proxy. Unconstrained proxy services can become vulnerabilities when they expose access to services, or levels of privilege on those services, that should not be available to the end user.
Once you save this file, you’ll need to restart your webpack dev server to pick up the changes. You’ll also need to make sure you’re running the Express web services from the last chapter, and make sure your local Elasticsearch cluster is up and running. With those services running, now we can implement a view that uses data from them, as served through the proxy.
Implementing a View
To implement a view that lists the user’s bundles, we’ll need a couple of things. First we’ll need a way of retrieving the bundles asynchronously from the server. Next we’ll need a function that renders the list using a compiled Handlebars template to produce displayable HTML. And lastly we’ll need to add the hash route to the showView function to tie it all together.
Let’s start with the bundle-retrieving task. Open your app/index.ts and insert the following getBundles async function after the imports and page-setup part of the file.
| | const getBundles = async () => { |
| | const esRes = await fetch('/es/b4/bundle/_search?size=1000'); |
| | |
| | const esResBody = await esRes.json(); |
| | |
| | return esResBody.hits.hits.map(hit => ({ |
| | id: hit._id, |
| | name: hit._source.name, |
| | })); |
| | }; |
This method starts off by issuing an asynchronous request to Elasticsearch through the global fetch method.[81] This is a Promise-producing function that initiates an HTTP request with the provided settings. In this case, we’re passing in an Elasticsearch query URL in which we hope to retrieve up to 1,000 bundle documents from the b4 index.
The fetch API is relatively new, and meant to supplant the older XMLHttpRequest API. It is widely available, with the notable exceptions being Safari and Internet Explorer. If you need to support these browsers, you can pull in a popular polyfill implementation from the npm package whatwg-fetch.[82]
As a Promise-producing request API, fetch is quite similar to the request-promise module we used in the last chapter. One notable difference is the way that the response body content is handled. To decode the body content as JSON using the fetch API, you need to call the response object’s json method, which is another asynchronous, Promise-producing function. So here we await the results of that operation.
Once the JSON body has been decoded, we extract the Elasticsearch results (hits.hits) as an array of objects containing the automatically generated id of the document and the name of the bundle. Since getBundles is an async function, if anything goes wrong it will result in a rejection of the returned Promise. We’re explicitly not handling those potential errors here. Instead, we’ll rely on the caller to handle the error by alerting the user.
Still in app/index.ts, let’s add a listBundles function that renders the list of bundles using a Handlebars template. Insert the following after your getBundles function.
| | const listBundles = bundles => { |
| | mainElement.innerHTML = templates.listBundles({bundles}); |
| | }; |
Currently all this function does is render the bundles using an as-yet-unimplemented Handlebars template also called listBundles. Later we’ll add more functionality to this function, but it’s good enough for now.
We need to make one more change to the app/index.ts before we backfill the missing Handlebars template. Down in the showView function, we need to add a handler for the #list-bundles hash route. Insert the following into the switch ladder.
| | case '#list-bundles': |
| | const bundles = await getBundles(); |
| | listBundles(bundles); |
| | break; |
After you save the file, open your app/templates.ts. Add the following implementation of the listBundles template.
| | export const listBundles = Handlebars.compile(` |
| | <div class="panel panel-default"> |
| | <div class="panel-heading">Your Bundles</div> |
| | {{#if bundles.length}} |
| | <table class="table"> |
| | <tr> |
| | <th>Bundle Name</th> |
| | <th>Actions</th> |
| | </tr> |
| | {{#each bundles}} |
| | <tr> |
| | <td> |
| | <a href="#view-bundle/{{id}}">{{name}}</a> |
| | </td> |
| | <td> |
| | <button class="btn delete" data-bundle-id="{{id}}">Delete</button> |
| | </td> |
| | </tr> |
| | {{/each}} |
| | </table> |
| | {{else}} |
| | <div class="panel-body"> |
| | <p>None yet!</p> |
| | </div> |
| | {{/if}} |
| | </div> |
| | `); |
This template uses the array of bundle passed in to render a Bootstrap panel containing a two-column table. The left column of the table contains the name of the bundle and the right column has a Delete button. Neither the bundle-name link nor the Delete button will do anything yet—we have to add that later.
This template uses a couple of Handlebars features. First, the {{#if}}{{else}}{{/if}} block expression does what you might expect. If the condition in the {{#if}} is true, then Handlebars renders the first part; otherwise it renders the {{else}} part. So if you have no bundles, you’ll see a message instead of a table.
The {{#each}} block expression iterates over an array or object. Here we create a new <tr> for each bundle, and fill it with two <td> cells. Inside the {{#each}} expression, the context is the current element, so we can use {{id}} and {{name}} to refer to the current bundle’s ID and name, respectively.
Notice that the bundle name links to #view-bundle/{{id}}. Once we add #view-bundle to the showView switch ladder, these links will take you to a view showing the particular bundle.
Finally, observe the data-bundle-id attribute on the Delete button. This is not required by Bootstrap, but exists so that we know which bundle to delete when the user clicks this button.
Once you save the app/templates.ts file, everything should be in place to see the #list-bundles view from end to end. Start up your webpack dev server, if it’s not running already, then navigate to localhost:60800/#list-bundles. It should look something like this:
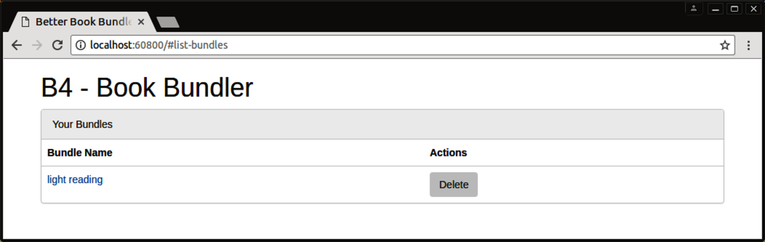
If you haven’t created any bundles yet, you’ll see a message stating None yet! instead of the table. You can create a bundle using the bundle API from Manipulating Documents RESTfully, with curl and jq.
| | $ curl -s -X POST localhost:60702/api/bundle?name=light%20reading | jq '.' |
| | { |
| | "_index": "b4", |
| | "_type": "bundle", |
| | "_id": "AVuFkyXcpWVRyMBC8pgr", |
| | "_version": 1, |
| | "result": "created", |
| | "_shards": { |
| | "total": 2, |
| | "successful": 1, |
| | "failed": 0 |
| | }, |
| | "created": true |
| | } |
So far so good, but what about adding a new bundle? Let’s add a form to do that next.