Table of Contents for
Node.js 8 the Right Way
 Node.js 8 the Right Way
Published by
Pragmatic Bookshelf, 2018
Node.js 8 the Right Way
Published by
Pragmatic Bookshelf, 2018
- Title Page
- Node.js 8 the Right Way
- Node.js 8 the Right Way
- Node.js 8 the Right Way
- Node.js 8 the Right Way
- Acknowledgments
- Preface
- Why Node.js the Right Way?
- What’s in This Book
- What This Book Is Not
- Code Examples and Conventions
- Online Resources
- Part I. Getting Up to Speed on Node.js 8
- 1. Getting Started
- Thinking Beyond the web
- Node.js’s Niche
- How Node.js Applications Work
- Aspects of Node.js Development
- Installing Node.js
- 2. Wrangling the File System
- Programming for the Node.js Event Loop
- Spawning a Child Process
- Capturing Data from an EventEmitter
- Reading and Writing Files Asynchronously
- The Two Phases of a Node.js Program
- Wrapping Up
- 3. Networking with Sockets
- Listening for Socket Connections
- Implementing a Messaging Protocol
- Creating Socket Client Connections
- Testing Network Application Functionality
- Extending Core Classes in Custom Modules
- Developing Unit Tests with Mocha
- Wrapping Up
- 4. Connecting Robust Microservices
- Installing ØMQ
- Publishing and Subscribing to Messages
- Responding to Requests
- Routing and Dealing Messages
- Clustering Node.js Processes
- Pushing and Pulling Messages
- Wrapping Up
- Node.js 8 the Right Way
- Part II. Working with Data
- 5. Transforming Data and Testing Continuously
- Procuring External Data
- Behavior-Driven Development with Mocha and Chai
- Extracting Data from XML with Cheerio
- Processing Data Files Sequentially
- Debugging Tests with Chrome DevTools
- Wrapping Up
- 6. Commanding Databases
- Introducing Elasticsearch
- Creating a Command-Line Program in Node.js with Commander
- Using request to Fetch JSON over HTTP
- Shaping JSON with jq
- Inserting Elasticsearch Documents in Bulk
- Implementing an Elasticsearch Query Command
- Wrapping Up
- Node.js 8 the Right Way
- Part III. Creating an Application from the Ground Up
- 7. Developing RESTful Web Services
- Advantages of Express
- Serving APIs with Express
- Writing Modular Express Services
- Keeping Services Running with nodemon
- Adding Search APIs
- Simplifying Code Flows with Promises
- Manipulating Documents RESTfully
- Emulating Synchronous Style with async and await
- Providing an Async Handler Function to Express
- Wrapping Up
- 8. Creating a Beautiful User Experience
- Getting Started with webpack
- Generating Your First webpack Bundle
- Sprucing Up Your UI with Bootstrap
- Bringing in Bootstrap JavaScript and jQuery
- Transpiling with TypeScript
- Templating HTML with Handlebars
- Implementing hashChange Navigation
- Listing Objects in a View
- Saving Data with a Form
- Wrapping Up
- 9. Fortifying Your Application
- Setting Up the Initial Project
- Managing User Sessions in Express
- Adding Authentication UI Elements
- Setting Up Passport
- Authenticating with Facebook, Twitter, and Google
- Composing an Express Router
- Bringing in the Book Bundle UI
- Serving in Production
- Wrapping Up
- Node.js 8 the Right Way
- 10. BONUS: Developing Flows with Node-RED
- Setting Up Node-RED
- Securing Node-RED
- Developing a Node-RED Flow
- Creating HTTP APIs with Node-RED
- Handling Errors in Node-RED Flows
- Wrapping Up
- A1. Setting Up Angular
- A2. Setting Up React
- Node.js 8 the Right Way
Clustering Node.js Processes
In multithreaded systems, doing more work in parallel means spinning up more threads. But Node.js uses a single-threaded event loop, so to take advantage of multiple cores or multiple processors on the same computer, you have to spin up more Node.js processes.
This is called clustering and it’s what Node.js’s built-in cluster module does. Clustering is a useful technique for scaling up your Node.js application when there’s unused CPU capacity available.
To explore how the cluster module works, we’ll build up a program that manages a pool of worker processes to respond to ØMQ requests. This will be a drop-in replacement for our previous responder program. It will use ROUTER, DEALER, and REP sockets to distribute requests to workers.
In all, we’ll end up with a short and powerful program that combines cluster-based, multiprocess work distribution and load-balanced message-passing.
Forking Worker Processes in a Cluster
Back in Spawning a Child Process, we used the child_process module’s spawn function to fire up a process. This works great for executing non-Node.js processes from your Node.js program. But for spinning up copies of the same Node.js program, forking is a better option because fork is a special case of spawn that sets up an interprocess communication channel, as you’ll see shortly.
Each time you call the cluster module’s fork method,[31] it creates a worker process running the same script as the original. To see what I mean, take a look at the following code snippet. It shows the basic framework for a clustered Node.js application.
| | const cluster = require('cluster'); |
| | |
| | if (cluster.isMaster) { |
| | // Fork some worker processes. |
| | for (let i = 0; i < 10; i++) { |
| | cluster.fork(); |
| | } |
| | |
| | } else { |
| | // This is a worker process; do some work. |
| | } |
First, we check whether the current process is the master process. If so, we use cluster.fork to create additional processes. The fork method launches a new Node.js process running the same script, but for which cluster.isMaster is false.
The forked processes are called workers. They can intercommunicate with the master process through various events.
For example, the master can listen for workers coming online with code like this:
| | cluster.on('online', worker => |
| | console.log(`Worker ${worker.process.pid} is online.`)); |
When the cluster module emits an online event, a worker parameter is passed along. One of the properties on this object is process—the same sort of process that you’d find in any Node.js program.
Similarly, the master can listen for processes exiting:
| | cluster.on('exit', (worker, code, signal) => |
| | console.log(`Worker ${worker.process.pid} exited with code ${code}`)); |
Like online, the exit event includes a worker object. It also includes the exit code of the process and what operating-system signal (like SIGINT or SIGTERM) was used to halt the process.
Building a Cluster
Now it’s time to put everything together, harnessing Node.js clustering and the ØMQ messaging patterns we’ve been talking about. We’ll build a program that distributes requests to a pool of worker processes.
Our master Node.js process will create ROUTER and DEALER sockets and spin up the workers. Each worker will create a REP socket that connects back to the DEALER.
The following figure illustrates how all these pieces fit together. As in previous figures, the rectangles represent Node.js processes. The ovals are the resources bound by ØMQ sockets, and the arrows show which sockets connect to which endpoints.
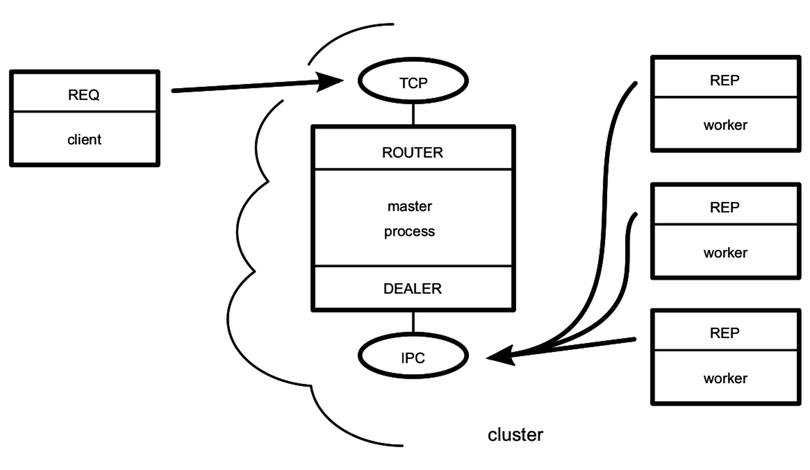
The master process is the most stable part of the architecture (it manages the workers), so it’s responsible for doing the binding. The worker processes and clients of the service all connect to endpoints bound by the master. Remember that the flow of messages is decided by the socket types, not which socket happens to bind or connect.
Now let’s get to the code. Open your favorite editor and enter the following:
| 1: | 'use strict'; |
| - | const cluster = require('cluster'); |
| - | const fs = require('fs'); |
| - | const zmq = require('zeromq'); |
| 5: | |
| - | const numWorkers = require('os').cpus().length; |
| - | |
| - | if (cluster.isMaster) { |
| - | |
| 10: | // Master process creates ROUTER and DEALER sockets and binds endpoints. |
| - | const router = zmq.socket('router').bind('tcp://127.0.0.1:60401'); |
| - | const dealer = zmq.socket('dealer').bind('ipc://filer-dealer.ipc'); |
| - | |
| - | // Forward messages between the router and dealer. |
| 15: | router.on('message', (...frames) => dealer.send(frames)); |
| - | dealer.on('message', (...frames) => router.send(frames)); |
| - | |
| - | // Listen for workers to come online. |
| - | cluster.on('online', |
| 20: | worker => console.log(`Worker ${worker.process.pid} is online.`)); |
| - | |
| - | // Fork a worker process for each CPU. |
| - | for (let i = 0; i < numWorkers; i++) { |
| - | cluster.fork(); |
| 25: | } |
| - | |
| - | } else { |
| - | |
| - | // Worker processes create a REP socket and connect to the DEALER. |
| 30: | const responder = zmq.socket('rep').connect('ipc://filer-dealer.ipc'); |
| - | |
| - | responder.on('message', data => { |
| - | |
| - | // Parse incoming message. |
| 35: | const request = JSON.parse(data); |
| - | console.log(`${process.pid} received request for: ${request.path}`); |
| - | |
| - | // Read the file and reply with content. |
| - | fs.readFile(request.path, (err, content) => { |
| 40: | console.log(`${process.pid} sending response`); |
| - | responder.send(JSON.stringify({ |
| - | content: content.toString(), |
| - | timestamp: Date.now(), |
| - | pid: process.pid |
| 45: | })); |
| - | }); |
| - | |
| - | }); |
| - | |
| 50: | } |
Save this file as zmq-filer-rep-cluster.js. This program is a little longer than our previous Node.js programs, but it should look familiar to you since it’s based entirely on snippets we’ve already discussed.
At the top, we use Node.js’s built-in os module to look up the number of available CPUs.[32] Spinning up one worker per CPU is a good rule of thumb. Too few means you won’t get maximum CPU utilization, and too many means more overhead for the OS to switch between them.
Next, notice that the ROUTER listens for incoming TCP connections on port 60401 on line 11. This allows the cluster to act as a drop-in replacement for the zmq-filer-rep.js program we developed earlier.
On line 12, the DEALER socket binds an interprocess connection (IPC) endpoint. This is backed by a Unix socket like the one we used in Listening on Unix Sockets.
By convention, ØMQ IPC files should end in the file extension ipc. In this case, the filer-dealer.ipc file will be created in the current working directory that the cluster was launched from (if it doesn’t exist already). Let’s run the cluster program to see how it works.
| | $ node zmq-filer-rep-cluster.js |
| | Worker 10334 is online. |
| | Worker 10329 is online. |
| | Worker 10335 is online. |
| | Worker 10340 is online. |
So far so good—the master process has spun up the workers, and they’ve all reported in. In a second terminal, fire up our REQ loop program (zmq-filer-req-loop.js):
| | $ node zmq-filer-req-loop.js target.txt |
| | Sending request 1 for target.txt |
| | Sending request 2 for target.txt |
| | Sending request 3 for target.txt |
| | Sending request 4 for target.txt |
| | Sending request 5 for target.txt |
| | Received response: { content: '', timestamp: 1459330686647, pid: 10334 } |
| | Received response: { content: '', timestamp: 1459330686672, pid: 10329 } |
| | Received response: { content: '', timestamp: 1459330686682, pid: 10335 } |
| | Received response: { content: '', timestamp: 1459330686684, pid: 10334 } |
| | Received response: { content: '', timestamp: 1459330686685, pid: 10329 } |
Just like our earlier reply program, this clustered approach answers each request in turn.
But notice that the reported process ID (pid) is different for each response received. This shows that the master process is indeed load-balancing the requests to different workers.
Next, we’ll examine one more messaging pattern offered by ØMQ before wrapping up the chapter.