Table of Contents for
Node.js 8 the Right Way
 Node.js 8 the Right Way
Published by
Pragmatic Bookshelf, 2018
Node.js 8 the Right Way
Published by
Pragmatic Bookshelf, 2018
- Title Page
- Node.js 8 the Right Way
- Node.js 8 the Right Way
- Node.js 8 the Right Way
- Node.js 8 the Right Way
- Acknowledgments
- Preface
- Why Node.js the Right Way?
- What’s in This Book
- What This Book Is Not
- Code Examples and Conventions
- Online Resources
- Part I. Getting Up to Speed on Node.js 8
- 1. Getting Started
- Thinking Beyond the web
- Node.js’s Niche
- How Node.js Applications Work
- Aspects of Node.js Development
- Installing Node.js
- 2. Wrangling the File System
- Programming for the Node.js Event Loop
- Spawning a Child Process
- Capturing Data from an EventEmitter
- Reading and Writing Files Asynchronously
- The Two Phases of a Node.js Program
- Wrapping Up
- 3. Networking with Sockets
- Listening for Socket Connections
- Implementing a Messaging Protocol
- Creating Socket Client Connections
- Testing Network Application Functionality
- Extending Core Classes in Custom Modules
- Developing Unit Tests with Mocha
- Wrapping Up
- 4. Connecting Robust Microservices
- Installing ØMQ
- Publishing and Subscribing to Messages
- Responding to Requests
- Routing and Dealing Messages
- Clustering Node.js Processes
- Pushing and Pulling Messages
- Wrapping Up
- Node.js 8 the Right Way
- Part II. Working with Data
- 5. Transforming Data and Testing Continuously
- Procuring External Data
- Behavior-Driven Development with Mocha and Chai
- Extracting Data from XML with Cheerio
- Processing Data Files Sequentially
- Debugging Tests with Chrome DevTools
- Wrapping Up
- 6. Commanding Databases
- Introducing Elasticsearch
- Creating a Command-Line Program in Node.js with Commander
- Using request to Fetch JSON over HTTP
- Shaping JSON with jq
- Inserting Elasticsearch Documents in Bulk
- Implementing an Elasticsearch Query Command
- Wrapping Up
- Node.js 8 the Right Way
- Part III. Creating an Application from the Ground Up
- 7. Developing RESTful Web Services
- Advantages of Express
- Serving APIs with Express
- Writing Modular Express Services
- Keeping Services Running with nodemon
- Adding Search APIs
- Simplifying Code Flows with Promises
- Manipulating Documents RESTfully
- Emulating Synchronous Style with async and await
- Providing an Async Handler Function to Express
- Wrapping Up
- 8. Creating a Beautiful User Experience
- Getting Started with webpack
- Generating Your First webpack Bundle
- Sprucing Up Your UI with Bootstrap
- Bringing in Bootstrap JavaScript and jQuery
- Transpiling with TypeScript
- Templating HTML with Handlebars
- Implementing hashChange Navigation
- Listing Objects in a View
- Saving Data with a Form
- Wrapping Up
- 9. Fortifying Your Application
- Setting Up the Initial Project
- Managing User Sessions in Express
- Adding Authentication UI Elements
- Setting Up Passport
- Authenticating with Facebook, Twitter, and Google
- Composing an Express Router
- Bringing in the Book Bundle UI
- Serving in Production
- Wrapping Up
- Node.js 8 the Right Way
- 10. BONUS: Developing Flows with Node-RED
- Setting Up Node-RED
- Securing Node-RED
- Developing a Node-RED Flow
- Creating HTTP APIs with Node-RED
- Handling Errors in Node-RED Flows
- Wrapping Up
- A1. Setting Up Angular
- A2. Setting Up React
- Node.js 8 the Right Way
Routing and Dealing Messages
The REQ/REP socket pair we explored makes request/reply logic easy to code by operating sequentially. The Node.js code for a given responder will only ever be aware of one message at a time.
For parallel message processing, ØMQ includes the more advanced socket types ROUTER and DEALER. Let’s explore these a bit; then we’ll be ready to construct our Node.js cluster.
Routing Messages
You can think of a ROUTER socket as a parallel REP socket. Rather than replying to only one message at a time, a ROUTER socket can handle many requests simultaneously. It remembers which connection each request came from and will route reply messages accordingly.
Recall from Implementing a Messaging Protocol, that any time you do networked programming, you’re working with one or more protocols. ØMQ uses the ZeroMQ Message Transport Protocol (ZMTP) for exchanging messages.[30] This protocol uses a sequence of low-overhead frames to compose messages. A ROUTER socket uses these frames to route each reply message back to the connection that issued the request.
Most of the time your Node.js programs can ignore the underlying details of ØMQ frames because the simpler socket types only need one frame per message. But the ROUTER socket type uses multiple frames.
Here’s an example of how to create a ROUTER socket in Node.js, with a message handler that grabs all the incoming frames:
| | const router = zmq.socket('router'); |
| | router.on('message', (...frames) => { |
| | // Use frames. |
| | }); |
Previously our message handlers would take a data parameter, but this handler takes an array of frames instead.
The three dots (...) introduce an ECMAScript 2015 feature called rest parameters. When used in a function declaration, this syntax allows you to collect any number of arguments passed into the function as an array.
Now that we can get all the frames, let’s look at the DEALER socket type.
Dealing Messages
If a ROUTER socket is a parallel REP socket, then a DEALER is a parallel REQ. A DEALER socket can send multiple requests in parallel.
Let’s see how a dealer and router work together in Node. Take a look at this code sample:
| | const router = zmq.socket('router'); |
| | const dealer = zmq.socket('dealer'); |
| | |
| | router.on('message', (...frames) => dealer.send(frames)); |
| | dealer.on('message', (...frames) => router.send(frames)); |
Here we create both a ROUTER socket and a DEALER socket. Whenever either receives a message, it sends the frames to the other socket.
This creates a passthrough relationship where incoming requests to the router will be passed off to the dealer to send out to its connections. Likewise, incoming replies to the dealer will be forwarded back to the router, which directs each reply back to the connection that requested it.
The following figure shows the structure we’ll implement shortly, using the techniques we’ve just discussed.
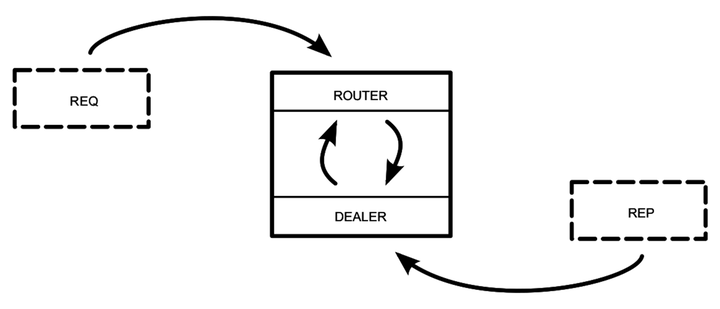
The box in the center of the figure is the Node.js program. An incoming REQ socket connects to the ROUTER. When the REQ socket issues a request, the ROUTER bounces it over to the DEALER. The DEALER then picks the next one of the REP sockets connected to it (round-robin style) and forwards the request.
When the REP connection produces a reply, it follows the reverse route. The DEALER receives the reply and bounces it back to the ROUTER. The ROUTER looks at the message’s frames to determine its origin and sends the reply back to the connected REQ that sent the initial request.
From the perspective of the REQ and REP sockets, nothing has changed. Each still works on one message at a time. Meanwhile, the ROUTER/DEALER pair can distribute (round-robin) among the REQ and REP sockets connected on both ends.
Now we’re ready to develop a clustered Node.js application on top of the REQ, REP, ROUTER, and DEALER sockets we’ve just explored.