Table of Contents for
Node.js 8 the Right Way
 Node.js 8 the Right Way
Published by
Pragmatic Bookshelf, 2018
Node.js 8 the Right Way
Published by
Pragmatic Bookshelf, 2018
- Title Page
- Node.js 8 the Right Way
- Node.js 8 the Right Way
- Node.js 8 the Right Way
- Node.js 8 the Right Way
- Acknowledgments
- Preface
- Why Node.js the Right Way?
- What’s in This Book
- What This Book Is Not
- Code Examples and Conventions
- Online Resources
- Part I. Getting Up to Speed on Node.js 8
- 1. Getting Started
- Thinking Beyond the web
- Node.js’s Niche
- How Node.js Applications Work
- Aspects of Node.js Development
- Installing Node.js
- 2. Wrangling the File System
- Programming for the Node.js Event Loop
- Spawning a Child Process
- Capturing Data from an EventEmitter
- Reading and Writing Files Asynchronously
- The Two Phases of a Node.js Program
- Wrapping Up
- 3. Networking with Sockets
- Listening for Socket Connections
- Implementing a Messaging Protocol
- Creating Socket Client Connections
- Testing Network Application Functionality
- Extending Core Classes in Custom Modules
- Developing Unit Tests with Mocha
- Wrapping Up
- 4. Connecting Robust Microservices
- Installing ØMQ
- Publishing and Subscribing to Messages
- Responding to Requests
- Routing and Dealing Messages
- Clustering Node.js Processes
- Pushing and Pulling Messages
- Wrapping Up
- Node.js 8 the Right Way
- Part II. Working with Data
- 5. Transforming Data and Testing Continuously
- Procuring External Data
- Behavior-Driven Development with Mocha and Chai
- Extracting Data from XML with Cheerio
- Processing Data Files Sequentially
- Debugging Tests with Chrome DevTools
- Wrapping Up
- 6. Commanding Databases
- Introducing Elasticsearch
- Creating a Command-Line Program in Node.js with Commander
- Using request to Fetch JSON over HTTP
- Shaping JSON with jq
- Inserting Elasticsearch Documents in Bulk
- Implementing an Elasticsearch Query Command
- Wrapping Up
- Node.js 8 the Right Way
- Part III. Creating an Application from the Ground Up
- 7. Developing RESTful Web Services
- Advantages of Express
- Serving APIs with Express
- Writing Modular Express Services
- Keeping Services Running with nodemon
- Adding Search APIs
- Simplifying Code Flows with Promises
- Manipulating Documents RESTfully
- Emulating Synchronous Style with async and await
- Providing an Async Handler Function to Express
- Wrapping Up
- 8. Creating a Beautiful User Experience
- Getting Started with webpack
- Generating Your First webpack Bundle
- Sprucing Up Your UI with Bootstrap
- Bringing in Bootstrap JavaScript and jQuery
- Transpiling with TypeScript
- Templating HTML with Handlebars
- Implementing hashChange Navigation
- Listing Objects in a View
- Saving Data with a Form
- Wrapping Up
- 9. Fortifying Your Application
- Setting Up the Initial Project
- Managing User Sessions in Express
- Adding Authentication UI Elements
- Setting Up Passport
- Authenticating with Facebook, Twitter, and Google
- Composing an Express Router
- Bringing in the Book Bundle UI
- Serving in Production
- Wrapping Up
- Node.js 8 the Right Way
- 10. BONUS: Developing Flows with Node-RED
- Setting Up Node-RED
- Securing Node-RED
- Developing a Node-RED Flow
- Creating HTTP APIs with Node-RED
- Handling Errors in Node-RED Flows
- Wrapping Up
- A1. Setting Up Angular
- A2. Setting Up React
- Node.js 8 the Right Way
Templating HTML with Handlebars
Up to this point, the B4 application only emits static HTML that is completely known in advance. For example, the alert box contains the same Success message every time. What we really want is the ability to render HTML for dynamic strings. For this we need templates.
Now, it’s true that ECMAScript supports template strings that allow you to easily inject values into strings, and we’ve been taking liberal advantage of this feature throughout the book. Unfortunately, though, this technique can quickly introduce cross-site scripting (XSS) vulnerabilities when used with user-supplied data. To protect our app from XSS vulnerabilities, any content over which a user may have any control must be properly encoded.
For example, consider the case where we’ll show the name of a user’s bundle. You might naively implement that template like this:
| | // DO NOT USE! VULNERABLE TO XSS. |
| | export const bundleName = name => `<h2>${name}</h2>`; |
Here, the bundleName takes a name parameter and returns a string including the name surrounded by a pair of <h2> tags. What could go wrong?
It turns out that this kind of templating is trivially exploitable and easy to break accidentally. Consider if the name contains an <img> tag. Your app could be inadvertently showing images where they weren’t expected. Or worse, if the tag has an onload or onerror attribute, it could execute arbitrary JavaScript in the page!
Defending against these types of vulnerabilities is not easy, but fortunately you don’t have to do it yourself. Modern frameworks and templating libraries handle these concerns for you.
For the purposes of this book, we’ll use Handlebars, a minimal and stable templating library.[79] Handlebars can operate both as a client-side runtime library and as a build-time module on the Node.js side of things. We’ll use it as a client-side library because I’ve found that easier to set up, but if you wanted to integrate Handlebars compilation into webpack, there is a handlebars-loader plugin for webpack that can help with this.[80]
To use Handlebars, start by installing it with npm.
| | $ npm install --save-dev --save-exact handlebars@4.0.10 |
Next, open your app/templates.ts file. Instead of exporting static HTML strings, we’ll export compiled Handlebars templates. Update the file’s contents to look like this:
| | import * as Handlebars from '../node_modules/handlebars/dist/handlebars.js'; |
| | |
| | export const main = Handlebars.compile(` |
| | <div class="container"> |
| | <h1>B4 - Book Bundler</h1> |
| | <div class="b4-alerts"></div> |
| | <div class="b4-main"></div> |
| | </div> |
| | `); |
| | |
| | export const welcome = Handlebars.compile(` |
| | <div class="jumbotron"> |
| | <h1>Welcome!</h1> |
| | <p>B4 is an application for creating book bundles.</p> |
| | </div> |
| | `); |
| | |
| | export const alert = Handlebars.compile(` |
| | <div class="alert alert-{{type}} alert-dismissible fade in" role="alert"> |
| | <button class="close" data-dismiss="alert" aria-label="Close"> |
| | <span aria-hidden="true">×</span> |
| | </button> |
| | {{message}} |
| | </div> |
| | `); |
For each of the exported constants, now the HTML string is passed into Handlebars.compile. This produces a function that takes in an object—a map of parameters by name—and returns a string with the appropriate replacements having been made.
The first two templates are exactly the same as before. Both main and welcome take no parameters and simply return a static string. Using Handlebars.compile makes no real difference, but for consistency all of the exported members of templates.ts will be compiled template functions.
The third template, alert, takes an object with two members: a type and a message. The type value is used to complete the alert- CSS class, which sets the color of the alert box. The four choices are success (green), info (blue), warning (yellow), and danger (red). The message value fills in the body of the alert box.
Save this file, then open app/index.ts We need to update the use of the templates members to call methods instead of using the values as strings directly. Edit that file to look like the following:
| | import '../node_modules/bootstrap/dist/css/bootstrap.min.css'; |
| | import 'bootstrap'; |
| | import * as templates from './templates.ts'; |
| | |
| | // Page setup. |
| | document.body.innerHTML = templates.main(); |
| | const mainElement = document.body.querySelector('.b4-main'); |
| | const alertsElement = document.body.querySelector('.b4-alerts'); |
| | |
| | mainElement.innerHTML = templates.welcome(); |
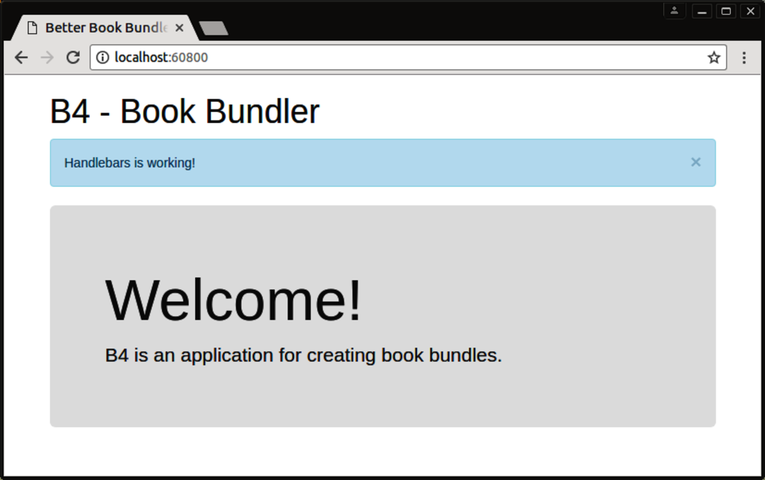
| | alertsElement.innerHTML = templates.alert({ |
| | type: 'info', |
| | message: 'Handlebars is working!', |
| | }); |
The only difference with respect to templates.main and templates.welcome is that now they are called as templates.main and templates.welcome, respectively. Note that the call to templates.alert takes an object with both a type and a message parameter.
Once you save this file, the webpack dev server should pick up the changes and update localhost:60800 for you. It should now look like the following:
I know all of this probably seems like a lot of work to get such a simple page working, but rest assured, it’s setting the groundwork for more involved functionality coming up.
Next we’ll implement a simple URL hash-based routing to navigate through the app.