Table of Contents for
Node.js 8 the Right Way
 Node.js 8 the Right Way
Published by
Pragmatic Bookshelf, 2018
Node.js 8 the Right Way
Published by
Pragmatic Bookshelf, 2018
- Title Page
- Node.js 8 the Right Way
- Node.js 8 the Right Way
- Node.js 8 the Right Way
- Node.js 8 the Right Way
- Acknowledgments
- Preface
- Why Node.js the Right Way?
- What’s in This Book
- What This Book Is Not
- Code Examples and Conventions
- Online Resources
- Part I. Getting Up to Speed on Node.js 8
- 1. Getting Started
- Thinking Beyond the web
- Node.js’s Niche
- How Node.js Applications Work
- Aspects of Node.js Development
- Installing Node.js
- 2. Wrangling the File System
- Programming for the Node.js Event Loop
- Spawning a Child Process
- Capturing Data from an EventEmitter
- Reading and Writing Files Asynchronously
- The Two Phases of a Node.js Program
- Wrapping Up
- 3. Networking with Sockets
- Listening for Socket Connections
- Implementing a Messaging Protocol
- Creating Socket Client Connections
- Testing Network Application Functionality
- Extending Core Classes in Custom Modules
- Developing Unit Tests with Mocha
- Wrapping Up
- 4. Connecting Robust Microservices
- Installing ØMQ
- Publishing and Subscribing to Messages
- Responding to Requests
- Routing and Dealing Messages
- Clustering Node.js Processes
- Pushing and Pulling Messages
- Wrapping Up
- Node.js 8 the Right Way
- Part II. Working with Data
- 5. Transforming Data and Testing Continuously
- Procuring External Data
- Behavior-Driven Development with Mocha and Chai
- Extracting Data from XML with Cheerio
- Processing Data Files Sequentially
- Debugging Tests with Chrome DevTools
- Wrapping Up
- 6. Commanding Databases
- Introducing Elasticsearch
- Creating a Command-Line Program in Node.js with Commander
- Using request to Fetch JSON over HTTP
- Shaping JSON with jq
- Inserting Elasticsearch Documents in Bulk
- Implementing an Elasticsearch Query Command
- Wrapping Up
- Node.js 8 the Right Way
- Part III. Creating an Application from the Ground Up
- 7. Developing RESTful Web Services
- Advantages of Express
- Serving APIs with Express
- Writing Modular Express Services
- Keeping Services Running with nodemon
- Adding Search APIs
- Simplifying Code Flows with Promises
- Manipulating Documents RESTfully
- Emulating Synchronous Style with async and await
- Providing an Async Handler Function to Express
- Wrapping Up
- 8. Creating a Beautiful User Experience
- Getting Started with webpack
- Generating Your First webpack Bundle
- Sprucing Up Your UI with Bootstrap
- Bringing in Bootstrap JavaScript and jQuery
- Transpiling with TypeScript
- Templating HTML with Handlebars
- Implementing hashChange Navigation
- Listing Objects in a View
- Saving Data with a Form
- Wrapping Up
- 9. Fortifying Your Application
- Setting Up the Initial Project
- Managing User Sessions in Express
- Adding Authentication UI Elements
- Setting Up Passport
- Authenticating with Facebook, Twitter, and Google
- Composing an Express Router
- Bringing in the Book Bundle UI
- Serving in Production
- Wrapping Up
- Node.js 8 the Right Way
- 10. BONUS: Developing Flows with Node-RED
- Setting Up Node-RED
- Securing Node-RED
- Developing a Node-RED Flow
- Creating HTTP APIs with Node-RED
- Handling Errors in Node-RED Flows
- Wrapping Up
- A1. Setting Up Angular
- A2. Setting Up React
- Node.js 8 the Right Way
Getting Started with webpack
Recall that the application we’ve been developing is for creating and managing named reading lists called book bundles. The application, Better Book Bundle Builder, abbreviated as B4, consists only of RESTful APIs at this point.
Throughout this chapter, we’ll be configuring a front-end builder tool called webpack. It takes all your front-end code and its dependencies and bundles it all up into a small number of deliverables.
For example, say you have one main JavaScript file, with two libraries that it depends on. Rather than send three individual JavaScript files to the client browser, webpack handles the job of combining these assets into a single JavaScript file. Through a variety of plugins, it can do the same for CSS, images, and other assets.
But the very first step is to create a directory to house the front-end project. Open a terminal, and create a directory called b4-app.
| | $ mkdir b4-app |
| | $ cd b4-app |
Next, let’s make this a Node.js project by calling npm init from inside the project directory. All of the defaults are fine, but you may want to update the license property to meet your own needs.
| | $ npm init -y |
| | Wrote to ./b4-app/package.json: |
| | |
| | { |
| | "name": "b4-app", |
| | "version": "1.0.0", |
| | "description": "", |
| | "main": "index.js", |
| | "scripts": { |
| | "test": "echo \"Error: no test specified\" && exit 1" |
| | }, |
| | "keywords": [], |
| | "author": "", |
| | "license": "ISC" |
| | } |
It is, of course, possible to create a web page or application without bundling your assets. But there’s a host of reasons why bundling has become standard practice. Transpiling down into a common version of JavaScript and reduced latency are just two.
In a production environment, you’d perform all of this bundling activity before deployment. But during development, it’s much more convenient to have the bundling occur on demand.
For this, we’ll use a plugin for webpack called the webpack dev server. Installing and running the webpack dev server, conveniently, also offers an introduction to working with Node.js peer dependencies.
Typically in Node.js, when a module depends on another, it goes into a nested subdirectory deep inside the node_modules directory. Not so with peer dependencies. In Node.js, a peer dependency is a required sibling module. So rather than having the dependency exist in a child directory, it must be at the same level.
With a terminal opened to your b4-app project directory, install the webpack-dev-server module.
| | $ npm install --save-dev --save-exact webpack-dev-server@2.9.1 |
Toward the end of the npm install command’s output, you may notice a couple of warnings about unmet peer dependencies.
| | npm WARN webpack-dev-server@2.9.1 requires a peer of webpack@^2.2.0 but none |
| | was installed. |
| | npm WARN webpack-dev-middleware@1.12.0 requires a peer of webpack@1.0.0 || |
| | ^2.0.0 || ^3.0.0 but none was installed. |
To run the webpack dev server, you’ll need to add a start script to your package.json file. Open that file now, and add the following start script:
| | "scripts": { |
| » | "start": "webpack-dev-server", |
| | "test": "echo \"Error: no test specified\" && exit 1" |
| | }, |
Now try to start the webpack dev server through npm.
| | $ npm start |
| | |
| | > b4-app@1.0.0 start ./b4-app |
| | > webpack-dev-server |
| | |
| | module.js:472 |
| | throw err; |
| | ^ |
| | |
| | Error: Cannot find module 'webpack' |
| | at Function.Module._resolveFilename (module.js:470:15) |
| | at Function.Module._load (module.js:418:25) |
| | at Module.require (module.js:498:17) |
| | at require (internal/module.js:20:19) |
| | at Object.<anonymous> (./b4-app/node_modules/webpack-dev-server/lib/ |
| | Server.js:15:17) |
| | at Module._compile (module.js:571:32) |
| | at Object.Module._extensions..js (module.js:580:10) |
| | at Module.load (module.js:488:32) |
| | at tryModuleLoad (module.js:447:12) |
| | at Function.Module._load (module.js:439:3) |
As you can see, webpack-dev-server’s peer dependency on webpack turns our failure to install it into a runtime error.
The reason for peer dependencies is to support a plugin model. Unlike a regular dependency, where its dependent projects are meant to be smaller units of functionality, a plugin adds functionality into a larger unit or framework.
In a sense, webpack-dev-server is a plugin to the larger webpack project. It wouldn’t be as correct to say that webpack-dev-server depends on webpack as it would be to say that it plugs into webpack.
Without an explicit peer-dependency mechanism in npm, you’d need to either have things like webpack-dev-server depend on the larger framework or invent your own plugin architecture.
Using plugins to augment libraries is a common pattern in front-end UI development, so we’ll be working a lot with peer dependencies in this chapter.
Let’s install the webpack module to resolve the peer dependency.
| | $ npm install --save-dev --save-exact webpack@3.6.0 |
To use webpack, you need to configure it in a file called webpack.config.js. We’ll start with a bare-bones configuration file, then build on it.
Create a file called webpack.config.js in your project root and give it the following content:
| | 'use strict'; |
| | module.exports = { |
| | entry: './entry.js', |
| | }; |
This file exports a minimal configuration object, which only contains an entry property. This property points to the root file from which all other dependencies will be computed. Without an entry-point file, webpack won’t do anything.
Let’s create an empty entry.js now, just to get started. We’ll make a more complete application entry point shortly.
| | $ touch entry.js |
Now let’s try running the dev server again. It should produce output something like the following:
| | $ npm start |
| | |
| | > b4-app@1.0.0 start ./b4-app |
| | > webpack-dev-server |
| | |
| | Project is running at http://localhost:8080/ |
| | webpack output is served from / |
| | Hash: 02f07941014e01e17c1c |
| | Version: webpack 3.6.0 |
| | Time: 695ms |
| | Asset Size Chunks Chunk Names |
| | bundle.js 314 kB 0 [emitted] [big] main |
| | chunk {0} bundle.js (main) 300 kB [entry] [rendered] |
| | [35] ./entry.js 0 bytes {0} [built] |
| | [36] (webpack)-dev-server/client?http://localhost:8080 5.68 kB {0} [built] |
| | [37] ./~/ansi-html/index.js 4.26 kB {0} [built] |
| | [38] ./~/ansi-regex/index.js 135 bytes {0} [built] |
| | [40] ./~/events/events.js 8.33 kB {0} [built] |
| | [41] ./~/html-entities/index.js 231 bytes {0} [built] |
| | [48] ./~/querystring-es3/index.js 127 bytes {0} [built] |
| | [51] ./~/sockjs-client/lib/entry.js 244 bytes {0} [built] |
| | [77] ./~/strip-ansi/index.js 161 bytes {0} [built] |
| | [79] ./~/url/url.js 23.3 kB {0} [built] |
| | [80] ./~/url/util.js 314 bytes {0} [built] |
| | [81] (webpack)-dev-server/client/overlay.js 3.73 kB {0} [built] |
| | [82] (webpack)-dev-server/client/socket.js 897 bytes {0} [built] |
| | [84] (webpack)/hot/emitter.js 77 bytes {0} [built] |
| | [85] multi (webpack)-dev-server/client?http://localhost:8080 ./entry.js |
| | 40 bytes {0} [built] |
| | + 71 hidden modules |
| | webpack: Compiled successfully. |
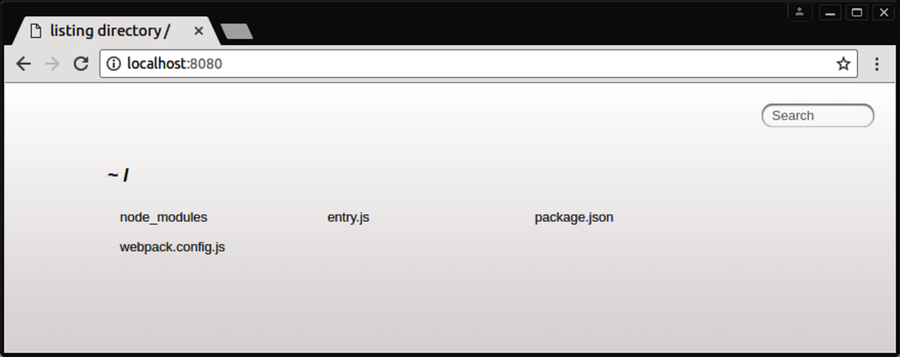
By default, webpack-dev-server listens on TCP port 8080. If you visit localhost:8080 in your browser, you should see a directory listing of your project directory.
Currently, our webpack.config.js contains only an entry point, no outputs. So webpack doesn’t yet pack anything. In the next section we’ll use an HTML-generating plugin to construct a basic Hello World page.