Table of Contents for
Node.js 8 the Right Way
 Node.js 8 the Right Way
Published by
Pragmatic Bookshelf, 2018
Node.js 8 the Right Way
Published by
Pragmatic Bookshelf, 2018
- Title Page
- Node.js 8 the Right Way
- Node.js 8 the Right Way
- Node.js 8 the Right Way
- Node.js 8 the Right Way
- Acknowledgments
- Preface
- Why Node.js the Right Way?
- What’s in This Book
- What This Book Is Not
- Code Examples and Conventions
- Online Resources
- Part I. Getting Up to Speed on Node.js 8
- 1. Getting Started
- Thinking Beyond the web
- Node.js’s Niche
- How Node.js Applications Work
- Aspects of Node.js Development
- Installing Node.js
- 2. Wrangling the File System
- Programming for the Node.js Event Loop
- Spawning a Child Process
- Capturing Data from an EventEmitter
- Reading and Writing Files Asynchronously
- The Two Phases of a Node.js Program
- Wrapping Up
- 3. Networking with Sockets
- Listening for Socket Connections
- Implementing a Messaging Protocol
- Creating Socket Client Connections
- Testing Network Application Functionality
- Extending Core Classes in Custom Modules
- Developing Unit Tests with Mocha
- Wrapping Up
- 4. Connecting Robust Microservices
- Installing ØMQ
- Publishing and Subscribing to Messages
- Responding to Requests
- Routing and Dealing Messages
- Clustering Node.js Processes
- Pushing and Pulling Messages
- Wrapping Up
- Node.js 8 the Right Way
- Part II. Working with Data
- 5. Transforming Data and Testing Continuously
- Procuring External Data
- Behavior-Driven Development with Mocha and Chai
- Extracting Data from XML with Cheerio
- Processing Data Files Sequentially
- Debugging Tests with Chrome DevTools
- Wrapping Up
- 6. Commanding Databases
- Introducing Elasticsearch
- Creating a Command-Line Program in Node.js with Commander
- Using request to Fetch JSON over HTTP
- Shaping JSON with jq
- Inserting Elasticsearch Documents in Bulk
- Implementing an Elasticsearch Query Command
- Wrapping Up
- Node.js 8 the Right Way
- Part III. Creating an Application from the Ground Up
- 7. Developing RESTful Web Services
- Advantages of Express
- Serving APIs with Express
- Writing Modular Express Services
- Keeping Services Running with nodemon
- Adding Search APIs
- Simplifying Code Flows with Promises
- Manipulating Documents RESTfully
- Emulating Synchronous Style with async and await
- Providing an Async Handler Function to Express
- Wrapping Up
- 8. Creating a Beautiful User Experience
- Getting Started with webpack
- Generating Your First webpack Bundle
- Sprucing Up Your UI with Bootstrap
- Bringing in Bootstrap JavaScript and jQuery
- Transpiling with TypeScript
- Templating HTML with Handlebars
- Implementing hashChange Navigation
- Listing Objects in a View
- Saving Data with a Form
- Wrapping Up
- 9. Fortifying Your Application
- Setting Up the Initial Project
- Managing User Sessions in Express
- Adding Authentication UI Elements
- Setting Up Passport
- Authenticating with Facebook, Twitter, and Google
- Composing an Express Router
- Bringing in the Book Bundle UI
- Serving in Production
- Wrapping Up
- Node.js 8 the Right Way
- 10. BONUS: Developing Flows with Node-RED
- Setting Up Node-RED
- Securing Node-RED
- Developing a Node-RED Flow
- Creating HTTP APIs with Node-RED
- Handling Errors in Node-RED Flows
- Wrapping Up
- A1. Setting Up Angular
- A2. Setting Up React
- Node.js 8 the Right Way
Creating HTTP APIs with Node-RED
Now that you have the basics of working with Node-RED down, let’s use Node-RED to create an HTTP service. This showcases the power of Node-RED to facilitate creating server-side APIs visually.
We’ll start simple, with a basic Hello World web service, then upgrade it to query Elasticsearch, much like the Express-based web services you developed in Chapter 7, Developing RESTful Web Services.
Establishing an HTTP Endpoint
To start with, let’s bring up a new flow. In the upper-right corner of the workspace you’ll find a plus (+) button. Click this to create a new tab for your next flow.
In the top-right corner of the screen is a button to open the main menu. Under View, if you check the Show Grid option, Node-RED will draw gridlines on the flow area, making it easier to align nodes.
To begin your HTTP API flow, in the nodes panel to the left, find the HTTP input node under the inputs. Click and drag one onto your workspace.
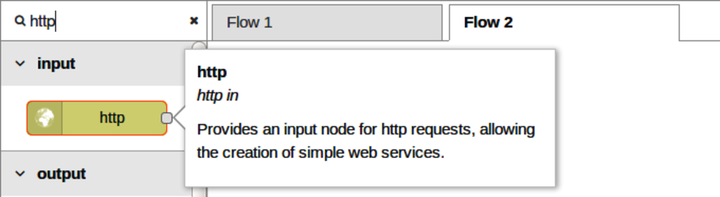
Notice that your HTTP node has the blue circle in the upper-right corner indicating that it hasn’t been deployed, and next to that there’s an orange triangle. The orange triangle signifies that the node needs to be configured.
Double-click it to open the node Edit dialog.
The most important field in the dialog is URL. This is the endpoint that Node-RED will expose to callers of your API. Enter /search for the URL.
For any HTTP API flow to work in Node-RED, you also need an HTTP response node. Grab one now from the nodes panel.
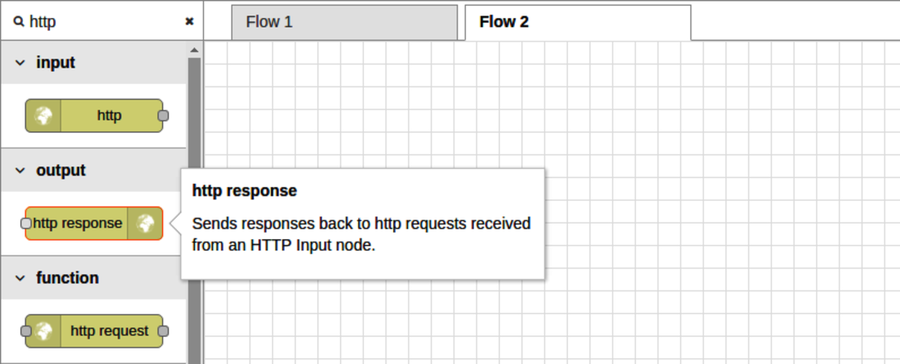
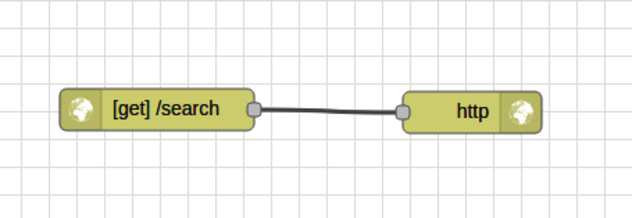
Once both the HTTP input and HTTP response nodes are in your flow, connect the input to the output and deploy.
Let’s give the API a try from the command line using curl. Open a terminal, then run the following:
| | $ curl -i -s localhost:1880/search |
| | HTTP/1.1 200 OK |
| | X-Powered-By: Express |
| | X-Content-Type-Options: nosniff |
| | Content-Type: application/json; charset=utf-8 |
| | Content-Length: 2 |
| | ETag: W/"2-mZFLkyvTelC5g8XnyQrpOw" |
| | Date: Thu, 01 Jun 2017 13:45:30 GMT |
| | Connection: keep-alive |
| | |
| | {} |
By using curl’s -i flag, the output includes the HTTP headers. The 200 OK status at the beginning tells us that we got a positive response. The body of the output is just a pair of curly braces ({}), an empty JSON response, in the last line of the output.
By contrast, try hitting a nonsense URL to see what it produces.
| | $ curl -i -s localhost:1880/nonsense-url |
| | HTTP/1.1 404 Not Found |
| | X-Powered-By: Express |
| | X-Content-Type-Options: nosniff |
| | Content-Type: text/html; charset=utf-8 |
| | Content-Length: 25 |
| | Date: Thu, 01 Jun 2017 13:46:10 GMT |
| | Connection: keep-alive |
| | |
| | Cannot GET /nonsense-url |
As you can see, if the API endpoint isn’t bound, Node-RED will give you a 404 Not Found response.
Setting a Response Body
Now let’s add a response body to the /search API. Back in the Node-RED editor, make some room between the HTTP input and HTTP response nodes by dragging them apart.
Next, grab a change node from the function area of the nodes panel at left. When you drag this over the connection between the HTTP input and HTTP response nodes, the line will become dashed. This means Node-RED is preparing to insert this node into the flow between the connected nodes.
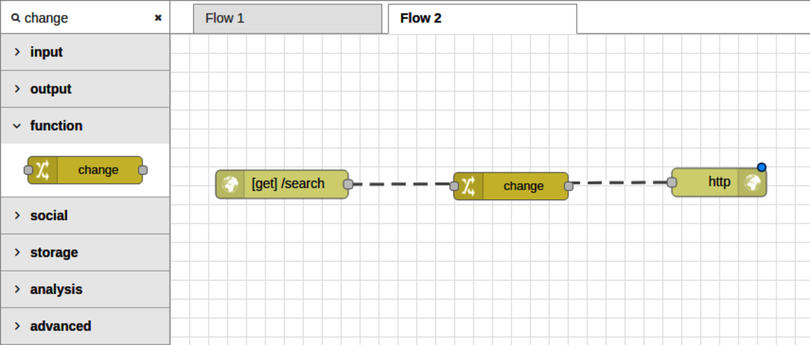
When you drop the node, the dashed lines become solid again, and the change node is ready to be configured.
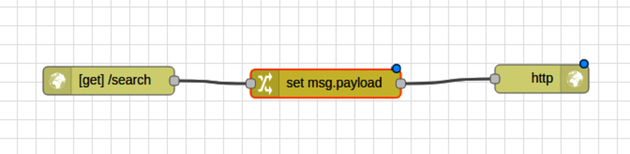
The change node allows you to modify properties of the message object (msg) as it passes through the flow. In particular, we want to set the payload property so that this value is returned to the caller in the HTTP response node.
Double-click the change node to open the Edit dialog. In the Rules section, you can add any number of modifications. For now, we only need one. In the Set rule, choose JSON from the To drop-down, then enter ["The Art of War"] in the adjacent input box. This is a placeholder value that will match our expected results once we hook the API up to Elasticsearch (as shown in the figure). Close the dialog when you’re done, then deploy the flow. Now hop back over to your terminal, and let’s try out the API again.

| | $ curl -i -s localhost:1880/search |
| | HTTP/1.1 200 OK |
| | X-Powered-By: Express |
| | X-Content-Type-Options: nosniff |
| | Content-Type: application/json; charset=utf-8 |
| | Content-Length: 18 |
| | ETag: W/"12-LP05bVd5cQX35db6gakpCA" |
| | Date: Thu, 01 Jun 2017 14:16:00 GMT |
| | Connection: keep-alive |
| | |
| | ["The Art of War"] |
If you see this, great! Now all we have to do is make the flow reach out to Elasticsearch and perform an actual query.
Calling Out to Elasticsearch
Extending our HTTP flow to retrieve content from Elasticsearch will involve a couple of steps. First we need to craft an Elasticsearch request body using a query parameter provided by the API caller. Then we’ll fire off the Elasticsearch request and format the response payload by extracting just the titles of the matching documents.
To make space, arrange the HTTP input node, change node, and HTTP response node vertically.
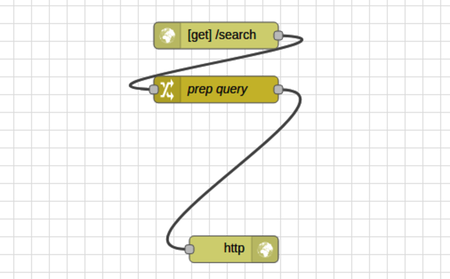
This is not strictly required, of course. Node-RED will execute the flow regardless of how the nodes are positioned graphically as long as all of the connections are in place. But this arrangement makes it easier to see what’s going on and to add more nodes, as you will do shortly.
Next, double-click the change node to open the Edit dialog. The goal here is to prepare msg.payload to contain an Elasticsearch request body much like you did back in Using Request with Express, when we were building out web services with Express.
Here’s an example JSON request body that Elasticsearch would honor when you hit the /_search endpoint for an index:
| | { |
| | "query": { |
| | "match_phrase": { |
| | "title": "example string" |
| | } |
| | } |
| | } |
For this example, Elasticsearch would query the index for documents whose title field matches the phrase example string. You can read more about Elasticsearch’s match_phrase feature on the Match Phrase Query documentation page.[111]
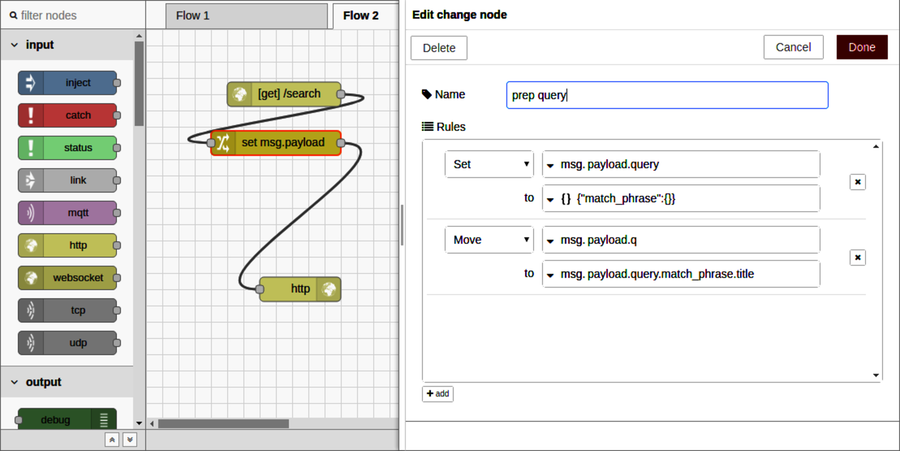
To make the change node work, we’ll need to construct a payload like this, but with the user’s query instead of example string. The change node is quite flexible, allowing you to add any number of rules to execute in sequence. There are many different ways to get this done, but here’s one way:
First, set the Name property to prep query. This name will show for the node in the flow editor, making it easy to identify later.
Next, in the Rules section, update the Set rule’s msg field from payload to payload.query. Below that, for the to field, select JSON from the drop-down and then enter {"match_phrase":{}}. Now all we need to do is set the title field.
Click the +add button at the bottom of the Edit dialog. This will add a new rule to the Rules section. In the first drop-down, change it from Set to Move—this is for relocating a property. Then set the first input to msg.payload.q and the second one to msg.payload.query.match_phrase.title. You’ll have to select msg from the to drop-down to make this happen.
When you’re done, the Edit dialog should look like the figure.
To finalize the configuration, click Done to close the dialog, and then deploy the flow. To test it, return to your terminal and use curl with jq like so:
| | $ curl -s localhost:1880/search?q=example | jq '.' |
| | { |
| | "query": { |
| | "match_phrase": { |
| | "title": "example" |
| | } |
| | } |
| | } |

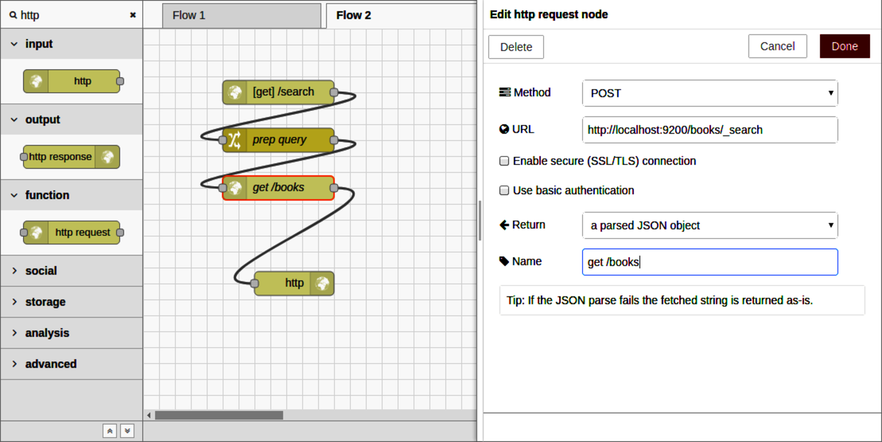
So far so good! Now to feed this to Elasticsearch. In the nodes panel, find the HTTP request node under the function nodes section. Grab one, then drag and drop it onto your flow in between the prep query node and the HTTP response node.
After you drop it in place, double-click it to open the Edit dialog. Change the settings in the dialog as follows:
- Method—Set to POST.
- URL—Set to http://localhost:9200/books/_search.
- Return—Set to a parsed JSON object.
- Name—Set to get /books.
This will configure the node to POST the msg.payload to Elasticsearch and treat the response as JSON (as shown in the figure).
Once you click Done to save the changes and deploy the flow, it’s time to try it out in the terminal. If you see something like the following, you’re on track.
| | $ curl -s localhost:1880/search?q=example | jq '.' | head -n 30 |
| | { |
| | "took": 7, |
| | "timed_out": false, |
| | "_shards": { |
| | "total": 5, |
| | "successful": 5, |
| | "failed": 0 |
| | }, |
| | "hits": { |
| | "total": 8, |
| | "max_score": 9.897307, |
| | "hits": [ |
| | { |
| | "_index": "books", |
| | "_type": "book", |
| | "_id": "pg22415", |
| | "_score": 9.897307, |
| | "_source": { |
| | "id": 22415, |
| | "title": "The Example of Vertu\nThe Example of Virtue", |
| | "authors": [ |
| | "Hawes, Stephen" |
| | ], |
| | "subjects": [ |
| | "Poetry" |
| | ] |
| | } |
| | }, |
| | { |
| | "_index": "books", |
Here the query for the string example found eight documents. We can pull out just the titles of the matching documents using jq with the filter expression .hits.hits[]._source.title like so:
| | $ curl -s localhost:1880/search?q=example | jq '.hits.hits[]._source.title' |
| | "The Example of Vertu\nThe Example of Virtue" |
| | "Rembrandt's Etching Technique: An Example" |
| | "An Example of Communal Currency: The facts about the Guernsey Market House" |
| | "The Printer Boy.\nOr How Benjamin Franklin Made His Mark. An Example for Yo... |
| | "Strive and Thrive; or, Stories for the Example and Encouragement of the You... |
| | "The Goop Directory of Juvenile Offenders Famous for their Misdeeds and Serv... |
| | "The Goop Directory of Juvenile Offenders Famous for their Misdeeds and Serv... |
| | "Discourses on a Sober and Temperate Life\r\nWherein is demonstrated, by his... |
The last step for our Node-RED HTTP API flow is to extract an array of titles like this as part of the flow.
Manipulating a Message with a Function Node
At this point, your Node-RED flow should be able to receive an incoming request, reach out to Elasticsearch, and then forward its response to the original caller. The last step is to trim down the Elasticsearch response to just the content that we want to return to the caller. For this, we’ll use a function node.
Grab a function node from the nodes panel and drag and drop it onto the flow before the HTTP response node.
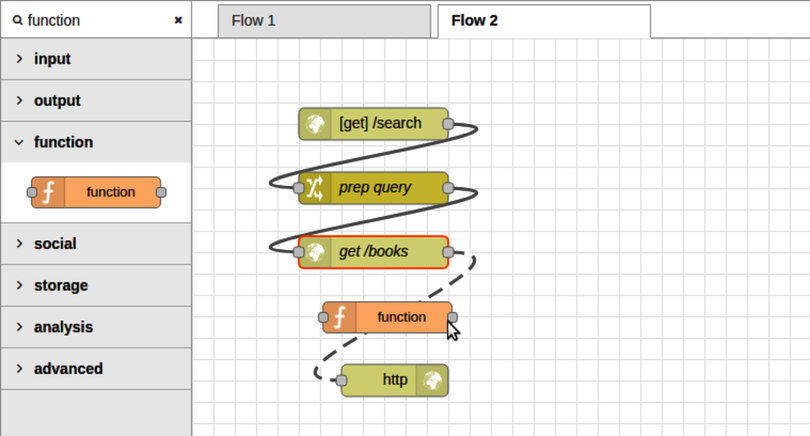
A function node gives you maximum flexibility in crafting a node’s behavior because it allows you to write arbitrary JavaScript to execute. This takes us further away from the spirit of Node-RED’s drag-and-drop philosophy, but it’s good to know that you can drill down to this level if you need to.
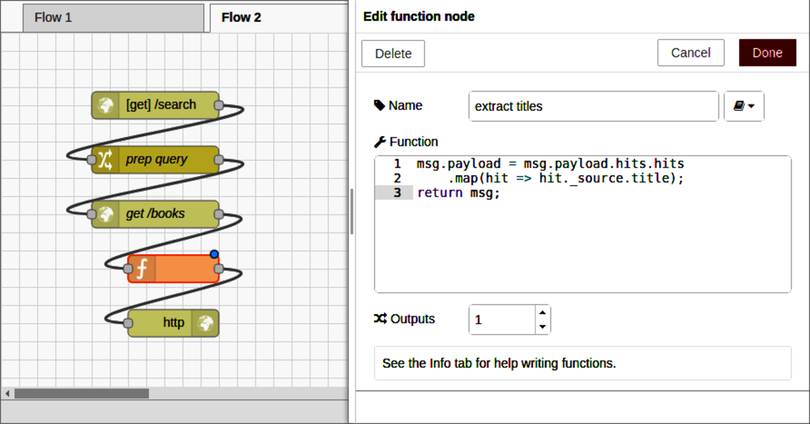
Double-click the function node to open the Edit dialog. Set the name to extract titles to describe the behavior of this node. Then, in the Function text area, enter the following:
| | msg.payload = msg.payload.hits.hits |
| | .map(hit => hit._source.title); |
| | return msg; |
This function body iterates over the matching documents returned by Elasticsearch and, for each one, extracts the title attribute.
After you click Done to save changes and deploy the flow, you can test it out with curl.
| | $ curl -s localhost:1880/search?q=example | jq '.' |
| | [ |
| | "The Example of Vertu\nThe Example of Virtue", |
| | "Rembrandt's Etching Technique: An Example", |
| | "An Example of Communal Currency: The facts about the Guernsey Market Hous... |
| | "The Printer Boy.\nOr How Benjamin Franklin Made His Mark. An Example for ... |
| | "Strive and Thrive; or, Stories for the Example and Encouragement of the Y... |
| | "The Goop Directory of Juvenile Offenders Famous for their Misdeeds and Se... |
| | "The Goop Directory of Juvenile Offenders Famous for their Misdeeds and Se... |
| | "Discourses on a Sober and Temperate Life\r\nWherein is demonstrated, by h... |
| | ] |
If you’re seeing something like this, great! It means that the happy path is working as expected.
But what if the API user doesn’t provide a query parameter? Or what if Elasticsearch doesn’t return any results?
We’ll deal with these kinds of edge cases next.