Table of Contents for
Packet Tracer Network Simulator
 Packet Tracer Network Simulator
Published by
Packt Publishing, 2014
Packet Tracer Network Simulator
Published by
Packt Publishing, 2014
- Cover
- Table of Contents
- Packet Tracer Network Simulator
- Packet Tracer Network Simulator
- Credits
- About the Author
- About the Reviewers
- www.PacktPub.com
- Preface
- Who this book is for
- Conventions
- Reader feedback
- Customer support
- 1. Getting Started with Packet Tracer
- Installing Packet Tracer
- Interface overview
- Creating a simple topology
- Summary
- 2. Network Devices
- Customizing devices with modules
- Emulating WAN
- Accessing the CLI
- Summary
- 3. Generic IP End Devices
- Servers
- Other end devices
- Configuring end devices
- Summary
- 4. Creating a Network Topology
- Testing connectivity with PDUs
- Using the simulation mode
- Clustering a topology
- Summary
- 5. Navigating and Modifying the Physical Workspace
- Moving devices physically
- Managing cables and distances
- Customizing icons and backgrounds
- Summary
- 6. Configuring Routing with the CLI
- Dynamic routing protocols
- The Routing table
- Load sharing
- Summary
- 7. Border Gateway Protocol (BGP)
- BGP versus dynamic routing protocols
- Configuring BGP in Packet Tracer
- Summary
- 8. IPv6 on Packet Tracer
- IPv6 static and dynamic routing
- Using both IPv4 and IPv6
- Summary
- 9. Setting Up a Wireless Network
- Wireless networks and physical workspaces
- Summary
- 10. Configuring VLANs and Trunks
- InterVLAN routing with routers and layer 3 switches
- Switch-to-switch trunk links
- Analyzing broadcasts in the simulation mode
- Summary
- 11. Creating Packet Tracer Assessments
- The initial network
- The answer network
- Testing the activity
- Summary
- Index
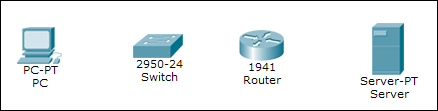
The following figure is what the examinee will see when the assessment file is opened. Clicking on the Show Initial Network option will take you to the logical workspace, from where you'll have to add devices. We will only add the devices shown here, and not connect them or assign IP addresses to them.
We'll open the CLI tab of the router, change the hostname, and set an enabled password by entering the following commands:
Router>en
Router#conf t
Router(config)#hostname R1
R1(config)#enable secret cisco
We'll stop the creation of the initial network here. Click on the wizard hat and wand icon on the bottom-left corner to return to the wizard. Save this topology by clicking on Export Initial Network to File; we'll be using this file on the answer network.
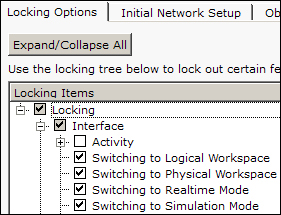
Now, we will choose features that will be locked in the main interface, so that users do not take help from the several tools of Packet Tracer. There are a lot of items to be checked under the Locking Options tab. The following screenshot shows the items to be checked under the Interface option:
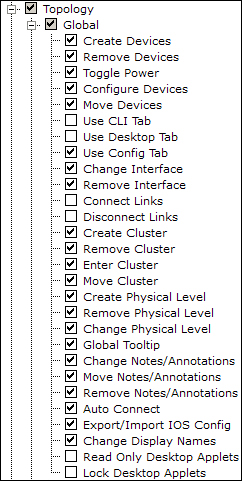
Next, we'll see the items to be selected under the Topology option.
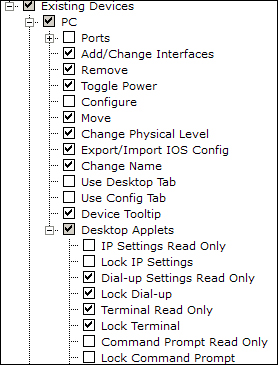
Now, for the Existing Devices option, check for the items that need to be selected according to the following screenshot. We'll first see the PC checklist:
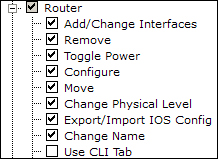
The Router option within End Devices has the following items checked:
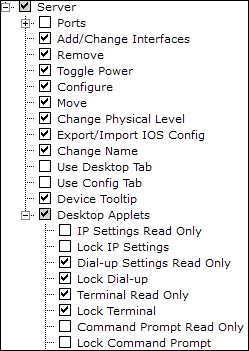
The Server option within End Devices has the following items selected: