Table of Contents for
Packet Tracer Network Simulator
 Packet Tracer Network Simulator
Published by
Packt Publishing, 2014
Packet Tracer Network Simulator
Published by
Packt Publishing, 2014
- Cover
- Table of Contents
- Packet Tracer Network Simulator
- Packet Tracer Network Simulator
- Credits
- About the Author
- About the Reviewers
- www.PacktPub.com
- Preface
- Who this book is for
- Conventions
- Reader feedback
- Customer support
- 1. Getting Started with Packet Tracer
- Installing Packet Tracer
- Interface overview
- Creating a simple topology
- Summary
- 2. Network Devices
- Customizing devices with modules
- Emulating WAN
- Accessing the CLI
- Summary
- 3. Generic IP End Devices
- Servers
- Other end devices
- Configuring end devices
- Summary
- 4. Creating a Network Topology
- Testing connectivity with PDUs
- Using the simulation mode
- Clustering a topology
- Summary
- 5. Navigating and Modifying the Physical Workspace
- Moving devices physically
- Managing cables and distances
- Customizing icons and backgrounds
- Summary
- 6. Configuring Routing with the CLI
- Dynamic routing protocols
- The Routing table
- Load sharing
- Summary
- 7. Border Gateway Protocol (BGP)
- BGP versus dynamic routing protocols
- Configuring BGP in Packet Tracer
- Summary
- 8. IPv6 on Packet Tracer
- IPv6 static and dynamic routing
- Using both IPv4 and IPv6
- Summary
- 9. Setting Up a Wireless Network
- Wireless networks and physical workspaces
- Summary
- 10. Configuring VLANs and Trunks
- InterVLAN routing with routers and layer 3 switches
- Switch-to-switch trunk links
- Analyzing broadcasts in the simulation mode
- Summary
- 11. Creating Packet Tracer Assessments
- The initial network
- The answer network
- Testing the activity
- Summary
- Index
Similar to IPv4, IPv6 too supports both static and dynamic routing. Configuration commands for its static routing are similar to IPv4.
Modifying the same topology that we used previously, let's add a router, switch, and two PCs to create a separate network, as shown in the following screenshot:
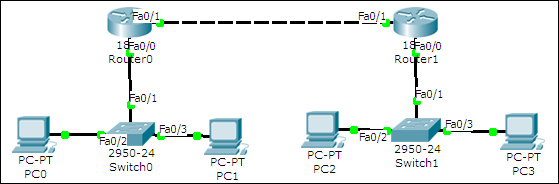
The first network will use addresses starting from 2000:1::/64 and the second network will use addresses starting from 2000:2::/64. The link between both the routers will have IP addresses 2001::10/64 and 2001::20/64.
Here is a table describing the topology:
|
Device |
Interface |
IP address |
|---|---|---|
|
R1 |
FastEthernet0/0 |
|
|
FastEthernet0/1 |
| |
|
PC0 |
FastEthernet |
|
|
PC1 |
FastEthernet |
|
|
R2 |
FastEthernet0/0 |
|
|
FastEthernet0/1 |
| |
|
PC2 |
FastEthernet |
|
|
PC3 |
FastEthernet |
|
After the necessary IP addresses and gateways have been assigned, open the CLI tab for the R1 router, and start configuring routing by following the given commands:
R1(config)#ipv6 unicast-routing
R1(config)#ipv6 route 2000:2::/64 2001::20
Next, open the CLI tab for R2 and configure routing on it.
R2(config)#ipv6 unicast-routing
R2(config)#ipv6 route 2000:1::/64 2001::10
Now use the simple PDU tool to test the connectivity. You may also use the tracert command on a PC to see the path a packet takes.
PC>tracert 2000:2::3
Tracing route to 2000:2::3 over a maximum of 30 hops:

  1   63 ms     63 ms     47 ms     2000:1::1
  2   94 ms     78 ms     94 ms     2001::20
  3   156 ms    109 ms    129 ms    2000:2::3

Trace complete.
Packet Tracer offers the same dynamic routing protocols for IPv6: RIPv6, EIGRP, and OSPF. We'll be configuring RIPv6 in this section. Note that RIPv6 does not represent RIP Version 6; it is RIP for IPv6 addresses.
For this exercise, we'll use the topology shown in the following screenshot:
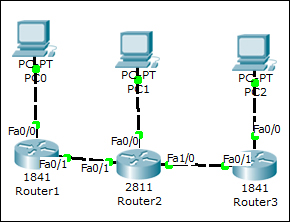
The additional IP assignment details alone are shown in the following table:
|
Device |
Interface |
IPv6 Address |
|---|---|---|
|
R2 |
FastEthernet1/0 |
|
|
R3 |
FastEthernet0/0 |
|
|
FastEthernet0/1 |
| |
|
PC2 |
FastEthernet |
|
We'll see how to configure RIP on one router and you can do the same on the others.
R1(config)#interface FastEthernet0/0
R1(config-if)#ipv6 address 2000:1::1/64
R1(config-if)#ipv6 rip Net1 enable
R1(config-if)#ipv6 enable
R1(config-if)#interface FastEthernet0/1
R1(config-if)#ipv6 address 2001::10/64
R1(config-if)#ipv6 rip Net1 enable
R1(config-if)#ipv6 enable
Note that the ipv6 rip command is used to enable RIP on a particular interface. Entering ipv6 rip Net1 enable on the first interface begins the RIPv6 process. The Net1 string can be any name that can be used to name the RIP process. Once configured, use the usual diagnostic tools (ping to simple PDU) to check the connectivity. To view the RIP database, use the following command:
R1#sh ipv6 rip database
RIP process "Net1" local RIB
 2000:2::/64, metric 2, installed
    FastEthernet0/1/FE80::201:97FF:FE87:E5A9, expires in 173 sec
 2000:3::/64, metric 3, installed
    FastEthernet0/1/FE80::201:97FF:FE87:E5A9, expires in 173 sec
 2001::/64, metric 2
    FastEthernet0/1/FE80::201:97FF:FE87:E5A9, expires in 173 sec
 2001:1::/64, metric 2, installed
    FastEthernet0/1/FE80::201:97FF:FE87:E5A9, expires in 173 sec
RIP process "LINK" local RIB
Trace the route of the packet to see the path it takes.
PC>tracert 2000:3::2
Tracing route to 2000:3::2 over a maximum of 30 hops:

  1   31 ms     32 ms     31 ms     2000:1::1
  2   50 ms     50 ms     63 ms     2001::20
  3   94 ms     94 ms     94 ms     2001:1::20
  4   125 ms    109 ms    125 ms    2000:3::2

Trace complete.