Table of Contents for
Packet Tracer Network Simulator
 Packet Tracer Network Simulator
Published by
Packt Publishing, 2014
Packet Tracer Network Simulator
Published by
Packt Publishing, 2014
- Cover
- Table of Contents
- Packet Tracer Network Simulator
- Packet Tracer Network Simulator
- Credits
- About the Author
- About the Reviewers
- www.PacktPub.com
- Preface
- Who this book is for
- Conventions
- Reader feedback
- Customer support
- 1. Getting Started with Packet Tracer
- Installing Packet Tracer
- Interface overview
- Creating a simple topology
- Summary
- 2. Network Devices
- Customizing devices with modules
- Emulating WAN
- Accessing the CLI
- Summary
- 3. Generic IP End Devices
- Servers
- Other end devices
- Configuring end devices
- Summary
- 4. Creating a Network Topology
- Testing connectivity with PDUs
- Using the simulation mode
- Clustering a topology
- Summary
- 5. Navigating and Modifying the Physical Workspace
- Moving devices physically
- Managing cables and distances
- Customizing icons and backgrounds
- Summary
- 6. Configuring Routing with the CLI
- Dynamic routing protocols
- The Routing table
- Load sharing
- Summary
- 7. Border Gateway Protocol (BGP)
- BGP versus dynamic routing protocols
- Configuring BGP in Packet Tracer
- Summary
- 8. IPv6 on Packet Tracer
- IPv6 static and dynamic routing
- Using both IPv4 and IPv6
- Summary
- 9. Setting Up a Wireless Network
- Wireless networks and physical workspaces
- Summary
- 10. Configuring VLANs and Trunks
- InterVLAN routing with routers and layer 3 switches
- Switch-to-switch trunk links
- Analyzing broadcasts in the simulation mode
- Summary
- 11. Creating Packet Tracer Assessments
- The initial network
- The answer network
- Testing the activity
- Summary
- Index
In the topology we have being configuring throughout this chapter, we can find that each router has two paths to reach each destination. So how about seeing how routers use these multiple paths together and load balancing the traffic across them.
We take RIP first because we do not have to do anything specific for load balancing. If there are multiple paths to reach a network destination with the same metric, RIP automatically load balances them. We will be using an interface type known as loopback to achieve this. A loopback is a virtual interface that behaves like a real interface and takes IP addresses.
We'll use the same topology we've been using throughout this chapter, and just add an extra interface. On router R4, we will add a loopback interface by using the following steps:
- Unfortunately, it isn't possible to do this with the GUI, so go to the CLI tab of R4 and enter the following commands:
R4(config)#interface loopback 0
R4(config-if)#ip address 192.168.100.0 255.255.255.0
- Now on the same router, let's enable this interface for RIP. Go to the RIP config mode and enter the network IP of this interface.
R4(config)#router rip
R4(router-if)#network 192.168.100.0
- That's it, create a complex PDU that is sent every two seconds.
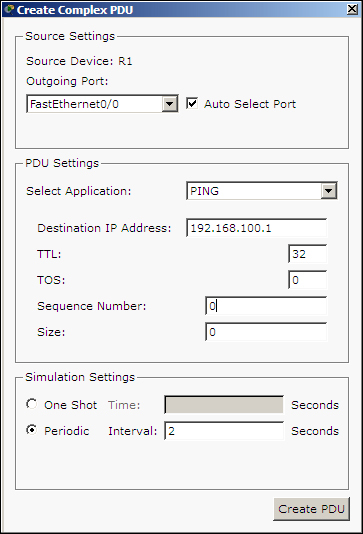
- Switch over to the simulation mode and you'll find that the first packet takes the R1-R2-R4 route while the second takes the R1-R3-R4 route.
You can also see which routes are load balanced by looking into the following routing table:
Router>show ip route
R    192.168.30.0/24 [120/1] via 192.168.10.2, 00:00:12, FastEthernet0/0
R    192.168.40.0/24 [120/1] via 192.168.20.2, 00:00:14, FastEthernet0/1
R    192.168.100.0/24 [120/2] via 192.168.20.2, 00:00:08, FastEthernet0/1
                      [120/2] via 192.168.10.2, 00:00:08, FastEthernet0/0
Only the RIP routes are shown here. Note that the route 192.168.100.0/24 has two gateways; this indicates that traffic to this network is load balanced.
Static routing requires additional configuration for a route to be load balanced. Assign IP addresses to all physical interfaces and also configure loopback interfaces as explained in the RIP section. To configure a load balanced route with static routing, perform the following steps:
- Go to router R2 and R3 and configure a route to the R4 router's loopback interface by using the following commands:
R2(config)#ip route 192.168.100.0 255.255.255.0 192.168.30.2
R3(config)#ip route 192.168.100.0 255.255.255.0 192.168.40.2
- Now for R1, we have to configure two routes to reach
192.168.100.0/24.We need to tell the router that there are two ways to get to the R4 router's loopback. We do this by using the following commands:R1(config)#ip route 192.168.100.0 255.255.255.0 192.168.10.2 R1(config)#ip route 192.168.100.0 255.255.255.0 192.168.20.2
- Use the same complex PDU to see how traffic is load balanced.
After this configuration, if you look at the routing table, you'll find the network 192.168.100.0/24 has two routes, similar to RIP.