Table of Contents for
Packet Tracer Network Simulator
 Packet Tracer Network Simulator
Published by
Packt Publishing, 2014
Packet Tracer Network Simulator
Published by
Packt Publishing, 2014
- Cover
- Table of Contents
- Packet Tracer Network Simulator
- Packet Tracer Network Simulator
- Credits
- About the Author
- About the Reviewers
- www.PacktPub.com
- Preface
- Who this book is for
- Conventions
- Reader feedback
- Customer support
- 1. Getting Started with Packet Tracer
- Installing Packet Tracer
- Interface overview
- Creating a simple topology
- Summary
- 2. Network Devices
- Customizing devices with modules
- Emulating WAN
- Accessing the CLI
- Summary
- 3. Generic IP End Devices
- Servers
- Other end devices
- Configuring end devices
- Summary
- 4. Creating a Network Topology
- Testing connectivity with PDUs
- Using the simulation mode
- Clustering a topology
- Summary
- 5. Navigating and Modifying the Physical Workspace
- Moving devices physically
- Managing cables and distances
- Customizing icons and backgrounds
- Summary
- 6. Configuring Routing with the CLI
- Dynamic routing protocols
- The Routing table
- Load sharing
- Summary
- 7. Border Gateway Protocol (BGP)
- BGP versus dynamic routing protocols
- Configuring BGP in Packet Tracer
- Summary
- 8. IPv6 on Packet Tracer
- IPv6 static and dynamic routing
- Using both IPv4 and IPv6
- Summary
- 9. Setting Up a Wireless Network
- Wireless networks and physical workspaces
- Summary
- 10. Configuring VLANs and Trunks
- InterVLAN routing with routers and layer 3 switches
- Switch-to-switch trunk links
- Analyzing broadcasts in the simulation mode
- Summary
- 11. Creating Packet Tracer Assessments
- The initial network
- The answer network
- Testing the activity
- Summary
- Index
When we learned about static routing we found that a lot of manual configuration was involved and a change to the topology also required manual configuration changes. Dynamic protocols work by advertising routes to each other.
The configuration is the opposite of static routing; here, we enable dynamic routing on the required interfaces. The routing protocol then forms "neighborship" with other routers and sends them the directly-connected routes and other received routes. In this way, all routers exchange updates with one another. When a topology change occurs, those updates are also sent out by routers that learn about this loss of connectivity.
Packet Tracer offers a GUI to configure a dynamic routing protocol called RIP (Routing Information Protocol). This GUI section is similar to the static routing section. It has only one textbox for entering the network address of the directly connected network.
You may think that the rest of the configuration is similar to the Static configuration, but it isn't. Whereas in the static configuration we entered routes of other routers, in RIP, we enter the network IP addresses of the router's interfaces. By doing this, you are enabling that routing protocol on a particular interface. To configure dynamic routing with the GUI, perform the following steps:
- Create the same four-router topology we used previously and assign the same IP addresses through the Config tab.
- Click on RIP—now, configuring this is very easy, with each router requiring only the Network IP of its own interfaces, as shown in the following screenshot:
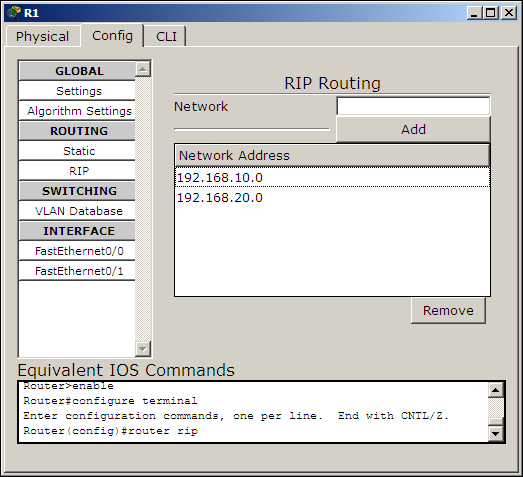
- Enter the following network IP addresses:
Device
RIP Network
R1
192.168.10.0192.168.20.0R2
192.168.10.0192.168.30.0R3
192.168.20.0192.168.40.0R4
192.168.30.0192.168.40.0 - Once the topology is configured, use the simple PDU to check for connectivity. Let's check for two indirectly connected routers (R1 and R4 or R2 and R3). Once the connection is successful, let's see how dynamic routing works on topology changes.
- Use the delete tool and remove either the link between R1 and R2 or the link between R1 and R3. Use the simulation mode and test connectivity with the simple PDU. You'll find that the packet takes the alternate, longer route and succeeds in reaching the destination.
If you have tried step 5 of the static routing topology, the packet would've failed as we did not enter any alternate gateway to each destination network. This is the biggest advantage of using a dynamic routing protocol.
Let's do the same thing using the CLI tab. The commands are very simple and if you have noticed the Equivalent IOS Commands section under the Config tab, you'll know them already. To configure dynamic routing by using the CLI tab, perform the following steps:
- Use the same commands used in the Static section to assign IP addresses to the interfaces.
- Then, from the global configuration mode, enter into the config mode of RIP by issuing the following command:
R1(config)#router rip - Use the
networkcommand, followed by the network IP address. For the device R1, use the following commands:R1(config-router)#network 192.168.10.0 R1(config-router)#network 192.168.20.0
- Configure all the other routers in the same way. Use the simple PDU to test the connectivity.
Now that you know how to configure basic static and dynamic routing, let's move to the routing table.