Table of Contents for
Packet Tracer Network Simulator
 Packet Tracer Network Simulator
Published by
Packt Publishing, 2014
Packet Tracer Network Simulator
Published by
Packt Publishing, 2014
- Cover
- Table of Contents
- Packet Tracer Network Simulator
- Packet Tracer Network Simulator
- Credits
- About the Author
- About the Reviewers
- www.PacktPub.com
- Preface
- Who this book is for
- Conventions
- Reader feedback
- Customer support
- 1. Getting Started with Packet Tracer
- Installing Packet Tracer
- Interface overview
- Creating a simple topology
- Summary
- 2. Network Devices
- Customizing devices with modules
- Emulating WAN
- Accessing the CLI
- Summary
- 3. Generic IP End Devices
- Servers
- Other end devices
- Configuring end devices
- Summary
- 4. Creating a Network Topology
- Testing connectivity with PDUs
- Using the simulation mode
- Clustering a topology
- Summary
- 5. Navigating and Modifying the Physical Workspace
- Moving devices physically
- Managing cables and distances
- Customizing icons and backgrounds
- Summary
- 6. Configuring Routing with the CLI
- Dynamic routing protocols
- The Routing table
- Load sharing
- Summary
- 7. Border Gateway Protocol (BGP)
- BGP versus dynamic routing protocols
- Configuring BGP in Packet Tracer
- Summary
- 8. IPv6 on Packet Tracer
- IPv6 static and dynamic routing
- Using both IPv4 and IPv6
- Summary
- 9. Setting Up a Wireless Network
- Wireless networks and physical workspaces
- Summary
- 10. Configuring VLANs and Trunks
- InterVLAN routing with routers and layer 3 switches
- Switch-to-switch trunk links
- Analyzing broadcasts in the simulation mode
- Summary
- 11. Creating Packet Tracer Assessments
- The initial network
- The answer network
- Testing the activity
- Summary
- Index
Wireless networks are growing everywhere; one can find Wi-Fi hotspots at most public places. Packet Tracer has a limited number of wireless devices but provides an unlimited number of possibilities. When configuring a wireless network, one has to consider the physical range of connectivity. Even though it is only a simulator, the physical workspace of Packet Tracer will enable us to test the wireless range of our network using its capability of moving around devices. Towards the end of this chapter, we'll also configure a RADIUS server to provide authentication for our wireless network.
Packet Tracer provides wireless modules for PCs/laptops and for routers to enable wireless connectivity. Following are the wireless modules:
- Linksys-WMP300N: This is available for servers, PCs, and laptops. It provides one 2.4 GHz wireless interface with protocols supporting Ethernet. Once plugged in, this module is configurable through the PC Wireless utility available in the Desktop tab.
- PC-HOST-NM-1W: This is a basic wireless interface that provides one 2.4 GHz wireless interface with support for Ethernet. This module isn't configurable.
- PC-HOST-NM-1W-A: This is similar in features to the preceding module, except that it provides a 5 GHz wireless interface.
- HWIC-AP-AG-B: This is a router module that works with 1841 and 2811 routers. It functions as an integrated access point and supports single band 802.11b/g or dual band 802.11a/b/g radios.
Now, we will look into the devices; Packet Tracer has wireless end devices as well as access points.
- TabletPC-PT / PDA-PT / WirelessEndDevice-PT: These three devices provide the same functionality, they only represent different things. These devices come with a built-in wireless interface.
- AccessPoint-PT / AccessPoint-PT-A / AccessPoint-PT-N: These are generic wireless access points with minimal configuration options. All of them have an antenna and a port to connect to a device, such as a router or DHCP server.
- Linksys-WRT300N: This wireless device provides a web interface similar to the one provided by a real Linksys model for configuring a SSID (Service Set Identifier), wireless authentication, WAN port, and much more. This device has 4 Ethernet LAN ports and 1 Ethernet WAN port which can be connected to a router or model that provides internet.
Now that we know the network devices available in Packet Tracer, let's start configuring a wireless network. We will use two access points with two different SSIDs, as shown in the following figure:
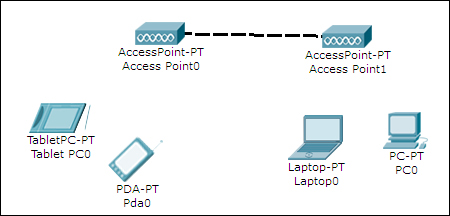
For a change, we will use TabletPC-PT and PDA-PT as wireless end devices. Once this topology is created, you'll find that these devices pair haphazardly with different access points. So, we will set the SSID field of Access Point0 to Office and that of Access Point1 to Guest.
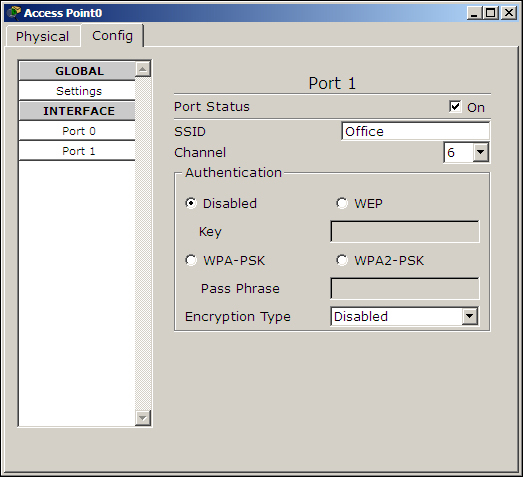
Open each access point, go to the Config tab, select Port 1, and change the SSID field, as shown in the following screenshot:
Now open each wireless end device, go to its Config tab, choose the Wireless option under INTERFACE, and change its SSID, as shown in the following screenshot:

You'll now see wireless lines from each end device connecting to their respective access points. Assign IP addresses to all of them from the same subnet space and use the simple PDU tool to check connectivity.