Table of Contents for
Packet Tracer Network Simulator
 Packet Tracer Network Simulator
Published by
Packt Publishing, 2014
Packet Tracer Network Simulator
Published by
Packt Publishing, 2014
- Cover
- Table of Contents
- Packet Tracer Network Simulator
- Packet Tracer Network Simulator
- Credits
- About the Author
- About the Reviewers
- www.PacktPub.com
- Preface
- Who this book is for
- Conventions
- Reader feedback
- Customer support
- 1. Getting Started with Packet Tracer
- Installing Packet Tracer
- Interface overview
- Creating a simple topology
- Summary
- 2. Network Devices
- Customizing devices with modules
- Emulating WAN
- Accessing the CLI
- Summary
- 3. Generic IP End Devices
- Servers
- Other end devices
- Configuring end devices
- Summary
- 4. Creating a Network Topology
- Testing connectivity with PDUs
- Using the simulation mode
- Clustering a topology
- Summary
- 5. Navigating and Modifying the Physical Workspace
- Moving devices physically
- Managing cables and distances
- Customizing icons and backgrounds
- Summary
- 6. Configuring Routing with the CLI
- Dynamic routing protocols
- The Routing table
- Load sharing
- Summary
- 7. Border Gateway Protocol (BGP)
- BGP versus dynamic routing protocols
- Configuring BGP in Packet Tracer
- Summary
- 8. IPv6 on Packet Tracer
- IPv6 static and dynamic routing
- Using both IPv4 and IPv6
- Summary
- 9. Setting Up a Wireless Network
- Wireless networks and physical workspaces
- Summary
- 10. Configuring VLANs and Trunks
- InterVLAN routing with routers and layer 3 switches
- Switch-to-switch trunk links
- Analyzing broadcasts in the simulation mode
- Summary
- 11. Creating Packet Tracer Assessments
- The initial network
- The answer network
- Testing the activity
- Summary
- Index
Once a topology has been created, connectivity can be tested between devices by using either simple or complex PDUs. Although it is possible to do the same by pinging devices from their command-line interface, using the PDU option is quicker for large topologies.
The Add Simple PDU option uses only ICMP (Internet Control Message Protocol). We will create a topology with a PC and a server to demonstrate how this option works:
- Add a PC and a server to the workspace and connect them using a copper crossover cable.
- Assign IP addresses to both of them in the same subnet. Example, PC1:
192.168.0.1/255.255.255.0and PC2:192.168.0.2/255.255.255.0. - From the common tools bar, click on the closed envelope icon or use the shortcut key P.
- The pointer will change to an envelope symbol. Click on the PC first and then on the server. Now look at the User Created Packet box. You'll see the status as Successful and will also see the source, the destination, and the type of packet that was sent.

That was very simple, wasn't it? Now let's see what complex PDUs have to offer.
We will demonstrate complex PDUs with the same PC-Server topology:
- Click on the open envelope icon or press C; this is the Add Complex PDU option.
- Click on the PC and the Create Complex PDU dialog box opens. Select the application and fill the Destination IP address (IP of the server), Starting Source Port, and Time fields, and then click on the Create PDU button.
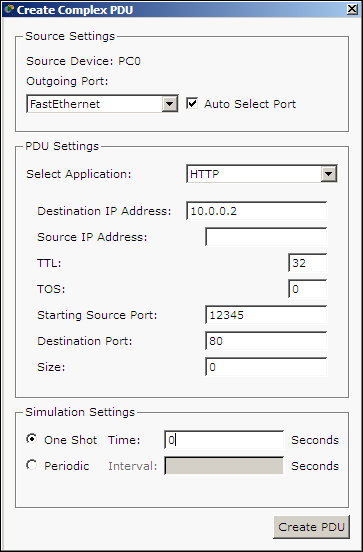
- Now click on the server and then look at the user-created packet box. An entry indicates a successful TCP three-way handshake as shown in the following screenshot::

See the red button under the Fire column? Double clicking on it will send the same packet again.