Table of Contents for
Building E-Commerce Solutions with WooCommerce - Second Edition
 Building E-Commerce Solutions with WooCommerce - Second Edition
Published by
Packt Publishing, 2015
Building E-Commerce Solutions with WooCommerce - Second Edition
Published by
Packt Publishing, 2015
- Cover
- Table of Contents
- Building E-Commerce Solutions with WooCommerce Second Edition
- Building E-Commerce Solutions with WooCommerce Second Edition
- Credits
- About the Author
- About the Reviewers
- www.PacktPub.com
- Preface
- What you need for this book
- Who this book is for
- Conventions
- Reader feedback
- Customer support
- 1. Setting Up WooCommerce
- Installing WooCommerce
- Setting up WooCommerce
- Summary
- 2. Creating Your First Products
- Creating your first product
- Setting the categories, tags, and images for your product
- Summary
- 3. Using Downloadable Products and Variations
- Using attributes
- Setting up variable and grouped products
- Other product types
- Summary
- 4. Payments, Shipping, and Coupons
- Shipping methods and prices
- Using discount coupons
- Summary
- 5. Working with WooCommerce Themes
- Making or buying a theme
- Installing a WooCommerce theme
- Using the Storefront theme
- Summary
- 6. Customizing a WooCommerce Theme
- WordPress theme basics
- Developing WooCommerce themes
- Summary
- 7. Running Your Online Store
- Deploying your WooCommerce store
- Working with sales orders
- Reporting
- Summary
- 8. More Possibilities Using Plugins
- Popular and useful WooCommerce plugins
- A store in multiple languages
- Summary
- Index
Now, we will create a couple of sales orders using our own details just to test the process, whether our payment methods are working, and if the e-mails that we're sending are all working as expected.
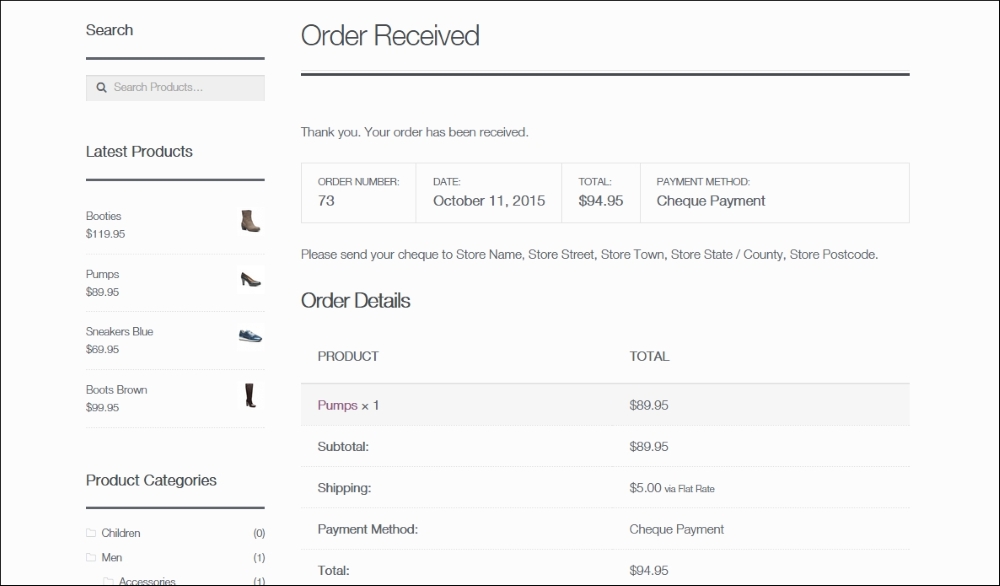
An order can be created as well from the frontend as from the WordPress administrative panel. Your customers will order from the frontend, of course. After creating an order, a typical confirmation page will look as follows. Besides the information shown on the screen, the customer and store owner will also receive an e-mail:
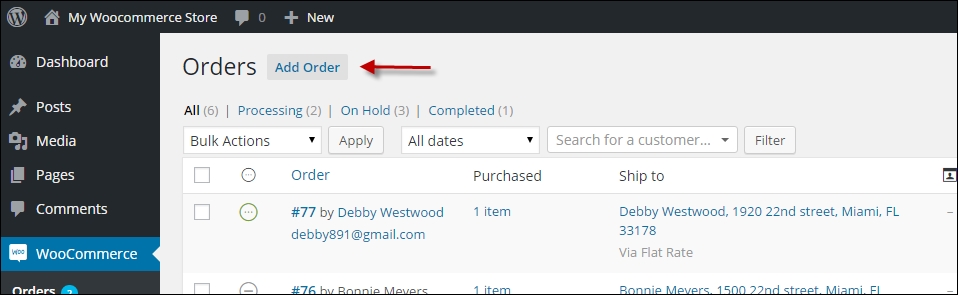
Once we create a couple of orders, we can find them in the WordPress administrative panel by navigating to WooCommerce | Orders. You will be notified of new orders directly in the menu. A small circle behind the Orders submenu shows the number of new orders:

The Orders screen shows all the sales orders that you received, regardless of their order status. From here, you may continue to process your orders.

Note the following points when working from this screen:
- The status of the order is indicated by an icon. It's important to pay attention to this so that you won't ship any orders that have not been paid for. A green icon with the dots means that the order status is processing and you may ship the items. If the icon is orange, the status is pending payment. This happens when an online payment method was used, but the order has not been paid yet. An order with a grey icon is on hold and neither has been paid. It might be paid offline by a bank transfer or cheque. Do not ship the order yet. You need to manually check if you received the payment. An icon with a red cross means that the payment was canceled, failed, or was fully refunded; this order should not be delivered.
- You can change the status of the order by clicking on the icon at the right of the order line. For orders that have been cancelled, this isn't possible here. If you still need to change a cancelled order, you may do that by opening the order and edit it from the Edit order screen.
- By selecting multiple orders, it's possible to change the status of them all at the same time. Be careful because you could easily delete multiple orders using the bulk function at the top of the screen. Accidentally deleted orders will be moved to the trash and can be restored.
- To the right of the shipping address, an icon will appear if the customer left any additional notes for its order:
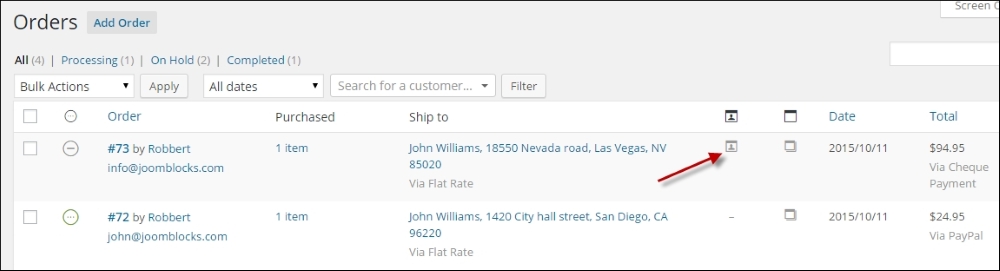
- You can look at the order details by clicking on the order number or on the View icon at the right of the order line:
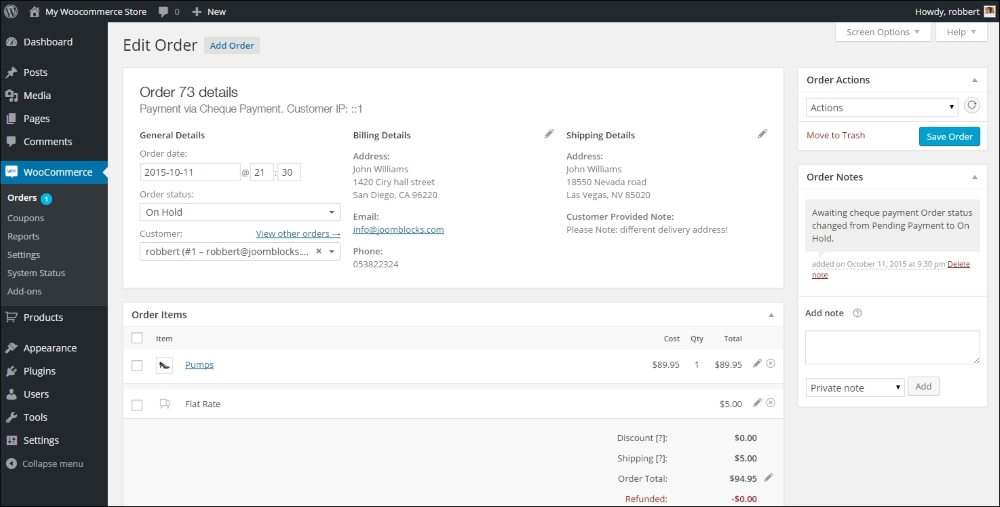
The order detail screen shows a lot of information. You can find all the address information, details of the products ordered, including attributes, and detailed tax information. On the bottom right of this screen, you'll find a list of Order Notes, holding all the status changes and other information about the process that this order went through. It's possible to add manual notes yourself. There are two types of notes. Customer note will be sent to the customer by e-mail. Remember that these e-mails will only be sent if they are enabled. Navigate to WooCommerce | Settings | Emails | Customer note to verify that. It will be visible as well when the customer looks at the order details by logging in again. A private note is for you or your employees only. Your customer will not receive a private note by e-mail.
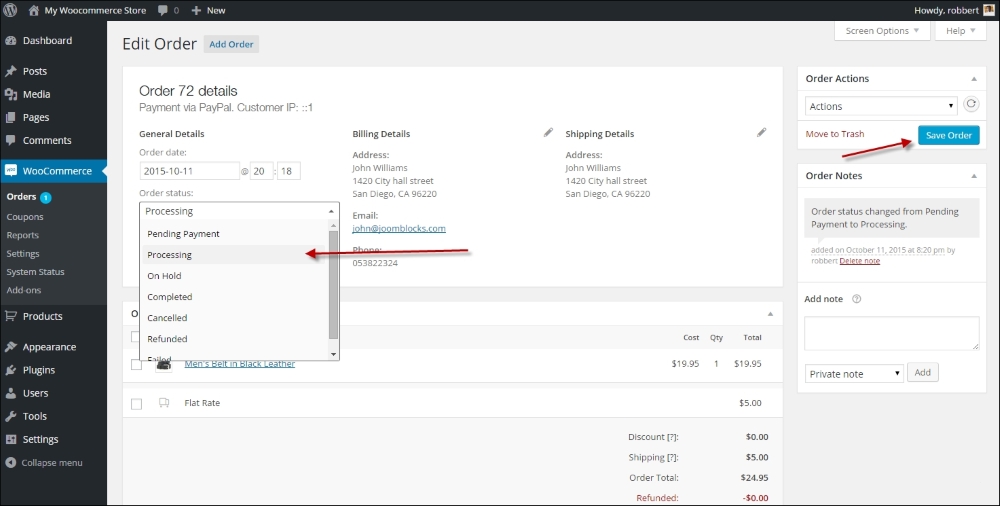
Further, on the top left of this screen, it's possible to change the Order status. You can set it to completed for instance once you have shipped all the items. Unfortunately, it's not possible to only ship a part of the order! After changing the status of an order, you must click on Save on the top right to make sure that the status change is actually saved. Depending on your e-mail settings, WooCommerce might send out a message to your customer to confirm that the order has been completed:
Note that when setting an order to refunded by changing the status on the top right, there's no direct connection to your payment gateway. You'll have to manually make sure that your customer receives back the paid amount. Most payment service providers offer a function to refund an order amount. However, there's a function available that lets you automatically refund the amount online. To do this, use the Refund button below the order details. Whether or not you are able to refund the amount automatically depends on the payment gateway. Using PayPal, for instance, it is possible to do an automatic refund.
Tip
Handling refunds can be overwhelming sometimes, and there are lots of possibilities. If you want to learn more, there's a good article available in the WooCommerce documentation at https://docs.woothemes.com/document/woocommerce-refunds/.
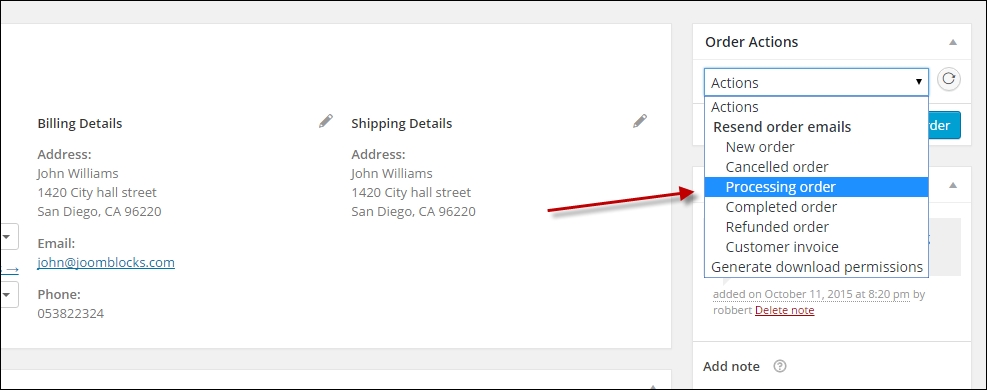
By using Order Actions on the top right, it's possible to manually resend the order e-mails to your customer again. Also in this case, you need to press the Save Order button or the Apply icon on the right to actually send the message:
At the bottom of this page, there's one more function available. When selling digital goods, like for example e-books, the buyer receives the order confirmation including a download link as soon as the status of the order becomes Processing. Sometimes, it's necessary to overrule the default behavior of WooCommerce and grant access to the file manually. You can do that, and it's even possible to grant access to a digital file that wasn't at all on the order. If you want to do that, just type the name of the product in the search box, select the correct product, and click on Grant Access:

After giving access, it's possible to limit the number of downloads for this file or set an expiration date. It's also possible to Revoke Access again.
Tip
After creating several sales orders, you'll notice that the sales order numbering isn't always sequential:
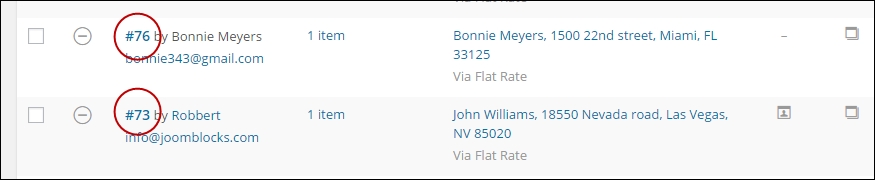
Multiple order numbers are sometimes skipped. This is caused by the fact that WordPress saves everything as a post. A page is a post, a product is a post, and sales order is a post. They all use the same, single number sequence and that's why the sales order numbers will not be sequential. There's a plugin available that can solve this issue at https://wordpress.org/plugins/woocommerce-sequential-order-numbers/. This is the free version which is working fine but doesn't give you any options. The premium version is available on WooThemes.com.
Besides handling orders that were created by online customers, it's also possible to manually add a sales order yourself in the WordPress administrator. This is useful for orders that are for example placed by telephone, e-mail, or fax. Situations like this especially appear in business-to-business environments.
You may select the details of an existing customer by just start typing your customer's name in the Customer field. It's also possible to create the order for a Guest, so a customer that does not have an account in your store. This is the default setting. In this case, you have to enter the address details manually:
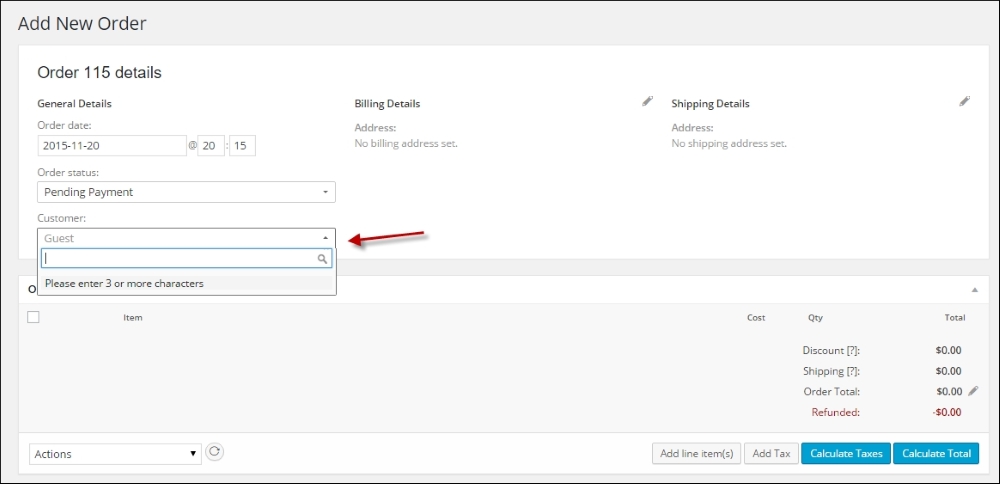
If you want to use the data of an existing customer, start with typing the name in the Customer field. Otherwise, keep the default setting as Guest.
When adding the address data, the drop-down fields like Country and State can be filled easily. Just start typing in the field and the matching records will appear:
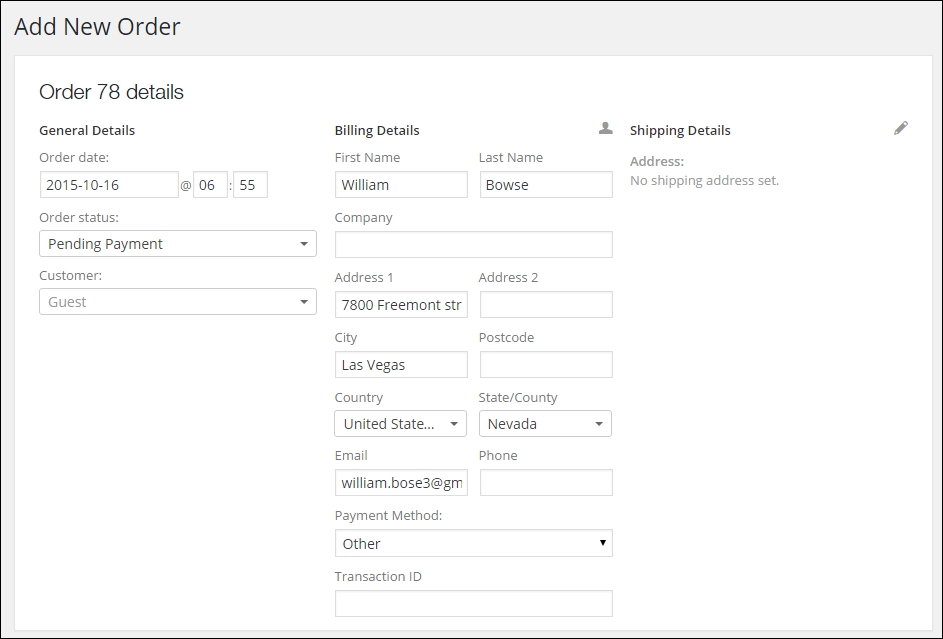
Set Order Status and Payment Method based on the way the customer is going to pay for the order. When adding Shipping Details, it's possible to copy all the data from Billing Details so that you do not have to enter them again.
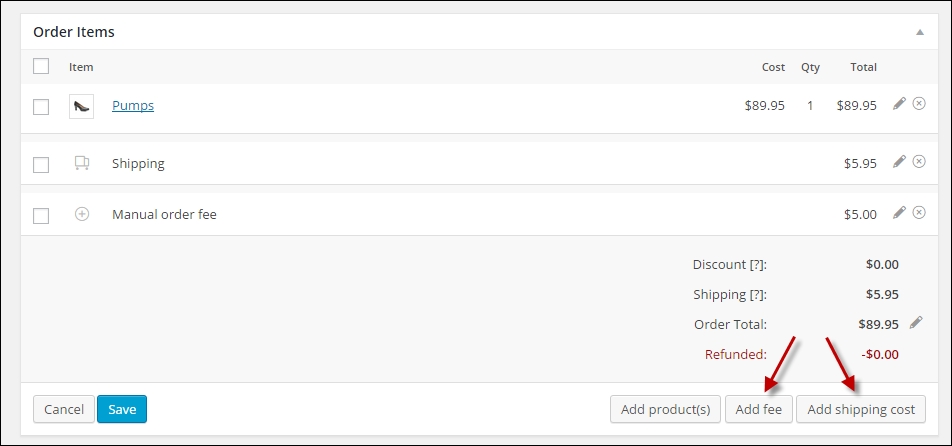
Click on the button Add line item(s) button, and then, click on Add product(s) to start adding products to your orders:
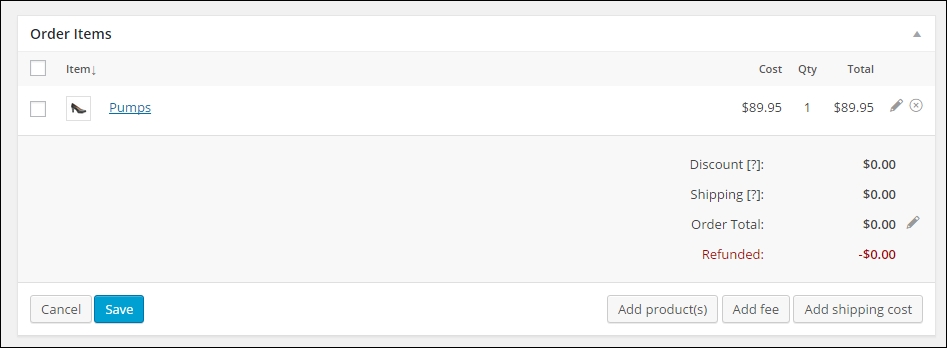
Next, a search window opens that lets you search and add a product to the order. You may change the quantity if needed.
From the window shown in the preceding screenshot, you may Add shipping cost to your order or add an order fee using the Add fee button. If you're adding the shipping cost, you manually have to select the correct shipping method and amount it will not be filled in automatically.
Click on the Save button on the bottom left once you're finished with adding items. Click on Calculate totals as well to set the total order value.
Don't forget to also click on Save on the top right corner to save your order. Once saved, you can manage this order in exactly the same way as a sales order entered by an online customer.
Tip
The WooThemes website is a great and updated resource. If you have additional questions about managing your orders, then this is a good starting point: https://docs.woothemes.com/document/managing-orders/.