Table of Contents for
Building E-Commerce Solutions with WooCommerce - Second Edition
 Building E-Commerce Solutions with WooCommerce - Second Edition
Published by
Packt Publishing, 2015
Building E-Commerce Solutions with WooCommerce - Second Edition
Published by
Packt Publishing, 2015
- Cover
- Table of Contents
- Building E-Commerce Solutions with WooCommerce Second Edition
- Building E-Commerce Solutions with WooCommerce Second Edition
- Credits
- About the Author
- About the Reviewers
- www.PacktPub.com
- Preface
- What you need for this book
- Who this book is for
- Conventions
- Reader feedback
- Customer support
- 1. Setting Up WooCommerce
- Installing WooCommerce
- Setting up WooCommerce
- Summary
- 2. Creating Your First Products
- Creating your first product
- Setting the categories, tags, and images for your product
- Summary
- 3. Using Downloadable Products and Variations
- Using attributes
- Setting up variable and grouped products
- Other product types
- Summary
- 4. Payments, Shipping, and Coupons
- Shipping methods and prices
- Using discount coupons
- Summary
- 5. Working with WooCommerce Themes
- Making or buying a theme
- Installing a WooCommerce theme
- Using the Storefront theme
- Summary
- 6. Customizing a WooCommerce Theme
- WordPress theme basics
- Developing WooCommerce themes
- Summary
- 7. Running Your Online Store
- Deploying your WooCommerce store
- Working with sales orders
- Reporting
- Summary
- 8. More Possibilities Using Plugins
- Popular and useful WooCommerce plugins
- A store in multiple languages
- Summary
- Index
If you bought a commercial WooCommerce-compatible theme, you will have to install it through the WordPress administrative panel or upload it using FTP. Before we do so, let's first take a look at what we actually received. In almost all cases, you'll receive a ZIP file holding different folders. The content and names of the folders will differ from theme to theme. Still, it's good to have a closer look at it and get familiar with commercial theme packages.
An example of the contents of a downloaded theme can be found in the next screenshot:
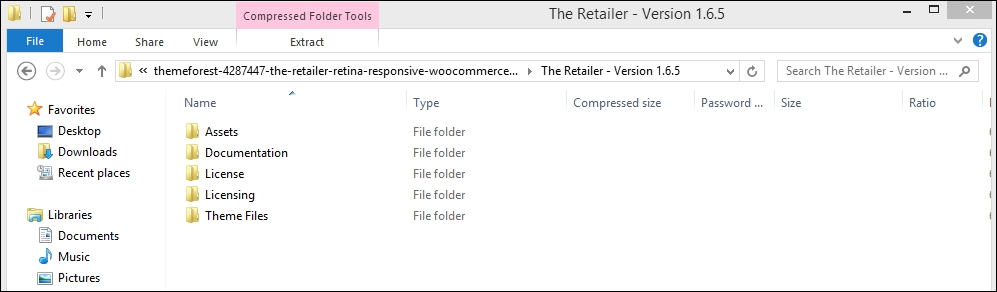
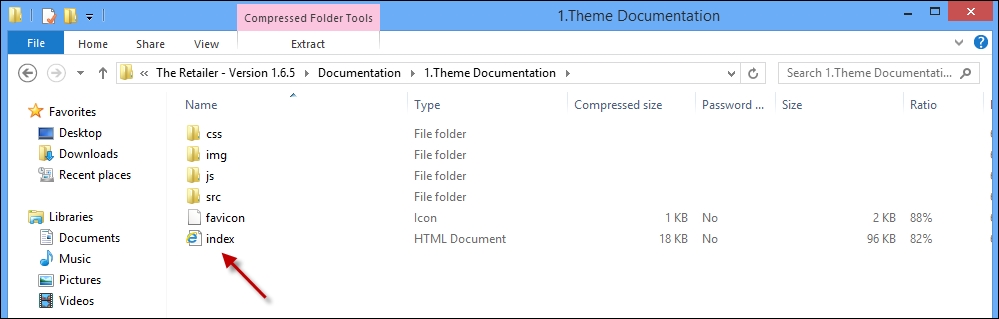
Note that this is just an example, coming from a ThemeForest WooCommerce theme named The Retailer. The folder structure of this theme shows that it differs from just a regular WordPress theme. There are separate folders holding Assets, the original Photoshop files and Demo data for instance. The actual theme files we need to install the theme have been placed in the folder theme files and we first need to extract (unzip) the whole package in order to be able to continue with our installation. Although the folder names will differ from theme to theme, this is an approach that you will see with lots of premium themes. Always look for a folder named Documentation and start reading this before doing anything else! Often, you'll see that the documentation is offered in an HTML format, starting with index.html that you should open using your browser. In the following screenshot, there's an example of such a documentation:
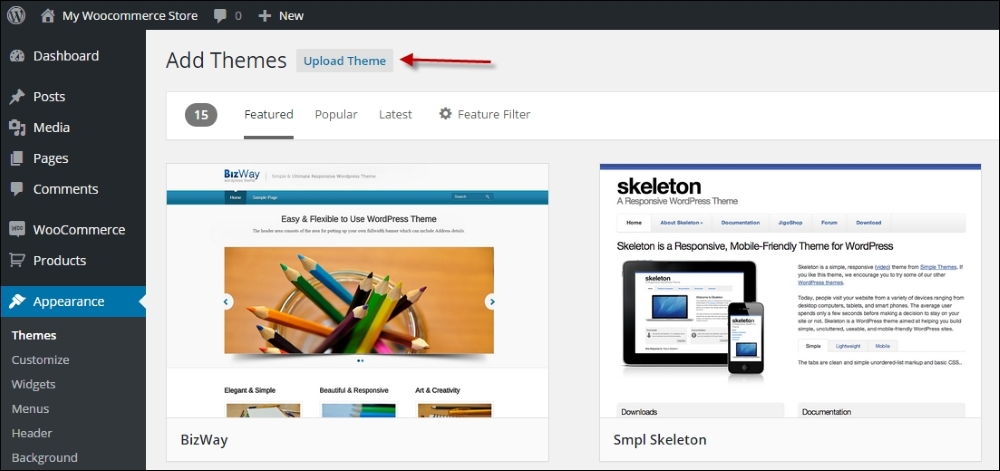
To install the theme, we head over to the WordPress administrator and choose Appearance | Themes in the menu. Click on Add New, and then click on the Upload Theme link:
Click on Choose file, and then browse to the folder where you unpacked the theme files a minute ago. We open the file theretailer.zip from the subfolder named Theme files and click on Install Now. Remember to upload the ZIP file and not the theme folder inside it.
Next, since this theme is already delivering a child theme, we'll install that one as well. We repeat the preceding steps for the file theretailer-child.zip. Note that we must do it in this order: first install the main or parent theme and after that the child theme. Besides that not every theme will deliver a child theme as well. Often, you'll just receive a single theme package.
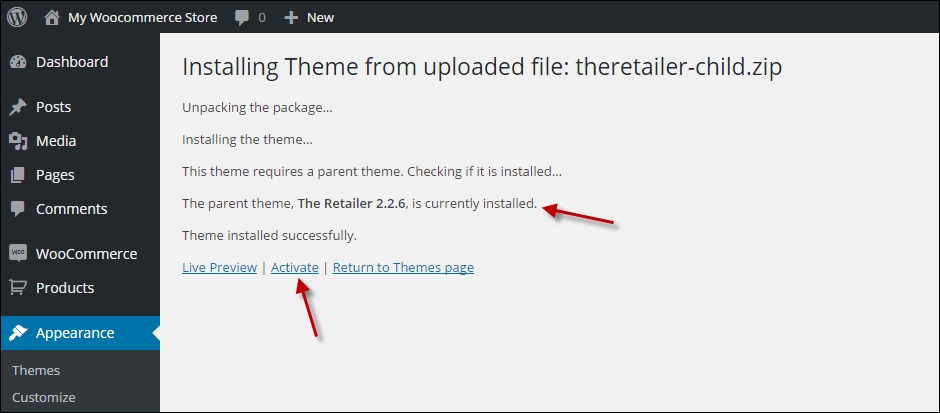
Working with Child theme is a best practice if you need to make changes to your theme. By using a parent and child theme, we'll avoid losing our changes if the developer ever needs to update the theme—and this will happen. If the theme of your choice does not deliver a child theme in the package, it's not very difficult to create one. More on child themes will follow in Chapter 6, Customizing a WooCommerce Theme.
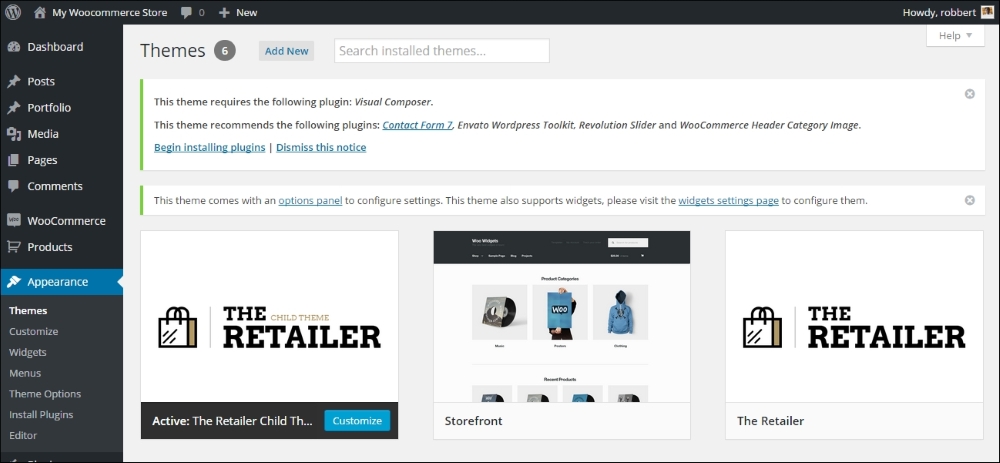
Don't forget to activate the Child theme by clicking on the link after installation! Note that our theme requires us to install a couple of additional plugins. We receive a warning message that we can do this by clicking on the link, as shown in the following screenshot:
You would see the following screen after clicking on the link:
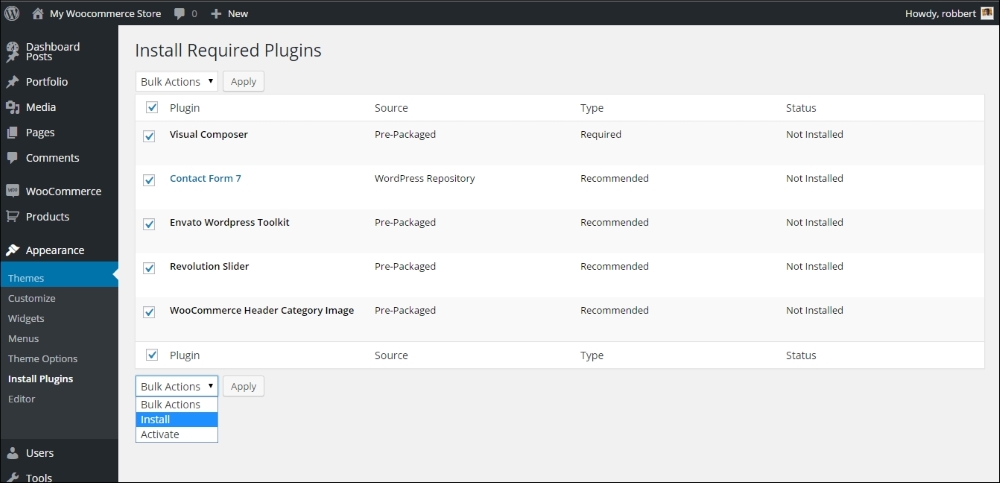
Select the plugins and install them all at the same time.
Whether or not your theme will ask for similar steps completely depends on the way it was set up by the developer. Refer to the documentation for your theme when you're in doubt about the steps to take. Note that after bulk-installing the plugins, we also need to activate them.
Tip
Premium themes are regularly delivered including demo content. If you are a beginner and find it difficult to start, it's often a good idea to install the demo content in your WordPress test environment. By combining the theme and demo content, is just gets easier to know the theme and its functions. Use the WordPress importer (Tools | Import in the menu) to import the demo content.
After installing the parent and child themes and activating it, our store page looks as follows on the frontend:
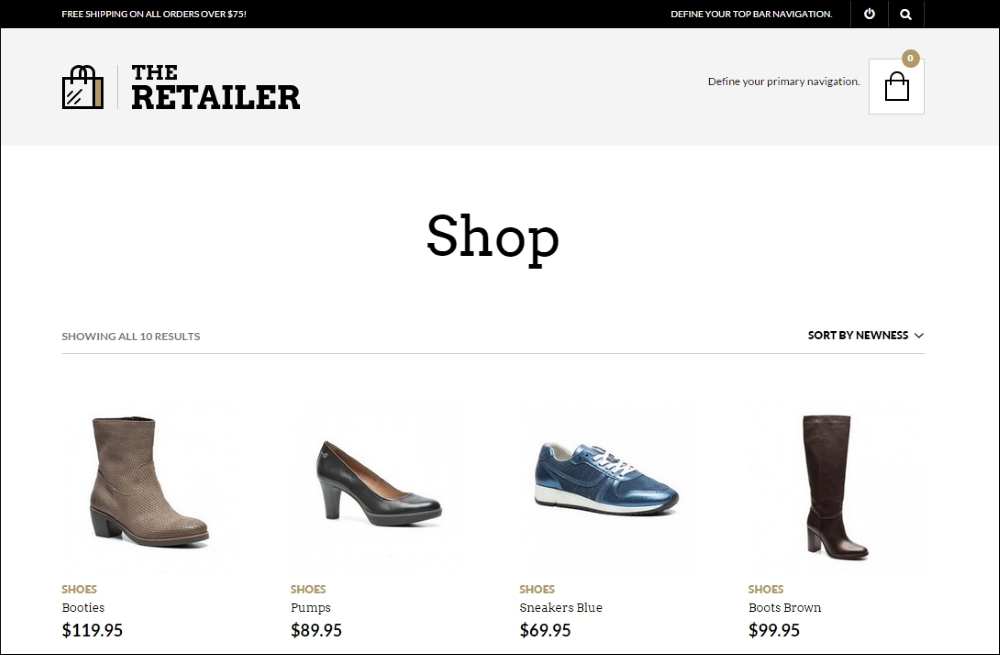
It's functional but still requires additional setup.
WordPress is expanding the standard functions to work with theme settings since WordPress version 3.4. However, we can see that the possibilities have been too limited for premium themes and developers continued to work with their own solutions. This is changing though and WordPress puts in more and more effort on customizing your theme using the default WordPress customizer. In this example, the theme comes with its own solution. We can find the settings of our theme by navigating to Appearance | Theme options, but you might just as well find a new high-level menu item for your theme. The following screenshot shows the options for our theme:
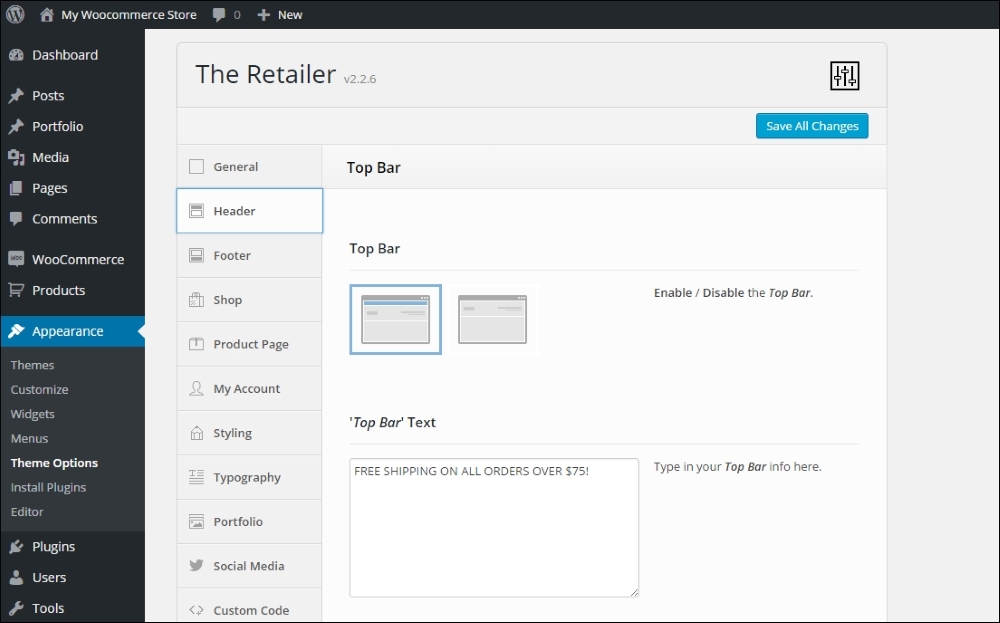
Our theme, The Retailer, offers an extended option panel with lots of options to set up our store and change the look and feel. Of course, we can upload our own logo, but it's also possible to change colors, fonts, the contents of the header and footer, and many more. There's no use in exploring all the possibilities here because they are theme-specific. Your situation will be different depending on the theme that you're using.
In the remaining part of this book, we'll switch back to the free Storefront theme. It gives us possibilities to show theme customization and development examples in a better way.
Tip
Do you like the way the theme, The Retailer, looks like and its flexibility to change all the colors just the way you need them? The theme is available for purchase at http://themeforest.net/item/the-retailer-retina-responsive-woocommerce-theme/4287447.
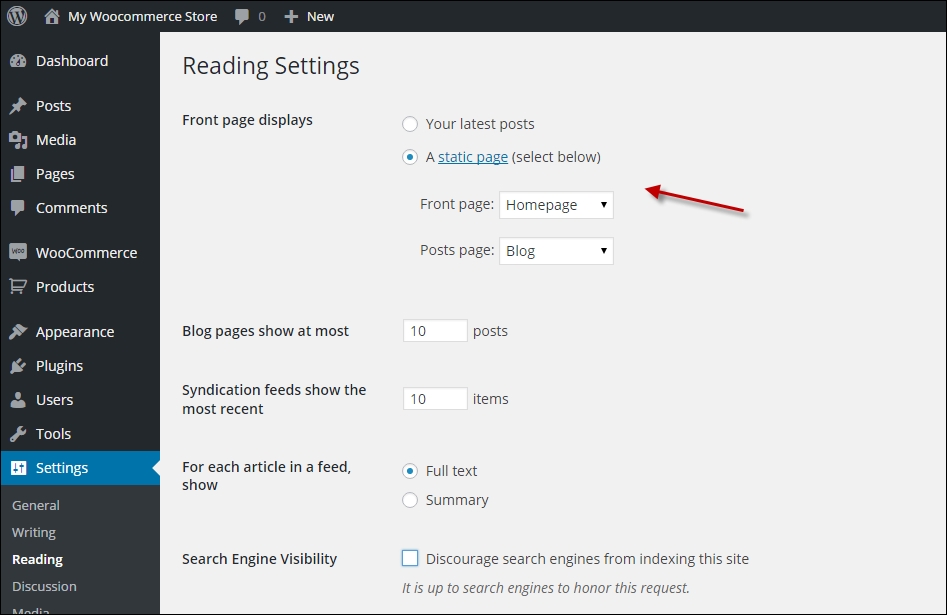
There's one more item that we need to discuss that is generic and not really dependent on the theme you're using. Although it is a basic WordPress setting, we still see lots of users getting confused about it. When you have just installed WordPress, by default it will always show blog items on the Front page. For an online store that isn't suitable. You want to show products, maybe a slider and some other information. But in most cases not the blog. If you don't know how to change that here' how:
- First, navigate to Pages and create a new page named
Homepage. Do not fill any content, just publish it. Note that sometimes, you'll have to set the page template to home page or front page, depending on your theme. Refer to your theme documentation if you're not sure. - Repeat this step and create a page named
Blog. - Head over to the WordPress Settings menu and click on Reading. In here, change the Front page displays to A static page and select the pages that you just created. The following screenshot shows an example. Save your settings and you're done. Depending on the way your theme works, it will automatically start filling your home page with a slider, products, or other items. Please refer to your theme documentation for more information.