Table of Contents for
Building E-Commerce Solutions with WooCommerce - Second Edition
 Building E-Commerce Solutions with WooCommerce - Second Edition
Published by
Packt Publishing, 2015
Building E-Commerce Solutions with WooCommerce - Second Edition
Published by
Packt Publishing, 2015
- Cover
- Table of Contents
- Building E-Commerce Solutions with WooCommerce Second Edition
- Building E-Commerce Solutions with WooCommerce Second Edition
- Credits
- About the Author
- About the Reviewers
- www.PacktPub.com
- Preface
- What you need for this book
- Who this book is for
- Conventions
- Reader feedback
- Customer support
- 1. Setting Up WooCommerce
- Installing WooCommerce
- Setting up WooCommerce
- Summary
- 2. Creating Your First Products
- Creating your first product
- Setting the categories, tags, and images for your product
- Summary
- 3. Using Downloadable Products and Variations
- Using attributes
- Setting up variable and grouped products
- Other product types
- Summary
- 4. Payments, Shipping, and Coupons
- Shipping methods and prices
- Using discount coupons
- Summary
- 5. Working with WooCommerce Themes
- Making or buying a theme
- Installing a WooCommerce theme
- Using the Storefront theme
- Summary
- 6. Customizing a WooCommerce Theme
- WordPress theme basics
- Developing WooCommerce themes
- Summary
- 7. Running Your Online Store
- Deploying your WooCommerce store
- Working with sales orders
- Reporting
- Summary
- 8. More Possibilities Using Plugins
- Popular and useful WooCommerce plugins
- A store in multiple languages
- Summary
- Index
WordPress theme development in a short version:
- Every WordPress theme has its own folder, which you may find in the
wp-content/themesfolder of your WordPress installation. - The bare minimum that every WordPress theme needs is an
index.phpandstyle.cssfile. Theindex.phpfile determines the way the home page looks like, by the so-called WordPress loop. There are also other possibilities for the home page, which we'll see in a minute. Thestyle.cssfile contains all the styling or calls for other CSS files. It also contains the name and author of the theme. - From
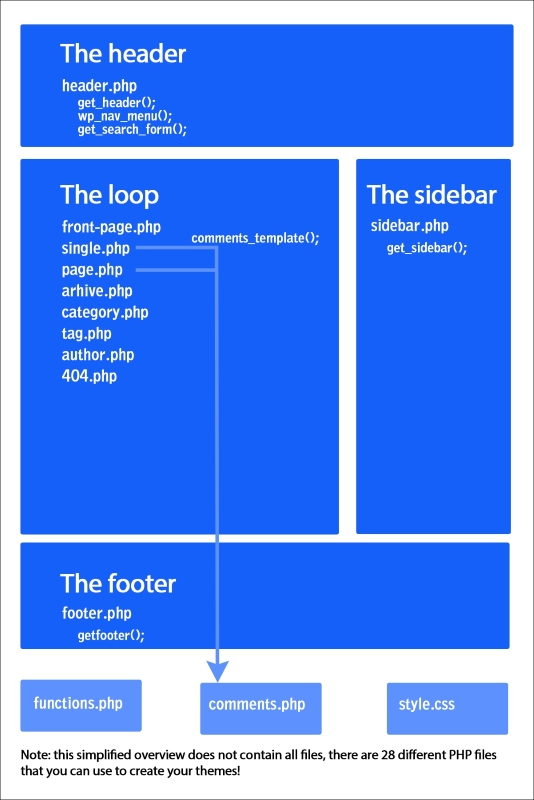
index.php, lots of different PHP files can be called. Here are a couple of the most common ones, including their meaning:header.php: This contains the logic for the header of your theme, which mostly contains things such as the logo, website name, search bar, and menu. It also contains the necessary HTML head code.sidebar.php: This contains the definition of a sidebar, that is used to display widgets. More complex themes often give the possibility to use multiple sidebars with different content.footer.php: This contains some closing tags for the theme. Besides that, it has become quite common to define additional widget areas in the footer as well.home.php: This file can be used to show the latest blog posts on the landing page for your blog. Often, this is the home page of your website, but it doesn't have to be. If WordPress is set up to use a static page as the home page, thenhome.phpcould be used for your blog.front-page.php: If this file exists, it will be used for the home page of the website. If it doesn't exist, WordPress will look forhome.php. If both of them don't exist,index.phpwill be used. For a deeper explanation, have a look at http://codex.wordpress.org/Creating_a_Static_Front_Page.single.php: This is used to display a single post type—often, a single blog item.page.php: This is used to display a single WordPress page.functions.php: This is an important one because, here, you'll define all kinds of different functions for your theme, for instance, the widget positions, theme support for post thumbnails, and so on. Also, when creating WooCommerce themes,functions.phpplays an important role. Usingfunctions.php, you are able to add features and functions to your website. Note that for larger changes, creating a plugin is a better option though.Are you making changes to an existing WordPress theme, please always work with a Child theme. The procedure to create one is very simple. I'll show you how to do this later on in this chapter.
There's much, much more, like the
comments.php,search.php,author.php, andcategory.php. Note that you may use these kinds of different content types, but they aren't mandatory. If you want to learn all about these files, we highly recommend reading a book on WordPress Theme Development. Another great online resource is the WordPress codex: http://codex.wordpress.org/Theme_Development. It's also good to have a closer look at the template hierarchy, that describes exactly how all the files in a theme are working together: https://developer.wordpress.org/themes/basics/template-hierarchy.
The image below shows a simplified structure of the way in which a WordPress theme is set up:
Before making any changes to your theme, it's always good to work with a child theme. A Child theme inherits all the functions from the parent theme that it belongs to. This has the following benefits:
- Everything you changed is easily visible. You won't keep on searching for that one little change that you made, but cannot remember where.
- When your theme receives an update, your changes are safe. The update is applied to the original theme and not to the changes that you made in your Child theme. Do not underestimate this, updates will be there, and only by creating a Child theme, you'll be sure that your changes will not be overwritten.
- It speeds up your web development. Even later on, if you'd decide to create your own theme, it's good to start with a solid base theme and work from there.
The steps that you need to create a child theme for the Storefront theme are as follows:
- Navigate to the
wp-content/themesfolder. In there, every installed theme has its own folder. - Create a new folder named
storefront-child. If you're creating a Child theme for a different theme, just replace storefront with your theme name. The result should look as follows: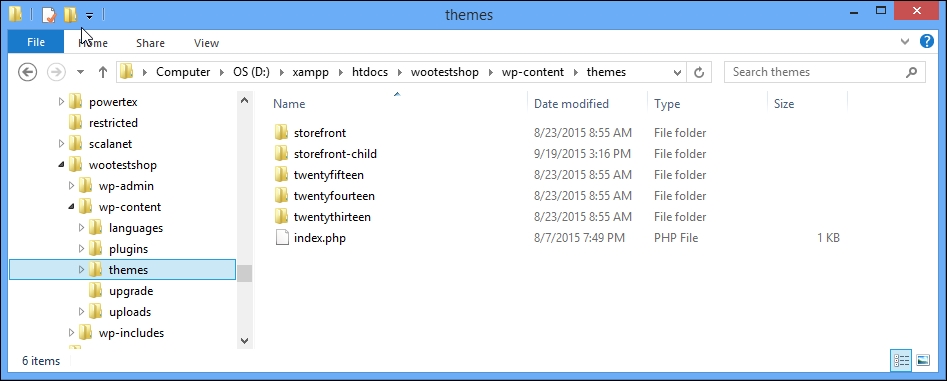
- In the new folder, create two empty text files named
style.cssandfunctions.php. Use text editor tools like the ones mentioned at the beginning of this chapter. - Next, add the following code in the
style.cssfile:/* Theme Name: Storefront Child Theme URI: http://www.woothemes.com/storefront/ Description: Storefront Child Theme Author: Robbert Ravensbergen Author URI: http://www.joomblocks.com Template: storefront Version: 1.0.0 License: GNU General Public License v2 or later License URI: http://www.gnu.org/licenses/gpl-2.0.html Tags: black, white, light, two-columns, left-sidebar, right-sidebar, responsive-layout, custom-background Text Domain: storefront-child */
Of course you should replace the various lines with your own data. Important are the lines with the Template name, which is the name of the parent theme folder.
- We also need to add a few lines of code to
functions.php:<?php add_action( 'wp_enqueue_scripts', 'theme_enqueue_styles' ); function theme_enqueue_styles() { wp_enqueue_style( 'parent-style', get_template_directory_uri() . '/style.css' ); } - It's important to know that if your parent theme loads more than just a single
style.css, you need to include the additional CSS files separately, just like in your parent theme. - Save both the files, and activate the new Child theme in the WordPress backend:
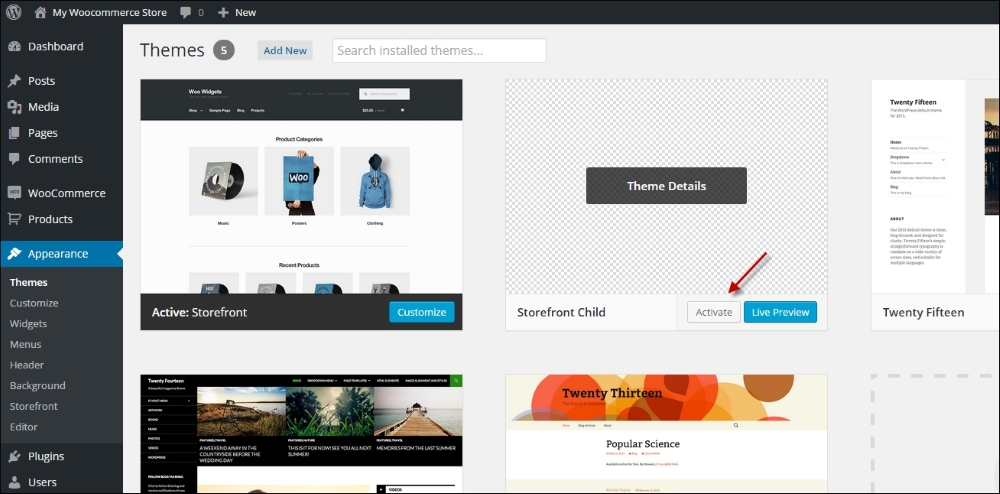
Note that the Child theme exists, but does not have an image yet. You may copy the existing image from the parent theme to your child theme folder ( named screenshot.png), or create your own.
Your Child theme is now fully up and running, and you can continue to make changes to it.
Tip
Note that the functions.php file of your Child theme will be loaded before functions.php of the parent theme. This gives possibilities to override functions in the parent theme, but only if they have been declared correctly in the parent theme. Do not duplicate function names from the parent theme in your child theme. That could cause fatal errors and your website could stop working completely.
Template files like for instance page.php, single.php, and others can be copied from the parent theme to the child theme. This will overwrite the original file, which gives the possibility to create your own version of these files.
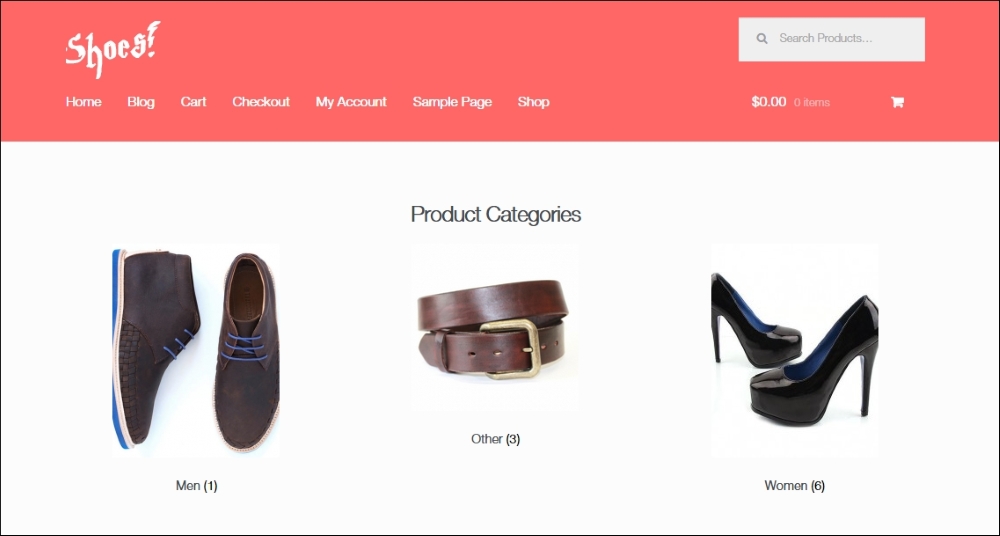
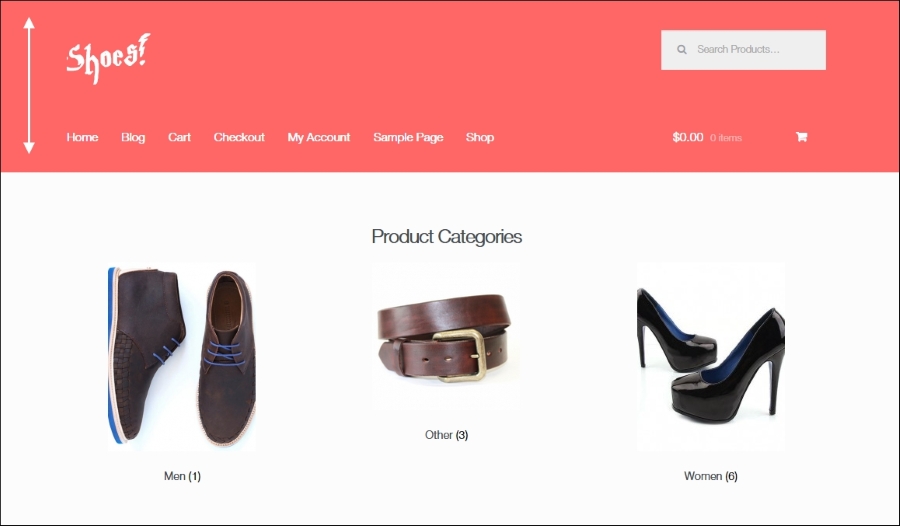
Often, you do not need to change the template files of your theme. Being able to change the CSS using a child theme is already a huge benefit. Let's finish with a simple example. In our Storefront theme, we would like to have a smaller header. The current header contains a lot of white space, which we want to decrease, as shown in the following screenshot:
To do that, we simply inspect the elements in the header using the Chrome tools that we saw earlier in this chapter.
We can see that margins have been defined for the site logo in the class site-logo-anchor. There's also a margin at the top of the site header and navigation. Add the following lines of code to style.css of your Child theme:
.site-header {padding-top: 1.3em; }
.site-header .site-logo-anchor { margin-bottom: 0; }
@media screen and (min-width: 768px) {
   .main-navigation { padding-top: 0; }
   .woocommerce-active .site-header .site-header-cart { padding-top: 0; }
}
All that we do here is use smaller margins and paddings. The last two lines of code will only be applied on desktop screen resolutions (larger than 768 pixels in width). We leave the mobile view unchanged for now. Save the file and check the results. Notice that the header is much smaller now: