Table of Contents for
Building E-Commerce Solutions with WooCommerce - Second Edition
 Building E-Commerce Solutions with WooCommerce - Second Edition
Published by
Packt Publishing, 2015
Building E-Commerce Solutions with WooCommerce - Second Edition
Published by
Packt Publishing, 2015
- Cover
- Table of Contents
- Building E-Commerce Solutions with WooCommerce Second Edition
- Building E-Commerce Solutions with WooCommerce Second Edition
- Credits
- About the Author
- About the Reviewers
- www.PacktPub.com
- Preface
- What you need for this book
- Who this book is for
- Conventions
- Reader feedback
- Customer support
- 1. Setting Up WooCommerce
- Installing WooCommerce
- Setting up WooCommerce
- Summary
- 2. Creating Your First Products
- Creating your first product
- Setting the categories, tags, and images for your product
- Summary
- 3. Using Downloadable Products and Variations
- Using attributes
- Setting up variable and grouped products
- Other product types
- Summary
- 4. Payments, Shipping, and Coupons
- Shipping methods and prices
- Using discount coupons
- Summary
- 5. Working with WooCommerce Themes
- Making or buying a theme
- Installing a WooCommerce theme
- Using the Storefront theme
- Summary
- 6. Customizing a WooCommerce Theme
- WordPress theme basics
- Developing WooCommerce themes
- Summary
- 7. Running Your Online Store
- Deploying your WooCommerce store
- Working with sales orders
- Reporting
- Summary
- 8. More Possibilities Using Plugins
- Popular and useful WooCommerce plugins
- A store in multiple languages
- Summary
- Index
Once you've set up your store, added products, and changed e-mails if needed, you're ready to start the deployment process of your store. Assuming that up until now, you've been working in a development environment, there's one more important thing that you need to do before bringing live your online store: test it!
Just use your store as if you are a customer. Is everything clear for the visitor? Are the links to conditions and shipping information easily available? Is it clear what payment methods you're offering? But above all, does the order process work? It's very important to spend some time in your own store and actually create orders yourself. So you are sure that it is working and that the e-mails that the customer receives are clear and correct.
If everything is okay, you can start the deployment process. There are many ways to deploy a website from development to live, but, in this example, we use a basic, simple technique to do it. Note the steps below only work if you're deploying a new website. If you are adding WooCommerce to an existing website, other steps could be needed.
- Create a copy of the WordPress database. Actually, you should do this regularly for every website that you own or are developing. A tool like PhpMyAdmin may be used to create the backup. If you don't know how, also a database backup plugin can be used: https://wordpress.org/plugins/wp-db-backup/.
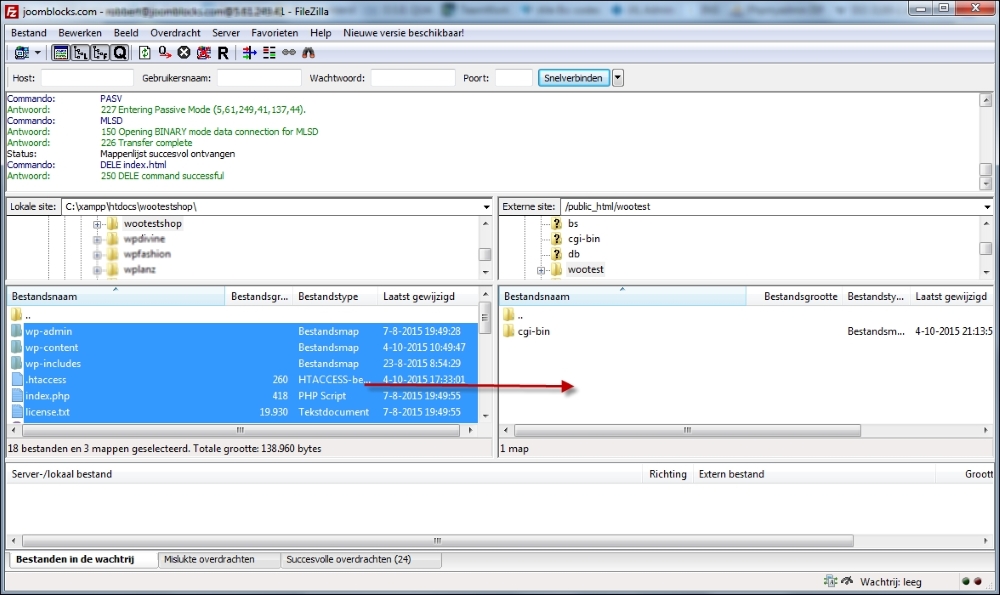
- If you're developing locally, you'll already have a complete file set of your WordPress installation available. If your temporary site is hosted with a hosting provider, you first need to create a full backup. Use an FTP tool like FileZilla to create one. Or you could even use a WordPress plugin to create a full backup.
- Next, restore the backup that you just created to the hosting environment at your hosting provider. Again, using FTP with FileZilla is an easy and straightforward method to do this:
- Restore your database backup using the Import function of PhpMyAdmin, which is offered by almost every hosting provider.
- Change the setting in your
wp-config.phpso that it holds the correct values for accessing the database at your hosting provider. If you make changes locally, be sure to upload the file using FTP again. - Basically, your store should be working now. However, settings and the contents of sidebars might be lost. This is caused by the way WordPress stores its data in the database. The complete URL, including the domain name, is stored. This is an issue because now that your store is live, the domain name has changed. To correct this situation, we need to do a find and replace in the database so that it will hold the correct domain name in all the records. There are several methods to do this, but I recommend using the tool of InterconnectIT: https://interconnectit.com/products/search-and-replace-for-wordpress-databases/. Download the tool and upload it to your hosting environment. Use it to do a search and replace from
http://localhost/…tohttp://yourdomain.com. Click the Dry run button to test the result, and use the Live run button to confirm and save the changes: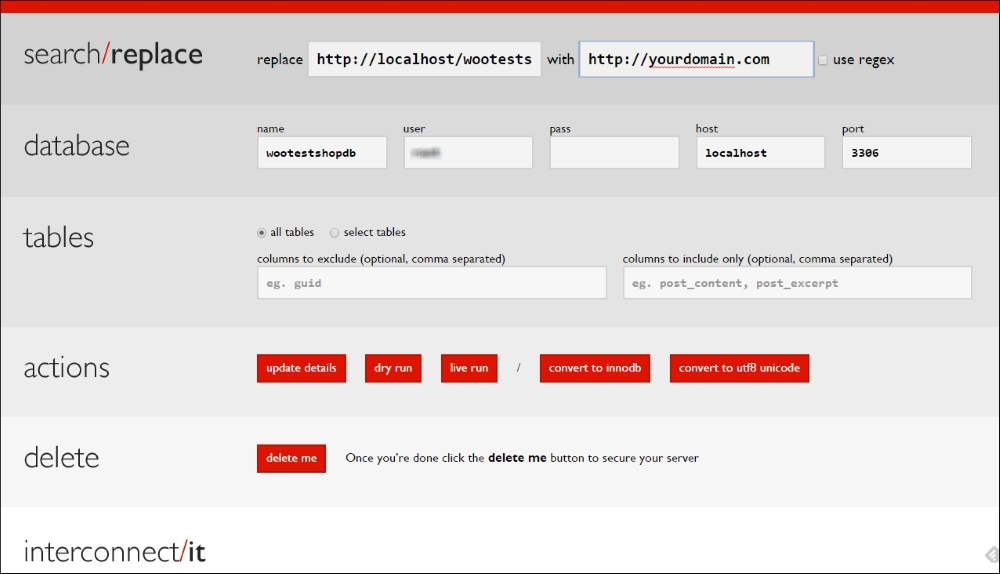
After doing these database changes, your online store will be available on the new domain. Test if it is reachable on your domain, and also test if you can reach the WordPress administrative panel of your site. If something went wrong, your site won't be available. In that case, restore your database and start again.
Tip
If you need more information about moving your development website to a live environment, you may find a tutorial including more details on my website: http://www.joomblocks.com/moving-a-wordpress-website.