Copyright © 2015 Packt Publishing
All rights reserved. No part of this book may be reproduced, stored in a retrieval system, or transmitted in any form or by any means, without the prior written permission of the publisher, except in the case of brief quotations embedded in critical articles or reviews.
Every effort has been made in the preparation of this book to ensure the accuracy of the information presented. However, the information contained in this book is sold without warranty, either express or implied. Neither the author, nor Packt Publishing, and its dealers and distributors will be held liable for any damages caused or alleged to be caused directly or indirectly by this book.
Packt Publishing has endeavored to provide trademark information about all of the companies and products mentioned in this book by the appropriate use of capitals. However, Packt Publishing cannot guarantee the accuracy of this information.
First published: November 2013
Second Edition: December 2015
Production reference: 1211215
Published by Packt Publishing Ltd.
Livery Place
35 Livery Street
Birmingham B3 2PB, UK.
ISBN 978-1-78588-156-5
Author
Robbert Ravensbergen
Reviewers
Matthew Allan
Rémi Corson
Nicola Mustone
Commissioning Editor
Priya Singh
Acquisition Editor
Manish Nainani
Content Development Editor
Arun Nadar
Technical Editor
Bharat Patil
Copy Editor
Tasneem Fatehi
Project Coordinator
Neha Bhatnagar
Proofreader
Safis Editing
Indexer
Mariammal Chettiyar
Production Coordinator
Arvindkumar Gupta
Cover Work
Arvindkumar Gupta
Robbert Ravensbergen is an experienced e-commerce and IT manager. He has been working in several international roles for various companies. He's also a passionate writer and blogger. WordPress, WooCommerce, and Magento are the topics that he writes about.
Robbert released several books about Magento and WooCommerce for Packt Publishing during the last couple of years. Besides this, he's an important writer in the Netherlands and well known for his understandable books for beginners about WordPress.
Readers can reach Robbert on his personal blog at http://www.joomblocks.com.
Matthew Allan works with a growing team of developers at Prospress to bring top-notch plugins and extensions to the WordPress and WooCommerce platforms. Some of Prospress' most well-known extensions are WooCommerce Subscriptions and WooCommerce One Page Checkout—both available from woothemes.com.
Over the past 3 years, Matthew has been reviewing WooCommerce books and developing new software for entrepreneurs wanting to jump into the e-commerce world and start selling online. Matt's experience in developing and supporting premium extensions for WooCommerce has informed his technical review for this book.
Rémi Corson built his first website in high school, where, after a few months, he realized he was teaching web languages to his own teacher. Then, he decided to build his own content management system called PHPforge, which was used by more than 5,000 users at that time. He finally switched to WordPress a few years later.
Formerly in the top ten of CodeCanyon's best sellers, the largest code-related marketplace on the planet, Remi worked on Easy Digital Downloads' early versions with Pippin Williamson, and joined WooThemes as a Happiness Engineer in 2013 before the acquisition by Automattic in 2015.
Rémi is a public speaker and code expert. He works on WooCommerce core code on a daily basis and he built/refactored many official add-ons. He was also involved in the first WooConf organization in San-Francisco in 2014, the major WooCommerce-related event. Rémi writes weekly posts on his blog, mainly about WooCommerce, and provides a lot of free plugins and snippets.
He is also passionate about woodworking, surfing, and video making, and is a great guitar player.
Nicola Mustone is a web developer based in Italy, where he studied economy and programming. He developed his first website at the age of 15. Since then, he fell in love with programming and web developing, so he started studying it in depth, improving his skill set.
He started working as a freelancer at the age of 19. In 2011, he accepted his first job at a local web agency.
In 2012, Nicola moved from his birth city, Lucera, to Acireale in Sicily to work with Your Inspiration where he learned about WordPress in its entirety, from end user usage to themes and plugins development. Working at Your Inspiration, he specialized in WordPress development and customer support.
In October 2014, he started working for WooThemes, and in June 2015, Automattic acquired WooThemes. He is currently an automattician working in the WooCommerce support team as an Internal Support Ninja. Nicola also writes articles and tutorials regularly to help customers understand WooCommerce and WordPress better.
For support files and downloads related to your book, please visit www.PacktPub.com.
Did you know that Packt offers eBook versions of every book published, with PDF and ePub files available? You can upgrade to the eBook version at www.PacktPub.com and as a print book customer, you are entitled to a discount on the eBook copy. Get in touch with us at <service@packtpub.com> for more details.
At www.PacktPub.com, you can also read a collection of free technical articles, sign up for a range of free newsletters and receive exclusive discounts and offers on Packt books and eBooks.

https://www2.packtpub.com/books/subscription/packtlib
Do you need instant solutions to your IT questions? PacktLib is Packt's online digital book library. Here, you can search, access, and read Packt's entire library of books.
If you have an account with Packt at www.PacktPub.com, you can use this to access PacktLib today and view 9 entirely free books. Simply use your login credentials for immediate access.
Back in the early days of WordPress, the platform was mainly used to create and run blogs. Soon plugins became available to add functionality to the platform. A couple of e-commerce plugins became available as well. However, often they were incomplete or buggy.
In 2011, the WooCommerce plugin became available on the market, developed by the popular creators of Woothemes.com, where you can buy premium WordPress themes. WooCommerce was an instant hit and reached over ten thousand downloads in the first couple of weeks. A few years later, the plugin was downloaded almost 1.4 million times and it received a complete makeover during 2013 with the release of WooCommerce 2.0. Meanwhile, the solution has become mature and is even used for larger online stores.
The reason that the plugin became so popular is that it is so easy to use. Millions of people were already using WordPress for their blogs and websites and were looking for an easy way to be able to sell products and services directly on their own website. WooCommerce made this possible for all of us.
This book will explain you how to set up WooCommerce, create products, and use payment and shipping methods. You will work with themes and add plugins to expand the functionality of WooCommerce. It will teach you how to create and run your own online store in a very easy, straightforward manner.
It's time to get started!
Chapter 1, Setting Up WooCommerce, shows you how to set up a test environment and install WooCommerce. After that, you'll learn how to set up WooCommerce and work with taxes.
Chapter 2, Creating Your First Products, helps you create your very first products. You'll learn what the minimum steps are to get your products available and be able to start selling them.
Chapter 3, Using Downloadable Products and Variations, offers various other possibilities when creating products. In this chapter, you'll create downloadable products, learn how to work with attributes, and create variable products.
Chapter 4, Payments, Shipping, and Coupons, shows you how to set up payment and shipping methods for your store. You will also learn how to use discount coupon codes for marketing purposes.
Chapter 5, Working with WooCommerce Themes, shows you what you need to pay attention to and where to buy or download good themes. Having a solid WordPress theme available for your WooCommerce store is very important.
Chapter 6, Customizing a WooCommerce Theme, gives you a brief introduction to themes to get you started. Creating a WordPress and WooCommerce theme is worth a book by itself. You'll actually make code changes to your theme and find some practical examples.
Chapter 7, Running Your Online Store, starts with explaining how to bring a development store live. What do you do when the first orders flow in? How do you use WooCommerce to make sure that orders are handled correctly? We'll also show how to manually create an order and speak about reporting. Time to bring your store online and start selling!
Chapter 8, More Possibilities Using Plugins, explains which plugins to use and where to look for other possibilities. WooCommerce is a plugin for WordPress. On top of WooCommerce, you can install additional plugins to expand or change the functionality. But there are so many options, which plugins are a good choice?.
In this book, we're assuming that you're familiar with using WordPress. You do not need development skills, but just a basic user-level knowledge of WordPress should be sufficient. Your WordPress website should be a self-hosted one. Using WordPress.com is not an option as it does not offer the possibility to install your own WordPress plugins.
If you're not yet familiar with WordPress, we highly recommend that you read one of the WordPress beginner's books or tutorials first. WordPress 4.x Complete from Packt Publishing is a good start (https://www.packtpub.com/web-development/wordpress-40-complete).
If you're already working with WordPress, we're also assuming that you know how to work with an FTP tool, like the free FileZilla.
Besides this, it's handy to have image manipulation software available, such as Photoshop, Photoshop Elements, Fireworks, or Gimp.
Finally, you'll need a code editor if you want to be able to change or create your own WooCommerce themes, a topic that we'll cover in Chapter 6, Customizing a WooCommerce Theme. Well-known editors are Notepad++ for Windows users and Coda or Sublime Text for Mac users. There are plenty of alternatives as well; just use the tools that you like.
This book has been written for everyone who wants to learn how to expand an existing WordPress website with e-commerce functions using the WooCommerce plugin.
WooCommerce is an easy-to-use, but fully-functional, e-commerce plugin that will turn your website into a fully-featured online store. The book is suitable for marketers, e-commerce (project) managers, and web design agencies working with WordPress. First of all, this book is meant for everyone willing to run their own online store on a relatively small budget.
Although this book is not aimed at developers, some WooCommerce code examples are provided in this book.
In this book, you will find a number of styles of text that distinguish between different kinds of information. Here are some examples of these styles, and an explanation of their meaning.
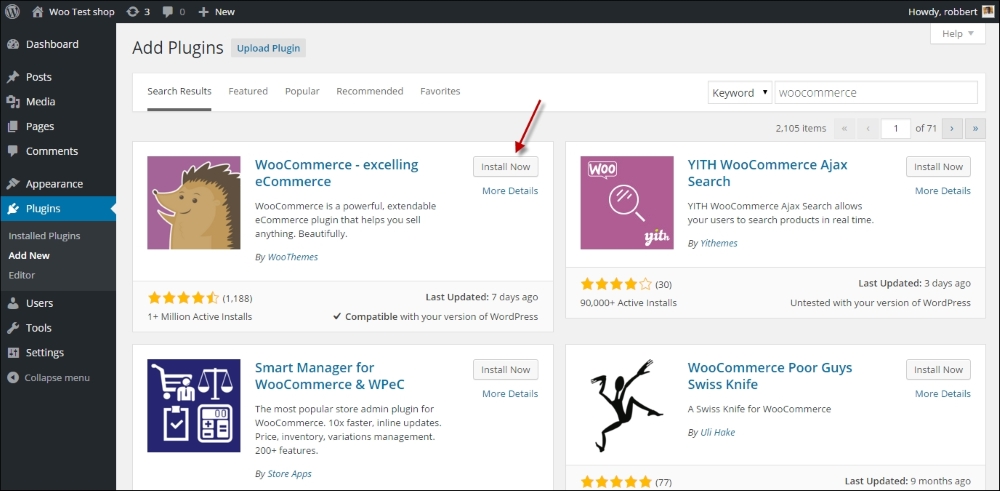
Code words in text, database table names, folder names, filenames, file extensions, pathnames, dummy URLs, user input, and Twitter handles are shown as follows: "Next, simply enter WooCommerce in the Search Plugins field and hit Enter."
A block of code is set as follows:
add_action( 'get_header', 'remove_storefront_sidebar' );
function remove_storefront_sidebar() {
  if ( is_product() ) {
    remove_action( 'storefront_sidebar', 'storefront_get_sidebar', 10 );
  }
}
New terms and important words are shown in bold. Words that you see on the screen, in menus or dialog boxes for example, appear in the text like this: "Click on Plugins in the menu on the left-hand side, and click on Add New".
Feedback from our readers is always welcome. Let us know what you think about this book—what you liked or may have disliked. Reader feedback is important for us to develop titles that you really get the most out of.
To send us general feedback, simply send an e-mail to <feedback@packtpub.com>, and mention the book title via the subject of your message.
If there is a topic that you have expertise in and you are interested in either writing or contributing to a book, see our author guide on www.packtpub.com/authors.
Now that you are the proud owner of a Packt book, we have a number of things to help you to get the most from your purchase.
Although we have taken every care to ensure the accuracy of our content, mistakes do happen. If you find a mistake in one of our books—maybe a mistake in the text or the code—we would be grateful if you would report this to us. By doing so, you can save other readers from frustration and help us improve subsequent versions of this book. If you find any errata, please report them by visiting http://www.packtpub.com/submit-errata, selecting your book, clicking on the errata submission form link, and entering the details of your errata. Once your errata are verified, your submission will be accepted and the errata will be uploaded on our website, or added to any list of existing errata, under the Errata section of that title. Any existing errata can be viewed by selecting your title from http://www.packtpub.com/support.
Piracy of copyright material on the Internet is an ongoing problem across all media. At Packt, we take the protection of our copyright and licenses very seriously. If you come across any illegal copies of our works, in any form, on the Internet, please provide us with the location address or website name immediately so that we can pursue a remedy.
Please contact us at <copyright@packtpub.com> with a link to the suspected pirated material.
We appreciate your help in protecting our authors, and our ability to bring you valuable content.
You can contact us at <questions@packtpub.com> if you are having a problem with any aspect of the book, and we will do our best to address it.
During the last couple of years, WordPress has outgrown any other Content Management Solution worldwide. Numerous websites are built using WordPress on a daily basis. WordPress is even popular among large companies. Currently about a quarter of all websites worldwide are powered by WordPress.
WooCommerce is a plugin for WordPress that turns your website into a complete online store. Practically in minutes, but that doesn't mean that the solution is very limited. This book will show you what you can do with it. WooCommerce is a versatile plugin that gives the possibility for everyone with a little WordPress knowledge to start their own online store.
Originally, WooCommerce was derived from the Jigoshop plugin. The WordPress theme developers of WooThemes quickly brought the solution to a higher level and soon it became the most popular plugin for e-commerce within WordPress. In 2015, Automattic (the company behind WordPress) acquired WooThemes and WooCommerce. So we could almost say that WooCommerce has become the default ecommerce solution for WordPress now. At time of print WooCommerce is even powering 30% of all online stores worldwide.
In case you are not familiar with WordPress at all, this book is not the first one you should read. No worries though, WordPress isn't that hard to learn and there are a lot of online possibilities resources to learn about WordPress solution very quickly. Or just turn to one of the many printed books on WordPress that are available.
The following are the topics covered in this chapter:
Before we start, remember that it's only possible to install your own plugins if you're working in your own WordPress installation. This means that users that are running a website on WordPress.com will not be able to follow along. It's simply impossible in that environment to install plugins yourself. WooCommerce has recently become a part of WordPress itself. I can imagine that because of this WooCommerce might become available for WordPress.com users in the future. But so far there are no signs yet of an integration of WooCommerce into WordPress.com.
When starting with WooCommerce there are two situations that might occur:
Either way, you'll need a test environment to be able to play with WooCommerce and follow along with this book. Although technically possible to add WooCommerce to an existing WordPress website immediately, I highly recommend using a test environment. Things can and will go wrong and you don't want to confront your current visitors with your experiments.
Setting up a WordPress test environment isn't as difficult as it might seem. There are tons of tutorials available, whether you're working on Windows or working with a Mac. When you want to add WooCommerce to your existing website, this is what you need to do to setup a test environment:
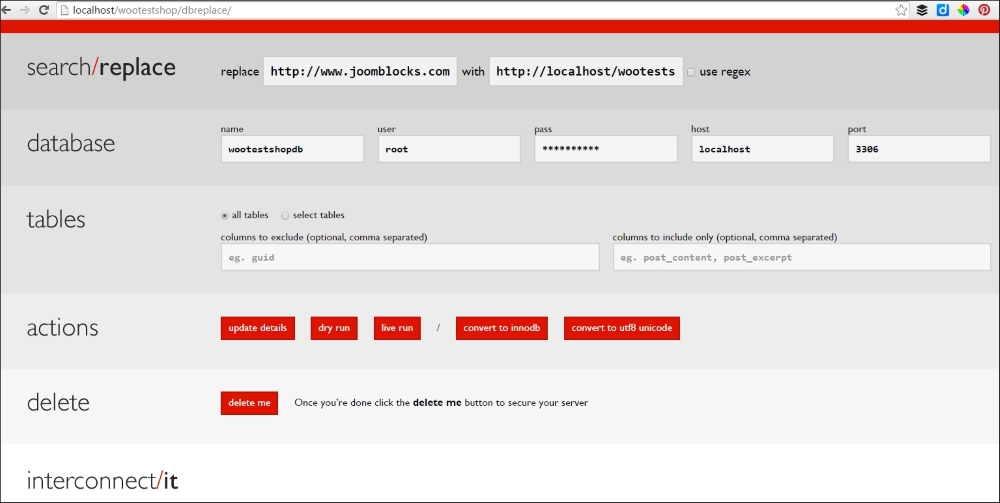
Alternatively, install a copy of your WordPress website as a temporary subdomain at your hosting provider. For instance, if my website is http://www.example.com, I could easily create a copy of my site in http://test.example.com. Possibilities may vary, depending on the hosting package you have with your hosting provider. Also in this scenario you need to adjust the content of the database, as mentioned in step four above.
If in your situation it isn't needed to add WooCommerce to an existing WordPress site, of course you may also start from scratch. Just install WordPress on a local test server or install it at your hosting provider.
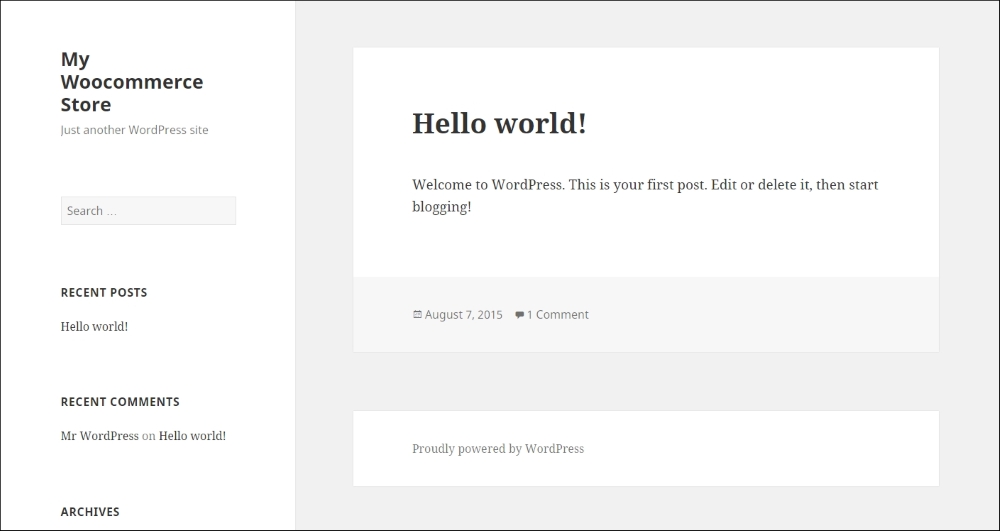
To keep our instructions in this book as clear as possible we did just that, so that there's no visible interference with already existing content and a custom theme. We created a fresh installation of WordPress version 4.2. Below you see a screenshot of our setup, still completely empty using the Twenty Fifteen default theme:
More information about setting up a test environment and restoring your website on it can be found in the following articles:
More tutorials will also be available on our website: http://www.joomblocks.com. Don't forget to sign up for the free Newsletter, that will bring you even more news and tutorials on WordPress, WooCommerce and other Open Source software solutions!
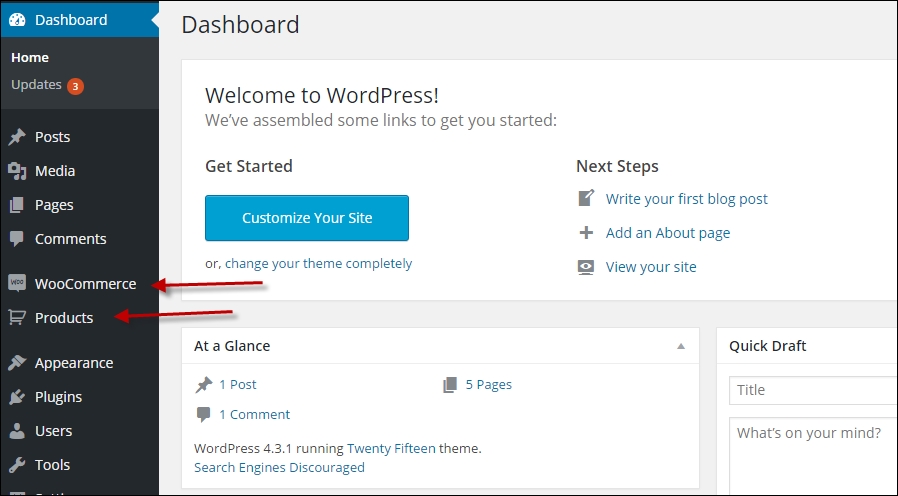
Once ready, we'll be able to take the next step and install the WooCommerce plugin. Let's take a look at our WordPress back-end. In our situation we can open this by browsing to http://localhost/wootestshop/wp-admin. Depending on the choices you made above for your test environment, your URL could be different.
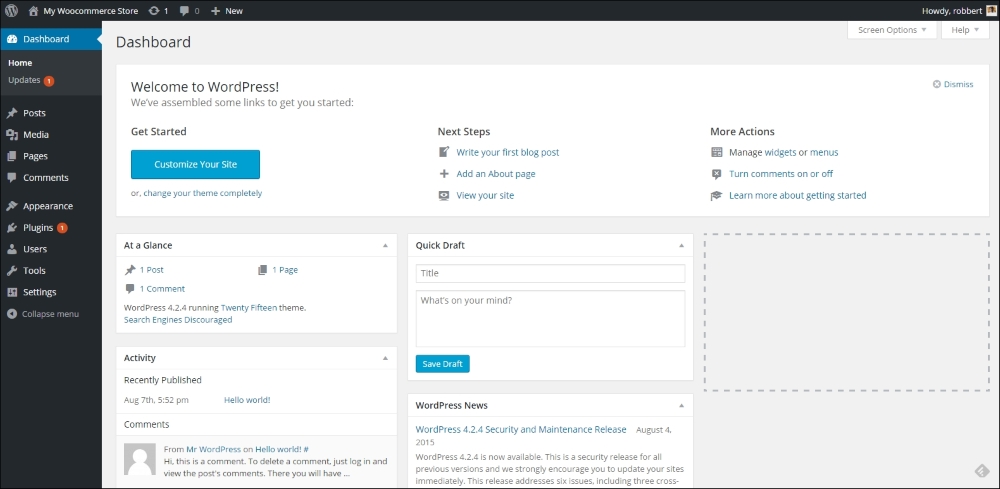
Well, this should all be familiar for you already. Again, your situation might look different, depending on your theme or the number of plugins that are already active for your website.
Installing a plugin is a fairly simple task:
WooCommerce in the Search Plugins field and hit Enter.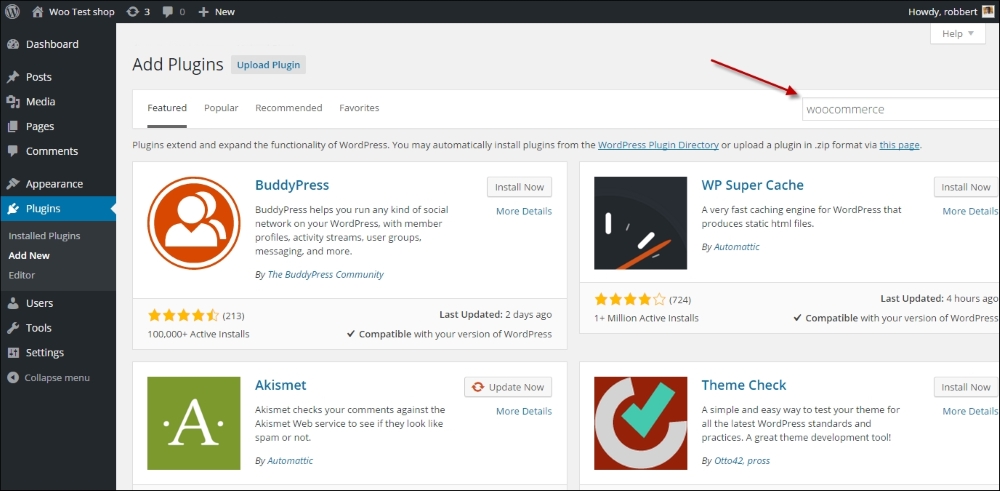

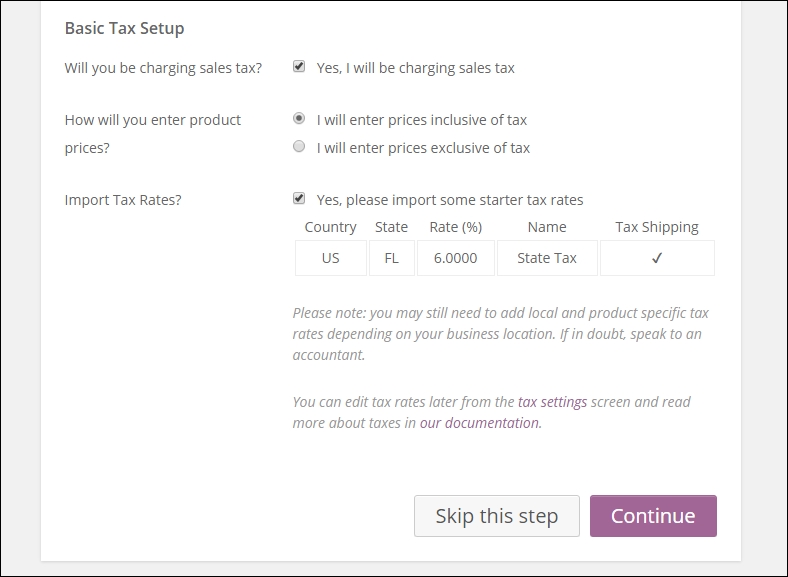
If you enable the checkbox Yes, I will be charging sales tax, additional options will become visible. WooCommerce will suggest some default tax settings, based on the country/region you selected at step 7:
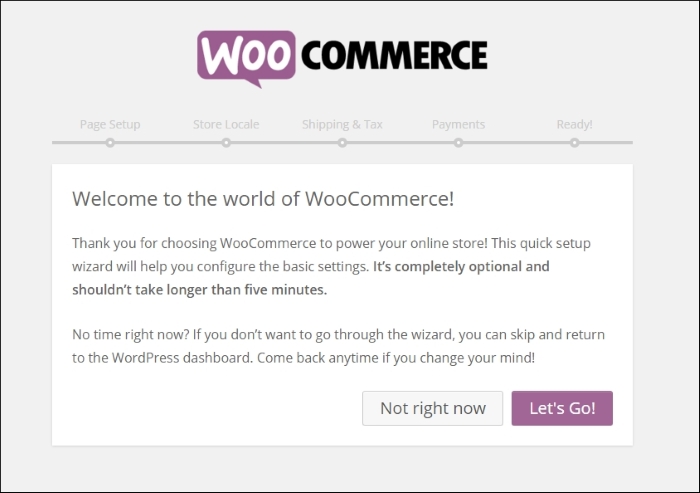
In our example project, we're installing the English version of WooCommerce. But you might need a different language. By default, WooCommerce is already delivered in a number of languages. This means that the installation will automatically follow the language of your WordPress installation. If you need something else, just browse through the plugin directory on WordPress.org to find any additional translations.
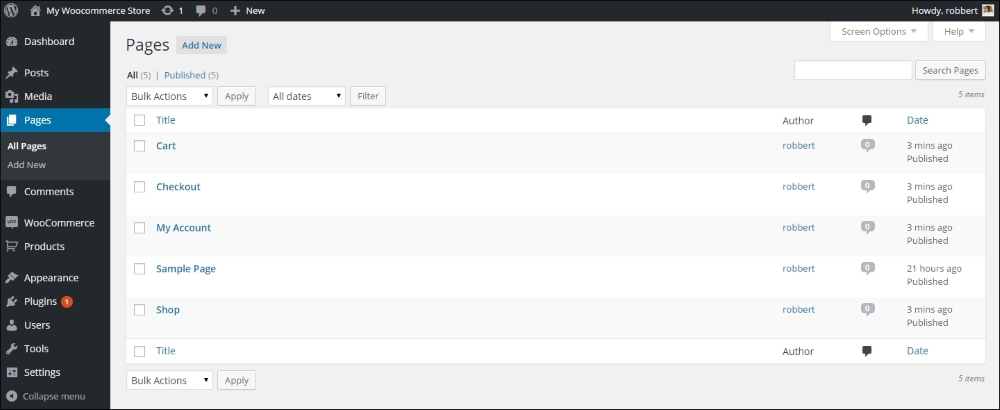
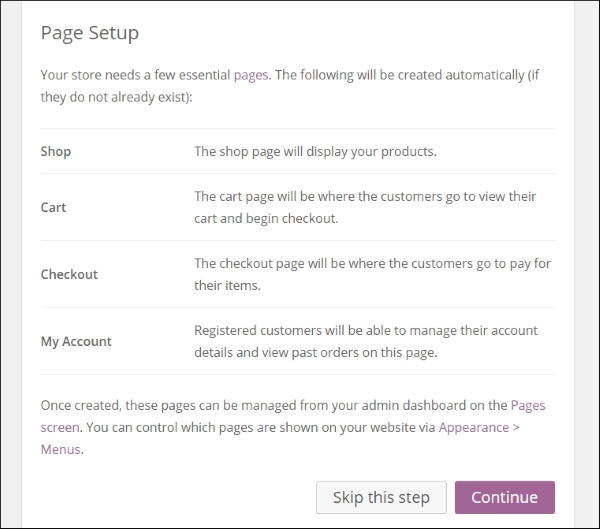
Note that if you open a page that was automatically created by WooCommerce, you'll only see a shortcode, that is used to call the needed functionality. Do not delete the shortcodes, or important WooCommerce pages like Cart, Checkout, and Shop will not work properly. However, it's still possible to add your own content before or after the shortcode on these pages.
WooCommerce is usable straight out of the box. However, in this section we'll cover almost every setup parameter that you may use to control your online store. Going through all settings might be quite overwhelming in the beginning, but it will help you in exploring the possibilities of WooCommerce.
Click on WooCommerce in the left menu and then click Settings. A new page holding different tabs with settings appears. The first one visible is the tab named General:
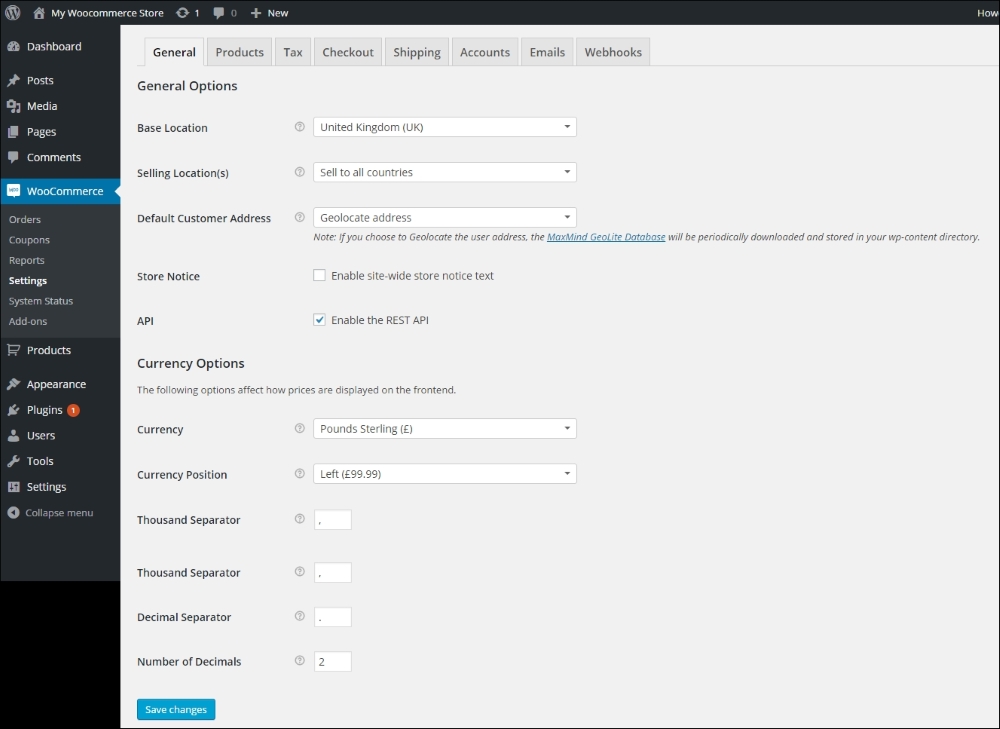
You will find certain fields described as follows:
Moving to the next tab you'll find different settings related to the usage of products in WooCommerce. Note that this tab is divided into four different sub areas, starting with another General tab:

The next area, named Display, shows several settings for products and categories:
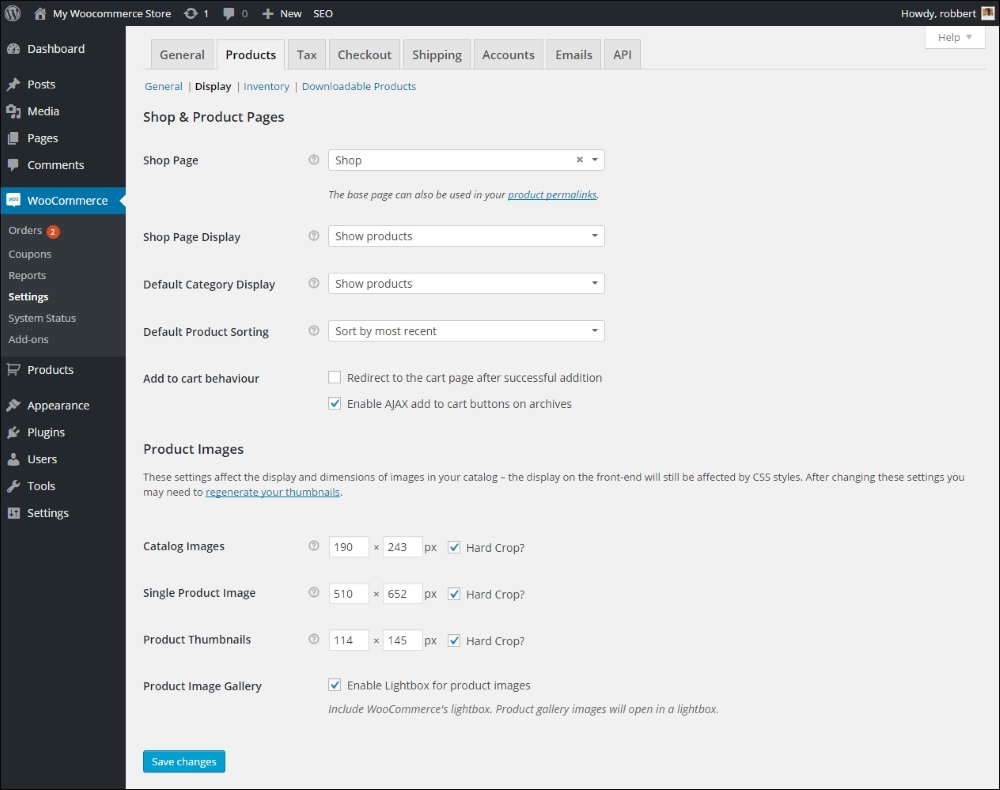
The setting for products and categories are as follows:
If you change the image sizes after you created products or when using a new WordPress theme later on, the Regenerate Thumbnails WordPress plugin https://wordpress.org/plugins/regenerate-thumbnails/ is very useful. It recalculates all images and image sizes at once.
The next section shows various settings to manage the inventory of your products.
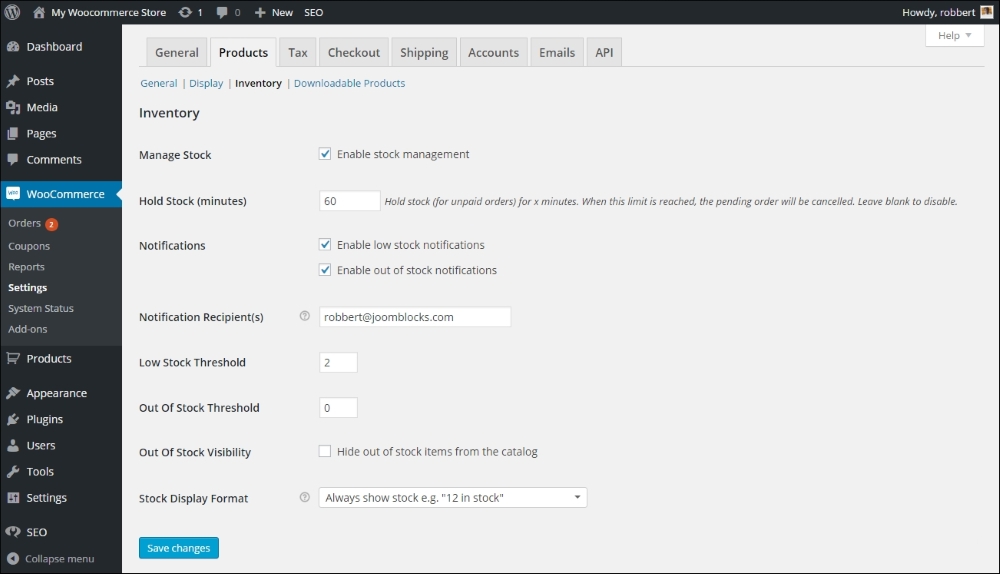
The inventory settings for the product page are as follows:
Remember to click the Save changes button at the bottom!
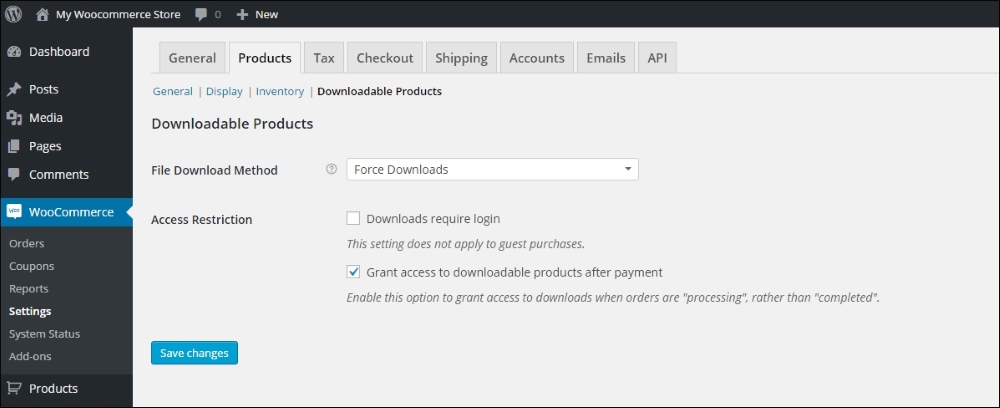
The last section holds some settings for downloadable products. If you're not planning to work with digital products you may skip this section:

The options are as follows:
Setting up taxes can be a difficult task. Of course there's no 'one size fits all' approach possible here. Tax laws and calculations differ from country to country and region to region. Besides that there's a large difference in handling taxes when selling goods to consumers or to other businesses. So in here we'll just stick to the basics, by explaining the functionality WooCommerce has available. It's up to you to find out how tax calculations should be done for your specific situation.
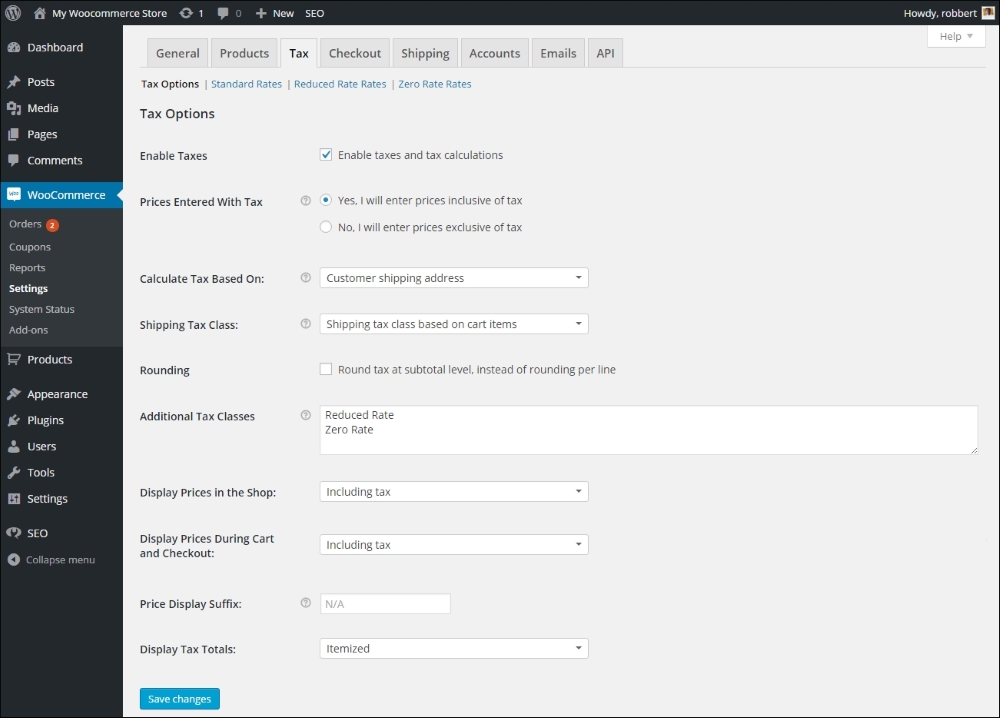
The settings for Tax Options page are as follows:
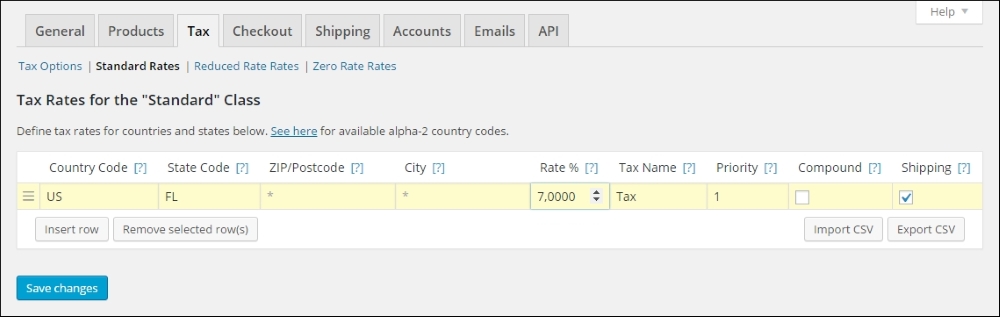
Note that it's possible to import a CSV file with tax rates, which can be handy if you need to setup a lot of them. The Import CSV button brings you to the Tools | Import section of WordPress. Over there you'll also find the possibility to download an example file.
In a simplified way, assuming only one tax percentage applies, WooCommerce offers this method to calculate the tax amount:
Tax calculation for gross price (amount entered inclusive tax) is: tax_amount = price - ( price / ( ( tax_rate_% / 100 ) + 1 ) ).
Tax calculation for net price (amount entered exclusive tax) is: tax_amount = price * ( tax_rate_% / 100 ).
When setting up taxes you might need to look up the two-digit country codes. Wikipedia has a good overview of all of them: https://en.wikipedia.org/wiki/ISO_3166-1#Current_codes. Wikipedia is also helpful when you need more information on tax rates per country: https://en.wikipedia.org/wiki/List_of_countries_by_tax_rates.
Setting up sales tax for the USA can be quite challenging sometimes. There's an easy solution for it, which is made available by WooTax: https://wootax.com/. Alternatively, have a look at the services offered by woosalestax.com (http://www.woosalestax.com/).
Moving on to the Checkout settings tab, we see again several sublevels. For this moment, we'll only discuss the Checkout Options. All other panels contain setup information about specific payment methods. More on choosing and configuring payment methods will be discussed in more detail in Chapter 4, Payments, Shipping, and Coupons:
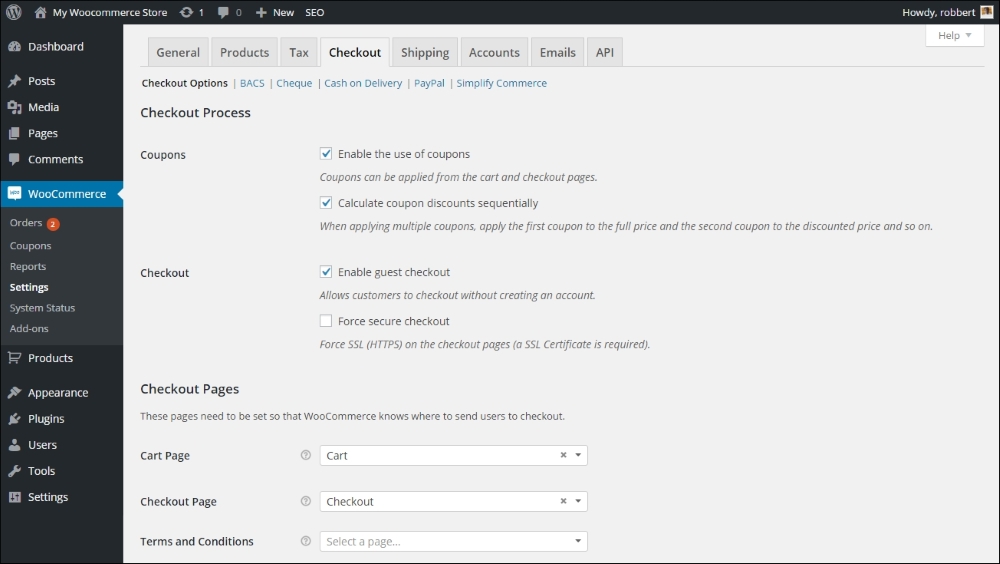
The Checkout Options are as follows:
Not sure what a SSL certificate is and how to use that for your website? The principle cannot be explained in just a few sentences, but by using a SSL certificate on your website you'll be able to offer your visitors a safe connection during checkout. More and more customers pay attention to security measures like this. There are lots of companies that offer SSL certificates. Verizon (http://www.verizonenterprise.com/products/security/identity/ssl/) is a major player, but you may just as well ask your hosting provider for help. Especially if you need to be able to collect credit card information directly on your own website, using a SSL certificate is a must. In case you're using a payment service provider you do not really need one, but increasing trust is always a good thing. Besides that, the SSL certificate seems to become more important lately now that also Google considers it as one of the many ranking factors. So your website will rank better in Google if you have SSL enabled. More on payments will follow in Chapter 4, Payments, Shipping, and Coupons.
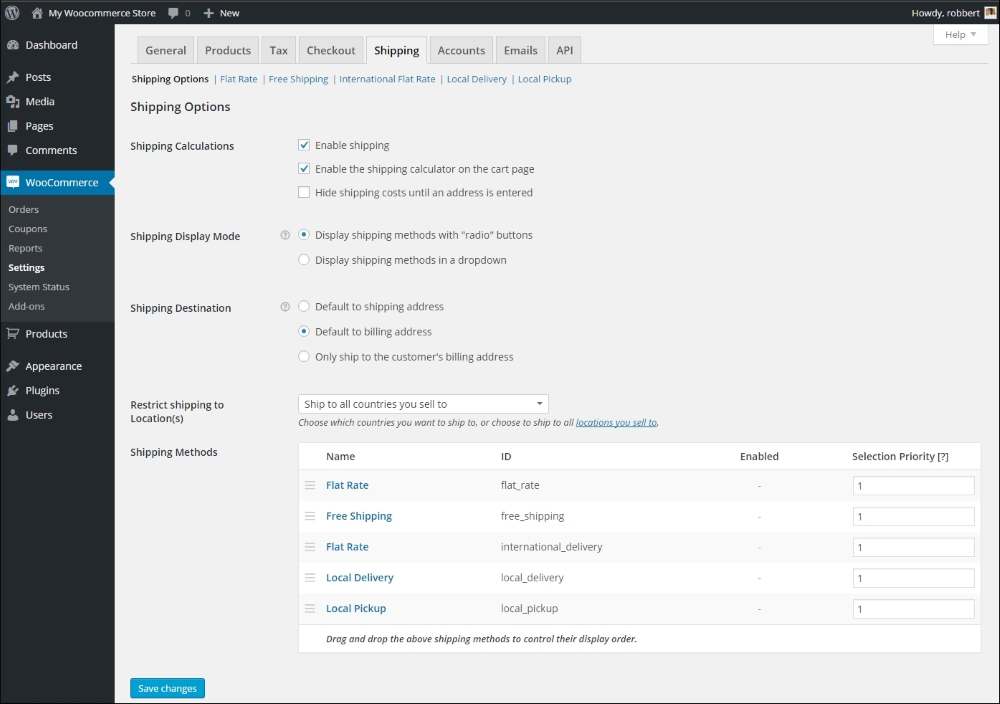
Setting up Shipping works in a similar way as the Checkout setup. In here we'll show the Shipping Options and in Chapter 4, Payments, Shipping, and Coupons we'll get back with more detailed instructions:
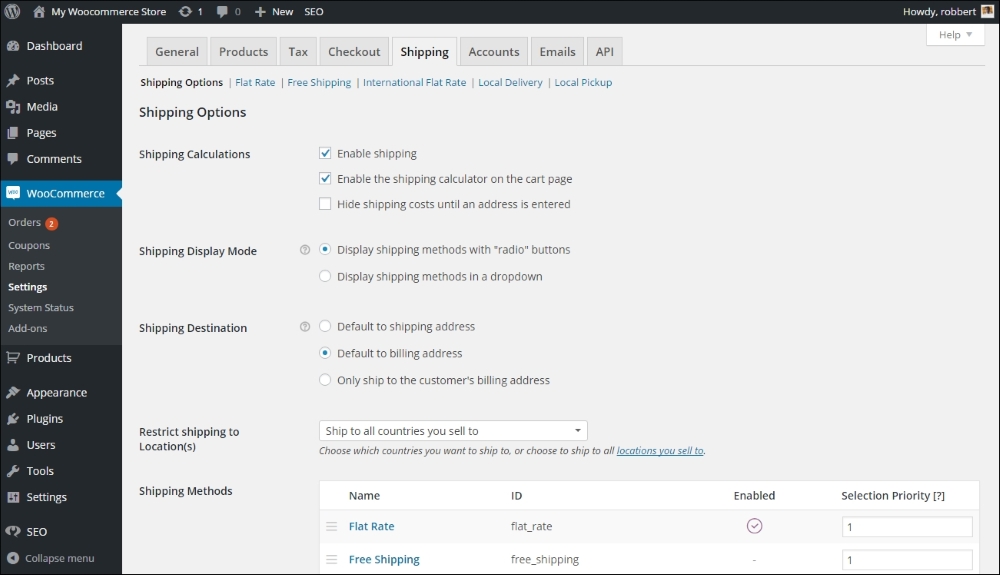
The Shipping Options settings are as follows:
We're moving to the next tab, named Accounts. There are only a couple of settings here that you need to pay attention to:
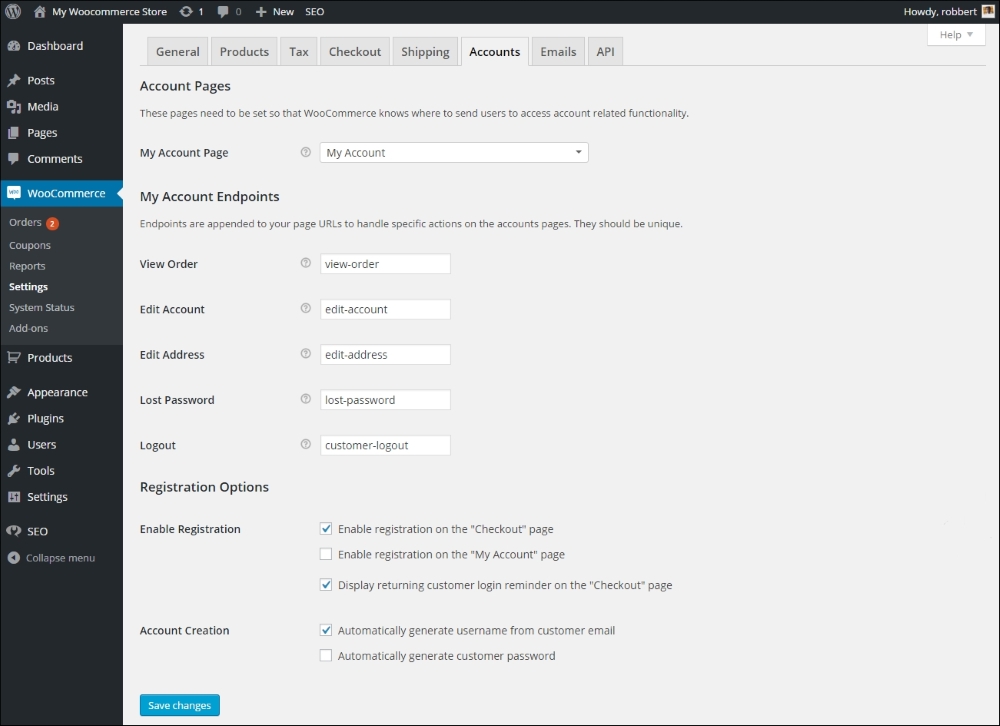
The setting for Accounts is as follows:
In this tab, you can configure the way WooCommerce handles e-mails it will send to your customer:
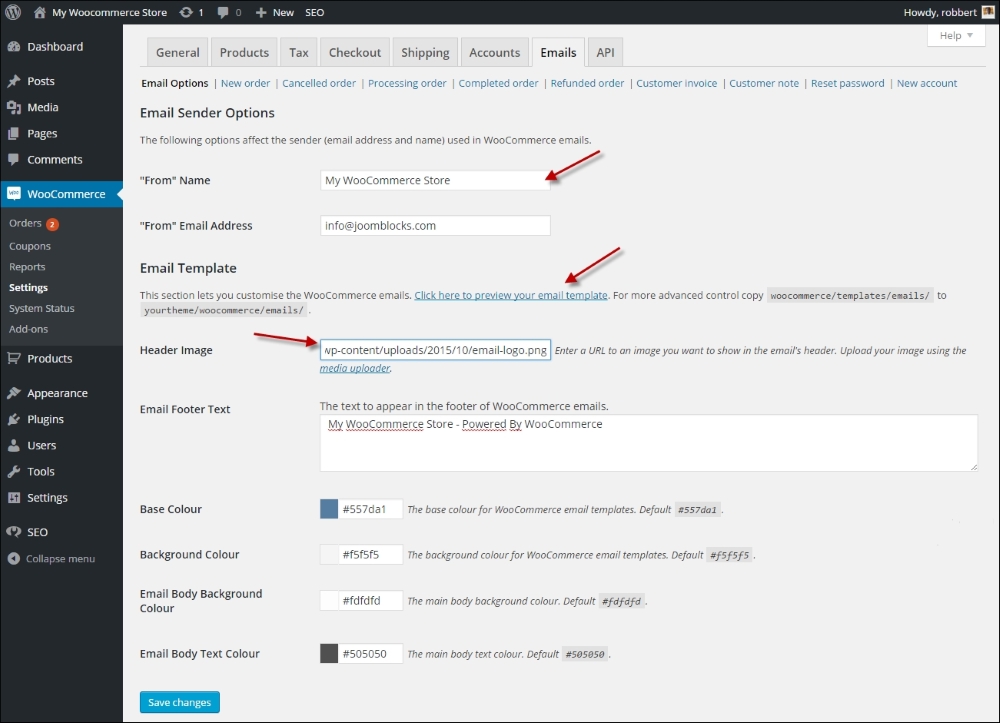
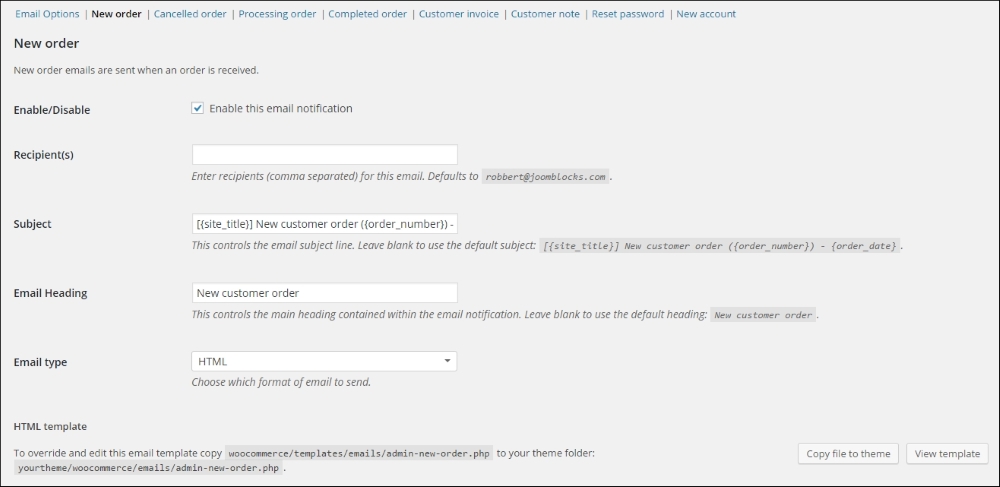
Also this tab contains several sub areas, starting with Email Options and followed by a couple of settings for every type of email WooCommerce can send:
The Api Settings tab is not discussed in this book. Api keys and Webhooks can be used to integrate third party tools with WooCommerce. Based on a trigger, another website or service can receive data from WooCommerce when certain events happen on your site, for instance when a new order is created. More information on Webhooks can be found here: http://docs.woothemes.com/document/webhooks/.
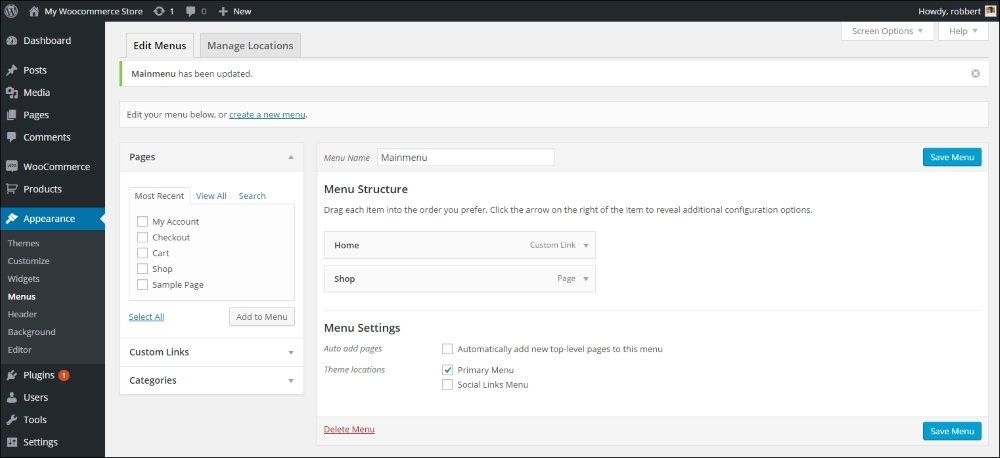
Now that we had a look at all settings of WooCommerce it's time to start adding products to our store. Before we do so, there are a couple of things that we need to do before moving on:
Storefront in the search box and hit Enter. Click the Install button and activate the theme after installation.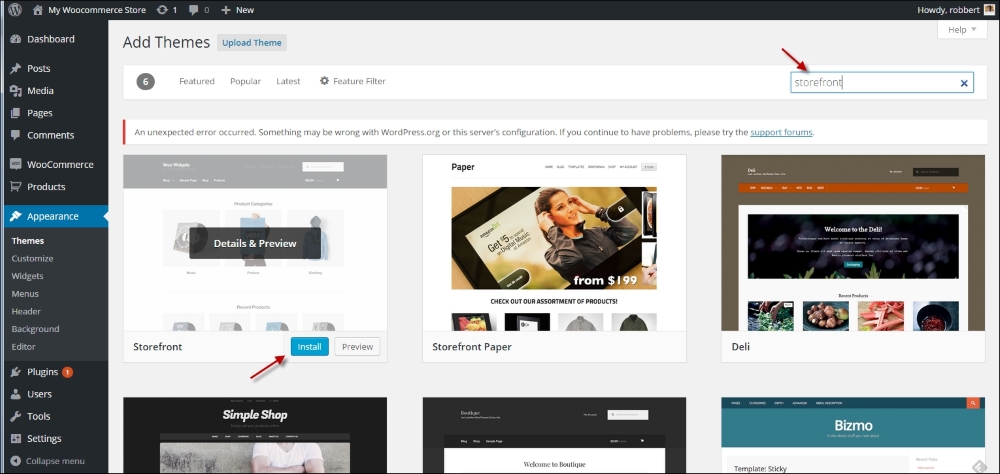
If you'd like to read more on installing WordPress themes you may use this link for a full tutorial: http://www.joomblocks.com/installing-wordpress-themes:
For this moment, we've covered the most important settings and we're ready to move to the next step. We've learned to setup a test environment and install WooCommerce, use the WooCommerce settings to setup our store in a way that fits our needs. Make the store available in our menu and install a WooCommerce compatible theme for our test environment.
In the next chapter, we will create our very first products.
Now that WooCommerce is up and running and we had a look at its settings it's time to start creating a couple of products and build our online store. WooCommerce offers several possibilities to create your product catalog. In this chapter, we'll stick to the basics. You'll learn to:
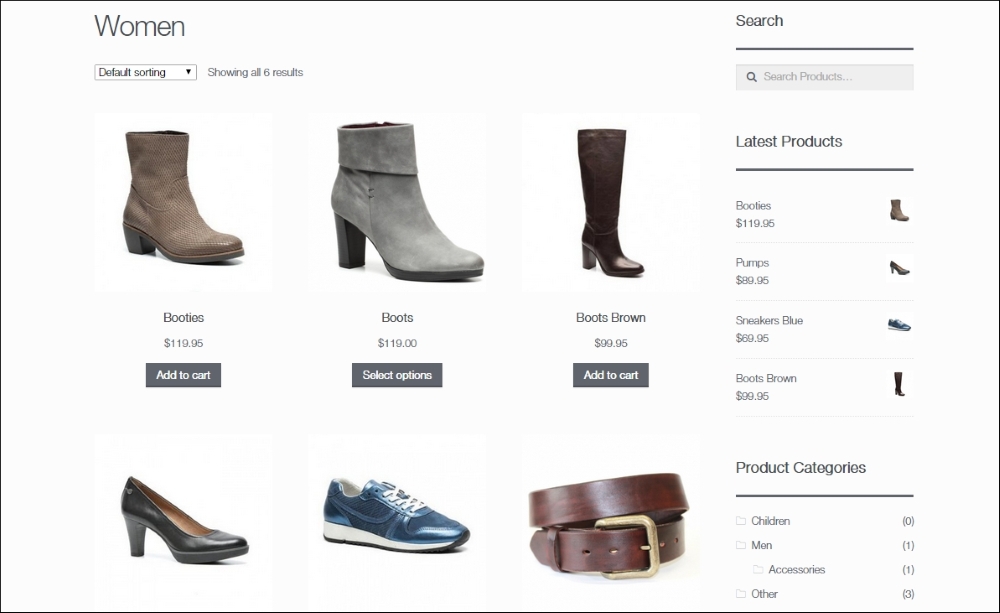
When setting up your product catalog, it often makes sense to create Categories for your products, even if you have not so many products. Using a clear category structure makes it easier for your visitors to navigate and search your store. Further on you can use Tags and Attributes in your product catalog. Categories and Tags work in the same way you're used to from WordPress itself. Attributes are important for more complex product types. For instance, if I have a category for women's dresses, I could add Attributes for size and color. We'll discuss that in more depth in Chapter 3, Using Downloadable Products and Variations. Besides this, Attributes can also be used to add additional information to simple products.
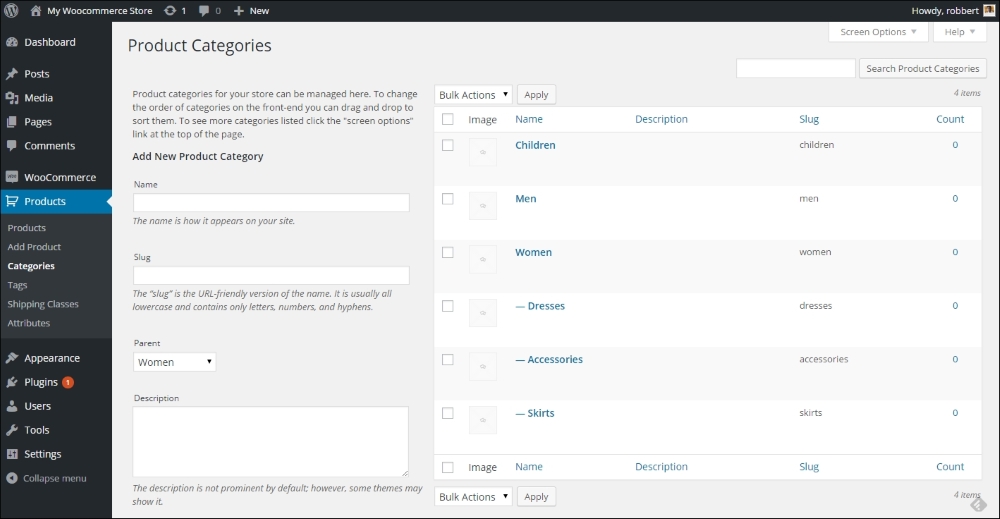
For now, we'll just set up our category structure. Let's assume we are going to sell apparel in our store. We could start with three main categories in that case: Women, Men, and Children. If you're used to working with categories for (blog) posts in WordPress, you'll have no problem in creating them for your products. To create categories, perform the following steps:
Now that our first category has been created it's easy to add some more. Also we can create the next levels, by choosing one of the top categories for the Parent field. A simplified category structure could look like this:
Once we've created some categories, it's time to start entering our first product. Click Products | Add Product in the menu on the left. Looking at the categories we created, most of the products will require sizing and colors as well. That's something we'll discuss later on, so for now we are going to create a simple women's belt in the category Accessories.
In the example below you'll see that we already pre-filled a lot of information, just to give an idea of the fields you need to start with:
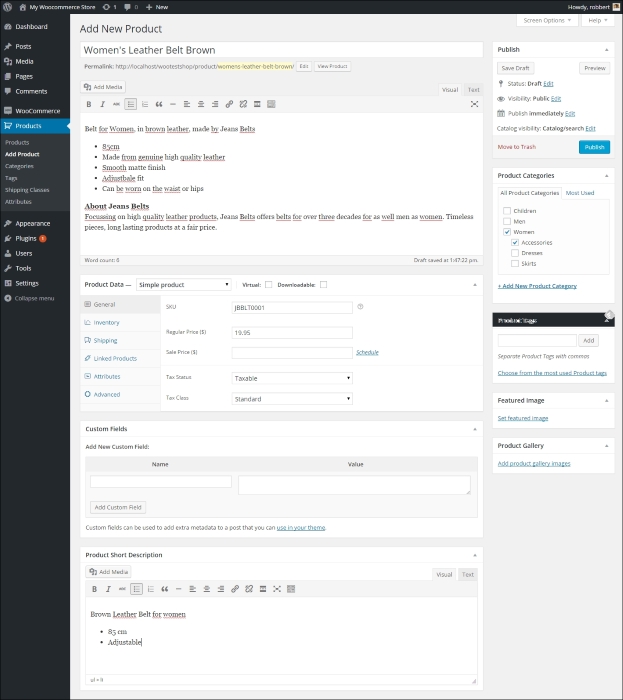
Let's have a closer look at all the available fields:
If you want to do more on the optimization of your online store for the search engines, we highly recommend using the SEO plugin of Joost de Valk (Yoast). It's a general SEO plugin for WordPress, but it works fine with WooCommerce as well. You may find it here: http://wordpress.org/plugins/wordpress-seo/.
The first tab in the area with product data is active by default and is named General. Just above that, you will notice that it's possible to select a Product Type and that there are two checkboxes available: Virtual and Downloadable. These are all items that will be discussed in Chapter 3, Using Downloadable Products and Variations. For this moment, we'll stick to the Simple products. These are suitable for anything that is a regular, physical product, without the need for the buyer to choose options or variables. For instance, a t-shirt available in different sizes is not a simple product, but a variable product. Let's take a closer look at the available fields for our simple product:
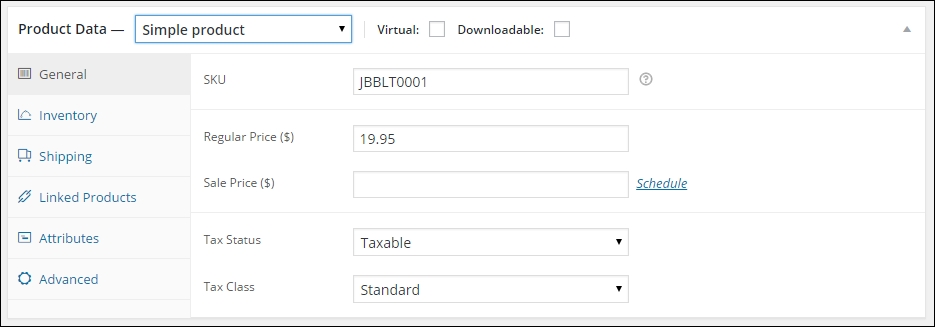
The parameters in the General tab are as follows:
Moving to the next tab, we'll find a couple of settings that control the way we're handling stock levels for this product:
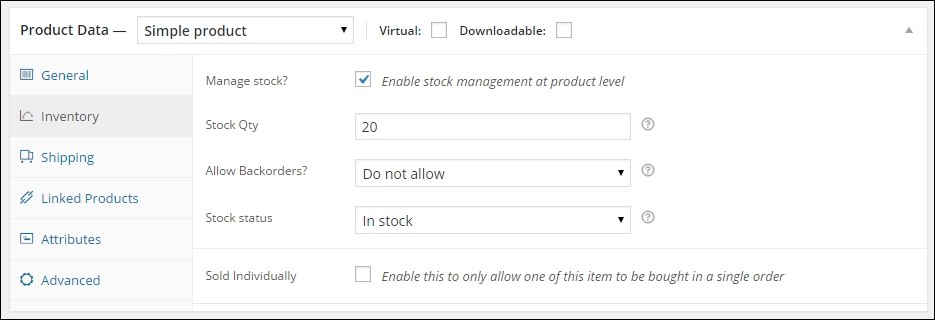
The parameters in the Inventory tab are as follows:
Note: The product stock status can be used even if enable stock management is disabled in WooCommerce main products settings, which we discussed in Chapter 1, Setting Up WooCommerce.
Sometimes you need to be able to add additional information to your product, because shipping possibilities or rates might depend on the weight and size of your product.

The parameters in the Shipping tab are as follows:
Since this is our first product, we can skip the Linked Products and Attributes tabs for this moment. We'll use those later on.
We'll be using attributes a lot during the next chapter, when we'll be discussing more complex product types. The usage of attributes often even makes sense for simple products. Attributes offer a way to store structured product data in a way that it can be used for searching and filtering products. Instead of entering for instance the fabric as text, we could create an attribute for it. Using that method will give more possibilities to your customers to filter your product catalog. Besides that the attributes will be shown to the customer in the front end on the product page, in the More information tab.
Refer to Chapter 3, Using Downloadable Products and Variations, for more information on using attributes.
There are a few interesting fields in the Advanced tab:
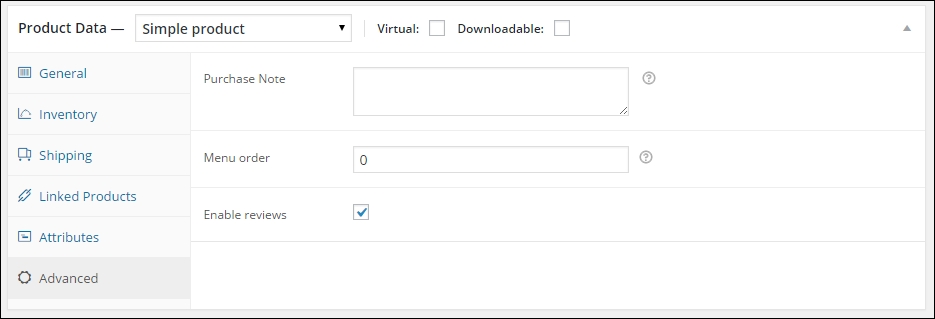
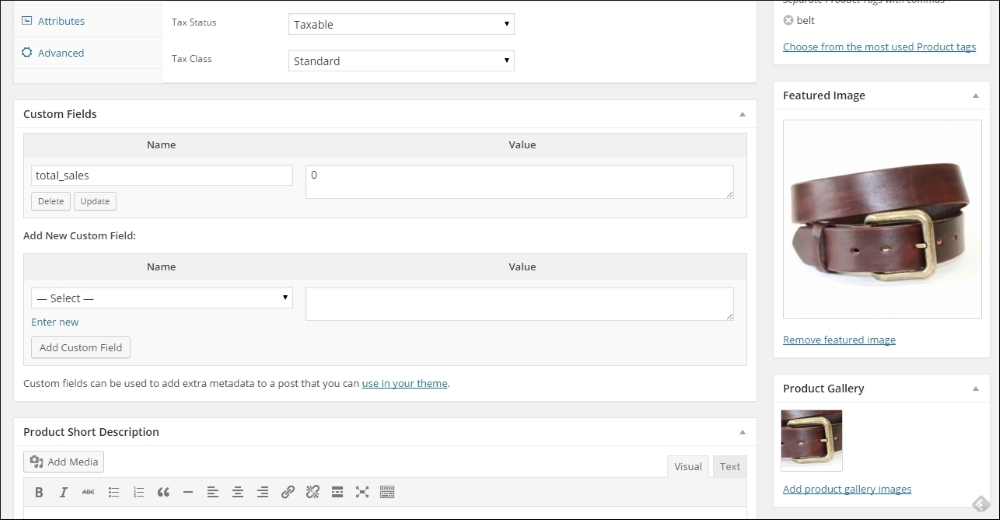
We're almost there now. Under the product data section there's a possibility to use custom fields that we also know from regular WordPress posts. We do not need that now. Always first try if you can solve your need using the standard available Attributes and Tags.
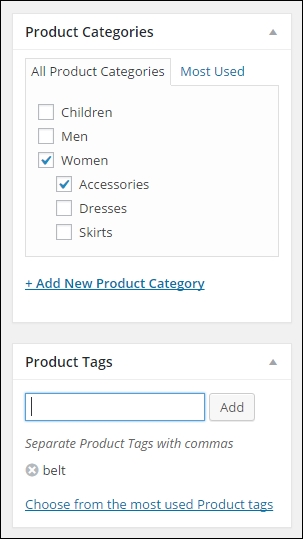
So far we've just used the main part of the product creation page. On the right there are the well known fields to publish the item. But before we do, we first need to take care of some other data, starting with the Product Categories. Just as with any regular WordPress post, just click the categories your product belongs to. Note that it's possible to select more than one category.
Next, set the Product Tags by entering them in the field and just press Enter. Don't use too many tags per product, stick to using a few. Having too many tags might lead to duplicate content, because the chance of having multiple pages with the same content increases in that case.
What is duplicate content? We speak of duplicate content if your website has the exact same content under two or more different URLs. You need to prevent that from happening, because search engines like Google won't know which page to show. The problem becomes bigger when people start linking to the different versions of the (same) content. Using too many tags for your posts increases the chance of having duplicate content. Joost de Valk from Yoast.com wrote some exceptional detailed information on this topic: https://yoast.com/duplicate-content/.
In the next screenshot you see an example of as well the selected categories as some tags that were entered for this product.
Below the Product Tags, there are two areas that allow you to add two of images to your product: the Product Gallery and the Featured Image. Before we start adding images, let's go back to the first chapter. Remember that we crossed a couple of settings that influence our image sizes? If you want to go back there now, first save your product as a draft and then go to WooCommerce | Settings | Products | Display using the menu. The image settings are on the bottom of that tab:
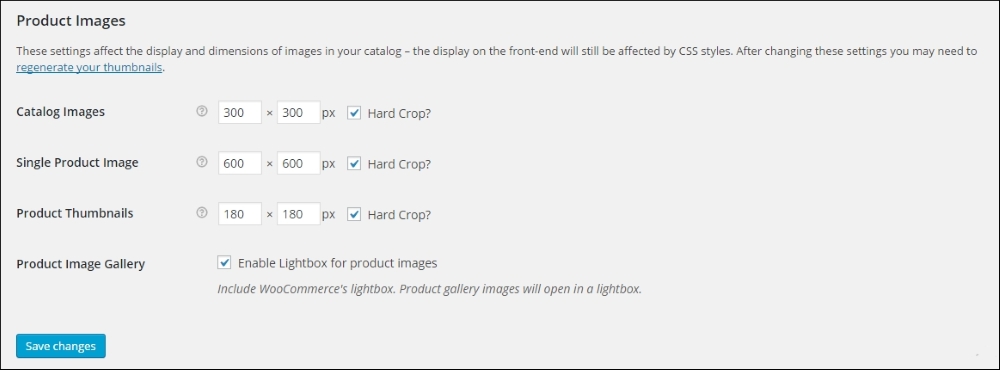
There are three image sizes that will be used by WooCommerce:
It is important to use the same ratio for all three sizes. It's not mandatory to keep the width and height the same, the portrait format (where the value for width is smaller than the value for height) is often used as well, especially on fashion websites.
The check box at the field hard crop means that if you upload an image with a different ratio, they will automatically be cropped to the correct ratio as set here. This might mean losing a part of your image. Therefore it's always good to just prepare your images before uploading them to your website. Use the correct image ratio and use an image size that is at least as large at the dimensions of the Single Product Image.
Note: Not sure which values to use? Before you make final settings and start filling your product catalog with lots of items, it's important that you have set these values correctly. If you're buying a theme for a store, the documentation of the theme will often explain what to use. If you're creating a theme yourself, you're completely free in your choices of course. Sometimes it's necessary to regenerate all your product images, just because you changed the settings previously after you created your products. As also mentioned in Chapter 1, Setting Up WooCommerce, there's a plugin that can help you with this task: http://wordpress.org/plugins/regenerate-thumbnails/.
We're heading back to our product to start adding our images. The first and most important image is the Featured Image. Just add that by clicking on the link Set Featured Image. This will open your media library, just like you are used to from creating WordPress posts or pages.
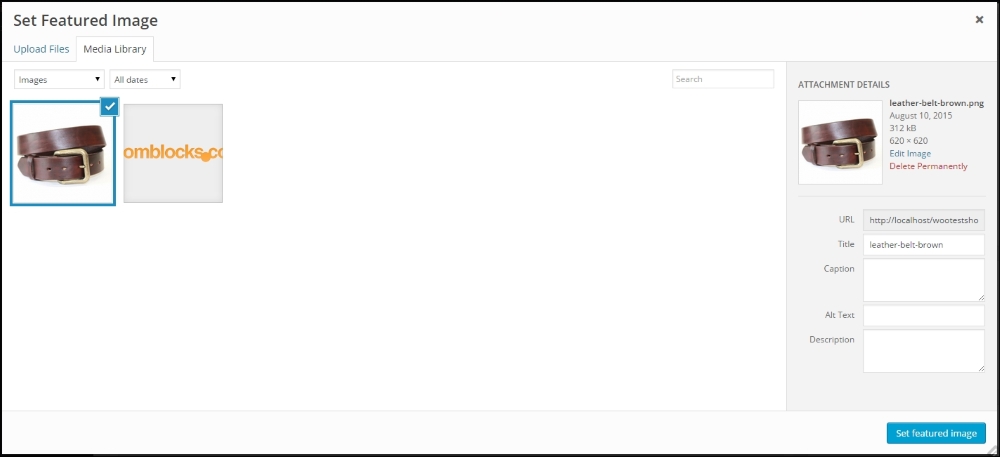
Click Select files and open a single image from your local machine. Don't forget to set a Alt Text and Description. Those are important for search engines! Then click the Set featured image button on the right. You'll return to the product maintenance page. If you have multiple photos available, don't hesitate to add those as well. Lack of good product photos is for sure a conversion killer. Click Add product gallery images and add the images you have available. Again, also for these images fill the Alt Text and Description fields. The result looks something like this:
We finished the most important steps for our product and can publish it on the top right by clicking the button Publish. Of course we also want to have a look at the result in the front-end of our store. You may open the product page directly by clicking the button View Product on the top of the product screen.
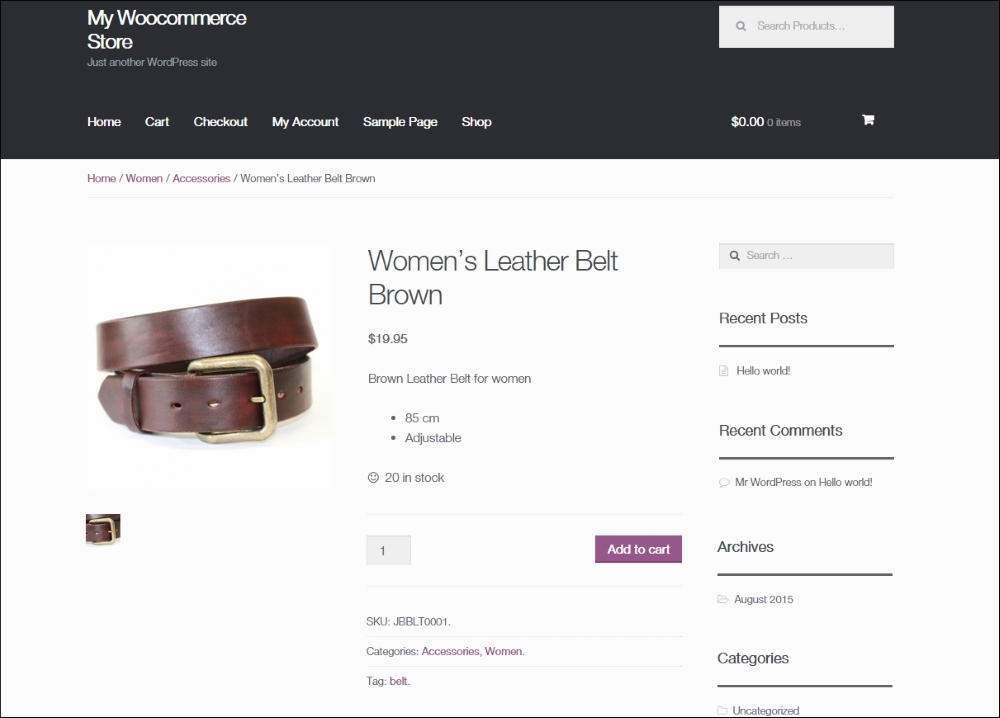
Since we are using the default Twenty Fifteen theme here, the layout of the page is okay but not more than that. Things could be better if we'd used an optimized WooCommerce theme. More on that topic will follow during Chapter 5, Working with WooCommerce Themes.
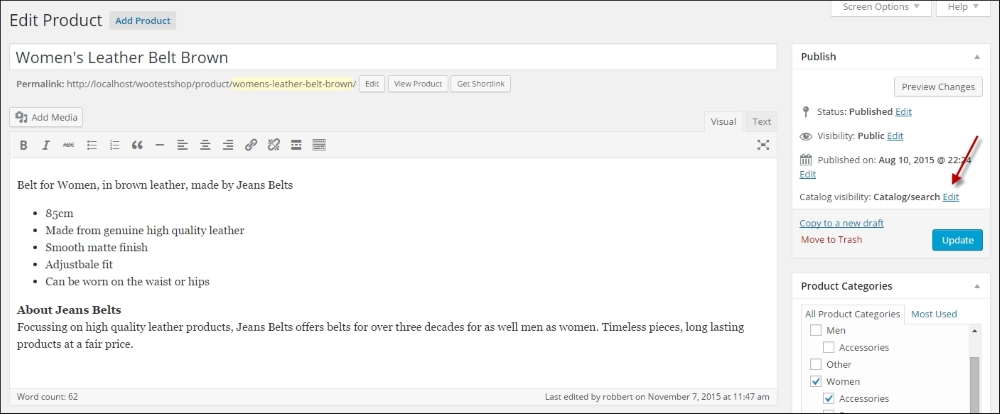
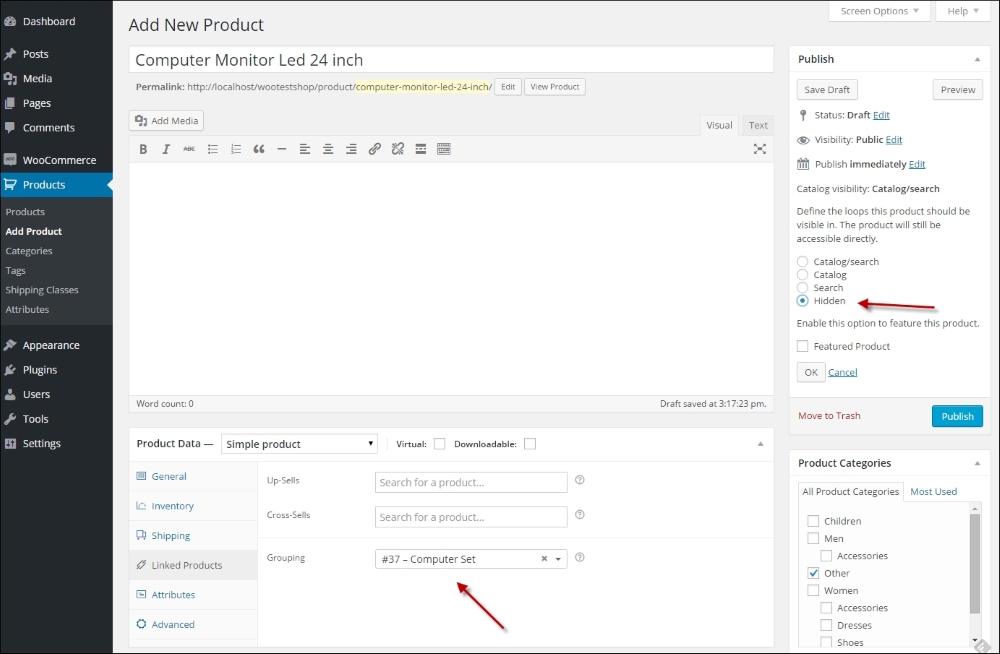
When publishing our product there are some more options that we can use to influence the behavior of WooCommerce for this product. First navigate back to your product and edit it. On the top right we see several default WordPress fields, that we already know from regular posts like Status, Visibility, and Published on. The behavior of these fields is exactly the same as for a regular WordPress post and gives you the possibility to control if and when a product becomes visible.
Next, click on the Edit link near Catalog visibility, as shown in the following screenshot:
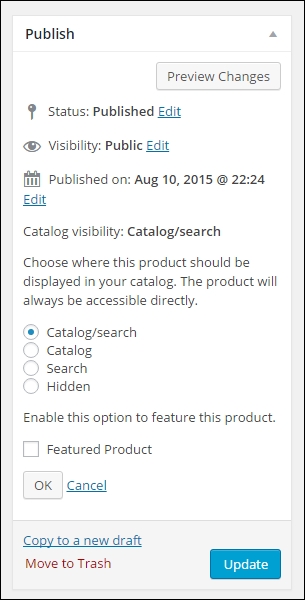
The default value, Catalog/search will have as result that:
The other possibilities are:
Just above the Ok button, there's a checkbox to make your product a Featured Product. Featured Product allows you to showcase specific products in different parts of your online store. You can for example show featured products in a slider on your homepage or in a widget. We'll show those possibilities later on in this book:
Remember to click the Update button if you make any changes to your product.
During this chapter, we have learned to create our very first products in WooCommerce. We have seen how to use the most important WooCommerce fields to determine the behavior of our product.
In the next chapter, we will be adding more complex products and learn how to use attributes to create them.
Our first product is available and we could easily continue using the same method to create multiple products in the same way. However, WooCommerce offers more possibilities than we just learned. In this chapter, we'll cover the following topics:
We've mentioned the usage of product tags already in Chapter 2, Creating Your First Products. Using tags works exactly in the same way that you're used to when writing WordPress posts. So in here, we do not want to spend too much time in explaining the concept.
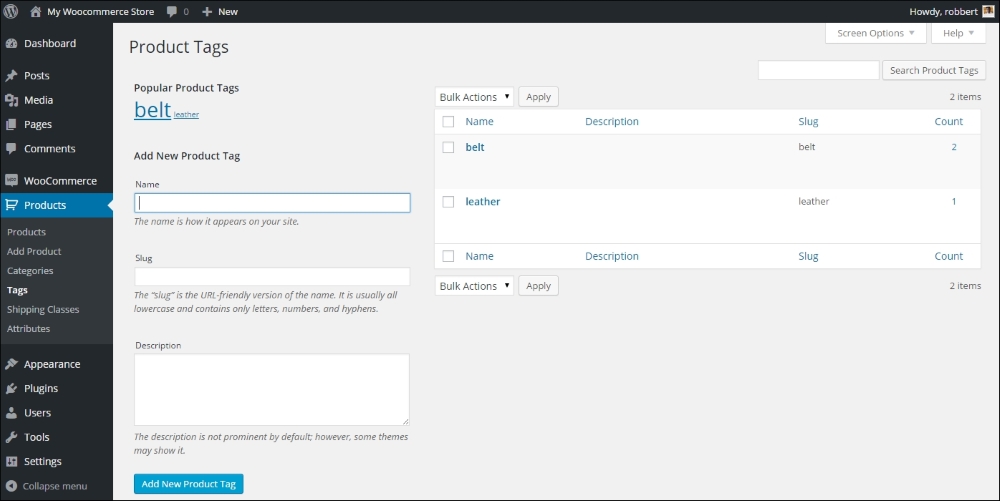
Just be aware that Product Tags and Tags for Posts are actually separated from each other. You may find the tags that you already used by navigating to Products | Tags in the menu on the left-hand side of your screen. Note that the tags that you entered during product creation appear here. Besides that, it's also possible to create a list of tags immediately in the Edit Product screen and use them later on. In general, when using a new tag, always ask yourself: Will this be a tag that I'll use more often?. If the answer is yes, go ahead and use it. If the answer is no, then it's better not to create that tag.
This product type is used for non-physical products. Use it to sell services, for instance. Virtual products will not be shipped, and as soon as you mark a simple product as virtual, the Shipping tab will disappear from the Product Data area. Besides that, if a customer only buys one or multiple virtual products in their order, the shipping address will be removed from the Checkout process:

Note: In the preceding screenshot, the Virtual field can only be set for a Simple product. If you need a variable product to be virtual, that's still possible but not using this field.
If you have digital goods to offer to your customers, WooCommerce supports this using the Downloadable product type. Often, you'll also want to mark these items as Virtual since you won't physically ship anything. On the other hand, if your item will be as well downloaded as shipped, you should not check the Virtual field. An example could be a book that is physically shipped, but where the buyer also receives a downloadable copy.
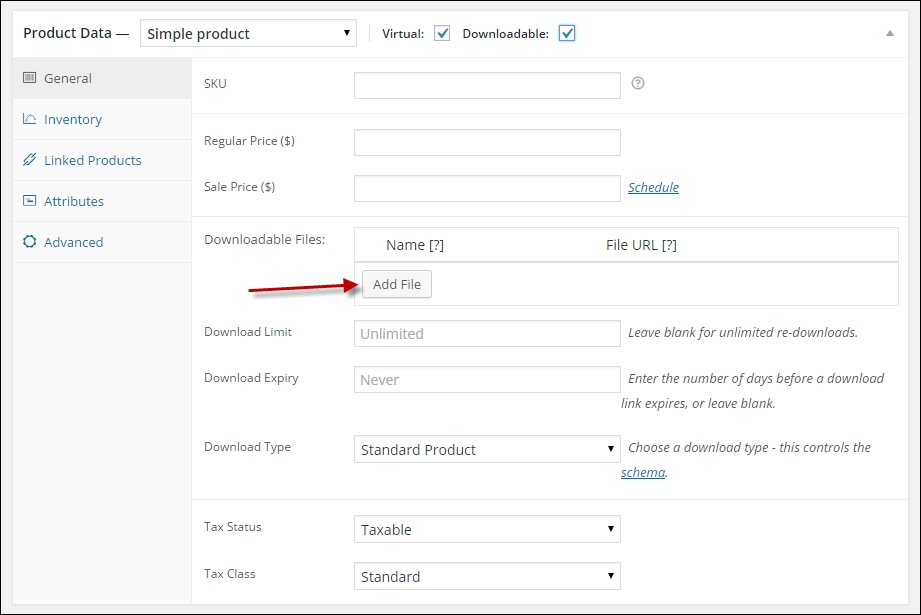
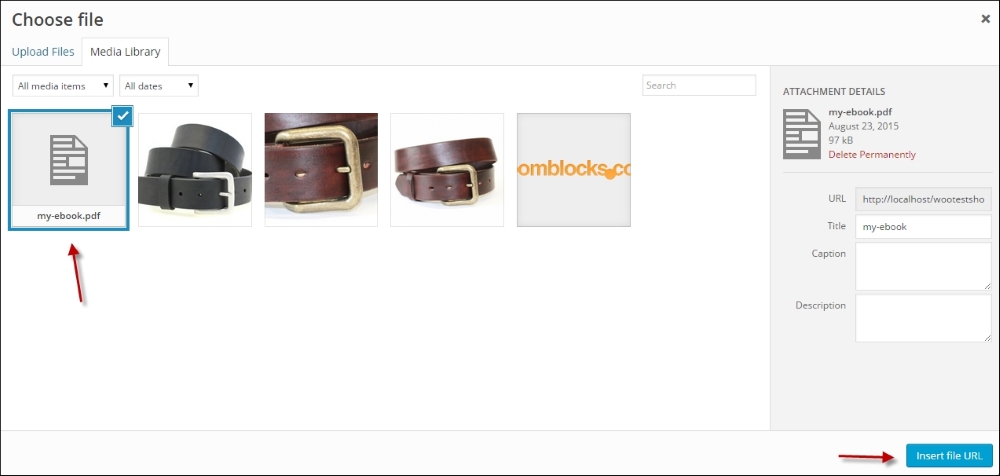
Once the Downloadable field has been checked, new fields become available in the General tab. Click on Add file, followed by the Choose file button to upload, and attach a digital file to your product:
You may also set the Download limit, which determines how often a customer can come back to download the same item again.
Besides that, you can set the Download expiry. Fill in the number of days that the download stays available for your customer after purchase. By default, both fields are blank, which means that there are no restrictions and your customers can always come back to download the purchased items again.
When using the Download limit or Download expiry fields, please note the following: if you ever need to change or replace an existing file, the download expiry and limit will be reset as it's technically a new file. Which means that the user can download the file again from their account or original e-mail.
Finally, the field Download type can contain the value Standard Product, Application/Software, or Music. If there's no fit for your product then leave it to Standard Product. This field controls the markup of your product page. To the end user, this field isn't visible, but it will tell the search engines what type of content the product contains. Unfortunately, the book type isn't supported in WooCommerce yet. More information can be found at http://schema.org/docs/schemas.html.
When your customer purchases a downloadable file, a link to download the item will be sent to the customer via an e-mail. But only if you enabled this e-mail in the WooCommerce settings. The link will also become available in the My Account section for that customer.
Whether or not a customer is forced to create an account in your store depends on the settings. Head over to WooCommerce | Settings | Products to check the settings for Downloadable products. See Chapter 1, Setting Up WooCommerce, for more information on these fields.
More information on using Downloadable products is available at the WooCommerce documentation website: https://docs.woothemes.com/document/digitaldownloadable-product-handling/.
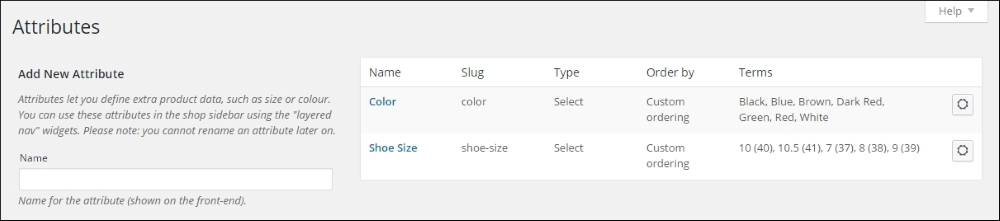
At first glance, attributes look like tags when we're accessing the function using the menu, Products | Attributes:
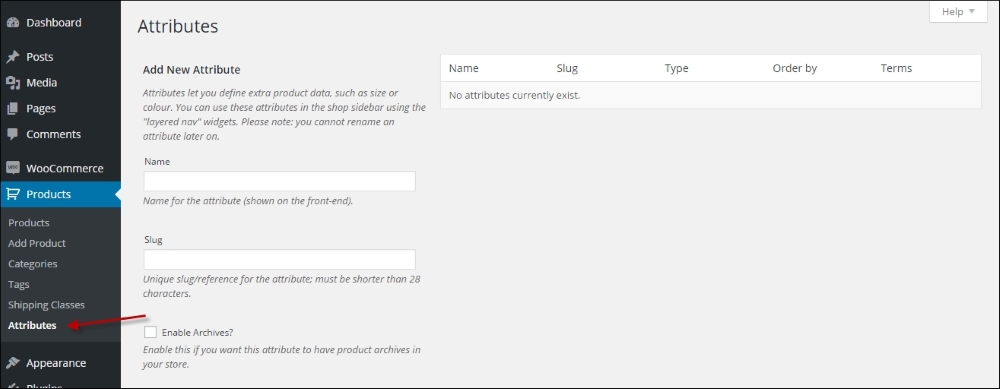
However, there is an important difference between Attributes and Categories. Attributes deliver a powerful mechanism to create different kinds of products. Besides that, working with Attributes is often smarter than working with Categories alone. Categories are used to organize entire products, whereas Attributes are a way of organizing product properties. Let's start with an example to clarify this.
Our simple product that we created earlier (the Brown Women's Belt) could easily be put in a category structure like: Women | Accessories | Belts. But that would give us all available belts in your store, right? And not just the brown ones. Ok, so we'll add another category for that! But no, although it is possible, it's not the best way to do it. Using Attributes in such a situation for the color is much more powerful. It will give your visitors the possibility to immediately filter all brown products once they're in the Accessories category so they can mix and match. Using categories for describing the color of your product is really a no-go. In other words, a category is a group in which a set of products can be bundled together. An attribute is a specific characteristic of a product. Other products may share that characteristic (for example, multiple products can be a medium size or have a brown color).
Since the usage of colors in our fashion store example is something that we'll need for sure, we are going to create that Attribute.
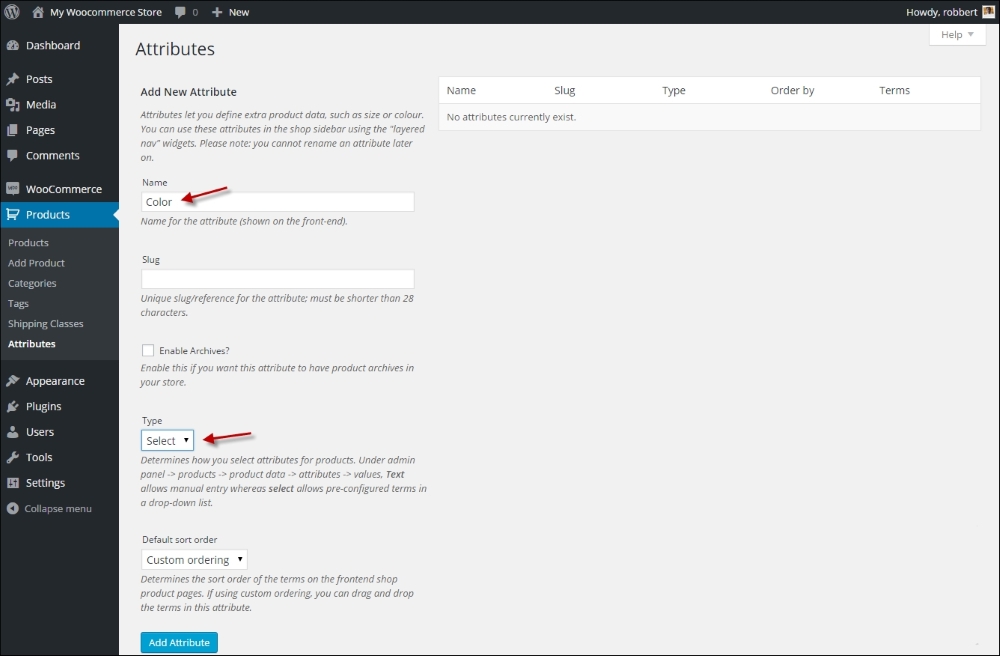
Creating an Attribute is very simple. Just enter the Name of the attribute (Color, in our example). You may leave the Slug field empty, it will automatically be filled based on the name of your attribute. Next, make sure that the Type field is set to Select. If you would set it to Text, it will give you the possibility to add values for every single product manually. Using Select will make sure that you enter and standardize the values beforehand. In most cases, using Select is the better choice.
The Enable Archives checkbox may stay switched off. This field allows you to create separate pages based on your attributes. So for instance, a page holding all the products in your store that are black. This can be handy, but also requires some additional coding to reach the desired result.
Leave Default sort order to Custom ordering so that later on, we'll be able to sort our Attribute values in the way we want to.
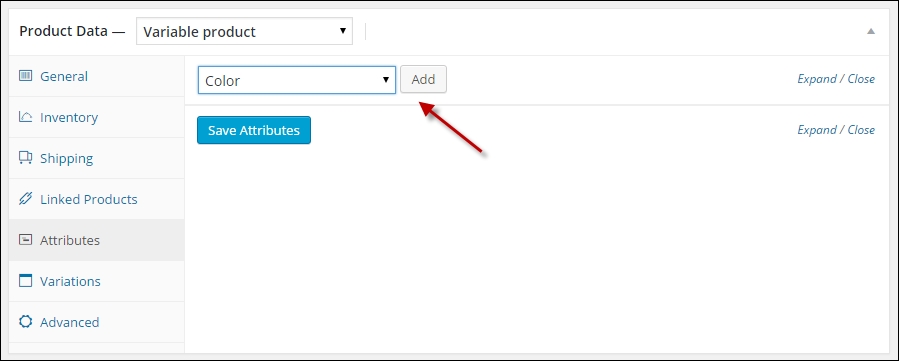
Click on the Add Attribute button:
Now that our Attribute has been created, it appears in the table on the right-hand side of the screen:
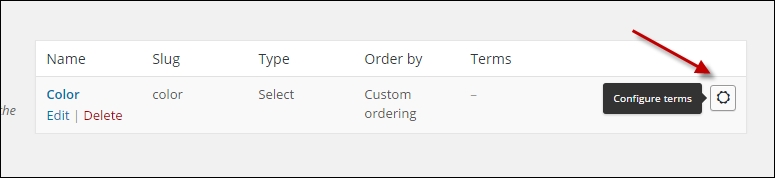
Click on the button on the right to Configure terms.
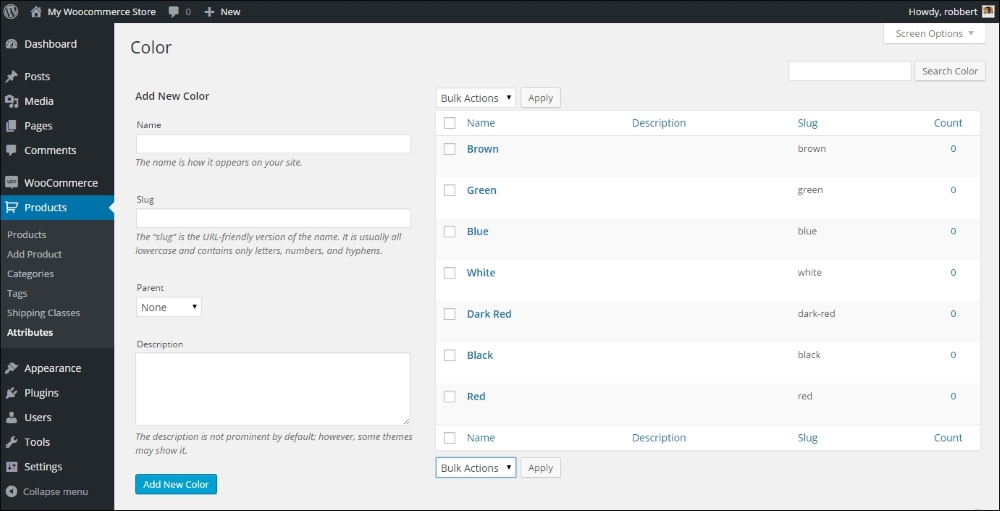
Next, add all the colors that you will possibly need in your store. Don't worry though, it's always possible to come back later and add more. For every color, just enter the name and click on Add New Color. You'll soon have a long list of colors available. Remember that these colors will be used later on, when we're creating new products.
Once done, go back to the Attributes form again by clicking in the menu on the left. Now repeat the preceding steps and create a new Attribute named Size or Shoe Size. When working with sizes, there are a lot of different possibilities, so you might want to distinguish the sizes depending on the products that you are going to use them for. We create Shoe size to support our next example. Our result looks like this:
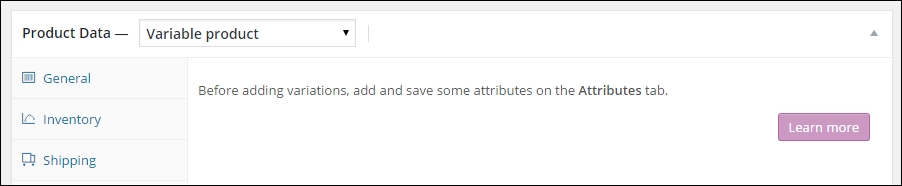
Now that we created some attributes, we'll be able to create a Variable Product.
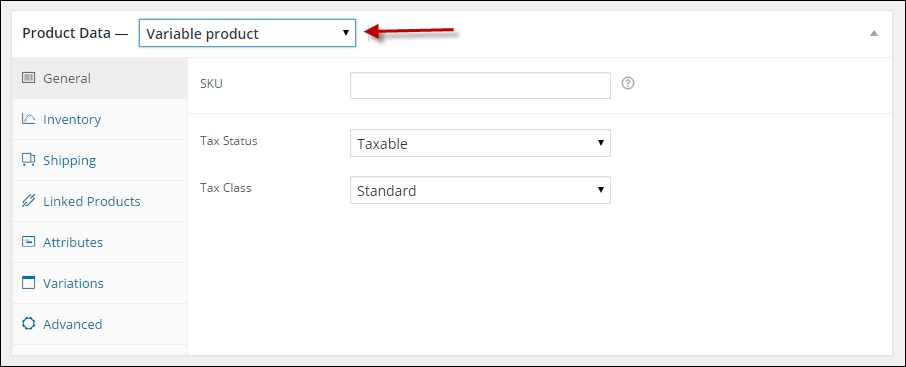
We've just created our first attributes that we'll use to add some shoes to our women's fashion store. Of course, we do not want to display all the sizes as individual products. We want to show our visitors one product and let them choose the right color and size. This is done using a variable product. To create a variable product, perform the following steps:
Blue and Grey: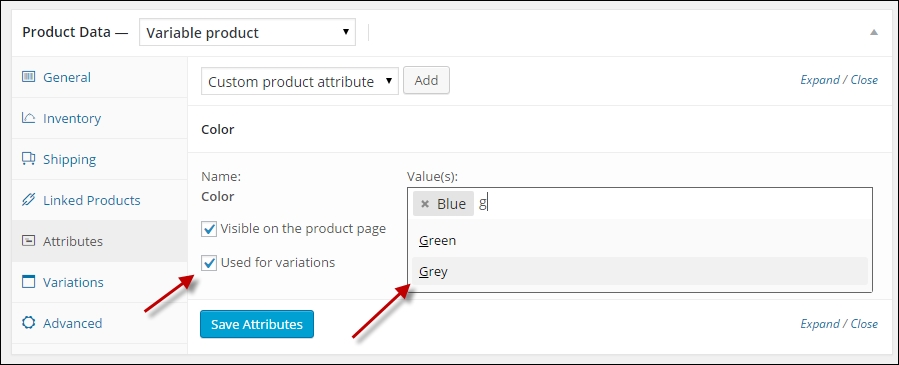
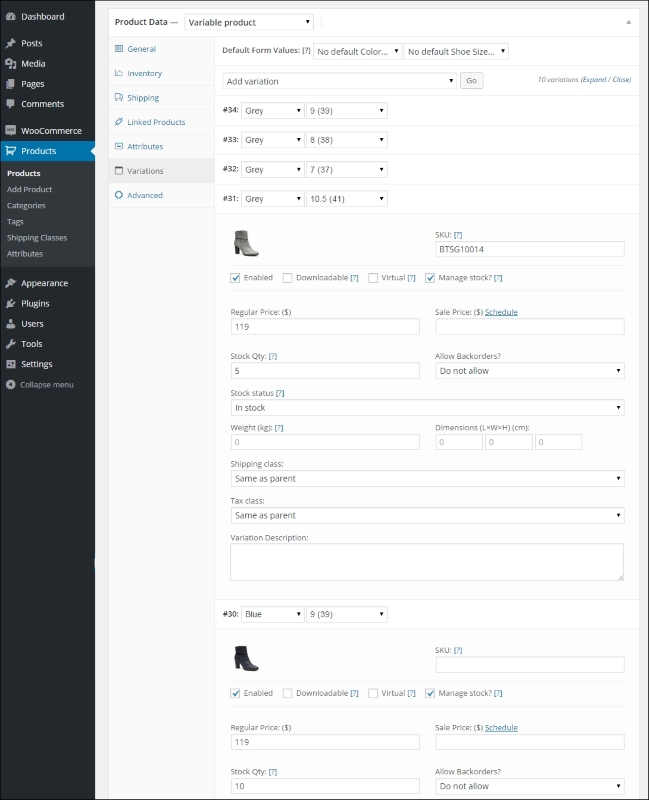
Shoe Size attribute, but now we push the Select All button to immediately select all the available shoe sizes. The final result will look as follows: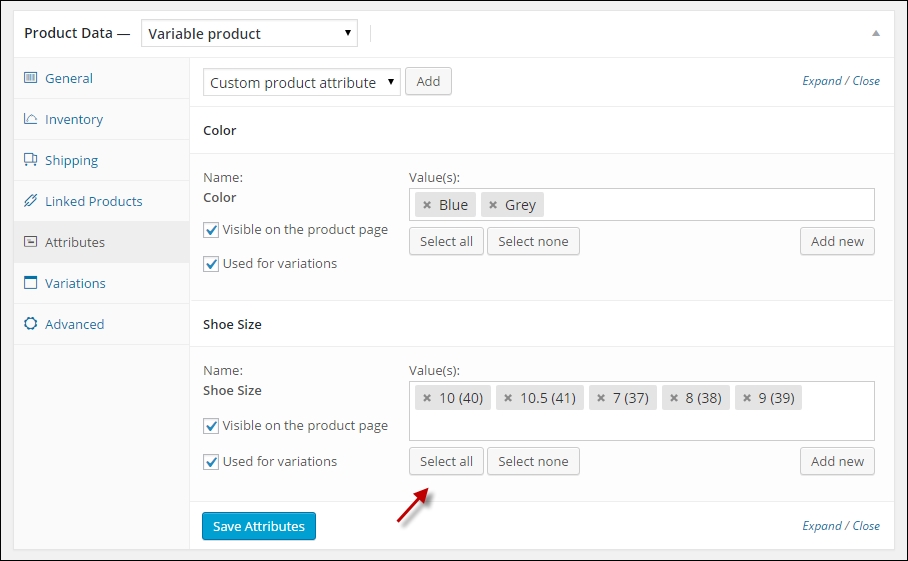
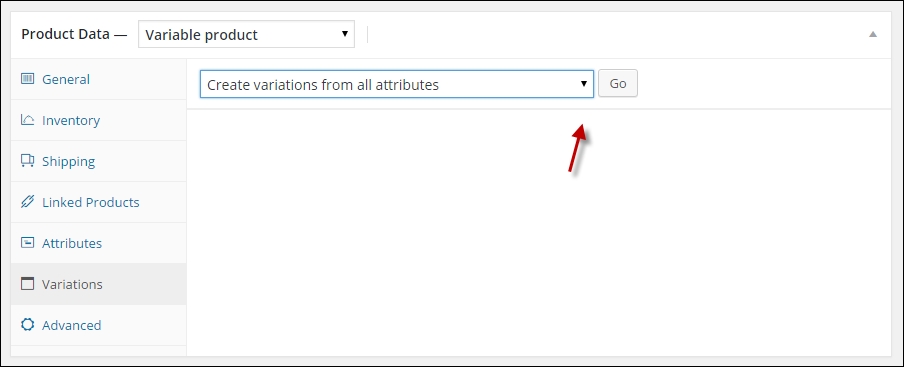
There's a limit of 50 variations per run. Please note that you should not create too many variations. If you would have more than 100, the chances are high that you'll be creating a complex product for your customers. For more complex products, there are additional plugins available to support that. Refer to Chapter 8, More Possibilities Using Plugins, for more information.
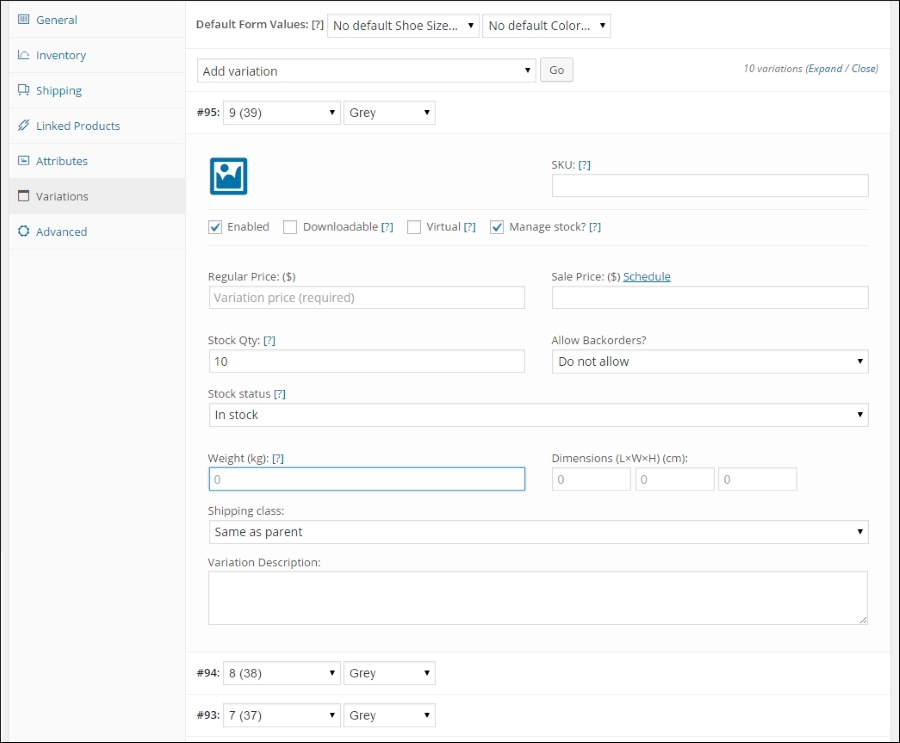

Note: if you made a mistake creating your variations, you can individually delete them by using the Remove button or use the Bulk Edit function again to delete them all at once. It isn't possible to set the image for all the variations at once, but be aware that, in fact, you only have to set this image for the variations where the image differs from the one that you set earlier as Featured Image on the main product level! If you do not set an image for your variation, WooCommerce will simply show the featured image of the main product.
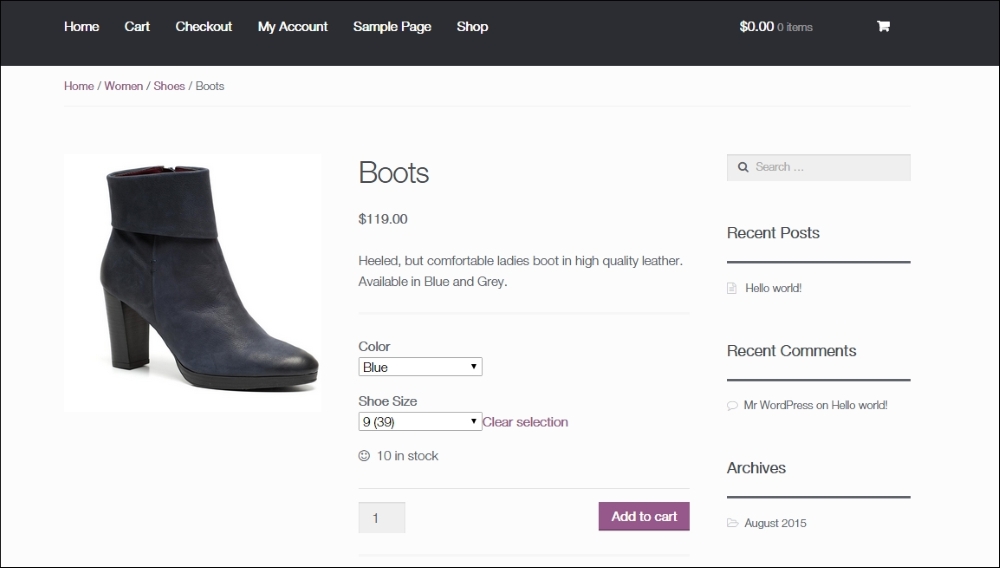
Note that the image that is shown automatically updates if the visitor selects a different color. If that doesn't happen, in your situation it's a problem of the WordPress theme and not an issue in WooCommerce. Are you thinking about changing the way this product page looks like? In Chapter 5, Working with WooCommerce Themes, we'll learn how to adjust the look and feel of our store.
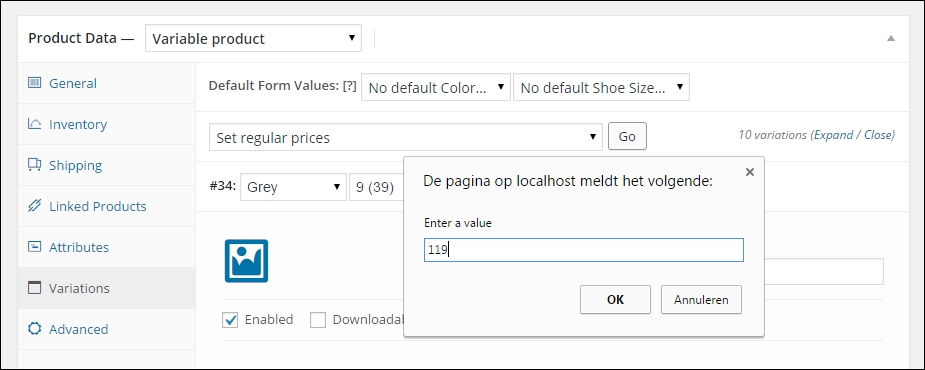
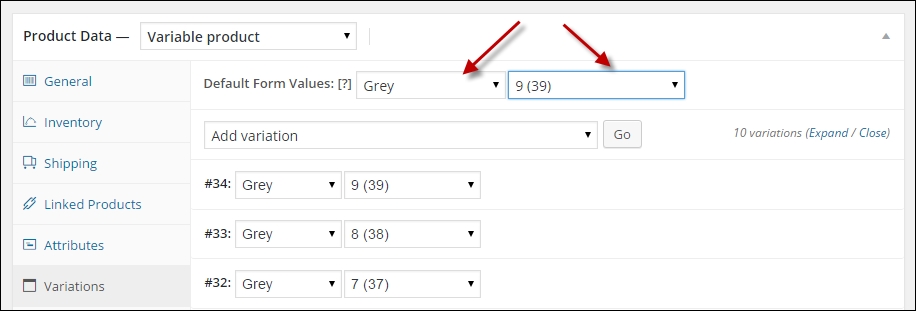
You probably noticed that the Add to cart button does not become available if no variation has been chosen yet. To overcome this problem, you can set a default form value for your product in the backend so that it will be displayed immediately:
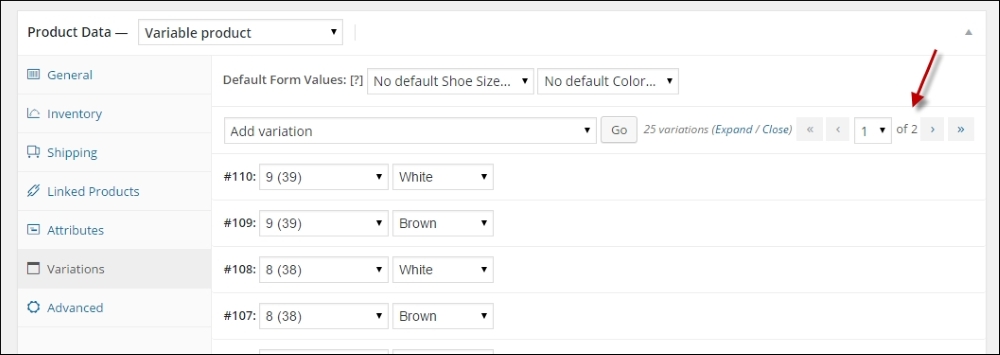
When working with a product with lots of variations, there's something important that you need to know about the product page your visitors see. Because of performance reasons, WooCommerce does not load the availability of all the variations if you have over 20 variations in a single product. In such a case, the attributes of the variation will be loaded using Ajax once a variation is selected by the user. This might mean that the user sees a certain color or size, but that it actually isn't available anymore. WooCommerce will show a message to the user in that case. Below 20 variations this issue doesn't exist.
Also in the WordPress administration, this limitation of 20 variations becomes visible. Pagination has been added on the top and bottom of the list with variations. This has been done to make sure that the number of items that must be loaded at once is manageable. Loading lots of variations was a former issue within WooCommerce, where products became very slow in the WordPress backend. This has been solved as of WooCommerce version 2.4.
If you paid some attention to the screenshots earlier in this chapter, you would have noticed that there are even more product types available in WooCommerce. Besides Simple and Variable products, we can create the following:
To create a grouped product, just simply select the type at the top of the Product Data area:
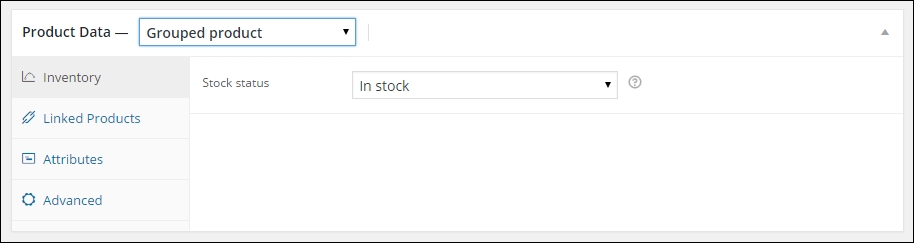
Fields that are no longer necessary will be removed. For instance, note that for a Simple product, there are various settings to control the stock levels. For a Grouped product, this isn't the case. You can only set the group to in stock or out of stock.
Unfortunately, it's not possible to set a sales price for the group. In your product catalog, WooCommerce will display From $xx, where xx is the price for the individual item with the lowest sales price. The final price that your customers pay will be calculated automatically, by adding the total sales prices of the individual products that your customer selects. In fact, the grouped item will display the individual items of the group together. Your customer is still in control of the items that will be put in the basket. Finish your product and create individual (simple) products that will belong to this group.
When creating the individual products for your group, please note the following:
The end result of the grouped product in the frontend could look as follows:
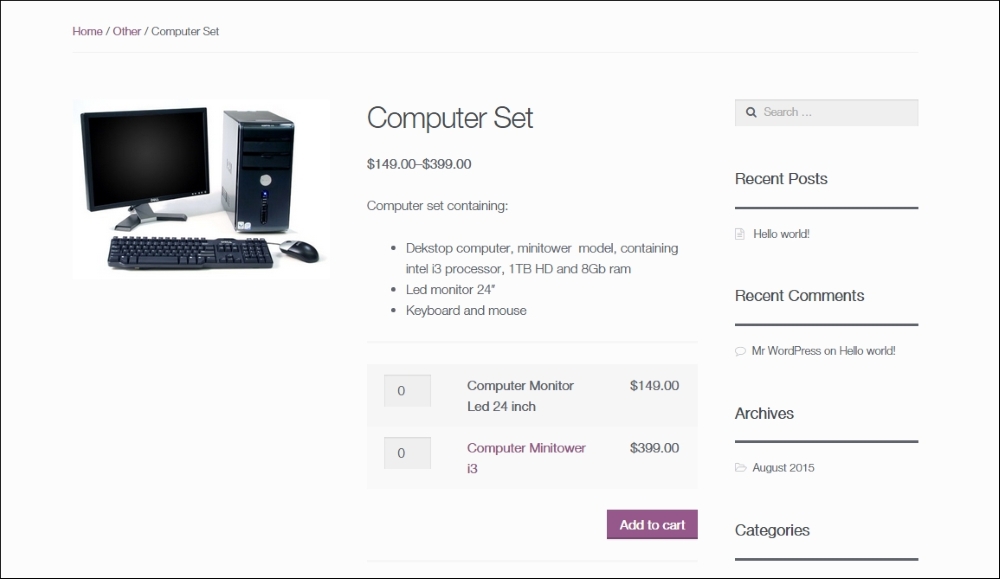
Note that the user has to enter the number of items he wants for every simple product. Often, that doesn't make sense. If you need more functionality for your grouped products, then you'll have to add additional plugins to WooCommerce.
This last product type that WooCommerce offers is a special one. As you probably know, affiliate marketers promote products of other websites. Using this product type, you can create products that are actually sold elsewhere. As a site owner, you'll often earn a percentage of the sale. This product type is popular among bloggers since it gives them the possibility to monetize their blog without having to create a full featured online store and keep stock levels themselves.
When creating such a product, the Product URL is the most important field. It redirects the visitor to the store that the product is actually sold in, including a unique code. Using this code, the seller will know that this buyer came from your website and you will receive your affiliate fee if that customer closes the sale.
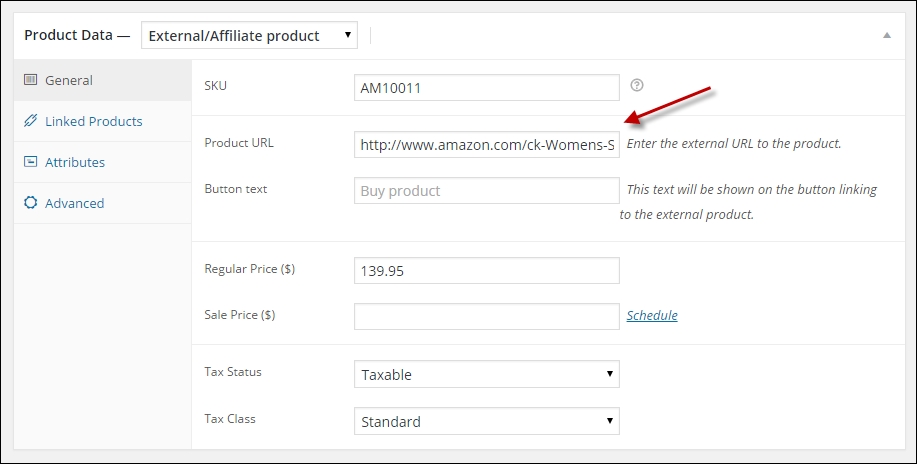
If you use your products in this way, the buyer will no longer be able to add an item to the cart. They will simply be redirected to the original store.
When you need to create a lot of products, it's good to take a closer look at the possibilities to import products automatically to your WooCommerce store.
The plugin WP All Import will, for example, deliver the possibility to import product data from XML and CSV sources (http://wordpress.org/plugins/woocommerce-xml-csv-product-import/).
WooThemes is also offering a plugin to import products using a CSV file named Product CSV Import Suite (http://www.woothemes.com/products/product-csv-import-suite/).
Both plugins have a similar price range. They aren't cheap, but they can save a lot of time if you need to create hundreds of products. Based on your needs, WP All Import might be a bit cheaper. WP All Import proves to be more flexible, especially if you're also working with the plugin Advanced Custom Fields. Or if you would like to use the plugin for other import tasks as well. It is a more generic import solution, where the Product CSV Import Suite is just used for importing products. A pro of the Product CSV Import Suite plugin is that it's also able to export data. Both solutions can do the job, so just check which one best fits your needs.
In this chapter, we've learned to create more complex products in WooCommerce. We need this to be able to create products with for example colors and sizes, but also if we're selling services or digital items. WooCommerce offers various possibilities using downloadable, virtual, variable, and grouped products. It's even possible to combine these techniques and create a variable, downloadable product.
If you need to create lots of products, there are various plugins available to help you getting the job done.
Now that we've covered everything about using products, it's time to take a closer look at shipping and payment methods in the next chapter.
You now have enough knowledge of the product possibilities WooCommerce has to offer. You may continue to add multiple categories and products to fill your product catalog. Next, we'll need to take a closer look at the shopping process your customers will be offered. In this chapter we'll have a closer look at:
Earlier in this book, during Chapter 1, Setting Up WooCommerce, we skipped the areas about handling the payment and shipping methods. These are both important subjects for your online store that deserve additional attention. Let's start with the payment methods that you'll offer to your customers.
Which payment methods should you offer in your store? First of all, there's no best answer to this question. Looking at the payment solutions that are available worldwide, you might be surprised. There are literally hundreds of possibilities.
When speaking of payment methods, we distinguish between the following types:
The methods that you need to offer to your customers will differ from country to country. Especially if you're selling locally (within a specific country), you need to prepare your store for that market. If you're not sure which payment methods you should offer, just look at the methods other online stores in your market are offering. Here are some, possibilities, but be aware that the list below only cover the most important, widely used payment possibilities:
This list explains something about the payment methods, but not about the Payment Provider yet. A payment provider allows the online store to accept payments in different forms and will authorize the transactions. Often they also provide an online tool to manage your funds. Just to mention some of the major players:
It's important to understand the difference between a Payment Provider and a Payment Gateway. The Payment Provider is the company used to offer one or multiple Payment methods, which are in WooCommerce referred to as Payment Gateways. For example, PayPal is a Payment Provider, offering Payment Gateways like PayPal Pro, PayPal Express Checkout and PayPal Digital Goods. Often, a Payment Provider offers multiple Payment methods.
For your store it's likely that you need to offer a combination of payment possibilities. Let's first have a look at what WooCommerce has to offer by default. Navigate to WooCommerce | Settings | Checkout.
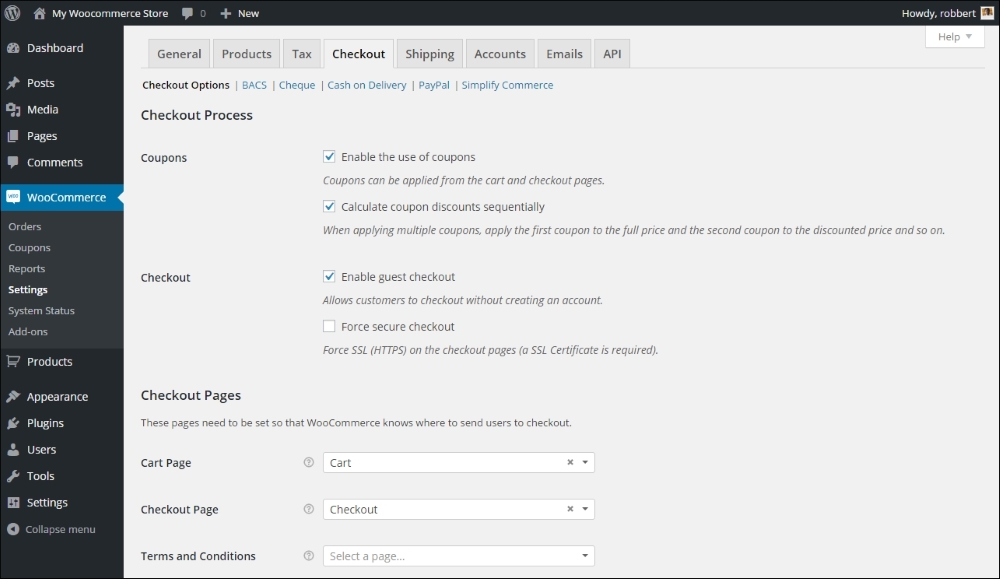
The Checkout Options were already discussed in Chapter 1, Setting Up WooCommerce. Note that next to the screen with options, we can see the following payment methods:
In fact, the methods mentioned above are offline payment methods, except for PayPal and Simplify Commerce. PayPal is widely accepted. Simplify Commerce is at moment of writing only available for the USA and Ireland.
An offline payment method means that your customer can use that method if you offer it, but the actual payment is not carried out immediately. You'll have to manually check later on if you received the money from your customer. The offline method requires that your customer makes sure the payment is done. Online payment methods immediately do the payment transaction online, at the moment of sale. In most cases the payment is verified automatically and the order status in WooCommerce will be updated accordingly.
When you want to accept credit cards in your store, you'll soon hear something about PCI compliancy. The issue is: if you let your customers enter their credit card details directly on your website, you must be PCI compliant. The downside is that getting your website PCI compliant is difficult to reach.
If you'd like to know more about this subject, the following website may be useful: http://www.pcicomplianceguide.org/.
So, how are we going to solve this? We still need to be able to accept credit cards in our store. Luckily, this is where the Payment Service Providers jump in. These are third-party companies handling the payment transactions for you in a secure way. Simplify Commerce that we just mentioned, is just one of the many options you have. However, your country of residence will influence the number of possibilities you can choose from.
Just by checking out the WooCommerce extensions page, you'll get an idea of what's possible for your market: http://www.woothemes.com/product-category/woocommerce-extensions/.
Select Payment Gateways and your country to receive an overview of available, payment extensions for WooCommerce:
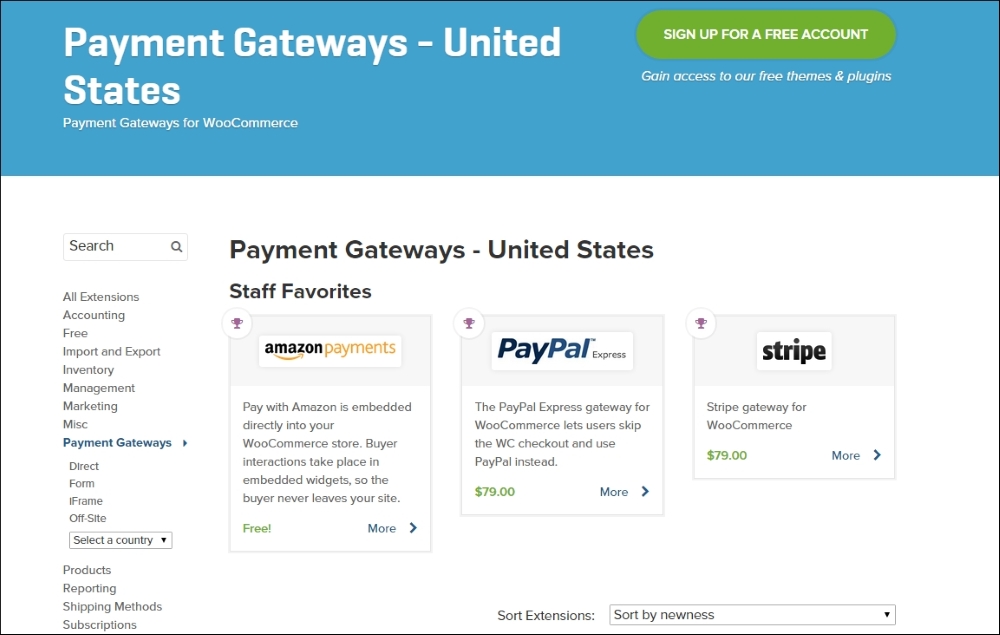
The extensions to support Payment Service Providers aren't free at the WooThemes website. Sometimes the Payment Service Provider of your choice might offer a free extension for WooCommerce when you sign up. Just make sure that you check if it is available. Installing an extension works in the same way as with any regular WordPress plugin. After installing the plugin there's always some configuration that needs to be done. The steps you need to take differ per Payment Gateway.
The extensions at the WooThemes website can sometimes be pricey. But you will receive support and updates for a year, which can be a good reason still to choose for a WooThemes plugin. Alternatively, there are lots of WooCommerce compatible extensions offered at the CodeCanyon website: http://codecanyon.net/category/wordpress/ecommerce/woocommerce. The quality of these plugins may differ, so please pay attention to the ratings and comments of other users.
It's wise to take some time to find the right Payment Service Provider for your market. Pay attention to the rates charged by the Payment Service Provider (as well transaction fees as monthly rates) and the way they will pay you after the transaction.
Setting up a contract with a Payment Service Provider of your choice and the way the setup is done in WooCommerce differs a lot. Therefore, in our example below, we've chosen to just stick to the default options of WooCommerce.
Setting up PayPal in your WooCommerce store is very simple. Of course you first need to create a PayPal account if you do not yet have one at http://www.paypal.com. Mark it as a business account and enter your bank account details to be able to transfer money from your PayPal account to your regular bank account.
Next, in WooCommerce, click PayPal at the top of the Payment Gateways tab
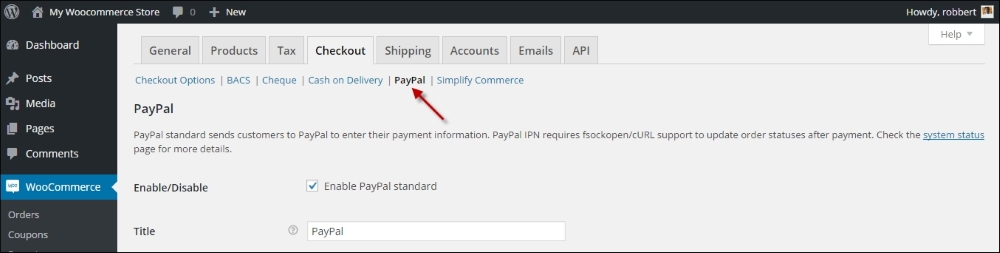
Enter the e-mail address that you used to create your PayPal account:

Note that you have the following possibilities:
Stripe is a payment method created for software developers. Meanwhile the service became more mature and is now available in more than 20 countries, among which the USA, Australia, and a part of Western Europe.
To be able to use Stripe, your website must use a SSL certificate. Without it, you cannot use Stripe in a production environment. If you'd like to receive more information on SSL: your hosting provider can help you. A good option could be Namecheap (https://www.namecheap.com/security/ssl-certificates.aspx), which has a pretty good acceptance and is very affordable. Even better, but also more expensive is Digicert (https://www.digicert.com/buy-ssl-certificates.htm). Note that Digicert also offers a lot of information on using SSL certificates.
After signing up for a Stripe account (http://stripe.com), you just have to confirm your e-mail address to get started. For WooCommerce, there are a couple of options. There's a plugin available at WooThemeshere: http://www.woothemes.com/products/stripe/.
There's also a free extension available through the WordPress.org website (https://wordpress.org/plugins/stripe-for-woocommerce/). And that's the one we'll be using in our example below:

That's all you need to setup a working solution to accept credit cards on your website. The exact procedure for other payment gateways will differ, but generally the steps will look similar.
The mentioned, free plugin for working with Stripe currently doesn't work very well together with the Subscriptions plugin. If you need to sell subscriptions this plugin is not the best choice at moment of writing. More on working with subscriptions will follow in Chapter 8, More Possibilities Using Plugins.
For the other, offline Payment Methods, it's just a matter of enabling or disabling them as you please. You are able to change the description that your visitors will see for every payment method. The Cash on Delivery payment method also gives the possibility to connect it to a shipping method. That's useful so you'll be able to set a different price for using this method, since Cash on Delivery is often an expensive choice.
Just as with Payment Methods, we also need to think about the shipping methods we are going to offer to our customers. Where are we going to ship to? Do we charge our customers for it and if yes, does the amount depend on the shipping address, the weight of the products or both? Also in here we have to think about several aspects:
Looking at the functions WooCommerce is offering we see a similar screen as used for Payment Methods. There are a couple of settings that we need to check:
At the top of the screen we'll find all settings regarding shipping, which we already discussed during Chapter 1, Setting Up WooCommerce.
Below the settings we'll find all standard available shipping methods. Every Shipping Method has a link on top of the screen that will bring us to the settings page for that Shipping Method. This is what WooCommerce has to offer by default:
You may sort the table by dragging the various shipping methods around. This is useful because the sorting here will also be the sort order of shipping methods the user sees during checkout. Besides that, using the priority field you can control the order in which the shipping methods are selected. If two or more Shipping Methods have the same priority, the one with the lowest cost will be selected first.
Let's take a closer look at the Flat Rate method, just to check how we need to configure it. Just click on the Flat Rate link at the top of your screen. The Flat Rate method will calculate one shipping rate per order, regardless of the weight and dimensions of the products in that order. The Flat Rate cannot differ per country, but the field Costs can contain a calculation, which means that the Flat Rate can also be a percentage of the total order value:
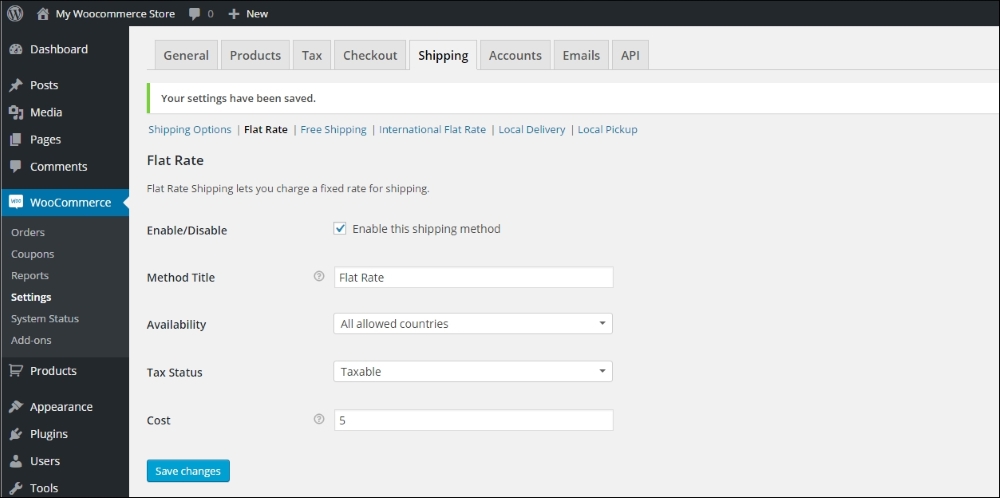
Some examples of a calculated Cost field could be:
Looking at the available Shipping Methods, we can imagine running short on possibilities. What if we need a Shipping Method that calculates the shipping rate based on the country, delivery address and the products that we'll ship? That's no longer a Flat Rate anymore and the other shipping methods do not offer a solution. In such a situation, WooCommerce needs additional extensions. A good and very flexible, but pretty expensive extension would be the Table Rate shipping plugin. It's available for $199 at the WooCommerce store: http://www.woothemes.com/products/table-rate-shipping-2/.
Because of the higher price of the official WooThemes extension, there's room for alternative suppliers in the market. On CodeCanyon, there's a reasonably priced plugin available. http://codecanyon.net/item/table-rate-shipping-for-woocommerce/3796656. It's already been on the market for a while now and has a lot of users.
Nowadays buyers often expect to receive free shipping when ordering items in your store. Shipping costs that are too high can be a reason for customers to leave your store and look for an alternative. WooCommerce offers a shipping method that gives the possibility to ship items for free. Let's have a look at the options:

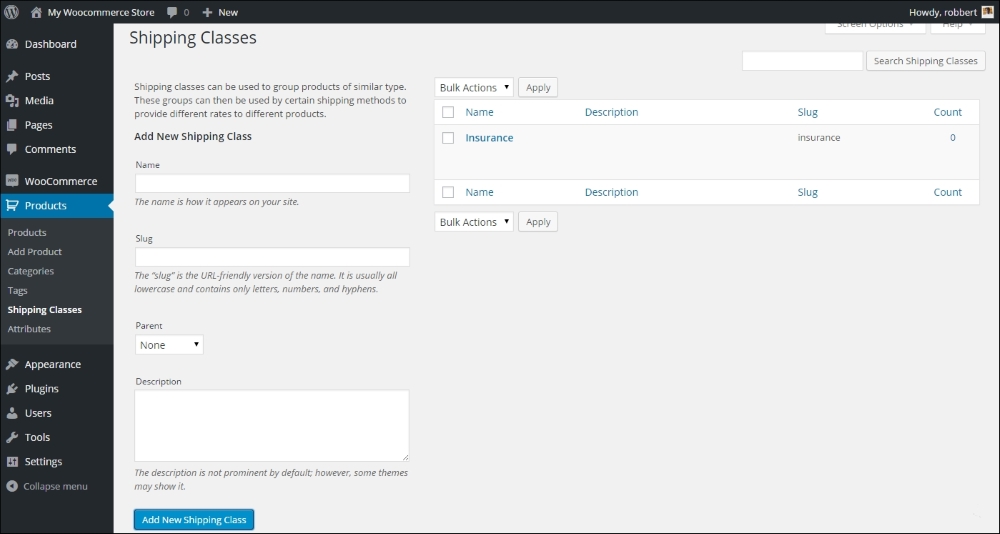
You must have noticed earlier in this book when creating products that there's a field named Shipping class that can be assigned to your products. A shipping class is nothing more than a connection between a product and a certain way of shipping. In other words, a shipping class can be assigned to a product. If we define multiple shipping classes, it becomes easier to use different shipping rates for different types of products. Defining shipping classes is just as easy as creating new categories. Just navigate in your WordPress menu on the left to Products | Shipping classes. Just enter a Name and Description for your class and click the button Add New Shipping Class:
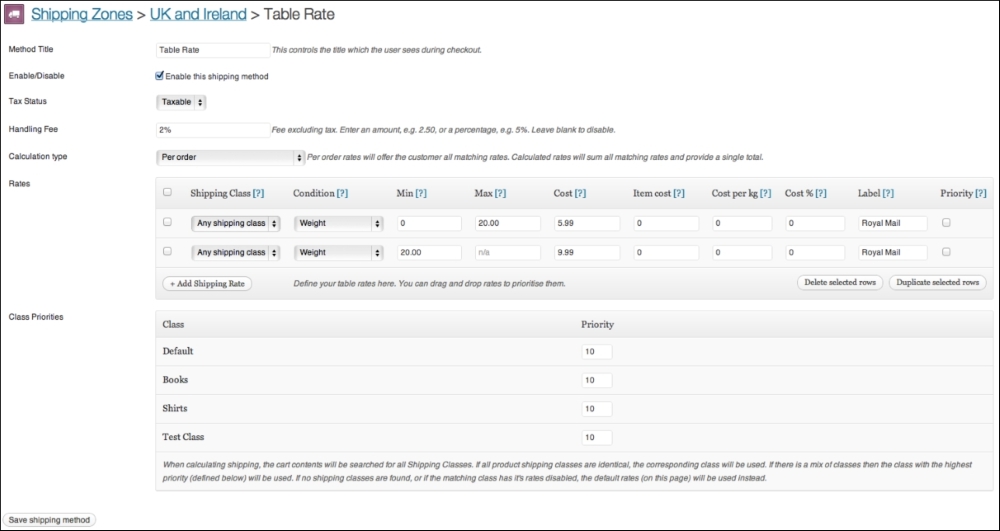
Once done, it's possible to set a rate per shipping class. Whether or not it is possible to set a rate per shipping class also depends on the shipping method. This way of working could be helpful when, for example, you're selling items of a higher value that need additional insurance:
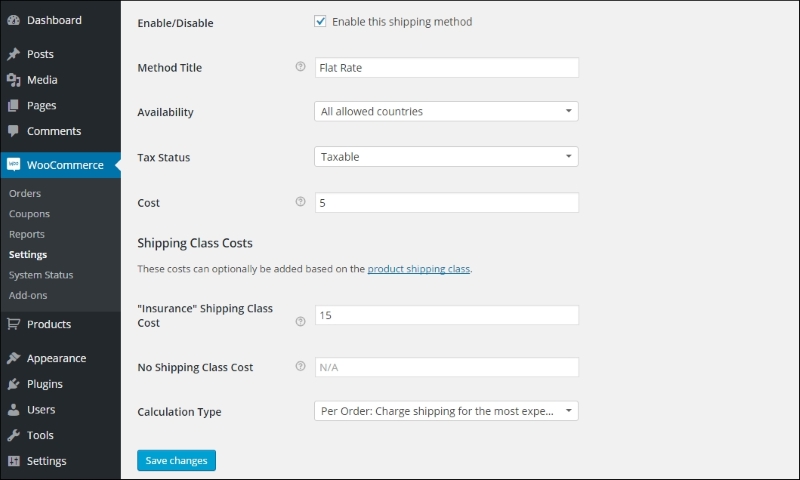
In this example we see that, when an item is part of the shipping class Insurance, there's a cost of $20 for shipping ($5 + $15), instead of the regular $5. The Calculation Type makes sure that the higher cost is only calculated once for the complete order. It's also possible to calculate the additional fee for every item on the order having this specific shipping class.
As with Payment Methods, there are lots of carriers on the market that offer integration with WooCommerce, so that you will not have to handle shipping transactions manually. There are too many possibilities to mention here, but there's always an extension needed to connect WooCommerce to a specific carrier.
If you're in need of integrating a carrier, head back to the WooCommerce website to check if there's an extension available: http://www.woothemes.com/product-category/woocommerce-extensions/. For major player like UPS and FedEx, extensions are available, but these extensions will only calculate the correct shipping rates for these carriers.
There's one more topic we would like to discuss in this chapter. Working with discount coupons gives you the possibility to organize promotions for your existing customers, subscribers, or any other target group. WooCommerce has the basic functionality on board to be able to work with discount coupons. You may find them in the menu by navigating to WooCommerce | Coupons:
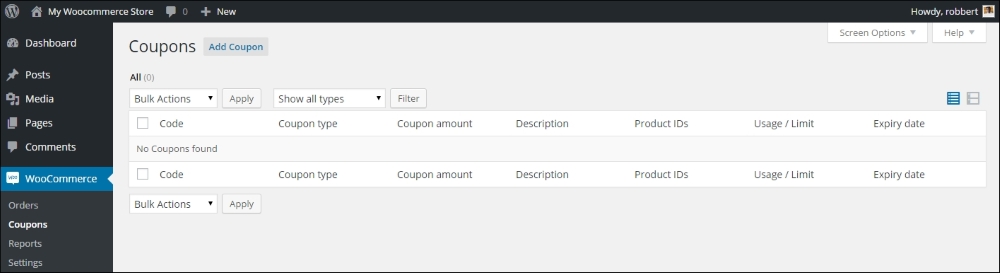
To add a new coupon, click on the Add Coupon button at the top of the screen:
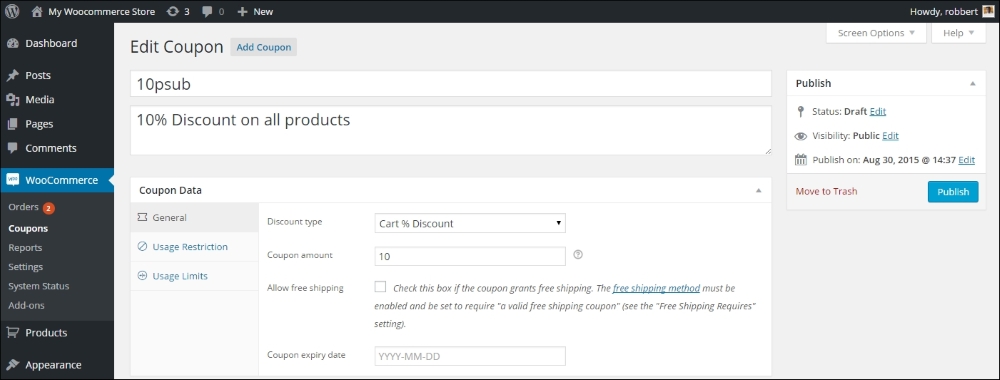
In the preceding example above we created a simple coupon that gives a 10% discount on the whole cart. To enable our coupon, we now simply need to hit the Publish button.
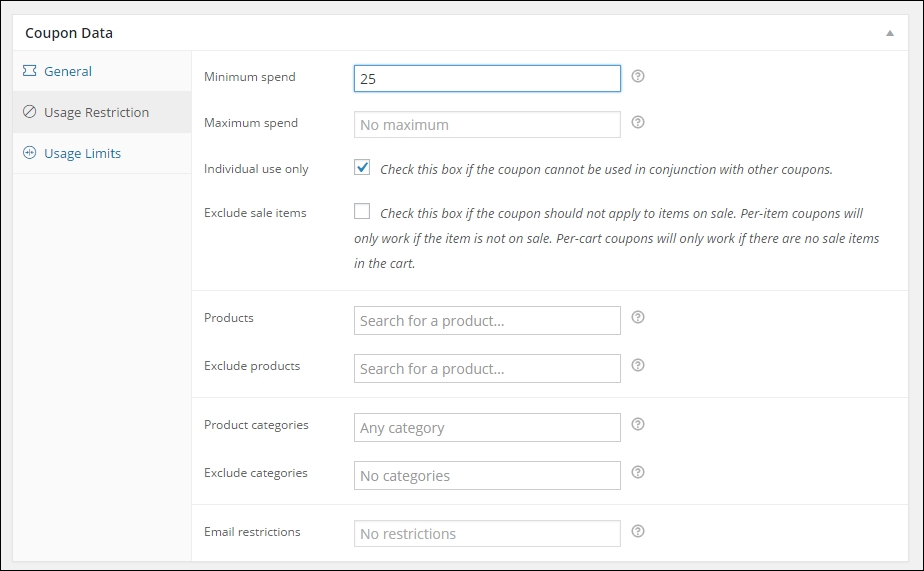
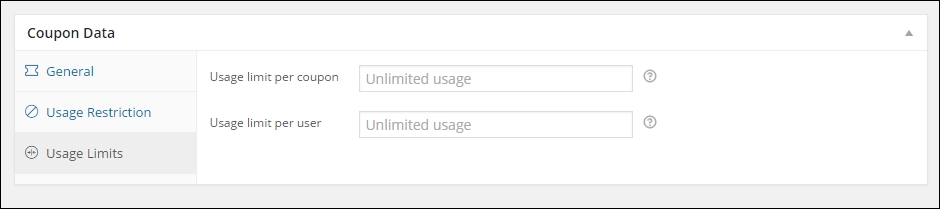
The Coupon function delivers several possibilities; let's go through the fields one by one:
At the Cart or Checkout, your customers will be asked to enter a coupon if they have one:
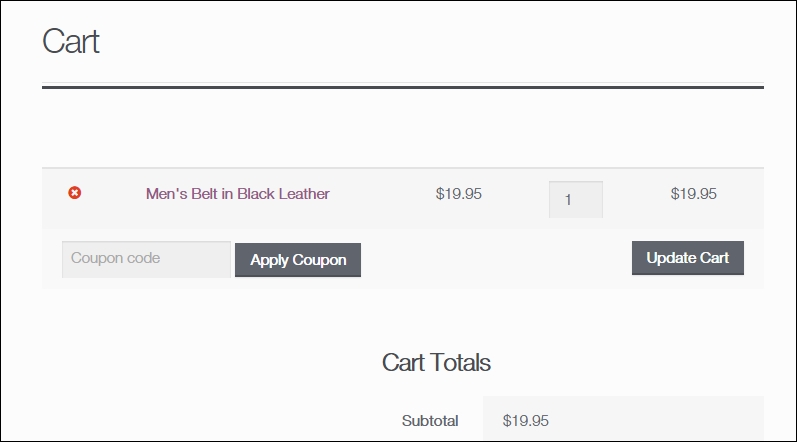
Note that the way this looks like completely depends on the theme you're using. Be aware that as soon as you enable the usage of coupons, potential customers that do not have one might be distracted and leave the cart to start searching for one. Sometimes it's just better to keep the function disabled, if you're not running any promotions where coupons are needed.
Once your customer applies the coupon to the order, the order review section looks as follows:
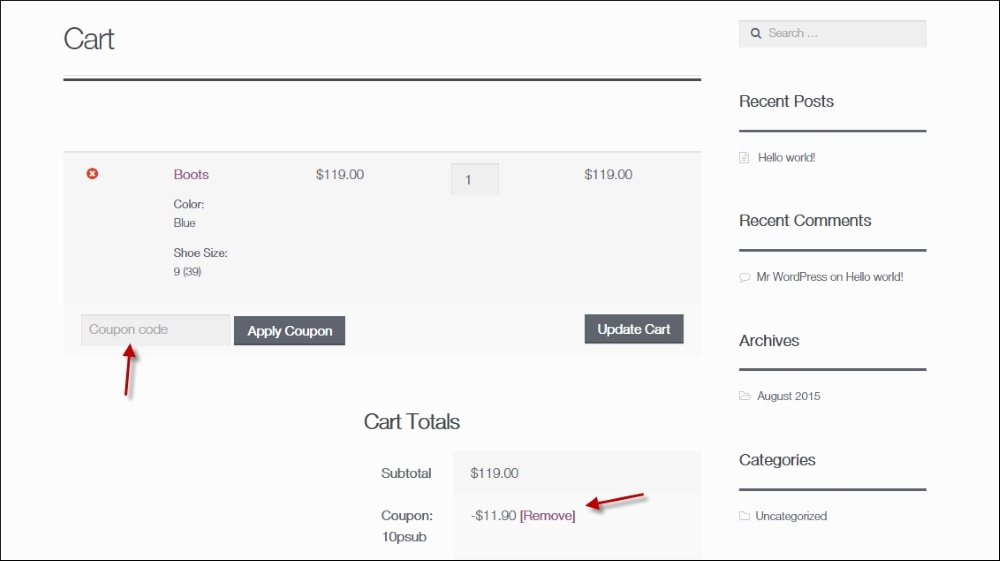
After adding the coupon, your customer can delete the coupon code again by clicking the Remove link.
Depending on the settings of your coupons, it will be allowed or disallowed to use multiple coupons for the same order.
During this chapter we've learned to work with the default Payment possibilities WooCommerce is offering. However, every country is different and it's important that you use the right payment solution for your area. We've also learned how to use the functions WooCommerce offers to calculate shipping costs. Finally, we've worked with discount coupons, to be used for marketing purposes.
In the next chapter we are going to change the look and feel of our store. We'll have a closer look at WordPress themes, tailored to work with WooCommerce.
So far we've been able to setup our online store, add different type of products and take the necessary steps to add payment and shipping methods. We already installed the free Storefront theme earlier, but our shop still looks very standard though. It's time to change the look and feel of our store!
In this chapter we'll cover:
When you installed WooCommerce, you also received a number of possibilities that you can use to show products to your visitors. Of course there are the default available shop, category and product pages. But sometimes, you need more than that. Let's look at the other options that WooCommerce offers by default.
WooCommerce offers the following widgets, that you can reach from the Theme customizer or via Appearance | Widgets:
The screenshot is as follows:
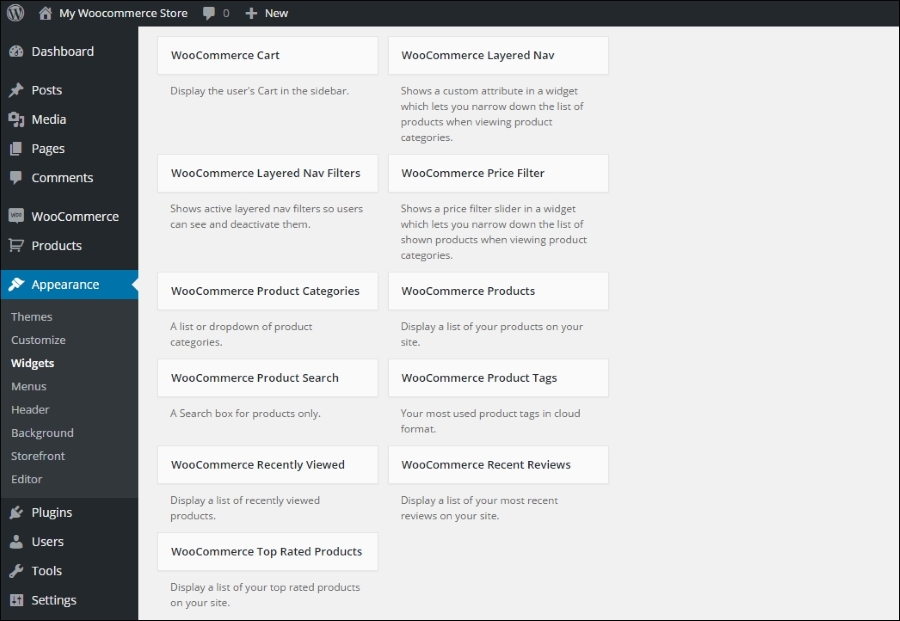
Using these widgets is easy and works just like any other WordPress widget. Using a couple of these in your sidebar gives your visitors the flexibility they need to find their way in your store. In the example below you see we activated the following widgets: WooCommerce Product Search, WooCommerce Products and WooCommerce Product Categories:
Note that the sidebar is on the right in this example. Generally it makes more sense in an online store to have such a sidebar on the left. This is something you can just set in the Storefront theme. Later on in this chapter we'll give you more information on customizing the Storefront theme.
The look and feel of your store is completely controlled by your WordPress theme. We already noticed that even a theme like Storefront already delivers good results. It's just better to use a theme that has been created with using WooCommerce in mind. If you would use a standard WordPress theme like Twenty Fifteen or Twenty Sixteen WooCommerce will still work, but layout issues might occur.
We have two possibilities when choosing a design for our store:
To start with the first option, creating a theme ourselves is not something we could do overnight. It requires extensive knowledge of Web design, WordPress, WooCommerce, PHP, HTML, and CSS, Just to name a few. But maybe, if we wanted to have a unique design that no other shop is using, this could still be a good choice. It just requires more time and a large budget to do so. Creating your own WordPress or WooCommerce theme is a learning experience if you never did it before.
The alternative is using a standard theme. These are themes optimized for WooCommerce and available out of the box. Using a standard theme you can start right away. Some of them are even free, like for instance the good Storefront theme. We'll often find that we need a commercial theme though. Commercial or Premium themes can be found in price ranges from $20 to $200, where the majority of the themes will be offered below $100. If we had a small budget this would definitely be the way to go, since there are hundreds of themes to choose from. Remember that it's always possible to make adjustments on these themes, so that the theme of your choice better fits your needs.
If you decided to use a standard theme you'll face a new challenge: which theme will fit your needs? There are free themes available on the market, but most WooCommerce themes are commercial themes you'll have to pay for. Often they are referred to as Premium themes. These themes are supported by the developer and deliver lots of functions in most cases. That's not always a good thing though. Functionality should be provided by plugins and not within the theme itself. Besides that, having too much functions will just slow down your website. As a beginner this is sometimes difficult to judge. Just pick what you really need and do not go for the theme that offers the most functions. Look for themes that make it easy to customize the layout, colors and fonts. There are a number of resources available online to look for WooCommerce-compatible themes:

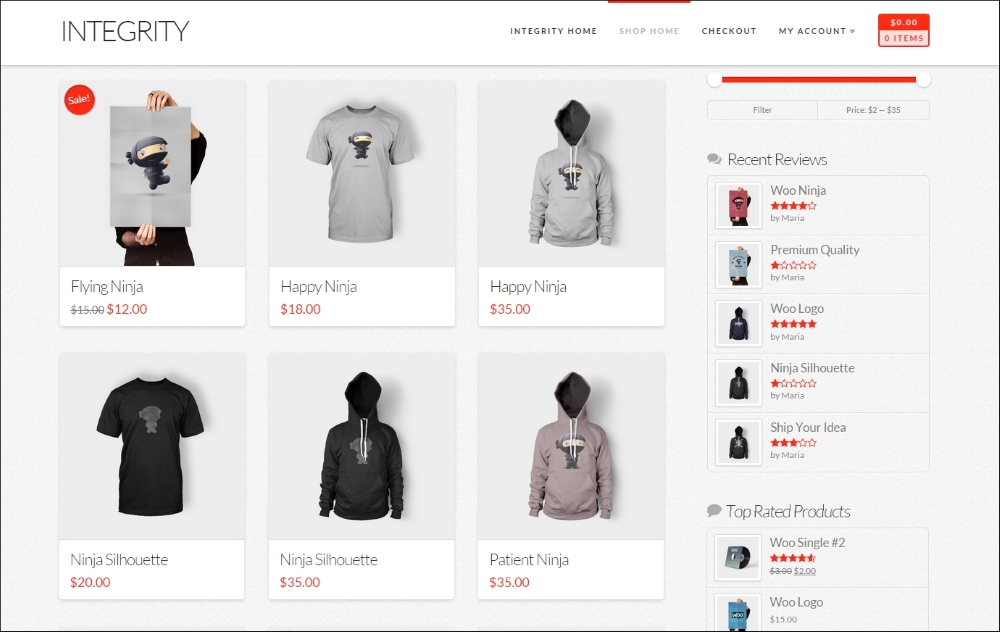
The image below shows the Integrity theme demo created using the X-theme, one of the many versatile and flexible WooCommerce themes at ThemeForest.com:
Sometimes, you may find free themes as well. The best resources are WooThemes and the WordPress.org website: http://wordpress.org/themes/. Search for WooCommerce if you're searching on WordPress.org. All themes can be used, but using a theme built for WooCommerce often gives better results out of the box. Be careful building your business on a free theme. Although it seems tempting if you're on a low budget, free themes are often not updated or supported. If there's any free theme we can really recommend, then it would be the Storefront theme, that is also used in this book. It is well written, and a good starting point if you want to learn WooCommerce theme development yourself. It is supported by WooThemes as well, which is an important asset for a free theme.
I also wrote a roundup of free WooCommerce themes on my blog. If you need to limit yourself to free themes, you should check it out. You may find it here:
http://www.joomblocks.com/best-free-woocommerce-themes-2015.
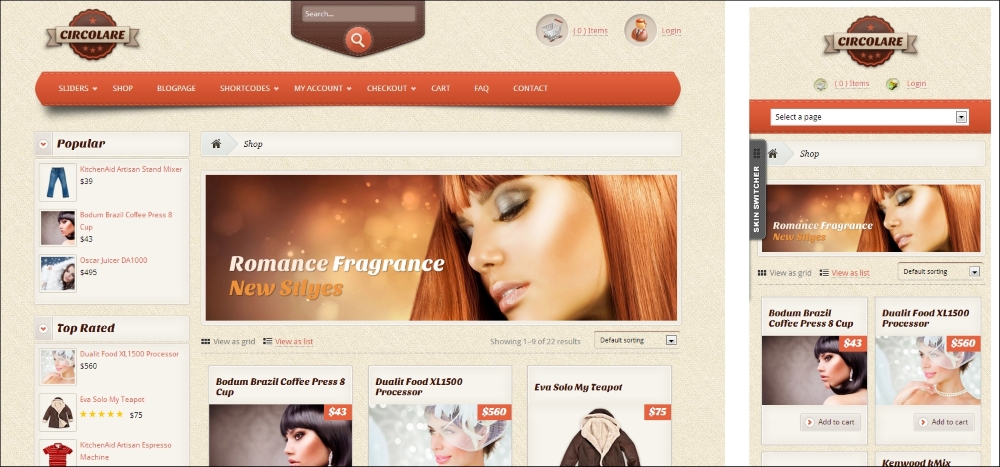
If you're not yet very familiar with working with different WordPress themes, then the following guidelines may be helpful to come to a good choice:
There are a lot of things that we have to pay attention to when buying a WooCommerce theme. However, when creating a theme from scratch, we need to pay attention to some of these topics as well. In this case, we must have, or gather, the knowledge to be able to build it correctly.
If you bought a commercial WooCommerce-compatible theme, you will have to install it through the WordPress administrative panel or upload it using FTP. Before we do so, let's first take a look at what we actually received. In almost all cases, you'll receive a ZIP file holding different folders. The content and names of the folders will differ from theme to theme. Still, it's good to have a closer look at it and get familiar with commercial theme packages.
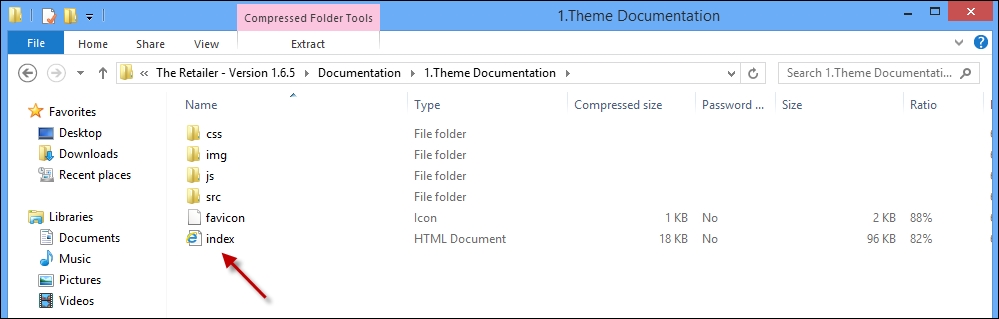
An example of the contents of a downloaded theme can be found in the next screenshot:
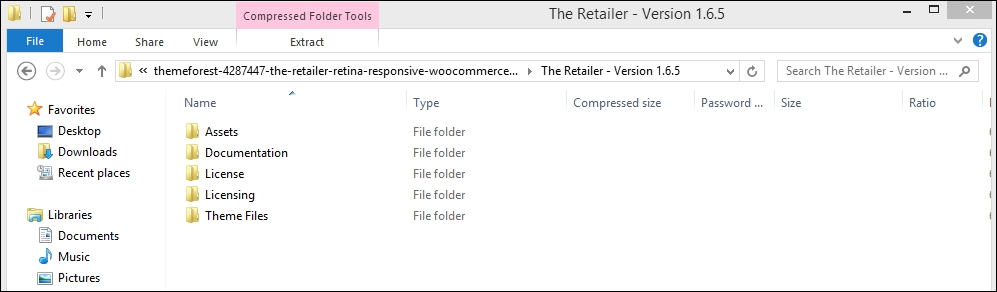
Note that this is just an example, coming from a ThemeForest WooCommerce theme named The Retailer. The folder structure of this theme shows that it differs from just a regular WordPress theme. There are separate folders holding Assets, the original Photoshop files and Demo data for instance. The actual theme files we need to install the theme have been placed in the folder theme files and we first need to extract (unzip) the whole package in order to be able to continue with our installation. Although the folder names will differ from theme to theme, this is an approach that you will see with lots of premium themes. Always look for a folder named Documentation and start reading this before doing anything else! Often, you'll see that the documentation is offered in an HTML format, starting with index.html that you should open using your browser. In the following screenshot, there's an example of such a documentation:
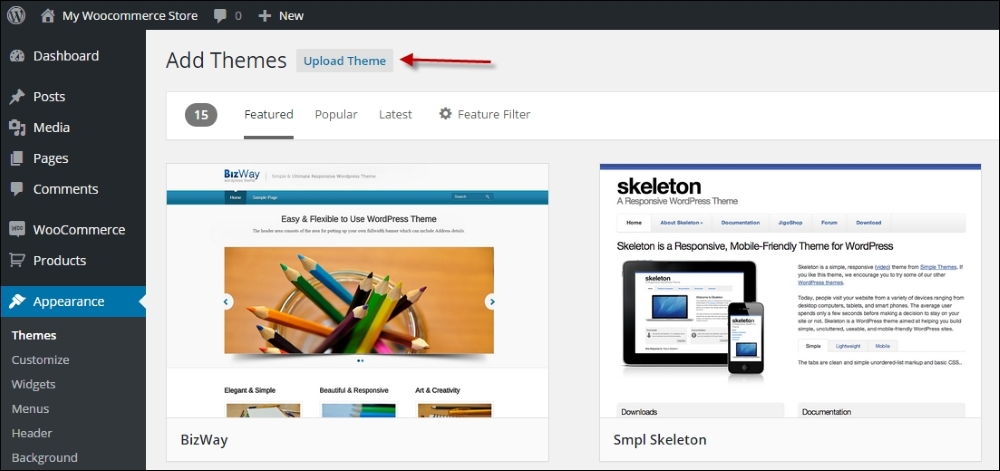
To install the theme, we head over to the WordPress administrator and choose Appearance | Themes in the menu. Click on Add New, and then click on the Upload Theme link:
Click on Choose file, and then browse to the folder where you unpacked the theme files a minute ago. We open the file theretailer.zip from the subfolder named Theme files and click on Install Now. Remember to upload the ZIP file and not the theme folder inside it.
Next, since this theme is already delivering a child theme, we'll install that one as well. We repeat the preceding steps for the file theretailer-child.zip. Note that we must do it in this order: first install the main or parent theme and after that the child theme. Besides that not every theme will deliver a child theme as well. Often, you'll just receive a single theme package.
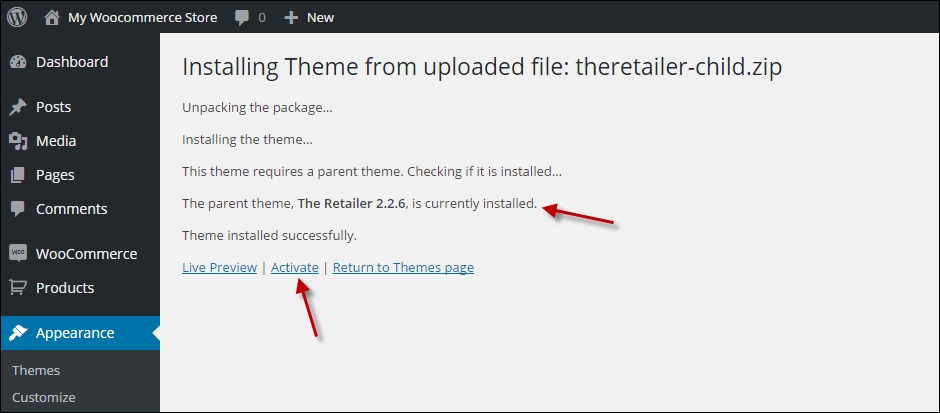
Working with Child theme is a best practice if you need to make changes to your theme. By using a parent and child theme, we'll avoid losing our changes if the developer ever needs to update the theme—and this will happen. If the theme of your choice does not deliver a child theme in the package, it's not very difficult to create one. More on child themes will follow in Chapter 6, Customizing a WooCommerce Theme.
Don't forget to activate the Child theme by clicking on the link after installation! Note that our theme requires us to install a couple of additional plugins. We receive a warning message that we can do this by clicking on the link, as shown in the following screenshot:
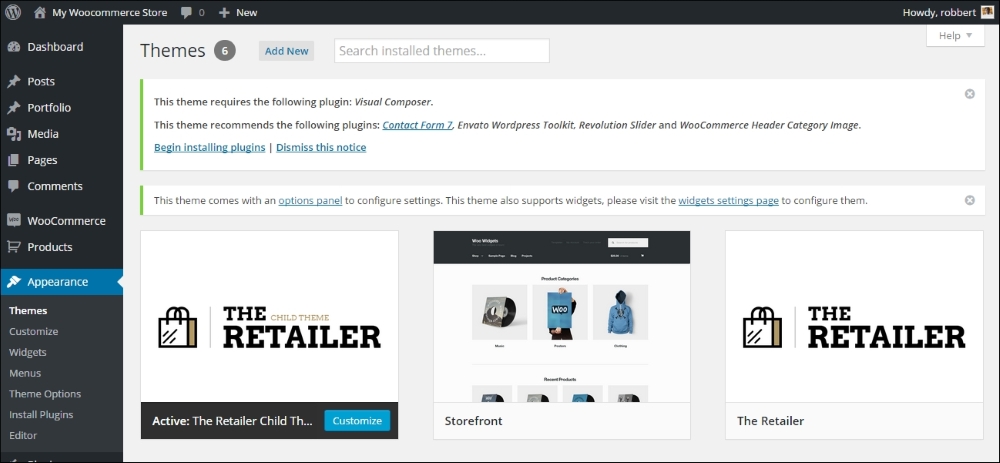
You would see the following screen after clicking on the link:
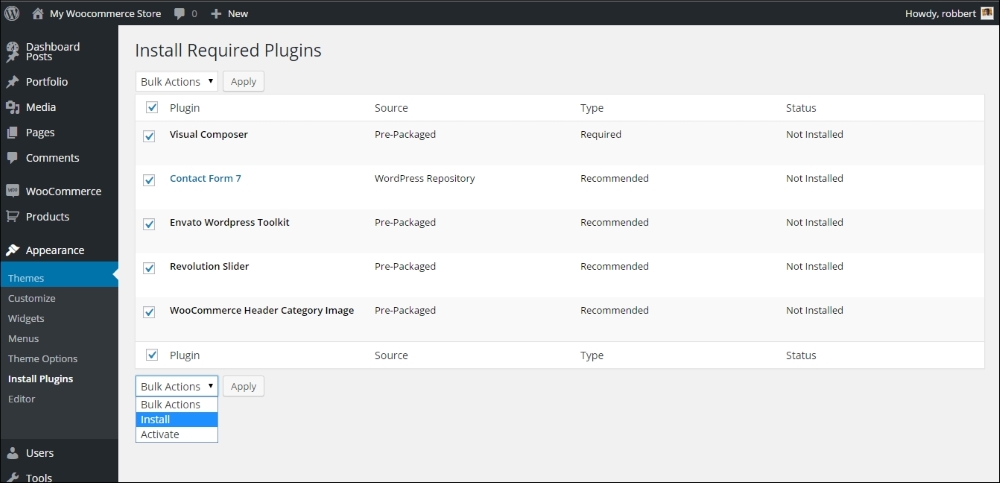
Select the plugins and install them all at the same time.
Whether or not your theme will ask for similar steps completely depends on the way it was set up by the developer. Refer to the documentation for your theme when you're in doubt about the steps to take. Note that after bulk-installing the plugins, we also need to activate them.
Premium themes are regularly delivered including demo content. If you are a beginner and find it difficult to start, it's often a good idea to install the demo content in your WordPress test environment. By combining the theme and demo content, is just gets easier to know the theme and its functions. Use the WordPress importer (Tools | Import in the menu) to import the demo content.
After installing the parent and child themes and activating it, our store page looks as follows on the frontend:
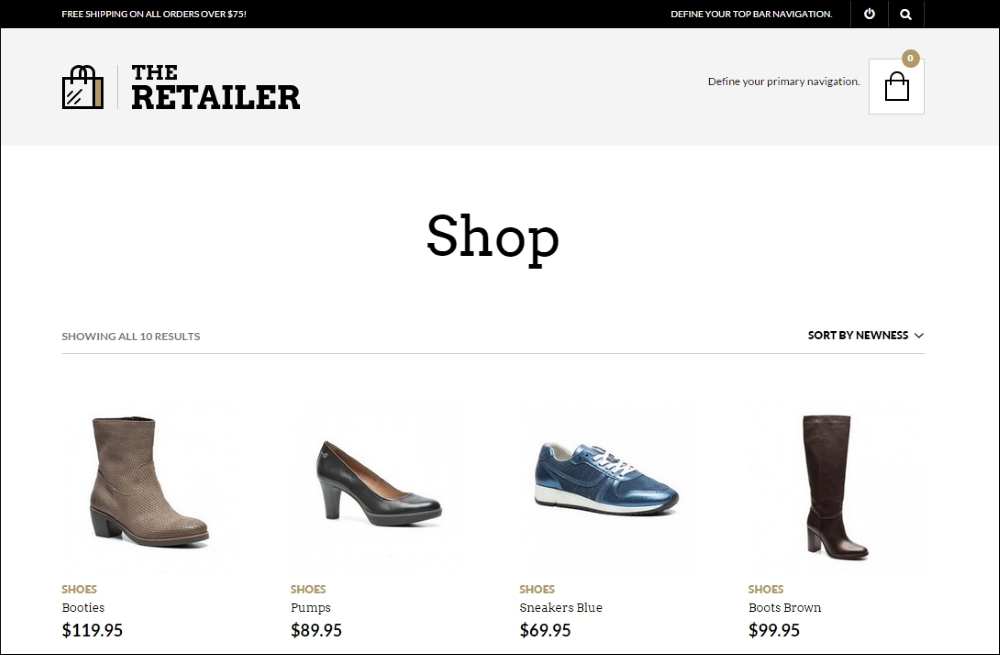
It's functional but still requires additional setup.
WordPress is expanding the standard functions to work with theme settings since WordPress version 3.4. However, we can see that the possibilities have been too limited for premium themes and developers continued to work with their own solutions. This is changing though and WordPress puts in more and more effort on customizing your theme using the default WordPress customizer. In this example, the theme comes with its own solution. We can find the settings of our theme by navigating to Appearance | Theme options, but you might just as well find a new high-level menu item for your theme. The following screenshot shows the options for our theme:
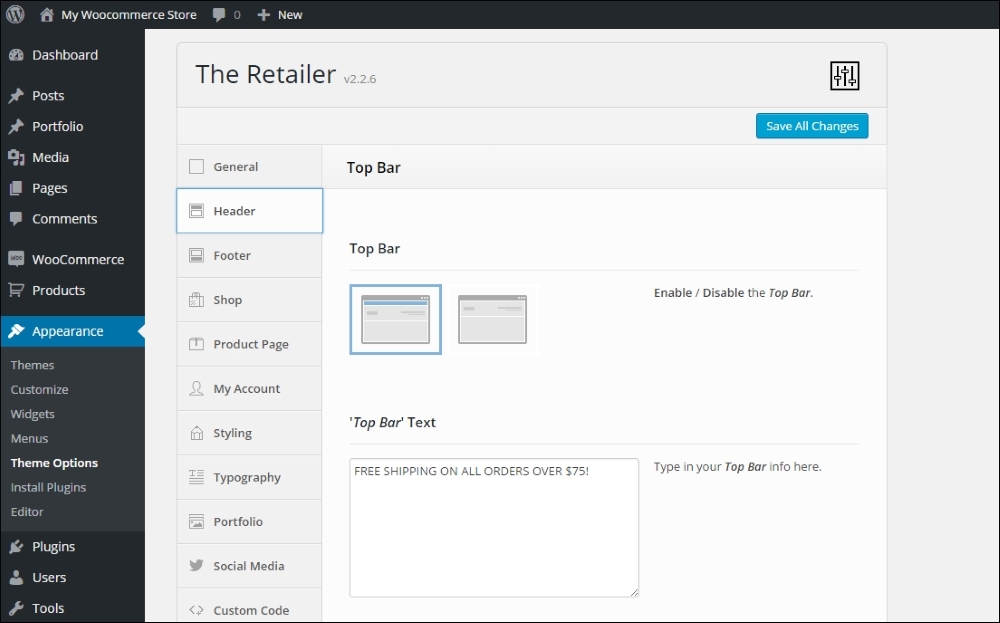
Our theme, The Retailer, offers an extended option panel with lots of options to set up our store and change the look and feel. Of course, we can upload our own logo, but it's also possible to change colors, fonts, the contents of the header and footer, and many more. There's no use in exploring all the possibilities here because they are theme-specific. Your situation will be different depending on the theme that you're using.
In the remaining part of this book, we'll switch back to the free Storefront theme. It gives us possibilities to show theme customization and development examples in a better way.
Do you like the way the theme, The Retailer, looks like and its flexibility to change all the colors just the way you need them? The theme is available for purchase at http://themeforest.net/item/the-retailer-retina-responsive-woocommerce-theme/4287447.
There's one more item that we need to discuss that is generic and not really dependent on the theme you're using. Although it is a basic WordPress setting, we still see lots of users getting confused about it. When you have just installed WordPress, by default it will always show blog items on the Front page. For an online store that isn't suitable. You want to show products, maybe a slider and some other information. But in most cases not the blog. If you don't know how to change that here' how:
Homepage. Do not fill any content, just publish it. Note that sometimes, you'll have to set the page template to home page or front page, depending on your theme. Refer to your theme documentation if you're not sure.Blog.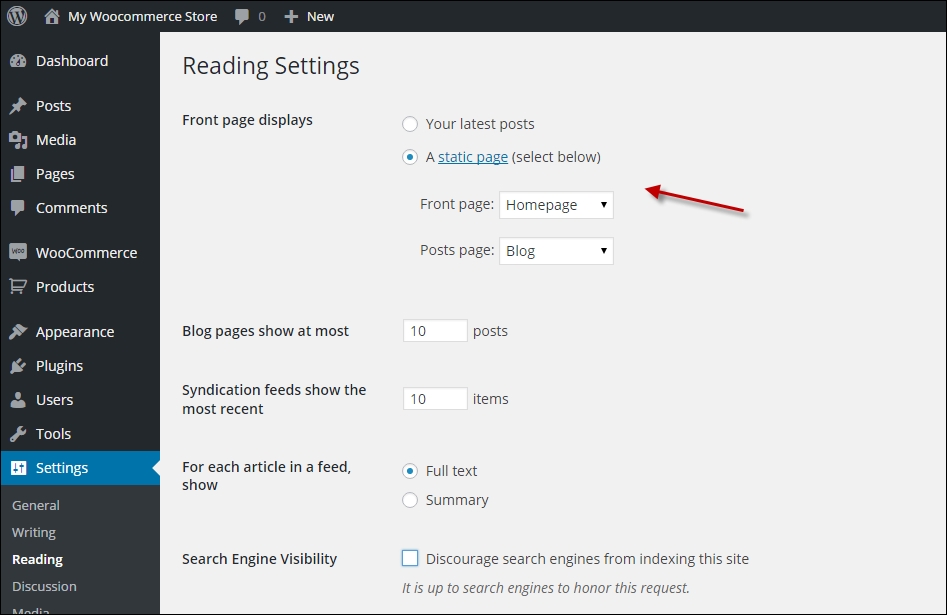
The Storefront theme is definitely one of the better free themes. That makes sense because it was developed by the creators of WooCommerce.
The functionality of Storefront is a bit limited. However, you can expand the functionality by installing additional plugins for Storefront, which you have to pay for. Let's first take a look at the changes that you can make by default.
After activating the theme, it will add additional menu items to the Appearance menu in WordPress. Here, you'll find several shortcuts for additional possibilities. WooThemes is a commercial company after all, so there are plenty of links here for more options, which you have to pay for.
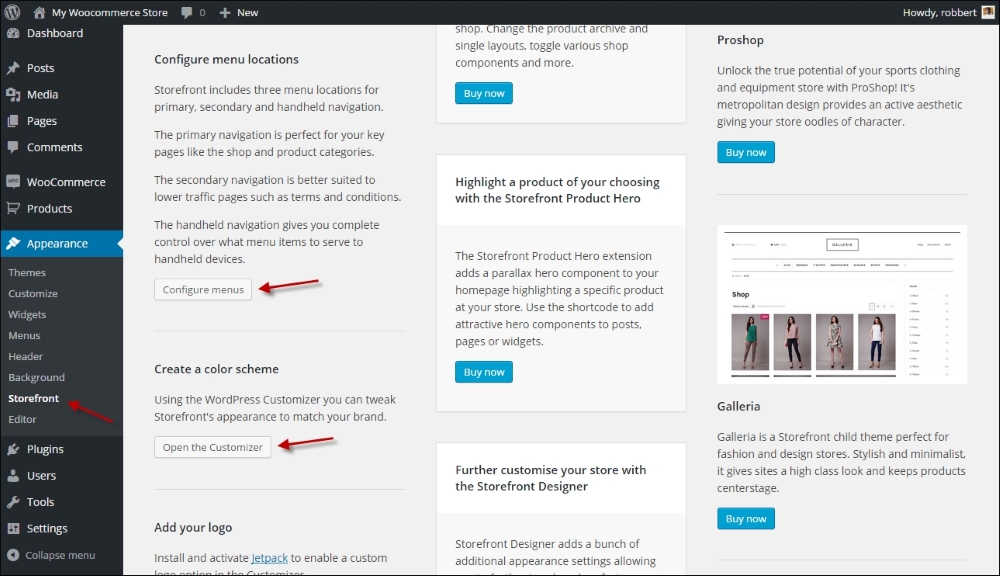
Whether you click on the link to Configure menus or Open the Customizer, in both cases the WordPress customizer will be opened. Since WordPress 4.3, you can change your menus from within the customizer, but the old function using Appearance | Menus is still available:
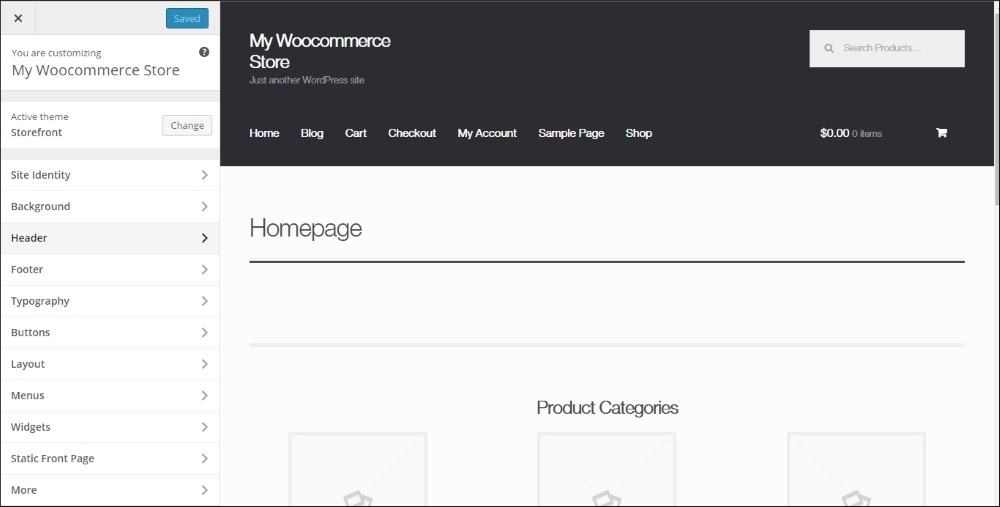
Just navigate the various options to change the items that you need, for example, the background and font colors.
Note that the Layout option on the left gives the possibility to show the sidebar on the left, which makes sense for a typical online store.
It's possible to add a header image to the Storefront theme. But strangely enough, Storefront does not offer the possibility to add your company logo, and the header image isn't really meant for this. To solve this problem, you must download and install the Storefront Logo Plugin, which will add the function to the customizer, at https://wordpress.org/plugins/storefront-site-logo/. Alternatively, you may also use the WordPress Jetpack plugin, which also gives you the possibility to change the logo http://jetpack.me/.
Another plugin that you really want to install when working with the Storefront theme is Homepage control. Use it if you decide to use a regular page as a home page for your website instead of the blog. Download it at https://wordpress.org/plugins/homepage-control/. Once activated, navigate to the customizer again to switch off any area that you do not want to include on your homepage:
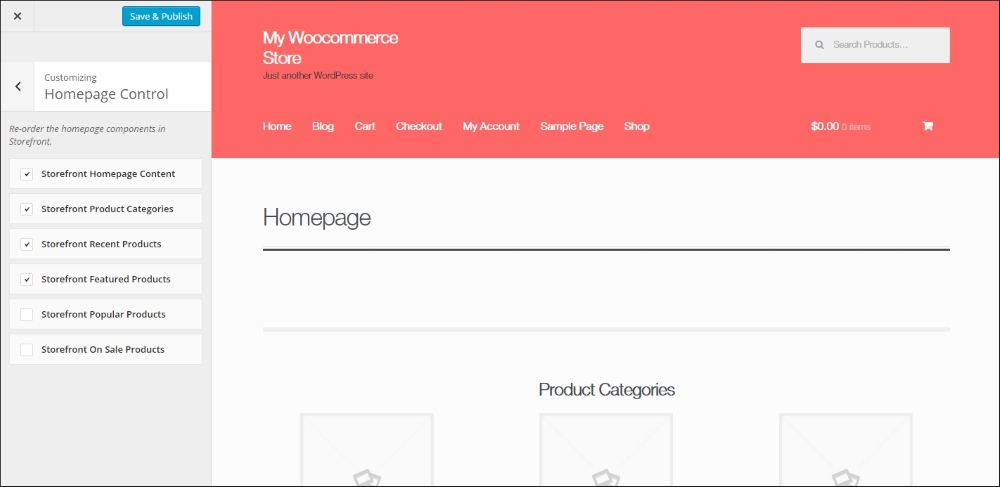
Did you notice that Storefront also shows an image for your product categories on the home page? You can switch these off, but if you want to keep them, navigate to Products | Categories and add an image for every category.
Let's have a look at our current result using the Storefront theme and without changing a single line of code!
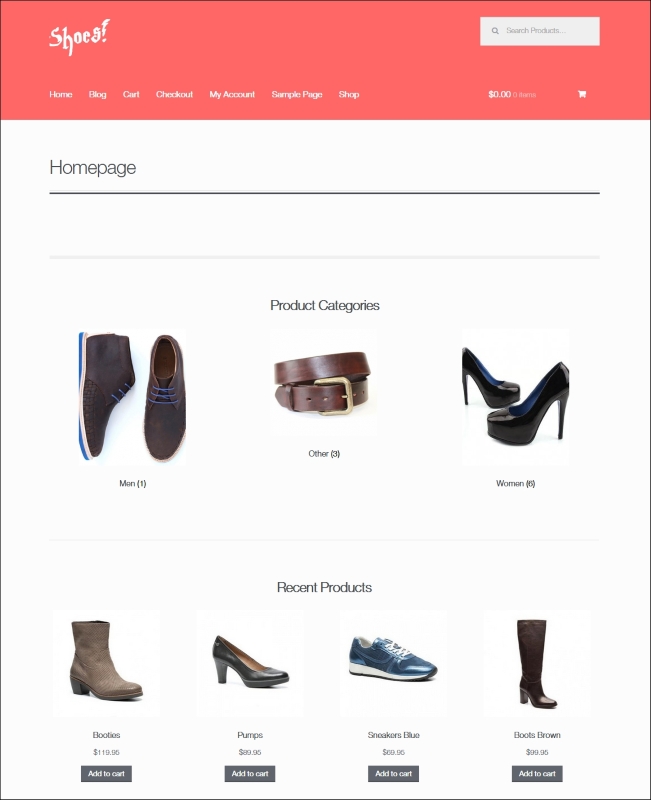
You might want to make more changes to the theme, but changing code is something that we'll discuss in the next chapter. Before we dive into code, please also have a look at the Storefront customization plugin. It's not free, but gives you additional possibilities to change the look and feel of your store (http://www.woothemes.com/products/storefront-woocommerce-customiser/).
There are lots of WooCommerce-compatible themes on the market. We've seen that working with a theme isn't difficult as long as you take the time to read the documentation and get to know your theme. The exact way of working may differ from theme to theme though, especially for premium themes.
The Storefront theme is giving us a good and solid base, and even without changing code, we can already reach a good-looking result.
In the next chapter, we'll have a closer look at the ability to modify the code of the Storefront theme.
Working with standard themes is a quick and effective solution to get your store up and running, but soon you'll feel the need to make changes to the theme that you're using. Or leave the standard theme and create one from scratch yourself. In this book, I cannot offer you a complete development course. I'll discuss the basics that will give you a good start, working with the Storefront theme. In this chapter, we will cover:
First of all, before we do anything at all, you need to be aware of the fact that this chapter is not suitable for the real beginners. Did you ever work with HTML, CSS, and PHP and have some experience in these areas? Good, then you're good to move forward. If you do not yet have knowledge on these topics, it's probably better to skip this chapter and jump to Chapter 7, Running Your Online Store. That will be easier to follow.
If you're not yet familiar with the techniques mentioned, there's plenty of information available on the Internet to get you started. From short tutorials to complete online video training, everything is already there. The following websites are highly recommended:
Would you rather work directly from a book? In that case, we can recommend the following books from Packt Publishing:
This chapter is too short to cover the topic of WordPress theme development completely. As we've seen, there have been complete books written about these topics. For this chapter, we'll stick to the basics and add specific WooCommerce information on top of that.
Before you start making changes to your theme, find out if it's really necessary to do so. WooCommerce comes with a lot of shortcodes that you can easily use on your posts and pages to call WooCommerce functions that you need. See http://docs.woothemes.com/document/woocommerce-shortcodes/ for a full list and examples.
Every web designer or developer has his/her own favorite tools. That's fine; just use what you like. If you're just starting, the minimum that you need is as follows:
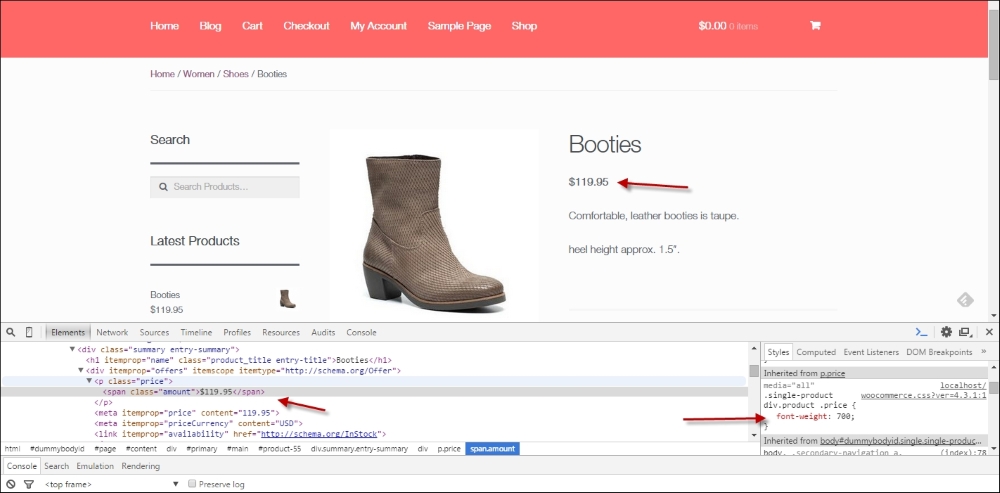
WordPress theme development in a short version:
wp-content/themes folder of your WordPress installation.index.php and style.css file. The index.php file determines the way the home page looks like, by the so-called WordPress loop. There are also other possibilities for the home page, which we'll see in a minute. The style.css file contains all the styling or calls for other CSS files. It also contains the name and author of the theme.index.php, lots of different PHP files can be called. Here are a couple of the most common ones, including their meaning:header.php: This contains the logic for the header of your theme, which mostly contains things such as the logo, website name, search bar, and menu. It also contains the necessary HTML head code.sidebar.php: This contains the definition of a sidebar, that is used to display widgets. More complex themes often give the possibility to use multiple sidebars with different content.footer.php: This contains some closing tags for the theme. Besides that, it has become quite common to define additional widget areas in the footer as well.home.php: This file can be used to show the latest blog posts on the landing page for your blog. Often, this is the home page of your website, but it doesn't have to be. If WordPress is set up to use a static page as the home page, then home.php could be used for your blog.front-page.php: If this file exists, it will be used for the home page of the website. If it doesn't exist, WordPress will look for home.php. If both of them don't exist, index.php will be used. For a deeper explanation, have a look at http://codex.wordpress.org/Creating_a_Static_Front_Page.single.php: This is used to display a single post type—often, a single blog item.page.php: This is used to display a single WordPress page.functions.php: This is an important one because, here, you'll define all kinds of different functions for your theme, for instance, the widget positions, theme support for post thumbnails, and so on. Also, when creating WooCommerce themes, functions.php plays an important role. Using functions.php, you are able to add features and functions to your website. Note that for larger changes, creating a plugin is a better option though.Are you making changes to an existing WordPress theme, please always work with a Child theme. The procedure to create one is very simple. I'll show you how to do this later on in this chapter.
There's much, much more, like the comments.php, search.php, author.php, and category.php. Note that you may use these kinds of different content types, but they aren't mandatory. If you want to learn all about these files, we highly recommend reading a book on WordPress Theme Development. Another great online resource is the WordPress codex: http://codex.wordpress.org/Theme_Development. It's also good to have a closer look at the template hierarchy, that describes exactly how all the files in a theme are working together: https://developer.wordpress.org/themes/basics/template-hierarchy.
The image below shows a simplified structure of the way in which a WordPress theme is set up:
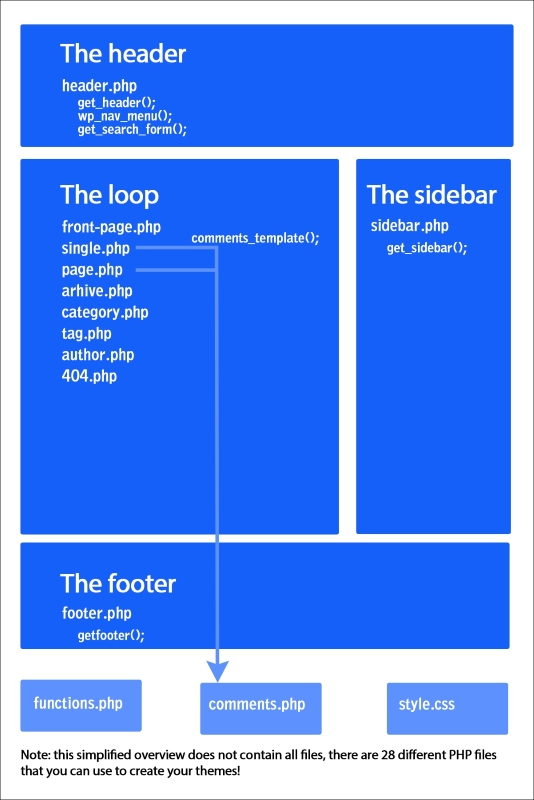
Before making any changes to your theme, it's always good to work with a child theme. A Child theme inherits all the functions from the parent theme that it belongs to. This has the following benefits:
The steps that you need to create a child theme for the Storefront theme are as follows:
wp-content/themes folder. In there, every installed theme has its own folder.storefront-child. If you're creating a Child theme for a different theme, just replace storefront with your theme name. The result should look as follows: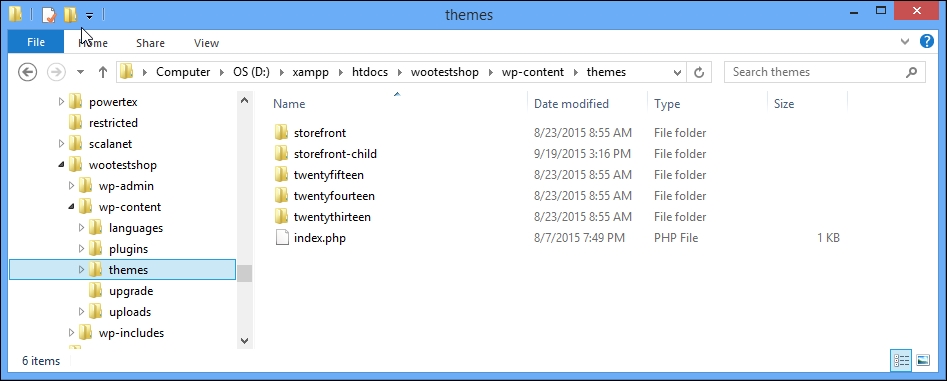
style.css and functions.php. Use text editor tools like the ones mentioned at the beginning of this chapter.style.css file:/* Theme Name: Storefront Child Theme URI: http://www.woothemes.com/storefront/ Description: Storefront Child Theme Author: Robbert Ravensbergen Author URI: http://www.joomblocks.com Template: storefront Version: 1.0.0 License: GNU General Public License v2 or later License URI: http://www.gnu.org/licenses/gpl-2.0.html Tags: black, white, light, two-columns, left-sidebar, right-sidebar, responsive-layout, custom-background Text Domain: storefront-child */
Of course you should replace the various lines with your own data. Important are the lines with the Template name, which is the name of the parent theme folder.
functions.php:<?php
add_action( 'wp_enqueue_scripts', 'theme_enqueue_styles' );
function theme_enqueue_styles() {
wp_enqueue_style( 'parent-style', get_template_directory_uri() . '/style.css' );
}style.css, you need to include the additional CSS files separately, just like in your parent theme.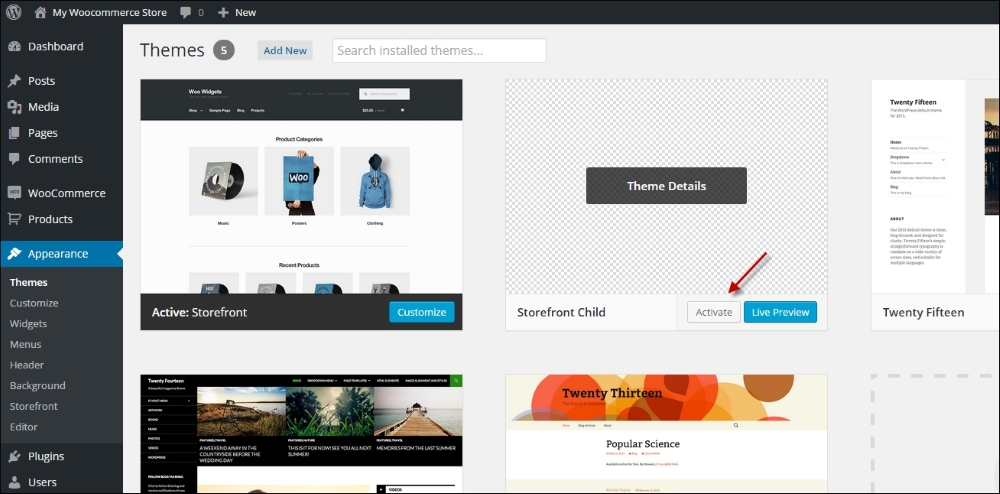
Note that the Child theme exists, but does not have an image yet. You may copy the existing image from the parent theme to your child theme folder ( named screenshot.png), or create your own.
Your Child theme is now fully up and running, and you can continue to make changes to it.
Note that the functions.php file of your Child theme will be loaded before functions.php of the parent theme. This gives possibilities to override functions in the parent theme, but only if they have been declared correctly in the parent theme. Do not duplicate function names from the parent theme in your child theme. That could cause fatal errors and your website could stop working completely.
Template files like for instance page.php, single.php, and others can be copied from the parent theme to the child theme. This will overwrite the original file, which gives the possibility to create your own version of these files.
Often, you do not need to change the template files of your theme. Being able to change the CSS using a child theme is already a huge benefit. Let's finish with a simple example. In our Storefront theme, we would like to have a smaller header. The current header contains a lot of white space, which we want to decrease, as shown in the following screenshot:
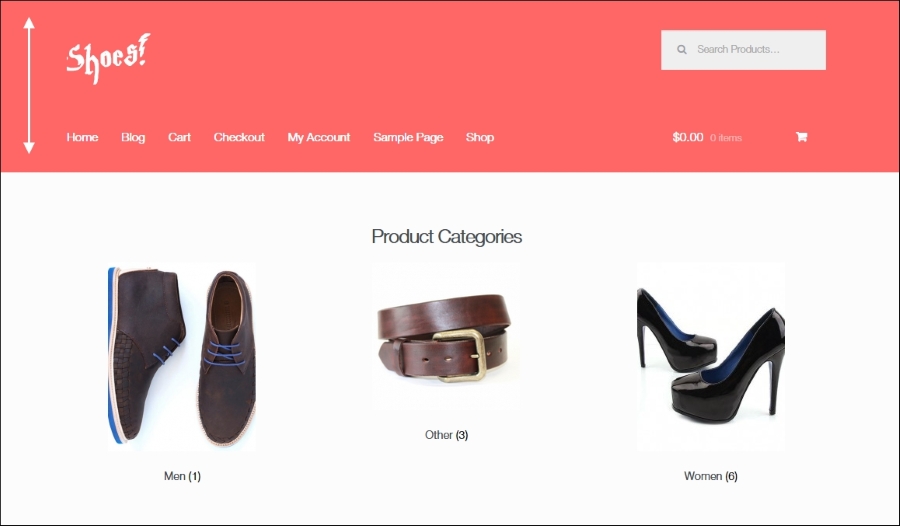
To do that, we simply inspect the elements in the header using the Chrome tools that we saw earlier in this chapter.
We can see that margins have been defined for the site logo in the class site-logo-anchor. There's also a margin at the top of the site header and navigation. Add the following lines of code to style.css of your Child theme:
.site-header {padding-top: 1.3em; }
.site-header .site-logo-anchor { margin-bottom: 0; }
@media screen and (min-width: 768px) {
   .main-navigation { padding-top: 0; }
   .woocommerce-active .site-header .site-header-cart { padding-top: 0; }
}
All that we do here is use smaller margins and paddings. The last two lines of code will only be applied on desktop screen resolutions (larger than 768 pixels in width). We leave the mobile view unchanged for now. Save the file and check the results. Notice that the header is much smaller now:
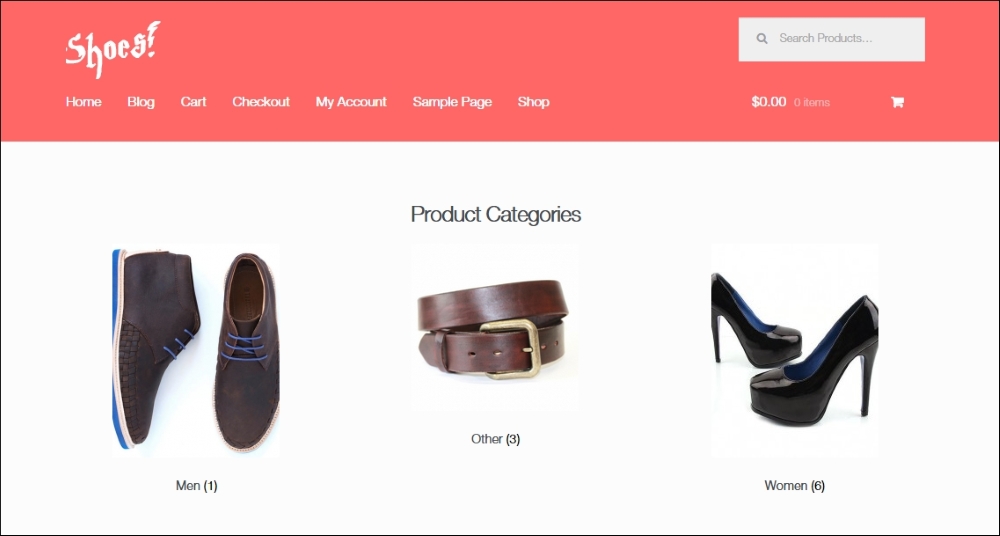
WooCommerce is delivered by default with a number of page templates that are used to display all shop information in the correct way. Even using the standard Twenty Fifteen theme, the WooCommerce pages already look pretty good. Just adding some additional CSS might be enough for you to get WooCommerce working even on a theme that was never even designed to work with WooCommerce. If you want to go further than that, here are the things that you need to know:
wp-content/plugins/woocommerce/templates.wp-content/themes/child-theme-name/woocommerce. Make sure to place your files here directly; do NOT use the templates subfolder that you can see in the original WooCommerce folder! If you are making changes to an existing WooCommerce theme, you'll already have this structure in place in your Parent theme. In that case, copy the files you want to change to the woocommerce folder within your Child theme.price.php is stored in wp-content/plugins/woocommerce/templates/single-product, the location of your changed version of the file should be wp-content/themes/child-theme-name/woocommerce/single-product.woocommerce/templates folder also contains a subfolder holding e-mails. You may copy and change these in the same way to your Child theme to be able to adjust the content of the e-mail messages.WooCommerce comes with default CSS styles to give the necessary elements at least some styling. These CSS files can be found in /wp-content/plugins/woocommerce/assets/css. Also here, it's better not to change the existing files because your changes will be overwritten in case of an update of the plugin.
You may simply add some CSS styling to the stylesheet of your Child theme in order to change the colors, fonts, and so on. The stylesheet of your child theme should be made available here: wp-content/themes/my-child-theme/style.css.
For example, use the following code to change the color of the buttons:
a.button, button.button, input.button, #review_form #submit { background:green; }If you want to completely disable the WooCommerce CSS styling, you can do this in the following way. Use your theme's functions.php file and add the following:
add_filter( 'woocommerce_enqueue_styles', '__return_empty_array' );
But remember that as a beginner, it's easier to change existing styles than to create everything from scratch.
WooCommerce heavily relies on the usage of Hooks, Actions, and Filters. It gives you the possibility to override the default output of WooCommerce. For instance, if you want to take control of the Checkout page and add or even remove fields in there, hooks and filters are what you need.
Let's first explain this concept. Within the WordPress and WooCommerce code, developers added hooks. On a hook, you can hang your own code so that it changes the original behavior. There are two types of hooks, which are actions and filters:
In other words, using actions you can do something and using a filter you can change the data.
If the topic of using hooks and filters is still new to you, here you may find a good tutorial about it: http://wpcandy.com/teaches/how-to-use-wordpress-hooks. Another good read explaining the concept for non-developers can be found at http://docs.presscustomizr.com/article/26-wordpress-actions-filters-and-hooks-a-guide-for-non-developers.
Now, let's take the following example. In some countries, having the State field on the checkout page doesn't make sense because States are not actively used. In such a case, you might want to remove the field from the checkout page. Here's how to do just that.
Add the following code to your functions.php file in your Child theme:
// Hook in
add_filter( 'woocommerce_checkout_fields' , 'custom_override_checkout_fields' );

// Our hooked in function - note that the $fields is passed via the filter

function custom_override_checkout_fields( $fields ) {
     unset($fields['shippping']['shipping_state']);
     unset($fields['billing']['billing_state']);
     return $fields;
}
So what does this do? First of all, we add our own custom function to the WooCommerce Checkout fields filter. In our custom function, we simply remove two fields by using the unset function. However, please note that this is an example only. Removing the State field might break extensions that rely on it. Besides that, the preceding code does not check if the fields are set before removing them. So, be careful when applying changes like these and always make sure to keep a backup copies of the original files available.
There's more to discover regarding the development of your own WooCommerce theme; especially, when working with hooks and filters. Here are some additional resources to move forward:
We saw earlier that adding a logo to the Storefront theme can be accomplished using an additional plugin. However, such a plugin might not be available for other themes. Besides that, adding more and more plugins is not a good idea for performance reasons. A simple change can just as well be made by a small code change. Let's see how we can add a logo to the Storefront theme without using the plugin. If you installed and used that plugin earlier, please remove it first:
/* Add a logo in the header */
add_action( 'init', 'storefront_logo' );
function storefront_logo() {
  remove_action( 'storefront_header', 'storefront_site_branding', 20 );
  add_action( 'storefront_header', 'storefront_display_logo', 20 );
}

function storefront_display_logo() {
?>
  <a href="<?php echo esc_url( home_url( '/' ) ); ?>" class="site-logo" rel="home">
    <img src="<?php echo get_stylesheet_directory_uri(); ?>/images/logo.png" alt="<?php echo get_bloginfo( 'name' ); ?>" />
  </a>
<?php
}
We also need a small change to the CSS of our child theme because the class used is slightly different compared to the one used in the plugin:
.site-header .site-logo { float: left; margin-bottom: 0; }Leave the remaining part of style.css unchanged. Note that the result of this small piece of code is the same as the one that the plugin offered.
The Storefront theme offers you the possibility to show the sidebar on the right or on the left. But what if you would like to show the sidebar on the category pages, but completely remove it on the (single) product page?
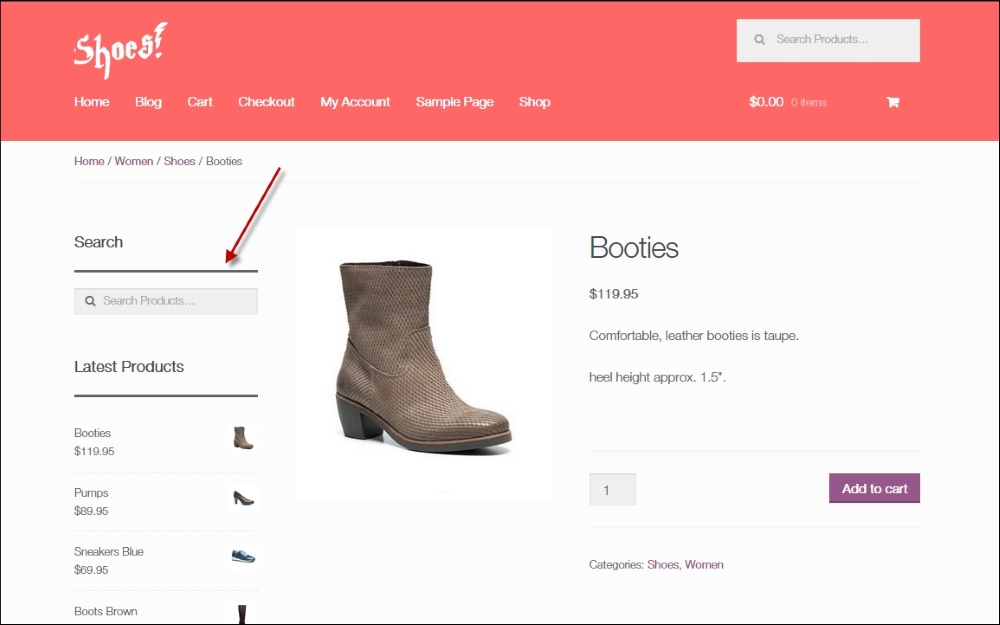
This is also pretty simple to do. With only a few code changes, we'll have more space available for our product images. Add the following to functions.php of your Child theme:
add_action( 'get_header', 'remove_storefront_sidebar' );
function remove_storefront_sidebar() {
  if ( is_product() ) {
    remove_action( 'storefront_sidebar', 'storefront_get_sidebar', 10 );
  }
}
Next, also add a line to style.css:
/* remove sidebar on product page */
body.woocommerce #primary { width: 100%; }
The end result is a much cleaner product page with larger product images:
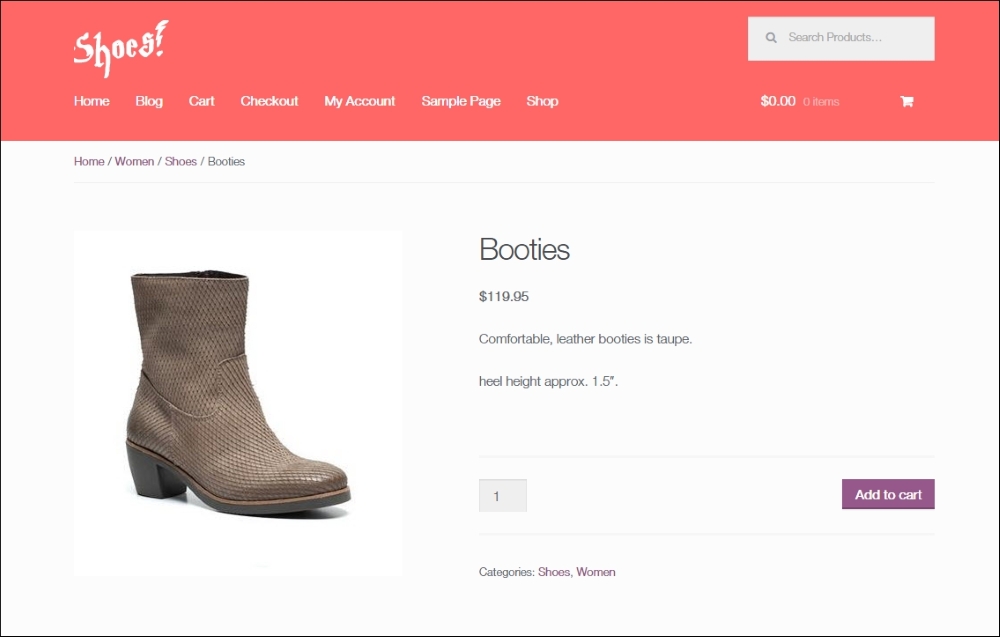
In this chapter, we've seen the basics of a WordPress theme. Besides this, we've had a look at the specific functions that WooCommerce adds on the top of that and how you can take advantage of the template files included in WooCommerce.
In the next chapter, we'll focus on running our store and working with orders and customer data.
During the former chapters, we've learned to work with WooCommerce themes. We even had a look at changing our WordPress theme, although this is a subject that requires a deeper knowledge of web design and coding techniques.
Once we set up our store, payment methods, products, and theme, we are able to start doing business! But what happens next? As a store owner, it's important to test the purchase process completely. Not only to check what your customers will see and receive, but also to know what will happen once your first orders start rolling in. In this chapter, we'll learn to:
Assuming that, up to this point, you've been setting up your store in a development environment, you're now almost ready to deploy your store.
A topic that we didn't fully discuss during Chapter 1, Setting Up WooCommerce, is e-mail messages. We discussed the basic settings, but what if we wanted to do additional changes? Let's first go back to the WooCommerce Settings page and click on the Emails tab.
Under Email Options, there's a link available that shows a preview of your current e-mail template. We added a logo during Chapter 1, Setting Up WooCommerce and changed some of the colors. Our example currently looks as follows:
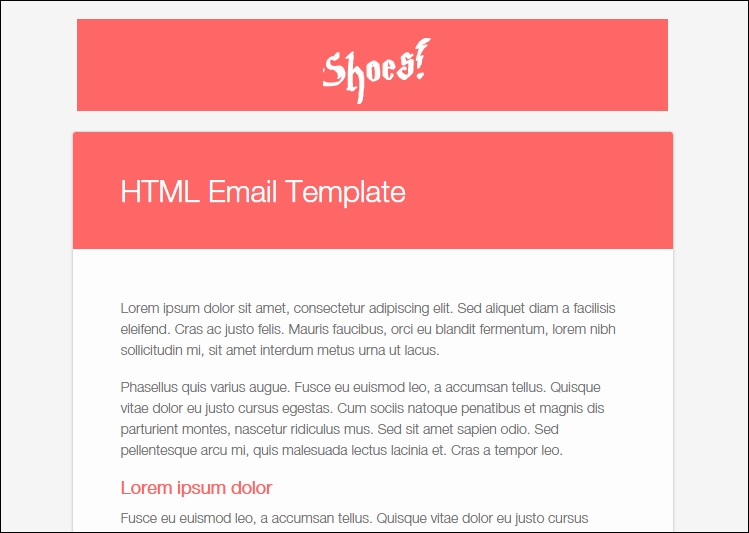
Note that, besides the general e-mail settings, every e-mail that WooCommerce can send has its own form with settings. You may use this to disable the e-mail completely or change its subject and title.
WooCommerce seems to offer an invoice possibility because it shows a couple of settings for the invoice e-mail. However, real invoice numbering doesn't exist in WooCommerce. WooCommerce uses post ID's, which means in practice that gaps will appear in your order numbering. In lots of countries, it's mandatory to use a progressive invoice number. You'll need an additional plugin to solve this issue. An example will follow in Chapter 8, More Possibilities Using Plugins.
If you like to have complete control over your e-mail templates, you have the following two possibilities:
In this chapter, we'll take a look at the second option. To be able to change the existing templates, you need to copy the template files to your own theme. By doing so, you will be able to change the HTML of your e-mails completely! Of course, you must have some PHP and HTML knowledge to be able to understand and change the files.
Don't just change the original WooCommerce e-mail templates in the plugin folder because, in that case, your changes will be lost when there's an update of the WooCommerce plugin.
If you want to use this possibility, copy the e-mail templates that you want to change from the following folder:
wp-content/plugins/woocommerce/templates/emails
Copy this to your theme folder:
wp-content/themes/your-theme-name/woocommerce/emails
In our demo store, using the Storefront Child theme, this would be as follows:
wp-content/themes/storefront-child/woocommerce/emails
WooCommerce has a handy function available that copies the necessary file for you. You can find it at the bottom of every individual e-mail settings screen:
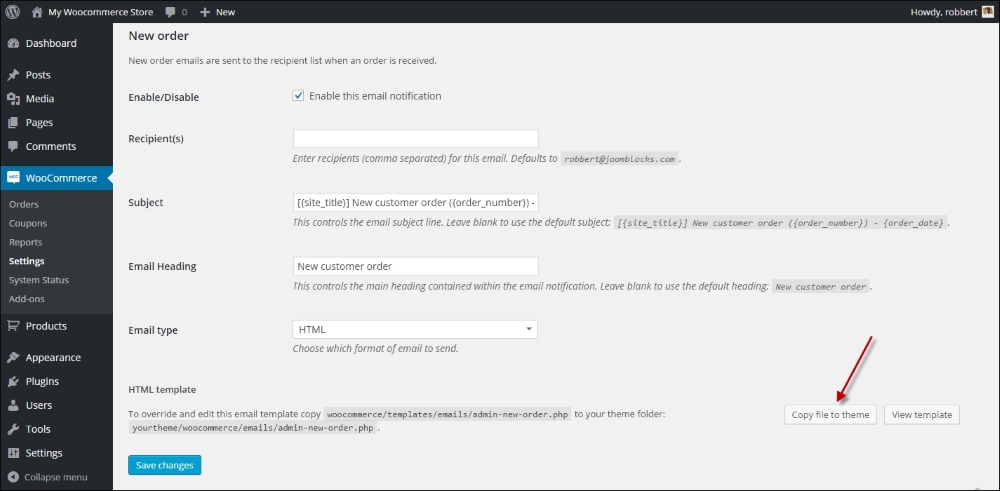
When you copy the file to your theme, it will automatically be added to your child theme if you're using one. Next, the view template button shows the code of the template file. It's possible to make changes here immediately and save your changes. Working that way isn't recommended though, because a small mistake in the code might break your website:
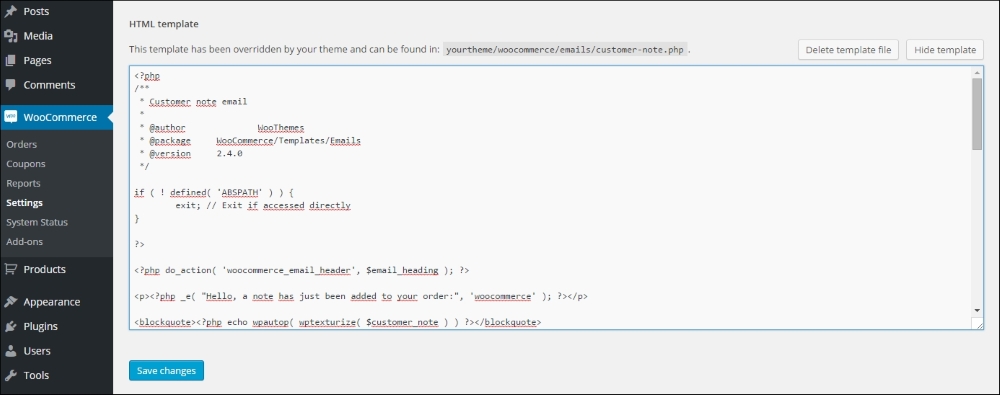
If you made any mistakes that break your e-mail, it's always possible to restart. Use the button Delete template file to remove it from your theme, and you can copy the original file again.
Note that you only need to copy the files that you want to change. Don't just copy all of them if you don't need it. That would only become confusing in the future when doing updates.
In the WooCommerce plugin folder, you'll see a PHP file for every e-mail template. There's also a subfolder available named plain. In this folder, the templates for non-HTML e-mails are stored. Depending on the changes that you're making, it can be necessary to copy as well the HTML e-mail templates as the plain versions to your theme folder.
Besides the template files, there are also helper files like email-header.php and email-footer.php. If you want to make a change to these parts of your e-mails, you need to copy these files as well.
For more information, refer to http://docs.woothemes.com/document/template-structure.
Once you've set up your store, added products, and changed e-mails if needed, you're ready to start the deployment process of your store. Assuming that up until now, you've been working in a development environment, there's one more important thing that you need to do before bringing live your online store: test it!
Just use your store as if you are a customer. Is everything clear for the visitor? Are the links to conditions and shipping information easily available? Is it clear what payment methods you're offering? But above all, does the order process work? It's very important to spend some time in your own store and actually create orders yourself. So you are sure that it is working and that the e-mails that the customer receives are clear and correct.
If everything is okay, you can start the deployment process. There are many ways to deploy a website from development to live, but, in this example, we use a basic, simple technique to do it. Note the steps below only work if you're deploying a new website. If you are adding WooCommerce to an existing website, other steps could be needed.
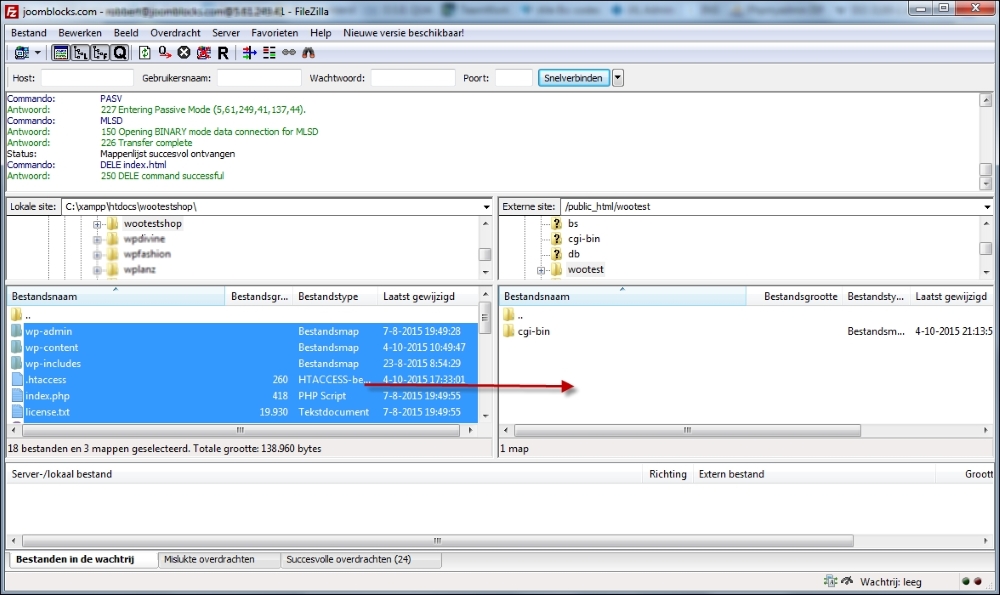
wp-config.php so that it holds the correct values for accessing the database at your hosting provider. If you make changes locally, be sure to upload the file using FTP again.http://localhost/… to http://yourdomain.com. Click the Dry run button to test the result, and use the Live run button to confirm and save the changes: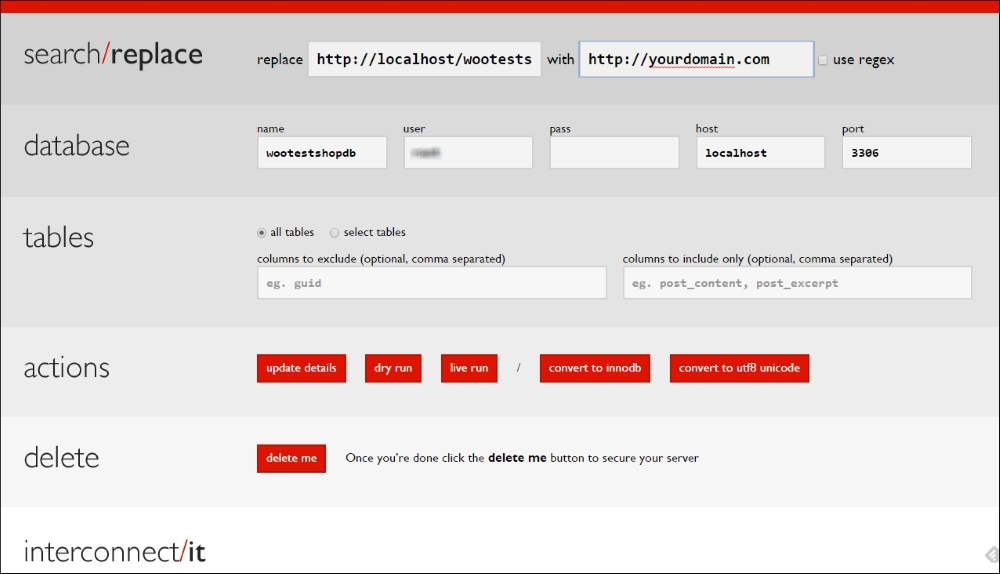
After doing these database changes, your online store will be available on the new domain. Test if it is reachable on your domain, and also test if you can reach the WordPress administrative panel of your site. If something went wrong, your site won't be available. In that case, restore your database and start again.
If you need more information about moving your development website to a live environment, you may find a tutorial including more details on my website: http://www.joomblocks.com/moving-a-wordpress-website.
Now, we will create a couple of sales orders using our own details just to test the process, whether our payment methods are working, and if the e-mails that we're sending are all working as expected.
An order can be created as well from the frontend as from the WordPress administrative panel. Your customers will order from the frontend, of course. After creating an order, a typical confirmation page will look as follows. Besides the information shown on the screen, the customer and store owner will also receive an e-mail:
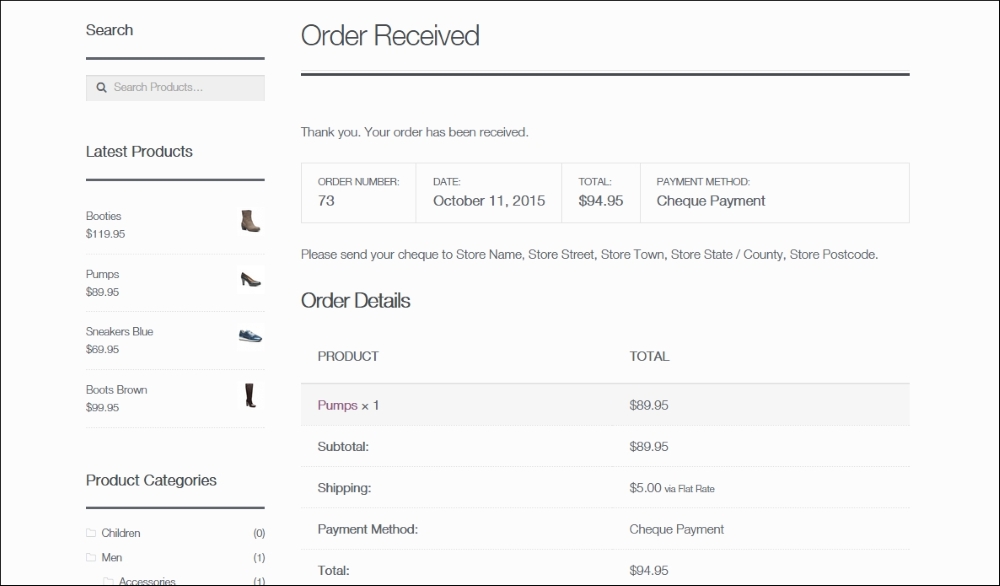
Once we create a couple of orders, we can find them in the WordPress administrative panel by navigating to WooCommerce | Orders. You will be notified of new orders directly in the menu. A small circle behind the Orders submenu shows the number of new orders:

The Orders screen shows all the sales orders that you received, regardless of their order status. From here, you may continue to process your orders.

Note the following points when working from this screen:
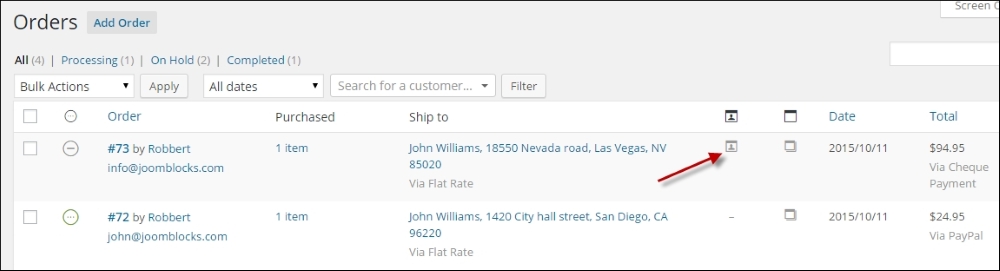
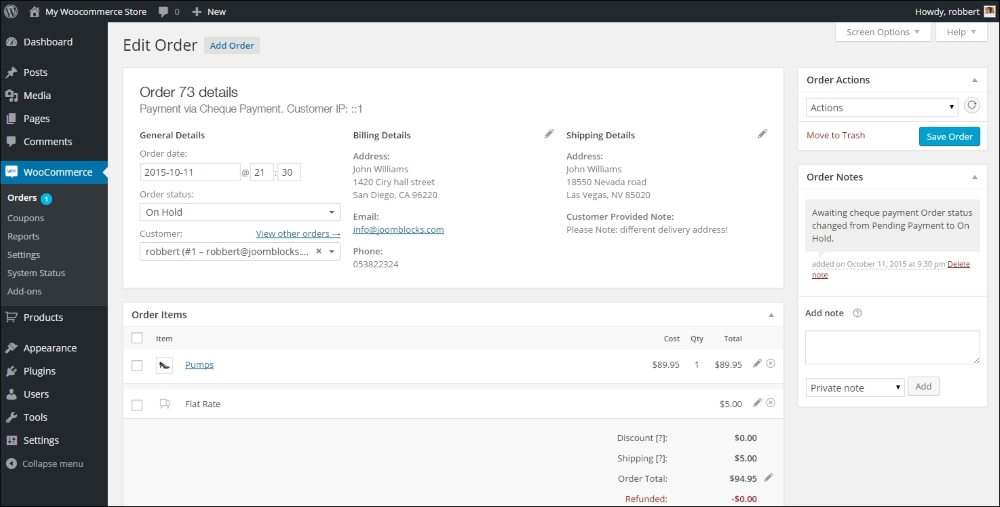
The order detail screen shows a lot of information. You can find all the address information, details of the products ordered, including attributes, and detailed tax information. On the bottom right of this screen, you'll find a list of Order Notes, holding all the status changes and other information about the process that this order went through. It's possible to add manual notes yourself. There are two types of notes. Customer note will be sent to the customer by e-mail. Remember that these e-mails will only be sent if they are enabled. Navigate to WooCommerce | Settings | Emails | Customer note to verify that. It will be visible as well when the customer looks at the order details by logging in again. A private note is for you or your employees only. Your customer will not receive a private note by e-mail.
Further, on the top left of this screen, it's possible to change the Order status. You can set it to completed for instance once you have shipped all the items. Unfortunately, it's not possible to only ship a part of the order! After changing the status of an order, you must click on Save on the top right to make sure that the status change is actually saved. Depending on your e-mail settings, WooCommerce might send out a message to your customer to confirm that the order has been completed:
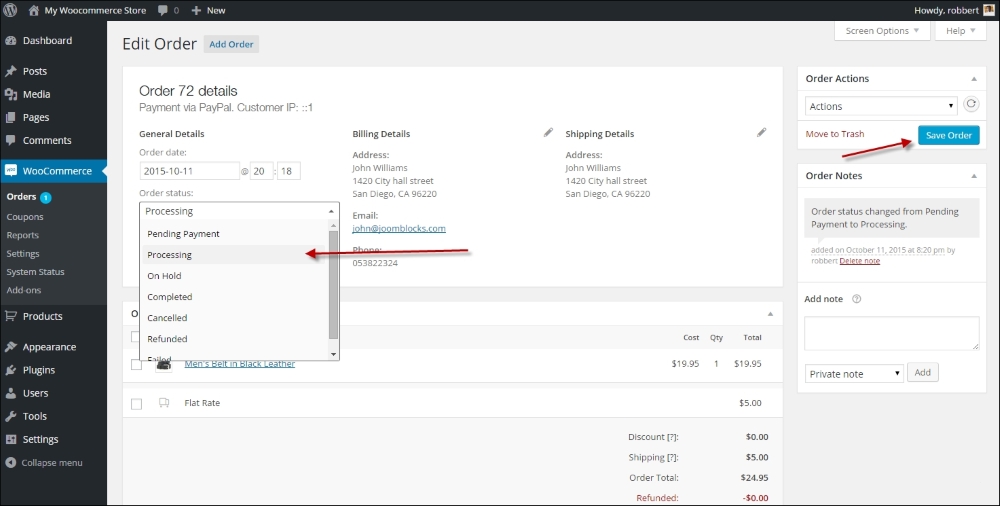
Note that when setting an order to refunded by changing the status on the top right, there's no direct connection to your payment gateway. You'll have to manually make sure that your customer receives back the paid amount. Most payment service providers offer a function to refund an order amount. However, there's a function available that lets you automatically refund the amount online. To do this, use the Refund button below the order details. Whether or not you are able to refund the amount automatically depends on the payment gateway. Using PayPal, for instance, it is possible to do an automatic refund.
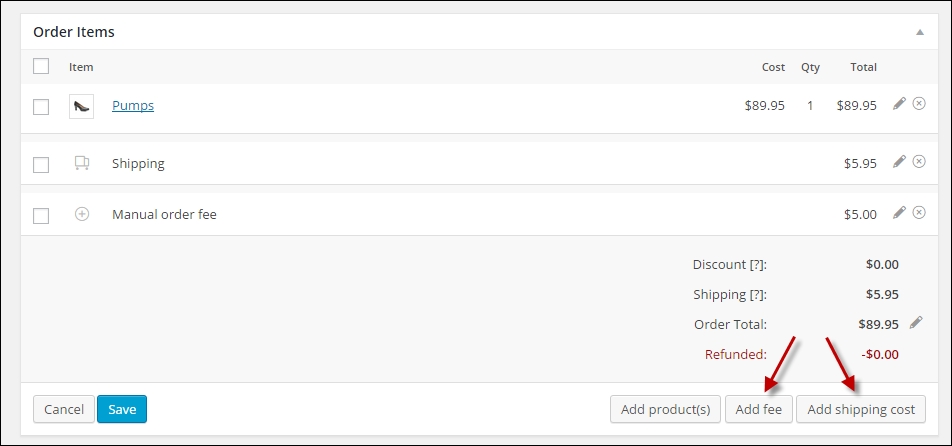
Handling refunds can be overwhelming sometimes, and there are lots of possibilities. If you want to learn more, there's a good article available in the WooCommerce documentation at https://docs.woothemes.com/document/woocommerce-refunds/.
By using Order Actions on the top right, it's possible to manually resend the order e-mails to your customer again. Also in this case, you need to press the Save Order button or the Apply icon on the right to actually send the message:
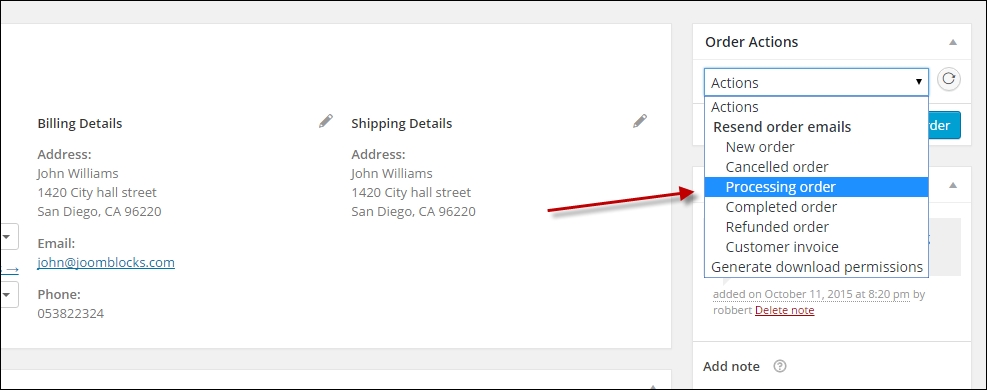
At the bottom of this page, there's one more function available. When selling digital goods, like for example e-books, the buyer receives the order confirmation including a download link as soon as the status of the order becomes Processing. Sometimes, it's necessary to overrule the default behavior of WooCommerce and grant access to the file manually. You can do that, and it's even possible to grant access to a digital file that wasn't at all on the order. If you want to do that, just type the name of the product in the search box, select the correct product, and click on Grant Access:

After giving access, it's possible to limit the number of downloads for this file or set an expiration date. It's also possible to Revoke Access again.
After creating several sales orders, you'll notice that the sales order numbering isn't always sequential:
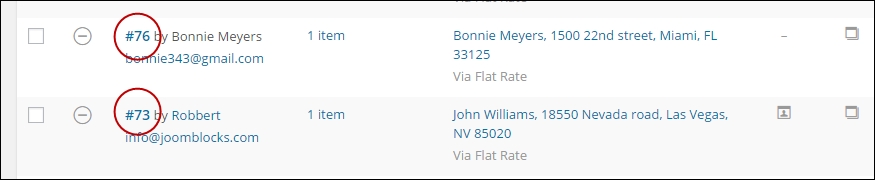
Multiple order numbers are sometimes skipped. This is caused by the fact that WordPress saves everything as a post. A page is a post, a product is a post, and sales order is a post. They all use the same, single number sequence and that's why the sales order numbers will not be sequential. There's a plugin available that can solve this issue at https://wordpress.org/plugins/woocommerce-sequential-order-numbers/. This is the free version which is working fine but doesn't give you any options. The premium version is available on WooThemes.com.
Besides handling orders that were created by online customers, it's also possible to manually add a sales order yourself in the WordPress administrator. This is useful for orders that are for example placed by telephone, e-mail, or fax. Situations like this especially appear in business-to-business environments.
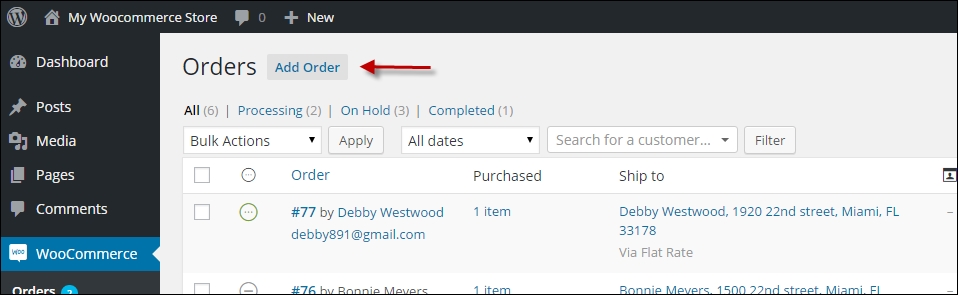
You may select the details of an existing customer by just start typing your customer's name in the Customer field. It's also possible to create the order for a Guest, so a customer that does not have an account in your store. This is the default setting. In this case, you have to enter the address details manually:
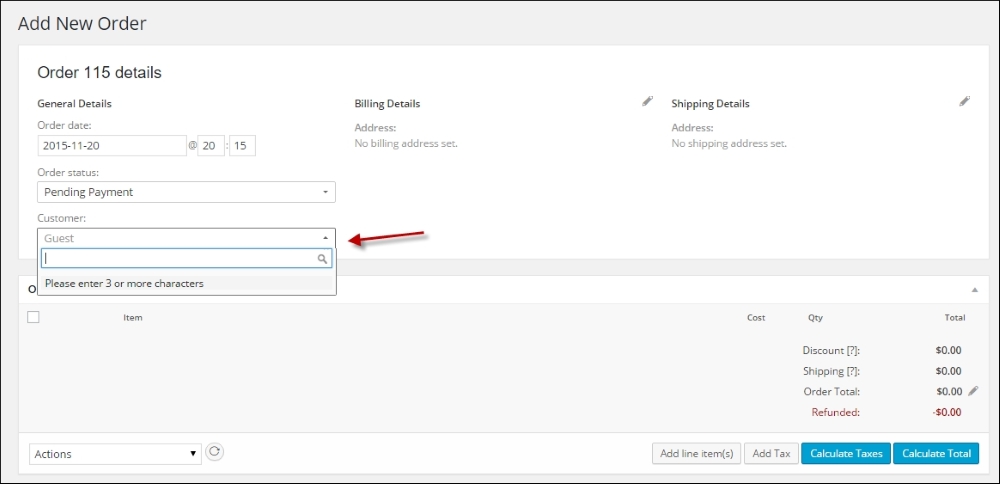
If you want to use the data of an existing customer, start with typing the name in the Customer field. Otherwise, keep the default setting as Guest.
When adding the address data, the drop-down fields like Country and State can be filled easily. Just start typing in the field and the matching records will appear:
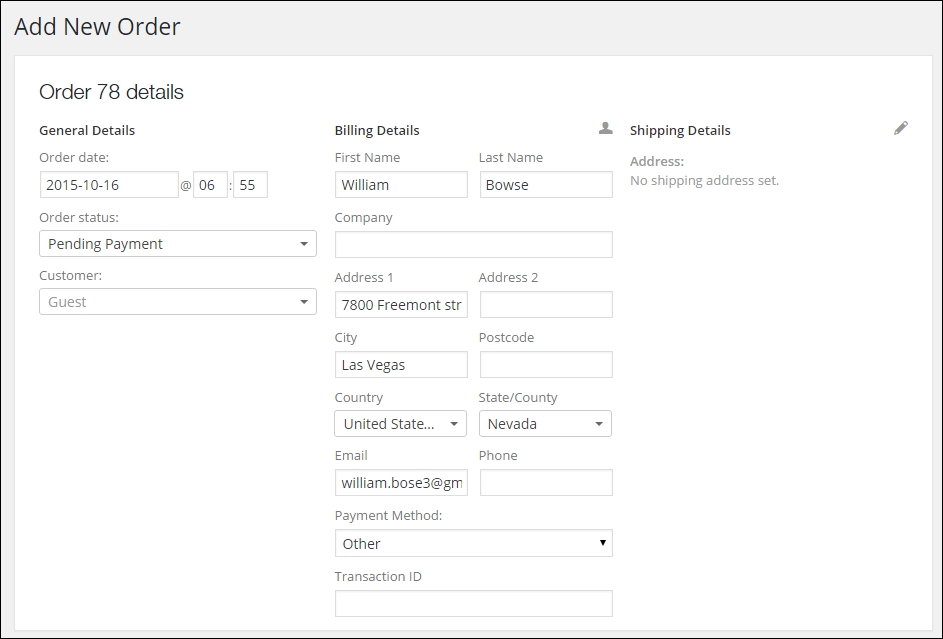
Set Order Status and Payment Method based on the way the customer is going to pay for the order. When adding Shipping Details, it's possible to copy all the data from Billing Details so that you do not have to enter them again.
Click on the button Add line item(s) button, and then, click on Add product(s) to start adding products to your orders:
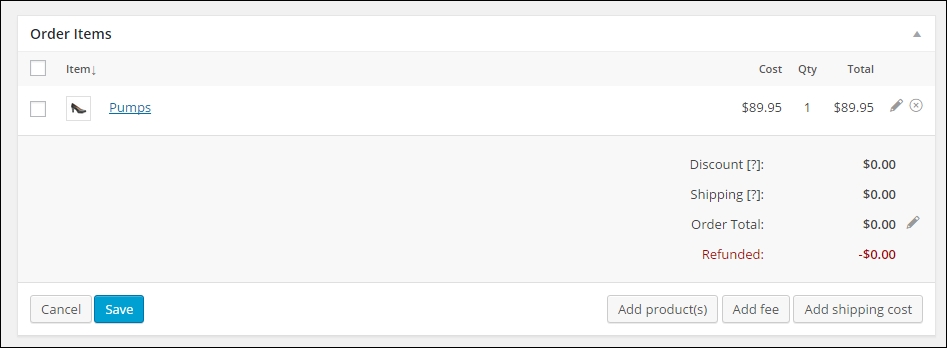
Next, a search window opens that lets you search and add a product to the order. You may change the quantity if needed.
From the window shown in the preceding screenshot, you may Add shipping cost to your order or add an order fee using the Add fee button. If you're adding the shipping cost, you manually have to select the correct shipping method and amount it will not be filled in automatically.
Click on the Save button on the bottom left once you're finished with adding items. Click on Calculate totals as well to set the total order value.
Don't forget to also click on Save on the top right corner to save your order. Once saved, you can manage this order in exactly the same way as a sales order entered by an online customer.
The WooThemes website is a great and updated resource. If you have additional questions about managing your orders, then this is a good starting point: https://docs.woothemes.com/document/managing-orders/.
By navigating in the main menu to WooCommerce | Reports we'll be able to take a look at the reporting capabilities that WooCommerce has available. It delivers a number of standardized reports that already give a lot of information. But unfortunately, there isn't much flexibility in this area. Just use what is available or find alternative reporting methods. More on reporting possibilities will follow in the next chapter.
When opening the reporting page, we'll see four main areas that are divided by tabs:
Every main area contains several reports. By default, the reporting section always opens with the Sales by date report of the last seven days. The following reports of sales orders are available:
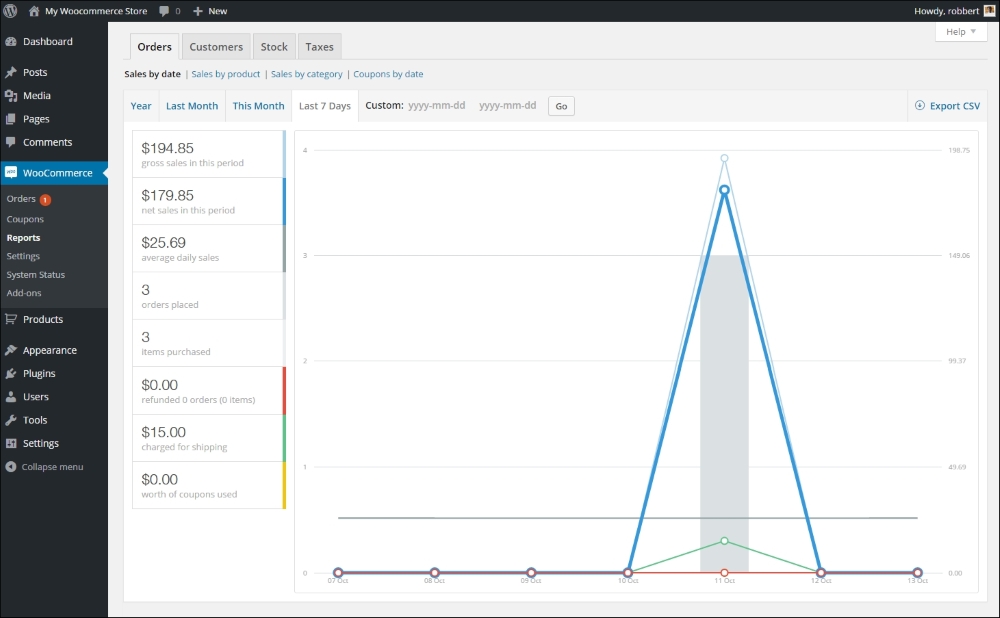
For every Sales report, it is possible to select the date range. By default, this is the Last 7 days, but other possibilities are This Month, Last Month, and the current Year. Besides that it's possible to enter a custom date range. Click on the Go button after entering the start and end date. WooCommerce automatically selects a matching period so that the graph can be drawn. For instance, when selecting a period of a year or more, WooCommerce will show the revenue per month in the graph.
On the top right of the screen, there's a button named Export CSV. If you click it, a file will be created holding the data of your graph so that you can import it to, say, for example Excel. Note that this is already aggregated data per period and no individual sales orders will be exported here.
In the Customers report section, two reports are available:
The customers versus guests reports give the ratio of buyers that did and did not create an account in your store. The second report, customer list, is more interesting because it shows your top buyers. Unfortunately, customers that do not have an account in your store will not be shown on this list.
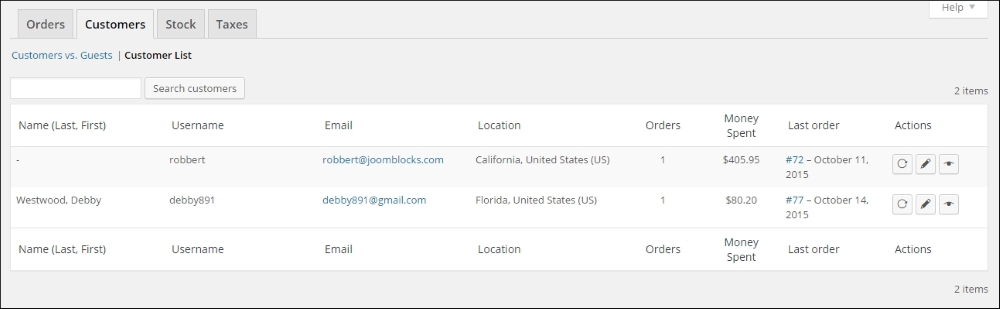
There are three different stock reports available:
All three reports are generally the same; the only difference is the filter that determines which items will be shown:
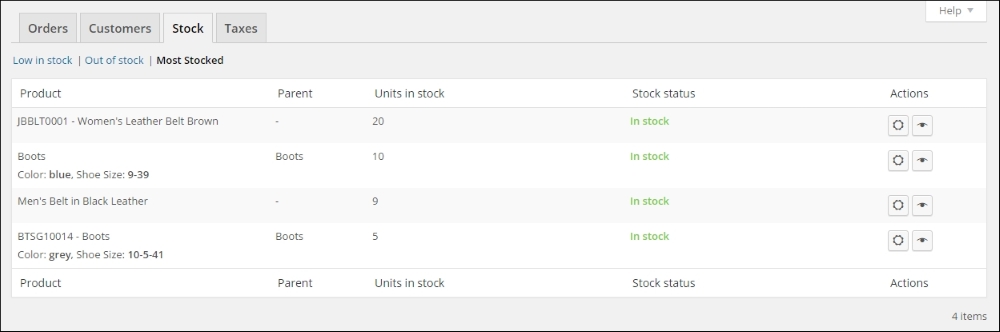
The example above shows the Most Stocked report, which sorts all the products with the available stock. The highest stock level shows on top of the report. You may navigate to the product details in as well the frontend as backend by using the icons on the right.
Stores working with lots of products will have an issue with the limitations of these reports. It isn't possible to export the data or search within the report.
The Taxes area contains the following reports:
It shows the sales tax that has been calculated for your orders. For both reports, you can set the date range. The Taxes by code report splits the sales tax per code, which is handy if you're working with different tax rates for your products. The Taxes by date report shows the tax totals per month, regardless of the used tax codes.
In this chapter, we've learned how to adjust the notification e-mails that are generated by WooCommerce. Next, we deployed our store from a development environment to live.
We also had a closer look at the possibilities to manage your orders. Finally, we worked with the reporting possibilities that are available within WooCommerce.
In the next and final chapter, we'll expand the functionality of our online store using additional plugins. We have covered the basics now, but using plugins there's much more that WooCommerce has to offer.
As you know, WooCommerce is a plugin for WordPress. Even though it might sound strange, it's possible to expand the functionality of WooCommerce with additional plugins. Those are regular WordPress plugins as well, just like any other. The only difference is that these plugins will only work if WooCommerce has been installed.
In this chapter, we'll discuss the following topics:
We already noticed earlier in this book that we probably need additional plugins to support the Payment Method or Payment Service Provider of our choice. There are a number of websites that we can check to see if the functionality we need is available:
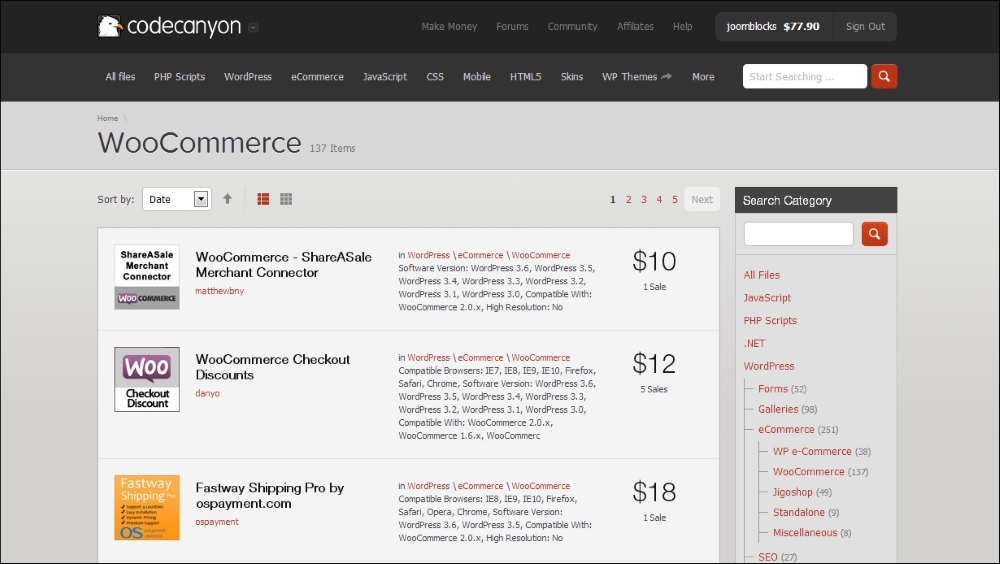
Besides these resources, there will be other developers offering their products and services. Not all plugins are mentioned on the websites mentioned above. If you cannot find what you're looking for, give Google a try as well. There are developers delivering WooCommerce plugins directly from their own website. If you're looking for an extension to support your Payment Service Provider or Carrier, don't forget to ask them if they have one available! Sometimes, you might even get it for free in this way.
Whatever plugin you choose to use, there are a couple of best practices that you need to pay attention to when working with plugins:
When looking closer at the plugin prices, you may notice that some plugins require a yearly renewal, whereas others deliver free updates forever. Vendors change their pricing model sometimes, but, at this moment, you have to take the following into account:
All other vendors have varying pricing models and their own way of handling support and updates. Always take a close look at the conditions so that you know what you are going to pay in the future. Keeping your store up to date is important, so please do not stop paying for your extensions just to save some money.
Note that all the prices mentioned in the remaining part of this chapter were the actual prices at the moment of writing. The prices of the mentioned extensions are subject to change.
Now that we've seen where to go for WooCommerce extensions, which ones will be useful to our store? Although WooCommerce already offers all the basic functions for an online store, there's always something that we can improve or need to do differently.
Once your store is up and running, it's important to start working on improvements. To be able to do that you first need to collect data about your visitors. Google Analytics is the free and most widely used tool to do so. If you've ever run any website before, you're probably familiar with it.
Unfortunately, even if you have already connected your website to Google Analytics, it will not track e-commerce conversions. Since that is important to have available, we need to take additional steps to solve this issue.
By searching the WordPress.org plugin repository, some plugins are available, but none of these have been actively maintained at the moment of writing.
Therefore, a good combination is the Google Analytics plugin of Yoast (free) combined with the WooCommerce add-on ($49) from https://yoast.com/wordpress/plugins/ga-ecommerce/.
When working with commercial plugins, you'll often find that the plugin cannot be installed by searching the WordPress.org repository from the WordPress administrative panel. On a website like WooThemes.com or CodeCanyon.com, you buy your product and receive a ZIP archive in most cases. Such an archive file contains everything that you need, but you first need to extract (unzip) it before being able to use the plugin. The archive often contains the plugin along with documentation and sometimes, other resources. If you don't extract the files, uploading the complete ZIP archive to your WordPress installation will simply fail. If you need more detailed instructions, you can find them on my blog at http://www.joomblocks.com/how-to-install-a-commercial-wordpress-plugin.
During the last couple of years, the Yoast SEO plugin has, more or less, become the standard SEO plugin available. It's the expertise of the Yoast team on the SEO subject combined with a very user-friendly plugin that makes the plugin so popular. The free version gives more than enough options to start. Use them like you're used to for regular pages and posts.
Below you'll see an example of using the basic fields of the Yoast SEO plugin:
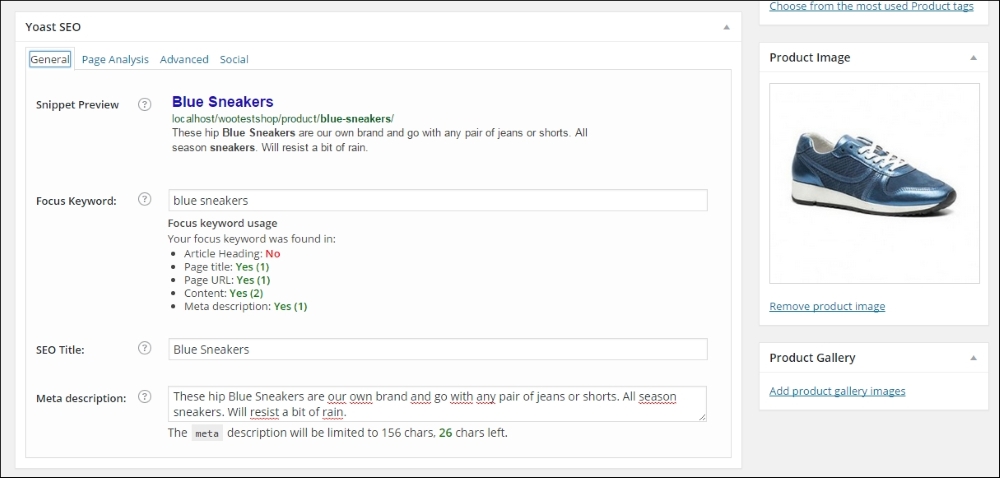
Yoast also offers a paid extension for WooCommerce, which gives some additional possibilities to influence the Twitter, Facebook, and Pinterest integration. It also gives you control over the WooCommerce default breadcrumbs and improves the quality of your sitemap. More information can be found at https://yoast.com/wordpress/plugins/yoast-woocommerce-seo/.
The following screenshot show the additional settings the paid SEO for WooCommerce extension is offering:
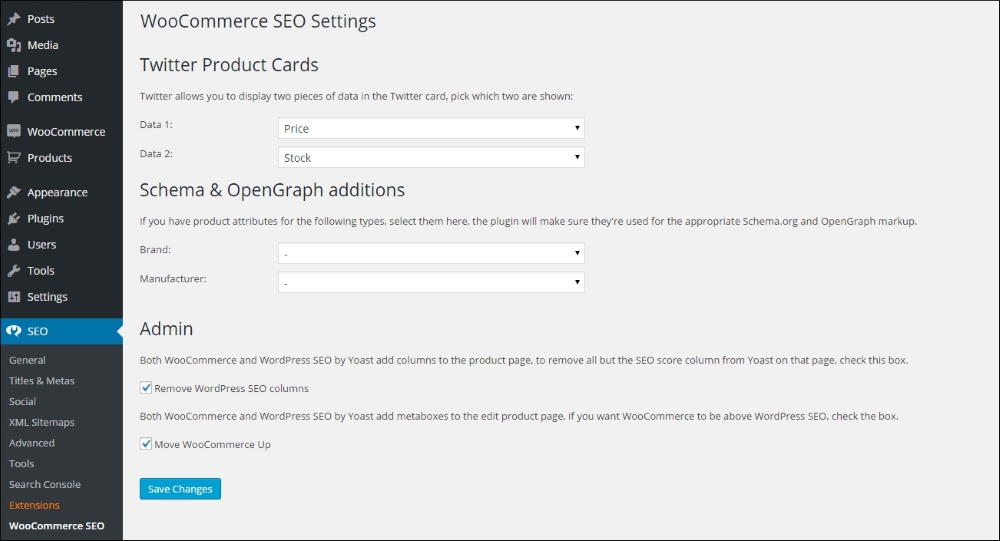
Note that to be able to use Schema & OpenGraph additions, you first need to create attributes for your products. After creating attributes for Brand and/or Manufacturer, you'll be able to use them in the WooCommerce SEO plugin as shown in the screenshot above. Refer to Chapter 3, Using Downloadable Products and Variations, for more information about working with attributes.
WooCommerce already provides you with some pretty good possibilities to create different types of products, but sometimes, this isn't enough. If you need more options, have a look at the following plugins.
WooCommerce product add-ons are available from WooThemes for a current price of $49. It gives you the possibility to add custom fields to your product, for example, when you need your customer to add a text to customize a product:
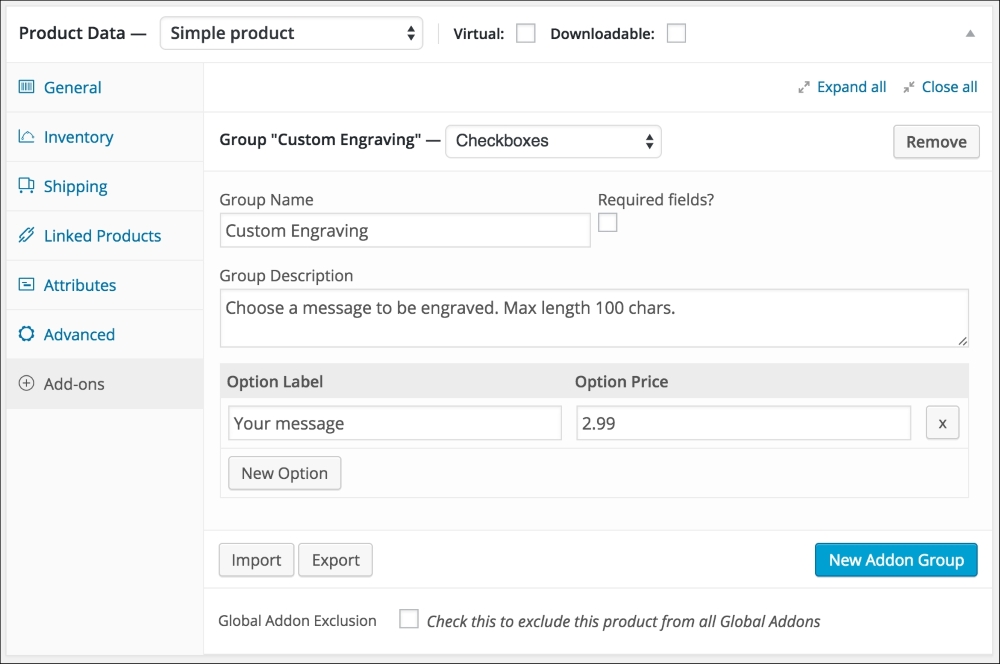
Alternatively, the CodeCanyon plugin, WooCommerce custom fields & Product add-ons, has a similar functionality. On top of that, using this plugin it's also possible to gather additional information from your customer during checkout. The plugin is available here: http://codecanyon.net/item/woocommerce-custom-fields-product-addons/11332742.
Another possibility to change fields on the checkout page, if available through WooThemes: http://www.woothemes.com/products/woocommerce-checkout-field-editor/.
Next, we're going to have a look at some plugins that will help you doing online marketing for your store in various ways.
E-mail marketing is, or should, play an important role in your online business. There are lots of solutions out there, but MailChimp (http://mailchimp.com) is a very popular choice because of the free plan up to 2000 subscribers. Using the MailChimp integration plugin, your customers will be able to sign up to your e-mail list when they go through the checkout. Besides this, the plugin also offers a nice widget for your WordPress dashboard that shows the subscriber statistics. Since it is offered on the WooThemes website, we may assume that it will still work with the latest version of WooCommerce. You may find the plugin here: http://www.Woothemes.com/products/newsletter-subscription/. The plugin is also able to use the Ecommerce360 functionality of Mailchimp that gives you the possibility to track visitors and customers coming from your e-mail campaigns individually. Currently, the price for this extension is $49. It can also be used to connect WooCommerce to the e-mail marketing provider Campaign Monitor (https://www.campaignmonitor.com/), instead of Mailchimp. Both e-mail providers have plenty of functions available. Mailchimp has a pretty good free plan, which makes it easy and accessible for starting sellers.
There's also a cheaper alternative available at CodeCanyon for $19: http://codecanyon.net/item/mailchimp-for-wordpress/11479536, which even includes a visual form designer.
Are you working with a different e-mail marketing solution for your newsletters? There's a good chance that there are integration plugins available. Just check the various extension websites and ask your e-mail provider, if needed.
Having the standard social like and share buttons in your store is something that we cannot do without. We could use the default share buttons you see everywhere, but there are better alternatives available. One of them is the Social coupon for WordPress plugin available on CodeCanyon at http://codecanyon.net/item/social-coupon-for-wordpress/3417466.
What makes this extension so interesting is that our visitors can share the product page on social media networks to obtain a discount coupon code that they can immediately use. This could be the ideal last step to convince visitors to buy. If products get shared a lot, this will automatically drive new traffic to your store! Below you'll find a screenshot of this plugin working on our demo store:
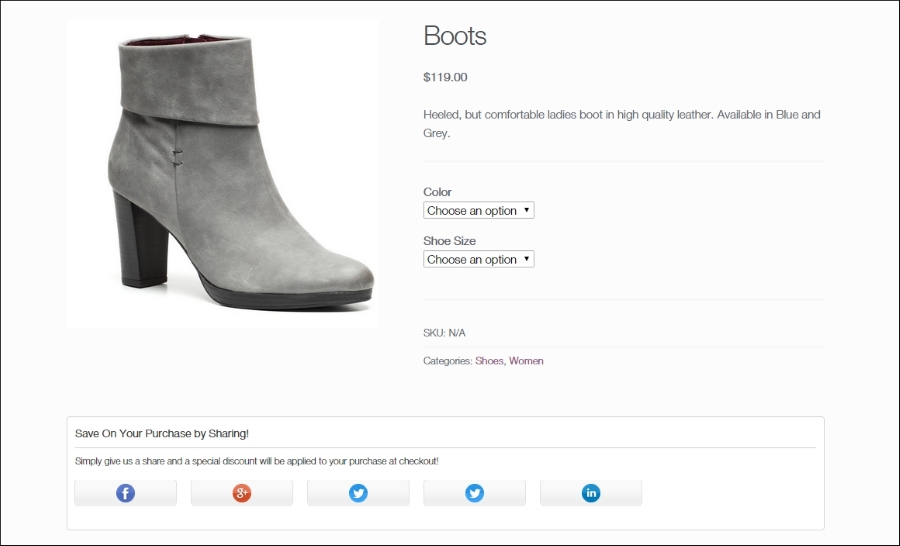
Advertising is going to be important as your store has just gone live and no one will be able to find you through the search engines yet. We recommend having a closer look at this area and learn to use the various possibilities. Besides the well-known regular Google AdWords ads, you could consider using Google shopping as well. More information can be found in Google Merchant Center at http://www.google.com/merchants.
You'll need a plugin for WooCommerce to be able to connect the products in your store automatically to Google. You may buy this plugin here: http://www.woothemes.com/products/google-product-feed/. It's currently priced at $79 for a single website. There are also other alternatives out there, but for those you need to pay. Free plugins to export your products to the Google Merchant Center are often not maintained.
Alternatively, if you do not have a lot of different products, it's also possible to just fill in a Google spreadsheet with your data and upload that one.
On the other side of the spectrum, we see services like the ones offered by http://www.exportfeed.com/. This isn't cheap, but they offer a full service including the possibility to export your products automatically to marketplaces like for instance Amazon and eBay. If you have lots of products and want to be able to sell them everywhere, this is probably a good solution.
Lots of visitors on your website will have the intention to buy something from you but, in the end, they don't. Something else came in between and they got distracted. End of story, and you lost your sale. Fortunately, there's something that you can do to help minimize this. There are plugins available that send your customer an e-mail at a specific time after they have abandoned their cart. You could even include a discount coupon in the reminder message.
There are several plugins on the market that help retrieve abandoned carts. Plugins like these will only work if the customer left their e-mail address, for example by creating an account. To name few possibilities https://www.tychesoftwares.com/store/premium-plugins/woocommerce-abandoned-cart-pro/. With a price of €119, this is a pretty expensive plugin. Luckily, there's also a light version which is available for free at the WordPress.org website (https://wordpress.org/plugins/woocommerce-abandoned-cart/) that gives you the possibility to check the plugin and decide later on if chasing abandoned carts is something that is really going to increase the revenue of your business.
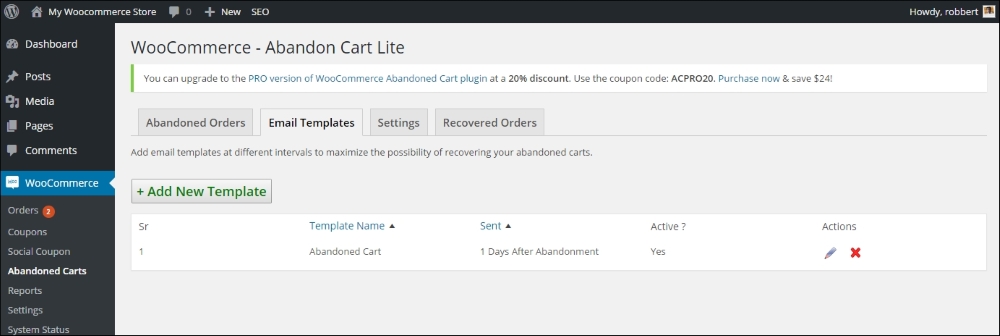
There are lots of additional plugins available to expand the functions that are available in order to run your store. From shipping calculations to invoicing and reporting, there are extensions available in every area.
We mentioned earlier in this book that the possibilities to calculate the shipping costs in WooCommerce are not always enough to suit your needs. Sometimes, you need to be able to store tables with shipping amounts based on volume or weight of the individual products or the total cart. This is where the Table rate shipping extensions will be helpful. There are multiple plugins available on the market. Let's start with the table rate shipping extension offered on the WooThemes website: http://www.woothemes.com/products/table-rate-shipping/.
The screenshot below shows you the table rate shipping plugin. In this example, the shipping fee that the customer pays is based on the country and total weight of the order:

This is a pretty expensive extension with a price of $199 for a single website. The extension is flexible and easy to use, but maybe other alternatives can work just as well. The table rate shipping extension offered at CodeCanyon offers similar functions on a bargain rate of only $22: http://codecanyon.net/item/woocommerce-table-rate-shipping/3796656. However, note that setting up table rate shipping can become complex. The support offered by WooThemes might therefore be one of the reasons to still choose that plugin.
Note: why would you bother with using an extension from WooThemes.com if plugins found elsewhere are much cheaper? The reason is simple: if you're starting an online business, then you are creating something for a longer period. Extensions bought on the WooThemes store probably will be updated for a longer period. We say probably because, even on WooThemes.com, we won't be sure that extensions will always be updated and continue to be supported. Based on our experience, we expect that your chances are better when using the official WooCommerce extensions, but there are no guarantees. And we've also seen examples of extensions on CodeCanyon that are already available for a couple of years and keep on getting updated. It's up to you to decide.
WooCommerce is offering the possibility to generate invoices for your store, but these won't be valid for all countries. Of course, we have the e-mails that will be sent out, but these are order confirmations only. The PDF Invoices extension available on the WooThemes website does just what we need. It's able to create a PDF invoice and use sequential invoice numbers. The invoice file is automatically attached to the e-mail that will be sent when the order is marked as completed.
The plugin is available here: http://www.woothemes.com/products/pdf-invoices/.
The other vendors that we mentioned at the beginning of this chapter are offering invoicing plugins as well. Just check which one fits your needs.
A function that is often asked for is being able to use subscriptions. Let's say that we would offer access to a closed area of our website with very valuable content. We'd like our customers to buy a subscription in this case and charge them every month. By default, that's not possible in WooCommerce. With the subscription extension, we can do so. This plugin can also be bought at the WooThemes website for $199 (http://www.woothemes.com/products/woocommerce-subscriptions/).
To be able to charge customers every month, our payment gateway needs to support such transactions. This isn't always the case. PayPal is supported out of the box by the plugin. For other payment gateways, have a look at this overview: http://docs.woothemes.com/document/payment-gateways/.
Note: More detailed instructions on creating a subscription-based website with WooCommerce can be found in Packt Publishing's book, WooCommerce Cookbook by Patrick Rauland (https://www.packtpub.com/web-development/woocommerce-cookbook).
In Chapter 7, Running Your Online Store, we noticed that the reporting and management possibilities of WooCommerce can sometimes be a bit limited. And even looking at the available extensions, the choice is still very limited.
The Cart reports extension available on the WooThemes website extends the standard functions with a few additional reports. It delivers interesting information about the number of carts that were abandoned and products that were abandoned while in the cart. If the cart was created by a logged-in user, we can even send them an e-mail about it. The extension is available here: http://www.woothemes.com/products/woocommerce-cart-reports/.
Another extension that can get integrated into the reporting function of WooCommerce is the Cost of goods plugin. It gives you the possibility to check your margins by date or product. The extension is available here: http://www.woothemes.com/products/woocommerce-cost-of-goods/.
Finally, we would also like to mention the following reporting plugin: http://woo.report/. At the moment of writing, this extension could be downloaded for free, but it seems that in the near future, a fee will be charged. This extension delivers some really good insights on customer behavior, sales per product, and value of your stock. These things are missing in WooCommerce itself.
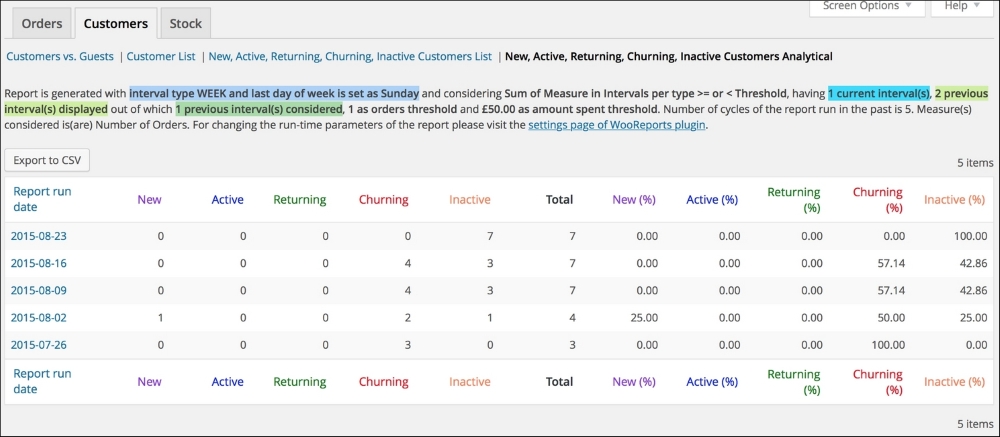
WooCommerce can easily be used as an online catalog, but prices will always remain visible. If you want to hide your prices and only show them to authenticated users, this plugin is the one that you need: http://www.woothemes.com/products/catalog-visibility-options/.
This plugin also offers the possibility to hide the e-commerce functionality completely so that your store will only be an online catalog:
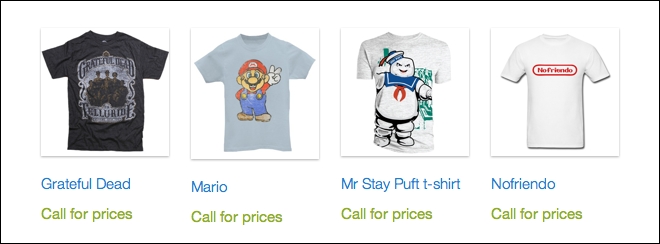
If we would already have a product catalog available, WooCommerce is not giving us the possibility to automatically import product data. The Product CSV Import Suite available at WooThemes can be a real time-saver: http://www.woothemes.com/products/product-csv-import-suite/.
If you are moving from another WooCommerce store, you can just export product data from the first site and import them to the new website using the WordPress importer plugin. In other situations where you have to import your products from another software solution, it's better to use a plugin like the one mentioned previously.
At the moment of writing this, this plugin is priced at $199. You can easily create a CSV file using Google Sheets or Microsoft Excel. If you're currently using a different solution to store your product data, then often there's a possibility to export this data using the CSV file format. The plugin offers enough flexibility to map your product fields to the fields available in WooCommerce.
Alternatively, take a look at the WP All Import plugin at http://www.wpallimport.com/.
We've seen during Chapter 1, Setting Up WooCommerce, that the standard available tax calculations are not always flexible enough when you're doing business in the USA.
The TaxNow plugin, using the Avalara service, can overcome this problem, but it is a paid service. More information about TaxNow can be found here: http://www.avalara.com/products/avatax. The WooCommerce plugin can be bought here for $49: http://www.adipietro.com/product/taxnow-for-WooCommerce/.
If you need to run a website in multiple languages, there's one major player in the market that you need to go to: WPML (https://wpml.org/). Unfortunately, WordPress does not support multilingual websites out of the box, so using plugins is always mandatory. Creating a store in multiple languages is a pretty complex process and requires you to thoroughly read the documentation provided by WPML. You'll need the Multilingual CMS plugin that is currently available from $79. Running WPML can become resource-intensive, so keep in mind that it can have consequences for your hosting plan as well:

You'll need to install several plugins offered by WPML:
The WPML plugin offers a pretty good guide for beginners at https://wpml.org/documentation/getting-started-guide/. Besides that, please also read the documentation the was made for WooCommerce users: https://wpml.org/documentation/related-projects/woocommerce-multilingual/.
All the plugins are included when buying the WPML package.
We've seen in this chapter that the majority of WooCommerce plugins are offered by commercial parties. Sometimes, there's a free, limited version of the plugin available. Now, there's nothing wrong with this because if your online business relies on it, it's better to have a developer that is actually maintaining the plugin code. This doesn't mean that with a free plugin the code won't be maintained, but we've seen lots of situations in the past where free plugins were not regularly updated. However, if you're looking for free plugins, here are a couple of examples that are worth checking out:
Of course, the plugins mentioned above just were examples to show you what WooCommerce is capable of doing. There are many, many more possibilities, so always carefully check if your requirements can be met using an existing extension. If the functionality that you need is not available, it sometimes makes sense to have it created just for your situation. In such a case, always ask for programmers that have experience with creating custom WooCommerce plugins!
The functionality of WooCommerce can be easily expanded using plugins. Unless you have a unique requirement, almost everything is already available. Most of the plugins aren't free, but remember that developers will have to be able to deliver continuous support on their products. Although it is tempting to install lots of plugins, we recommend installing only what you really need. The more plugins that you have, the larger the chance of conflicts or problems during WordPress or WooCommerce upgrades.
By now, you should have a good solid knowledge of the possibilities of WooCommerce and the way in which the solution works. Of course, there's more to discover than the topics discussed in this book. The WooThemes website is being updated continuously and is always a good resource for more information. Besides that, continuing with the WooCommerce Cookbook is a good next step as well (https://www.packtpub.com/web-development/woocommerce-cookbook). It contains lots of practical WooCommerce recipes for users and developers.
Copyright © 2015 Packt Publishing
All rights reserved. No part of this book may be reproduced, stored in a retrieval system, or transmitted in any form or by any means, without the prior written permission of the publisher, except in the case of brief quotations embedded in critical articles or reviews.
Every effort has been made in the preparation of this book to ensure the accuracy of the information presented. However, the information contained in this book is sold without warranty, either express or implied. Neither the author, nor Packt Publishing, and its dealers and distributors will be held liable for any damages caused or alleged to be caused directly or indirectly by this book.
Packt Publishing has endeavored to provide trademark information about all of the companies and products mentioned in this book by the appropriate use of capitals. However, Packt Publishing cannot guarantee the accuracy of this information.
First published: November 2013
Second Edition: December 2015
Production reference: 1211215
Published by Packt Publishing Ltd.
Livery Place
35 Livery Street
Birmingham B3 2PB, UK.
ISBN 978-1-78588-156-5
Author
Robbert Ravensbergen
Reviewers
Matthew Allan
Rémi Corson
Nicola Mustone
Commissioning Editor
Priya Singh
Acquisition Editor
Manish Nainani
Content Development Editor
Arun Nadar
Technical Editor
Bharat Patil
Copy Editor
Tasneem Fatehi
Project Coordinator
Neha Bhatnagar
Proofreader
Safis Editing
Indexer
Mariammal Chettiyar
Production Coordinator
Arvindkumar Gupta
Cover Work
Arvindkumar Gupta
Robbert Ravensbergen is an experienced e-commerce and IT manager. He has been working in several international roles for various companies. He's also a passionate writer and blogger. WordPress, WooCommerce, and Magento are the topics that he writes about.
Robbert released several books about Magento and WooCommerce for Packt Publishing during the last couple of years. Besides this, he's an important writer in the Netherlands and well known for his understandable books for beginners about WordPress.
Readers can reach Robbert on his personal blog at http://www.joomblocks.com.
Matthew Allan works with a growing team of developers at Prospress to bring top-notch plugins and extensions to the WordPress and WooCommerce platforms. Some of Prospress' most well-known extensions are WooCommerce Subscriptions and WooCommerce One Page Checkout—both available from woothemes.com.
Over the past 3 years, Matthew has been reviewing WooCommerce books and developing new software for entrepreneurs wanting to jump into the e-commerce world and start selling online. Matt's experience in developing and supporting premium extensions for WooCommerce has informed his technical review for this book.
Rémi Corson built his first website in high school, where, after a few months, he realized he was teaching web languages to his own teacher. Then, he decided to build his own content management system called PHPforge, which was used by more than 5,000 users at that time. He finally switched to WordPress a few years later.
Formerly in the top ten of CodeCanyon's best sellers, the largest code-related marketplace on the planet, Remi worked on Easy Digital Downloads' early versions with Pippin Williamson, and joined WooThemes as a Happiness Engineer in 2013 before the acquisition by Automattic in 2015.
Rémi is a public speaker and code expert. He works on WooCommerce core code on a daily basis and he built/refactored many official add-ons. He was also involved in the first WooConf organization in San-Francisco in 2014, the major WooCommerce-related event. Rémi writes weekly posts on his blog, mainly about WooCommerce, and provides a lot of free plugins and snippets.
He is also passionate about woodworking, surfing, and video making, and is a great guitar player.
Nicola Mustone is a web developer based in Italy, where he studied economy and programming. He developed his first website at the age of 15. Since then, he fell in love with programming and web developing, so he started studying it in depth, improving his skill set.
He started working as a freelancer at the age of 19. In 2011, he accepted his first job at a local web agency.
In 2012, Nicola moved from his birth city, Lucera, to Acireale in Sicily to work with Your Inspiration where he learned about WordPress in its entirety, from end user usage to themes and plugins development. Working at Your Inspiration, he specialized in WordPress development and customer support.
In October 2014, he started working for WooThemes, and in June 2015, Automattic acquired WooThemes. He is currently an automattician working in the WooCommerce support team as an Internal Support Ninja. Nicola also writes articles and tutorials regularly to help customers understand WooCommerce and WordPress better.
For support files and downloads related to your book, please visit www.PacktPub.com.
Did you know that Packt offers eBook versions of every book published, with PDF and ePub files available? You can upgrade to the eBook version at www.PacktPub.com and as a print book customer, you are entitled to a discount on the eBook copy. Get in touch with us at <service@packtpub.com> for more details.
At www.PacktPub.com, you can also read a collection of free technical articles, sign up for a range of free newsletters and receive exclusive discounts and offers on Packt books and eBooks.
https://www2.packtpub.com/books/subscription/packtlib
Do you need instant solutions to your IT questions? PacktLib is Packt's online digital book library. Here, you can search, access, and read Packt's entire library of books.
If you have an account with Packt at www.PacktPub.com, you can use this to access PacktLib today and view 9 entirely free books. Simply use your login credentials for immediate access.
Back in the early days of WordPress, the platform was mainly used to create and run blogs. Soon plugins became available to add functionality to the platform. A couple of e-commerce plugins became available as well. However, often they were incomplete or buggy.
In 2011, the WooCommerce plugin became available on the market, developed by the popular creators of Woothemes.com, where you can buy premium WordPress themes. WooCommerce was an instant hit and reached over ten thousand downloads in the first couple of weeks. A few years later, the plugin was downloaded almost 1.4 million times and it received a complete makeover during 2013 with the release of WooCommerce 2.0. Meanwhile, the solution has become mature and is even used for larger online stores.
The reason that the plugin became so popular is that it is so easy to use. Millions of people were already using WordPress for their blogs and websites and were looking for an easy way to be able to sell products and services directly on their own website. WooCommerce made this possible for all of us.
This book will explain you how to set up WooCommerce, create products, and use payment and shipping methods. You will work with themes and add plugins to expand the functionality of WooCommerce. It will teach you how to create and run your own online store in a very easy, straightforward manner.
It's time to get started!
Chapter 1, Setting Up WooCommerce, shows you how to set up a test environment and install WooCommerce. After that, you'll learn how to set up WooCommerce and work with taxes.
Chapter 2, Creating Your First Products, helps you create your very first products. You'll learn what the minimum steps are to get your products available and be able to start selling them.
Chapter 3, Using Downloadable Products and Variations, offers various other possibilities when creating products. In this chapter, you'll create downloadable products, learn how to work with attributes, and create variable products.
Chapter 4, Payments, Shipping, and Coupons, shows you how to set up payment and shipping methods for your store. You will also learn how to use discount coupon codes for marketing purposes.
Chapter 5, Working with WooCommerce Themes, shows you what you need to pay attention to and where to buy or download good themes. Having a solid WordPress theme available for your WooCommerce store is very important.
Chapter 6, Customizing a WooCommerce Theme, gives you a brief introduction to themes to get you started. Creating a WordPress and WooCommerce theme is worth a book by itself. You'll actually make code changes to your theme and find some practical examples.
Chapter 7, Running Your Online Store, starts with explaining how to bring a development store live. What do you do when the first orders flow in? How do you use WooCommerce to make sure that orders are handled correctly? We'll also show how to manually create an order and speak about reporting. Time to bring your store online and start selling!
Chapter 8, More Possibilities Using Plugins, explains which plugins to use and where to look for other possibilities. WooCommerce is a plugin for WordPress. On top of WooCommerce, you can install additional plugins to expand or change the functionality. But there are so many options, which plugins are a good choice?.
In this book, we're assuming that you're familiar with using WordPress. You do not need development skills, but just a basic user-level knowledge of WordPress should be sufficient. Your WordPress website should be a self-hosted one. Using WordPress.com is not an option as it does not offer the possibility to install your own WordPress plugins.
If you're not yet familiar with WordPress, we highly recommend that you read one of the WordPress beginner's books or tutorials first. WordPress 4.x Complete from Packt Publishing is a good start (https://www.packtpub.com/web-development/wordpress-40-complete).
If you're already working with WordPress, we're also assuming that you know how to work with an FTP tool, like the free FileZilla.
Besides this, it's handy to have image manipulation software available, such as Photoshop, Photoshop Elements, Fireworks, or Gimp.
Finally, you'll need a code editor if you want to be able to change or create your own WooCommerce themes, a topic that we'll cover in Chapter 6, Customizing a WooCommerce Theme. Well-known editors are Notepad++ for Windows users and Coda or Sublime Text for Mac users. There are plenty of alternatives as well; just use the tools that you like.
This book has been written for everyone who wants to learn how to expand an existing WordPress website with e-commerce functions using the WooCommerce plugin.
WooCommerce is an easy-to-use, but fully-functional, e-commerce plugin that will turn your website into a fully-featured online store. The book is suitable for marketers, e-commerce (project) managers, and web design agencies working with WordPress. First of all, this book is meant for everyone willing to run their own online store on a relatively small budget.
Although this book is not aimed at developers, some WooCommerce code examples are provided in this book.
In this book, you will find a number of styles of text that distinguish between different kinds of information. Here are some examples of these styles, and an explanation of their meaning.
Code words in text, database table names, folder names, filenames, file extensions, pathnames, dummy URLs, user input, and Twitter handles are shown as follows: "Next, simply enter WooCommerce in the Search Plugins field and hit Enter."
A block of code is set as follows:
add_action( 'get_header', 'remove_storefront_sidebar' );
function remove_storefront_sidebar() {
  if ( is_product() ) {
    remove_action( 'storefront_sidebar', 'storefront_get_sidebar', 10 );
  }
}
New terms and important words are shown in bold. Words that you see on the screen, in menus or dialog boxes for example, appear in the text like this: "Click on Plugins in the menu on the left-hand side, and click on Add New".
Feedback from our readers is always welcome. Let us know what you think about this book—what you liked or may have disliked. Reader feedback is important for us to develop titles that you really get the most out of.
To send us general feedback, simply send an e-mail to <feedback@packtpub.com>, and mention the book title via the subject of your message.
If there is a topic that you have expertise in and you are interested in either writing or contributing to a book, see our author guide on www.packtpub.com/authors.
Now that you are the proud owner of a Packt book, we have a number of things to help you to get the most from your purchase.
Although we have taken every care to ensure the accuracy of our content, mistakes do happen. If you find a mistake in one of our books—maybe a mistake in the text or the code—we would be grateful if you would report this to us. By doing so, you can save other readers from frustration and help us improve subsequent versions of this book. If you find any errata, please report them by visiting http://www.packtpub.com/submit-errata, selecting your book, clicking on the errata submission form link, and entering the details of your errata. Once your errata are verified, your submission will be accepted and the errata will be uploaded on our website, or added to any list of existing errata, under the Errata section of that title. Any existing errata can be viewed by selecting your title from http://www.packtpub.com/support.
Piracy of copyright material on the Internet is an ongoing problem across all media. At Packt, we take the protection of our copyright and licenses very seriously. If you come across any illegal copies of our works, in any form, on the Internet, please provide us with the location address or website name immediately so that we can pursue a remedy.
Please contact us at <copyright@packtpub.com> with a link to the suspected pirated material.
We appreciate your help in protecting our authors, and our ability to bring you valuable content.
You can contact us at <questions@packtpub.com> if you are having a problem with any aspect of the book, and we will do our best to address it.
During the last couple of years, WordPress has outgrown any other Content Management Solution worldwide. Numerous websites are built using WordPress on a daily basis. WordPress is even popular among large companies. Currently about a quarter of all websites worldwide are powered by WordPress.
WooCommerce is a plugin for WordPress that turns your website into a complete online store. Practically in minutes, but that doesn't mean that the solution is very limited. This book will show you what you can do with it. WooCommerce is a versatile plugin that gives the possibility for everyone with a little WordPress knowledge to start their own online store.
Originally, WooCommerce was derived from the Jigoshop plugin. The WordPress theme developers of WooThemes quickly brought the solution to a higher level and soon it became the most popular plugin for e-commerce within WordPress. In 2015, Automattic (the company behind WordPress) acquired WooThemes and WooCommerce. So we could almost say that WooCommerce has become the default ecommerce solution for WordPress now. At time of print WooCommerce is even powering 30% of all online stores worldwide.
In case you are not familiar with WordPress at all, this book is not the first one you should read. No worries though, WordPress isn't that hard to learn and there are a lot of online possibilities resources to learn about WordPress solution very quickly. Or just turn to one of the many printed books on WordPress that are available.
The following are the topics covered in this chapter:
Before we start, remember that it's only possible to install your own plugins if you're working in your own WordPress installation. This means that users that are running a website on WordPress.com will not be able to follow along. It's simply impossible in that environment to install plugins yourself. WooCommerce has recently become a part of WordPress itself. I can imagine that because of this WooCommerce might become available for WordPress.com users in the future. But so far there are no signs yet of an integration of WooCommerce into WordPress.com.
When starting with WooCommerce there are two situations that might occur:
Either way, you'll need a test environment to be able to play with WooCommerce and follow along with this book. Although technically possible to add WooCommerce to an existing WordPress website immediately, I highly recommend using a test environment. Things can and will go wrong and you don't want to confront your current visitors with your experiments.
Setting up a WordPress test environment isn't as difficult as it might seem. There are tons of tutorials available, whether you're working on Windows or working with a Mac. When you want to add WooCommerce to your existing website, this is what you need to do to setup a test environment:
Alternatively, install a copy of your WordPress website as a temporary subdomain at your hosting provider. For instance, if my website is http://www.example.com, I could easily create a copy of my site in http://test.example.com. Possibilities may vary, depending on the hosting package you have with your hosting provider. Also in this scenario you need to adjust the content of the database, as mentioned in step four above.
If in your situation it isn't needed to add WooCommerce to an existing WordPress site, of course you may also start from scratch. Just install WordPress on a local test server or install it at your hosting provider.
To keep our instructions in this book as clear as possible we did just that, so that there's no visible interference with already existing content and a custom theme. We created a fresh installation of WordPress version 4.2. Below you see a screenshot of our setup, still completely empty using the Twenty Fifteen default theme:
More information about setting up a test environment and restoring your website on it can be found in the following articles:
More tutorials will also be available on our website: http://www.joomblocks.com. Don't forget to sign up for the free Newsletter, that will bring you even more news and tutorials on WordPress, WooCommerce and other Open Source software solutions!
Once ready, we'll be able to take the next step and install the WooCommerce plugin. Let's take a look at our WordPress back-end. In our situation we can open this by browsing to http://localhost/wootestshop/wp-admin. Depending on the choices you made above for your test environment, your URL could be different.
Well, this should all be familiar for you already. Again, your situation might look different, depending on your theme or the number of plugins that are already active for your website.
Installing a plugin is a fairly simple task:
WooCommerce in the Search Plugins field and hit Enter.If you enable the checkbox Yes, I will be charging sales tax, additional options will become visible. WooCommerce will suggest some default tax settings, based on the country/region you selected at step 7:
In our example project, we're installing the English version of WooCommerce. But you might need a different language. By default, WooCommerce is already delivered in a number of languages. This means that the installation will automatically follow the language of your WordPress installation. If you need something else, just browse through the plugin directory on WordPress.org to find any additional translations.
Note that if you open a page that was automatically created by WooCommerce, you'll only see a shortcode, that is used to call the needed functionality. Do not delete the shortcodes, or important WooCommerce pages like Cart, Checkout, and Shop will not work properly. However, it's still possible to add your own content before or after the shortcode on these pages.
WooCommerce is usable straight out of the box. However, in this section we'll cover almost every setup parameter that you may use to control your online store. Going through all settings might be quite overwhelming in the beginning, but it will help you in exploring the possibilities of WooCommerce.
Click on WooCommerce in the left menu and then click Settings. A new page holding different tabs with settings appears. The first one visible is the tab named General:
You will find certain fields described as follows:
Moving to the next tab you'll find different settings related to the usage of products in WooCommerce. Note that this tab is divided into four different sub areas, starting with another General tab:
The next area, named Display, shows several settings for products and categories:
The setting for products and categories are as follows:
If you change the image sizes after you created products or when using a new WordPress theme later on, the Regenerate Thumbnails WordPress plugin https://wordpress.org/plugins/regenerate-thumbnails/ is very useful. It recalculates all images and image sizes at once.
The next section shows various settings to manage the inventory of your products.
The inventory settings for the product page are as follows:
Remember to click the Save changes button at the bottom!
The last section holds some settings for downloadable products. If you're not planning to work with digital products you may skip this section:
The options are as follows:
Setting up taxes can be a difficult task. Of course there's no 'one size fits all' approach possible here. Tax laws and calculations differ from country to country and region to region. Besides that there's a large difference in handling taxes when selling goods to consumers or to other businesses. So in here we'll just stick to the basics, by explaining the functionality WooCommerce has available. It's up to you to find out how tax calculations should be done for your specific situation.
The settings for Tax Options page are as follows:
Note that it's possible to import a CSV file with tax rates, which can be handy if you need to setup a lot of them. The Import CSV button brings you to the Tools | Import section of WordPress. Over there you'll also find the possibility to download an example file.
In a simplified way, assuming only one tax percentage applies, WooCommerce offers this method to calculate the tax amount:
Tax calculation for gross price (amount entered inclusive tax) is: tax_amount = price - ( price / ( ( tax_rate_% / 100 ) + 1 ) ).
Tax calculation for net price (amount entered exclusive tax) is: tax_amount = price * ( tax_rate_% / 100 ).
When setting up taxes you might need to look up the two-digit country codes. Wikipedia has a good overview of all of them: https://en.wikipedia.org/wiki/ISO_3166-1#Current_codes. Wikipedia is also helpful when you need more information on tax rates per country: https://en.wikipedia.org/wiki/List_of_countries_by_tax_rates.
Setting up sales tax for the USA can be quite challenging sometimes. There's an easy solution for it, which is made available by WooTax: https://wootax.com/. Alternatively, have a look at the services offered by woosalestax.com (http://www.woosalestax.com/).
Moving on to the Checkout settings tab, we see again several sublevels. For this moment, we'll only discuss the Checkout Options. All other panels contain setup information about specific payment methods. More on choosing and configuring payment methods will be discussed in more detail in Chapter 4, Payments, Shipping, and Coupons:
The Checkout Options are as follows:
Not sure what a SSL certificate is and how to use that for your website? The principle cannot be explained in just a few sentences, but by using a SSL certificate on your website you'll be able to offer your visitors a safe connection during checkout. More and more customers pay attention to security measures like this. There are lots of companies that offer SSL certificates. Verizon (http://www.verizonenterprise.com/products/security/identity/ssl/) is a major player, but you may just as well ask your hosting provider for help. Especially if you need to be able to collect credit card information directly on your own website, using a SSL certificate is a must. In case you're using a payment service provider you do not really need one, but increasing trust is always a good thing. Besides that, the SSL certificate seems to become more important lately now that also Google considers it as one of the many ranking factors. So your website will rank better in Google if you have SSL enabled. More on payments will follow in Chapter 4, Payments, Shipping, and Coupons.
Setting up Shipping works in a similar way as the Checkout setup. In here we'll show the Shipping Options and in Chapter 4, Payments, Shipping, and Coupons we'll get back with more detailed instructions:
The Shipping Options settings are as follows:
We're moving to the next tab, named Accounts. There are only a couple of settings here that you need to pay attention to:
The setting for Accounts is as follows:
In this tab, you can configure the way WooCommerce handles e-mails it will send to your customer:
Also this tab contains several sub areas, starting with Email Options and followed by a couple of settings for every type of email WooCommerce can send:
The Api Settings tab is not discussed in this book. Api keys and Webhooks can be used to integrate third party tools with WooCommerce. Based on a trigger, another website or service can receive data from WooCommerce when certain events happen on your site, for instance when a new order is created. More information on Webhooks can be found here: http://docs.woothemes.com/document/webhooks/.
Now that we had a look at all settings of WooCommerce it's time to start adding products to our store. Before we do so, there are a couple of things that we need to do before moving on:
Storefront in the search box and hit Enter. Click the Install button and activate the theme after installation.If you'd like to read more on installing WordPress themes you may use this link for a full tutorial: http://www.joomblocks.com/installing-wordpress-themes:
For this moment, we've covered the most important settings and we're ready to move to the next step. We've learned to setup a test environment and install WooCommerce, use the WooCommerce settings to setup our store in a way that fits our needs. Make the store available in our menu and install a WooCommerce compatible theme for our test environment.
In the next chapter, we will create our very first products.
Now that WooCommerce is up and running and we had a look at its settings it's time to start creating a couple of products and build our online store. WooCommerce offers several possibilities to create your product catalog. In this chapter, we'll stick to the basics. You'll learn to:
When setting up your product catalog, it often makes sense to create Categories for your products, even if you have not so many products. Using a clear category structure makes it easier for your visitors to navigate and search your store. Further on you can use Tags and Attributes in your product catalog. Categories and Tags work in the same way you're used to from WordPress itself. Attributes are important for more complex product types. For instance, if I have a category for women's dresses, I could add Attributes for size and color. We'll discuss that in more depth in Chapter 3, Using Downloadable Products and Variations. Besides this, Attributes can also be used to add additional information to simple products.
For now, we'll just set up our category structure. Let's assume we are going to sell apparel in our store. We could start with three main categories in that case: Women, Men, and Children. If you're used to working with categories for (blog) posts in WordPress, you'll have no problem in creating them for your products. To create categories, perform the following steps:
Now that our first category has been created it's easy to add some more. Also we can create the next levels, by choosing one of the top categories for the Parent field. A simplified category structure could look like this:
Once we've created some categories, it's time to start entering our first product. Click Products | Add Product in the menu on the left. Looking at the categories we created, most of the products will require sizing and colors as well. That's something we'll discuss later on, so for now we are going to create a simple women's belt in the category Accessories.
In the example below you'll see that we already pre-filled a lot of information, just to give an idea of the fields you need to start with:
Let's have a closer look at all the available fields:
If you want to do more on the optimization of your online store for the search engines, we highly recommend using the SEO plugin of Joost de Valk (Yoast). It's a general SEO plugin for WordPress, but it works fine with WooCommerce as well. You may find it here: http://wordpress.org/plugins/wordpress-seo/.
The first tab in the area with product data is active by default and is named General. Just above that, you will notice that it's possible to select a Product Type and that there are two checkboxes available: Virtual and Downloadable. These are all items that will be discussed in Chapter 3, Using Downloadable Products and Variations. For this moment, we'll stick to the Simple products. These are suitable for anything that is a regular, physical product, without the need for the buyer to choose options or variables. For instance, a t-shirt available in different sizes is not a simple product, but a variable product. Let's take a closer look at the available fields for our simple product:
The parameters in the General tab are as follows:
Moving to the next tab, we'll find a couple of settings that control the way we're handling stock levels for this product:
The parameters in the Inventory tab are as follows:
Note: The product stock status can be used even if enable stock management is disabled in WooCommerce main products settings, which we discussed in Chapter 1, Setting Up WooCommerce.
Sometimes you need to be able to add additional information to your product, because shipping possibilities or rates might depend on the weight and size of your product.
The parameters in the Shipping tab are as follows:
Since this is our first product, we can skip the Linked Products and Attributes tabs for this moment. We'll use those later on.
We'll be using attributes a lot during the next chapter, when we'll be discussing more complex product types. The usage of attributes often even makes sense for simple products. Attributes offer a way to store structured product data in a way that it can be used for searching and filtering products. Instead of entering for instance the fabric as text, we could create an attribute for it. Using that method will give more possibilities to your customers to filter your product catalog. Besides that the attributes will be shown to the customer in the front end on the product page, in the More information tab.
Refer to Chapter 3, Using Downloadable Products and Variations, for more information on using attributes.
There are a few interesting fields in the Advanced tab:
We're almost there now. Under the product data section there's a possibility to use custom fields that we also know from regular WordPress posts. We do not need that now. Always first try if you can solve your need using the standard available Attributes and Tags.
So far we've just used the main part of the product creation page. On the right there are the well known fields to publish the item. But before we do, we first need to take care of some other data, starting with the Product Categories. Just as with any regular WordPress post, just click the categories your product belongs to. Note that it's possible to select more than one category.
Next, set the Product Tags by entering them in the field and just press Enter. Don't use too many tags per product, stick to using a few. Having too many tags might lead to duplicate content, because the chance of having multiple pages with the same content increases in that case.
What is duplicate content? We speak of duplicate content if your website has the exact same content under two or more different URLs. You need to prevent that from happening, because search engines like Google won't know which page to show. The problem becomes bigger when people start linking to the different versions of the (same) content. Using too many tags for your posts increases the chance of having duplicate content. Joost de Valk from Yoast.com wrote some exceptional detailed information on this topic: https://yoast.com/duplicate-content/.
In the next screenshot you see an example of as well the selected categories as some tags that were entered for this product.
Below the Product Tags, there are two areas that allow you to add two of images to your product: the Product Gallery and the Featured Image. Before we start adding images, let's go back to the first chapter. Remember that we crossed a couple of settings that influence our image sizes? If you want to go back there now, first save your product as a draft and then go to WooCommerce | Settings | Products | Display using the menu. The image settings are on the bottom of that tab:
There are three image sizes that will be used by WooCommerce:
It is important to use the same ratio for all three sizes. It's not mandatory to keep the width and height the same, the portrait format (where the value for width is smaller than the value for height) is often used as well, especially on fashion websites.
The check box at the field hard crop means that if you upload an image with a different ratio, they will automatically be cropped to the correct ratio as set here. This might mean losing a part of your image. Therefore it's always good to just prepare your images before uploading them to your website. Use the correct image ratio and use an image size that is at least as large at the dimensions of the Single Product Image.
Note: Not sure which values to use? Before you make final settings and start filling your product catalog with lots of items, it's important that you have set these values correctly. If you're buying a theme for a store, the documentation of the theme will often explain what to use. If you're creating a theme yourself, you're completely free in your choices of course. Sometimes it's necessary to regenerate all your product images, just because you changed the settings previously after you created your products. As also mentioned in Chapter 1, Setting Up WooCommerce, there's a plugin that can help you with this task: http://wordpress.org/plugins/regenerate-thumbnails/.
We're heading back to our product to start adding our images. The first and most important image is the Featured Image. Just add that by clicking on the link Set Featured Image. This will open your media library, just like you are used to from creating WordPress posts or pages.
Click Select files and open a single image from your local machine. Don't forget to set a Alt Text and Description. Those are important for search engines! Then click the Set featured image button on the right. You'll return to the product maintenance page. If you have multiple photos available, don't hesitate to add those as well. Lack of good product photos is for sure a conversion killer. Click Add product gallery images and add the images you have available. Again, also for these images fill the Alt Text and Description fields. The result looks something like this:
We finished the most important steps for our product and can publish it on the top right by clicking the button Publish. Of course we also want to have a look at the result in the front-end of our store. You may open the product page directly by clicking the button View Product on the top of the product screen.
Since we are using the default Twenty Fifteen theme here, the layout of the page is okay but not more than that. Things could be better if we'd used an optimized WooCommerce theme. More on that topic will follow during Chapter 5, Working with WooCommerce Themes.
When publishing our product there are some more options that we can use to influence the behavior of WooCommerce for this product. First navigate back to your product and edit it. On the top right we see several default WordPress fields, that we already know from regular posts like Status, Visibility, and Published on. The behavior of these fields is exactly the same as for a regular WordPress post and gives you the possibility to control if and when a product becomes visible.
Next, click on the Edit link near Catalog visibility, as shown in the following screenshot:
The default value, Catalog/search will have as result that:
The other possibilities are:
Just above the Ok button, there's a checkbox to make your product a Featured Product. Featured Product allows you to showcase specific products in different parts of your online store. You can for example show featured products in a slider on your homepage or in a widget. We'll show those possibilities later on in this book:
Remember to click the Update button if you make any changes to your product.
During this chapter, we have learned to create our very first products in WooCommerce. We have seen how to use the most important WooCommerce fields to determine the behavior of our product.
In the next chapter, we will be adding more complex products and learn how to use attributes to create them.
Our first product is available and we could easily continue using the same method to create multiple products in the same way. However, WooCommerce offers more possibilities than we just learned. In this chapter, we'll cover the following topics:
We've mentioned the usage of product tags already in Chapter 2, Creating Your First Products. Using tags works exactly in the same way that you're used to when writing WordPress posts. So in here, we do not want to spend too much time in explaining the concept.
Just be aware that Product Tags and Tags for Posts are actually separated from each other. You may find the tags that you already used by navigating to Products | Tags in the menu on the left-hand side of your screen. Note that the tags that you entered during product creation appear here. Besides that, it's also possible to create a list of tags immediately in the Edit Product screen and use them later on. In general, when using a new tag, always ask yourself: Will this be a tag that I'll use more often?. If the answer is yes, go ahead and use it. If the answer is no, then it's better not to create that tag.
This product type is used for non-physical products. Use it to sell services, for instance. Virtual products will not be shipped, and as soon as you mark a simple product as virtual, the Shipping tab will disappear from the Product Data area. Besides that, if a customer only buys one or multiple virtual products in their order, the shipping address will be removed from the Checkout process:
Note: In the preceding screenshot, the Virtual field can only be set for a Simple product. If you need a variable product to be virtual, that's still possible but not using this field.
If you have digital goods to offer to your customers, WooCommerce supports this using the Downloadable product type. Often, you'll also want to mark these items as Virtual since you won't physically ship anything. On the other hand, if your item will be as well downloaded as shipped, you should not check the Virtual field. An example could be a book that is physically shipped, but where the buyer also receives a downloadable copy.
Once the Downloadable field has been checked, new fields become available in the General tab. Click on Add file, followed by the Choose file button to upload, and attach a digital file to your product:
You may also set the Download limit, which determines how often a customer can come back to download the same item again.
Besides that, you can set the Download expiry. Fill in the number of days that the download stays available for your customer after purchase. By default, both fields are blank, which means that there are no restrictions and your customers can always come back to download the purchased items again.
When using the Download limit or Download expiry fields, please note the following: if you ever need to change or replace an existing file, the download expiry and limit will be reset as it's technically a new file. Which means that the user can download the file again from their account or original e-mail.
Finally, the field Download type can contain the value Standard Product, Application/Software, or Music. If there's no fit for your product then leave it to Standard Product. This field controls the markup of your product page. To the end user, this field isn't visible, but it will tell the search engines what type of content the product contains. Unfortunately, the book type isn't supported in WooCommerce yet. More information can be found at http://schema.org/docs/schemas.html.
When your customer purchases a downloadable file, a link to download the item will be sent to the customer via an e-mail. But only if you enabled this e-mail in the WooCommerce settings. The link will also become available in the My Account section for that customer.
Whether or not a customer is forced to create an account in your store depends on the settings. Head over to WooCommerce | Settings | Products to check the settings for Downloadable products. See Chapter 1, Setting Up WooCommerce, for more information on these fields.
More information on using Downloadable products is available at the WooCommerce documentation website: https://docs.woothemes.com/document/digitaldownloadable-product-handling/.
At first glance, attributes look like tags when we're accessing the function using the menu, Products | Attributes:
However, there is an important difference between Attributes and Categories. Attributes deliver a powerful mechanism to create different kinds of products. Besides that, working with Attributes is often smarter than working with Categories alone. Categories are used to organize entire products, whereas Attributes are a way of organizing product properties. Let's start with an example to clarify this.
Our simple product that we created earlier (the Brown Women's Belt) could easily be put in a category structure like: Women | Accessories | Belts. But that would give us all available belts in your store, right? And not just the brown ones. Ok, so we'll add another category for that! But no, although it is possible, it's not the best way to do it. Using Attributes in such a situation for the color is much more powerful. It will give your visitors the possibility to immediately filter all brown products once they're in the Accessories category so they can mix and match. Using categories for describing the color of your product is really a no-go. In other words, a category is a group in which a set of products can be bundled together. An attribute is a specific characteristic of a product. Other products may share that characteristic (for example, multiple products can be a medium size or have a brown color).
Since the usage of colors in our fashion store example is something that we'll need for sure, we are going to create that Attribute.
Creating an Attribute is very simple. Just enter the Name of the attribute (Color, in our example). You may leave the Slug field empty, it will automatically be filled based on the name of your attribute. Next, make sure that the Type field is set to Select. If you would set it to Text, it will give you the possibility to add values for every single product manually. Using Select will make sure that you enter and standardize the values beforehand. In most cases, using Select is the better choice.
The Enable Archives checkbox may stay switched off. This field allows you to create separate pages based on your attributes. So for instance, a page holding all the products in your store that are black. This can be handy, but also requires some additional coding to reach the desired result.
Leave Default sort order to Custom ordering so that later on, we'll be able to sort our Attribute values in the way we want to.
Click on the Add Attribute button:
Now that our Attribute has been created, it appears in the table on the right-hand side of the screen:
Click on the button on the right to Configure terms.
Next, add all the colors that you will possibly need in your store. Don't worry though, it's always possible to come back later and add more. For every color, just enter the name and click on Add New Color. You'll soon have a long list of colors available. Remember that these colors will be used later on, when we're creating new products.
Once done, go back to the Attributes form again by clicking in the menu on the left. Now repeat the preceding steps and create a new Attribute named Size or Shoe Size. When working with sizes, there are a lot of different possibilities, so you might want to distinguish the sizes depending on the products that you are going to use them for. We create Shoe size to support our next example. Our result looks like this:
Now that we created some attributes, we'll be able to create a Variable Product.
We've just created our first attributes that we'll use to add some shoes to our women's fashion store. Of course, we do not want to display all the sizes as individual products. We want to show our visitors one product and let them choose the right color and size. This is done using a variable product. To create a variable product, perform the following steps:
Blue and Grey:Shoe Size attribute, but now we push the Select All button to immediately select all the available shoe sizes. The final result will look as follows:There's a limit of 50 variations per run. Please note that you should not create too many variations. If you would have more than 100, the chances are high that you'll be creating a complex product for your customers. For more complex products, there are additional plugins available to support that. Refer to Chapter 8, More Possibilities Using Plugins, for more information.
Note: if you made a mistake creating your variations, you can individually delete them by using the Remove button or use the Bulk Edit function again to delete them all at once. It isn't possible to set the image for all the variations at once, but be aware that, in fact, you only have to set this image for the variations where the image differs from the one that you set earlier as Featured Image on the main product level! If you do not set an image for your variation, WooCommerce will simply show the featured image of the main product.
Note that the image that is shown automatically updates if the visitor selects a different color. If that doesn't happen, in your situation it's a problem of the WordPress theme and not an issue in WooCommerce. Are you thinking about changing the way this product page looks like? In Chapter 5, Working with WooCommerce Themes, we'll learn how to adjust the look and feel of our store.
You probably noticed that the Add to cart button does not become available if no variation has been chosen yet. To overcome this problem, you can set a default form value for your product in the backend so that it will be displayed immediately:
When working with a product with lots of variations, there's something important that you need to know about the product page your visitors see. Because of performance reasons, WooCommerce does not load the availability of all the variations if you have over 20 variations in a single product. In such a case, the attributes of the variation will be loaded using Ajax once a variation is selected by the user. This might mean that the user sees a certain color or size, but that it actually isn't available anymore. WooCommerce will show a message to the user in that case. Below 20 variations this issue doesn't exist.
Also in the WordPress administration, this limitation of 20 variations becomes visible. Pagination has been added on the top and bottom of the list with variations. This has been done to make sure that the number of items that must be loaded at once is manageable. Loading lots of variations was a former issue within WooCommerce, where products became very slow in the WordPress backend. This has been solved as of WooCommerce version 2.4.
If you paid some attention to the screenshots earlier in this chapter, you would have noticed that there are even more product types available in WooCommerce. Besides Simple and Variable products, we can create the following:
To create a grouped product, just simply select the type at the top of the Product Data area:
Fields that are no longer necessary will be removed. For instance, note that for a Simple product, there are various settings to control the stock levels. For a Grouped product, this isn't the case. You can only set the group to in stock or out of stock.
Unfortunately, it's not possible to set a sales price for the group. In your product catalog, WooCommerce will display From $xx, where xx is the price for the individual item with the lowest sales price. The final price that your customers pay will be calculated automatically, by adding the total sales prices of the individual products that your customer selects. In fact, the grouped item will display the individual items of the group together. Your customer is still in control of the items that will be put in the basket. Finish your product and create individual (simple) products that will belong to this group.
When creating the individual products for your group, please note the following:
The end result of the grouped product in the frontend could look as follows:
Note that the user has to enter the number of items he wants for every simple product. Often, that doesn't make sense. If you need more functionality for your grouped products, then you'll have to add additional plugins to WooCommerce.
This last product type that WooCommerce offers is a special one. As you probably know, affiliate marketers promote products of other websites. Using this product type, you can create products that are actually sold elsewhere. As a site owner, you'll often earn a percentage of the sale. This product type is popular among bloggers since it gives them the possibility to monetize their blog without having to create a full featured online store and keep stock levels themselves.
When creating such a product, the Product URL is the most important field. It redirects the visitor to the store that the product is actually sold in, including a unique code. Using this code, the seller will know that this buyer came from your website and you will receive your affiliate fee if that customer closes the sale.
If you use your products in this way, the buyer will no longer be able to add an item to the cart. They will simply be redirected to the original store.
When you need to create a lot of products, it's good to take a closer look at the possibilities to import products automatically to your WooCommerce store.
The plugin WP All Import will, for example, deliver the possibility to import product data from XML and CSV sources (http://wordpress.org/plugins/woocommerce-xml-csv-product-import/).
WooThemes is also offering a plugin to import products using a CSV file named Product CSV Import Suite (http://www.woothemes.com/products/product-csv-import-suite/).
Both plugins have a similar price range. They aren't cheap, but they can save a lot of time if you need to create hundreds of products. Based on your needs, WP All Import might be a bit cheaper. WP All Import proves to be more flexible, especially if you're also working with the plugin Advanced Custom Fields. Or if you would like to use the plugin for other import tasks as well. It is a more generic import solution, where the Product CSV Import Suite is just used for importing products. A pro of the Product CSV Import Suite plugin is that it's also able to export data. Both solutions can do the job, so just check which one best fits your needs.
In this chapter, we've learned to create more complex products in WooCommerce. We need this to be able to create products with for example colors and sizes, but also if we're selling services or digital items. WooCommerce offers various possibilities using downloadable, virtual, variable, and grouped products. It's even possible to combine these techniques and create a variable, downloadable product.
If you need to create lots of products, there are various plugins available to help you getting the job done.
Now that we've covered everything about using products, it's time to take a closer look at shipping and payment methods in the next chapter.
You now have enough knowledge of the product possibilities WooCommerce has to offer. You may continue to add multiple categories and products to fill your product catalog. Next, we'll need to take a closer look at the shopping process your customers will be offered. In this chapter we'll have a closer look at:
Earlier in this book, during Chapter 1, Setting Up WooCommerce, we skipped the areas about handling the payment and shipping methods. These are both important subjects for your online store that deserve additional attention. Let's start with the payment methods that you'll offer to your customers.
Which payment methods should you offer in your store? First of all, there's no best answer to this question. Looking at the payment solutions that are available worldwide, you might be surprised. There are literally hundreds of possibilities.
When speaking of payment methods, we distinguish between the following types:
The methods that you need to offer to your customers will differ from country to country. Especially if you're selling locally (within a specific country), you need to prepare your store for that market. If you're not sure which payment methods you should offer, just look at the methods other online stores in your market are offering. Here are some, possibilities, but be aware that the list below only cover the most important, widely used payment possibilities:
This list explains something about the payment methods, but not about the Payment Provider yet. A payment provider allows the online store to accept payments in different forms and will authorize the transactions. Often they also provide an online tool to manage your funds. Just to mention some of the major players:
It's important to understand the difference between a Payment Provider and a Payment Gateway. The Payment Provider is the company used to offer one or multiple Payment methods, which are in WooCommerce referred to as Payment Gateways. For example, PayPal is a Payment Provider, offering Payment Gateways like PayPal Pro, PayPal Express Checkout and PayPal Digital Goods. Often, a Payment Provider offers multiple Payment methods.
For your store it's likely that you need to offer a combination of payment possibilities. Let's first have a look at what WooCommerce has to offer by default. Navigate to WooCommerce | Settings | Checkout.
The Checkout Options were already discussed in Chapter 1, Setting Up WooCommerce. Note that next to the screen with options, we can see the following payment methods:
In fact, the methods mentioned above are offline payment methods, except for PayPal and Simplify Commerce. PayPal is widely accepted. Simplify Commerce is at moment of writing only available for the USA and Ireland.
An offline payment method means that your customer can use that method if you offer it, but the actual payment is not carried out immediately. You'll have to manually check later on if you received the money from your customer. The offline method requires that your customer makes sure the payment is done. Online payment methods immediately do the payment transaction online, at the moment of sale. In most cases the payment is verified automatically and the order status in WooCommerce will be updated accordingly.
When you want to accept credit cards in your store, you'll soon hear something about PCI compliancy. The issue is: if you let your customers enter their credit card details directly on your website, you must be PCI compliant. The downside is that getting your website PCI compliant is difficult to reach.
If you'd like to know more about this subject, the following website may be useful: http://www.pcicomplianceguide.org/.
So, how are we going to solve this? We still need to be able to accept credit cards in our store. Luckily, this is where the Payment Service Providers jump in. These are third-party companies handling the payment transactions for you in a secure way. Simplify Commerce that we just mentioned, is just one of the many options you have. However, your country of residence will influence the number of possibilities you can choose from.
Just by checking out the WooCommerce extensions page, you'll get an idea of what's possible for your market: http://www.woothemes.com/product-category/woocommerce-extensions/.
Select Payment Gateways and your country to receive an overview of available, payment extensions for WooCommerce:
The extensions to support Payment Service Providers aren't free at the WooThemes website. Sometimes the Payment Service Provider of your choice might offer a free extension for WooCommerce when you sign up. Just make sure that you check if it is available. Installing an extension works in the same way as with any regular WordPress plugin. After installing the plugin there's always some configuration that needs to be done. The steps you need to take differ per Payment Gateway.
The extensions at the WooThemes website can sometimes be pricey. But you will receive support and updates for a year, which can be a good reason still to choose for a WooThemes plugin. Alternatively, there are lots of WooCommerce compatible extensions offered at the CodeCanyon website: http://codecanyon.net/category/wordpress/ecommerce/woocommerce. The quality of these plugins may differ, so please pay attention to the ratings and comments of other users.
It's wise to take some time to find the right Payment Service Provider for your market. Pay attention to the rates charged by the Payment Service Provider (as well transaction fees as monthly rates) and the way they will pay you after the transaction.
Setting up a contract with a Payment Service Provider of your choice and the way the setup is done in WooCommerce differs a lot. Therefore, in our example below, we've chosen to just stick to the default options of WooCommerce.
Setting up PayPal in your WooCommerce store is very simple. Of course you first need to create a PayPal account if you do not yet have one at http://www.paypal.com. Mark it as a business account and enter your bank account details to be able to transfer money from your PayPal account to your regular bank account.
Next, in WooCommerce, click PayPal at the top of the Payment Gateways tab
Enter the e-mail address that you used to create your PayPal account:
Note that you have the following possibilities:
Stripe is a payment method created for software developers. Meanwhile the service became more mature and is now available in more than 20 countries, among which the USA, Australia, and a part of Western Europe.
To be able to use Stripe, your website must use a SSL certificate. Without it, you cannot use Stripe in a production environment. If you'd like to receive more information on SSL: your hosting provider can help you. A good option could be Namecheap (https://www.namecheap.com/security/ssl-certificates.aspx), which has a pretty good acceptance and is very affordable. Even better, but also more expensive is Digicert (https://www.digicert.com/buy-ssl-certificates.htm). Note that Digicert also offers a lot of information on using SSL certificates.
After signing up for a Stripe account (http://stripe.com), you just have to confirm your e-mail address to get started. For WooCommerce, there are a couple of options. There's a plugin available at WooThemeshere: http://www.woothemes.com/products/stripe/.
There's also a free extension available through the WordPress.org website (https://wordpress.org/plugins/stripe-for-woocommerce/). And that's the one we'll be using in our example below:
That's all you need to setup a working solution to accept credit cards on your website. The exact procedure for other payment gateways will differ, but generally the steps will look similar.
The mentioned, free plugin for working with Stripe currently doesn't work very well together with the Subscriptions plugin. If you need to sell subscriptions this plugin is not the best choice at moment of writing. More on working with subscriptions will follow in Chapter 8, More Possibilities Using Plugins.
For the other, offline Payment Methods, it's just a matter of enabling or disabling them as you please. You are able to change the description that your visitors will see for every payment method. The Cash on Delivery payment method also gives the possibility to connect it to a shipping method. That's useful so you'll be able to set a different price for using this method, since Cash on Delivery is often an expensive choice.
Just as with Payment Methods, we also need to think about the shipping methods we are going to offer to our customers. Where are we going to ship to? Do we charge our customers for it and if yes, does the amount depend on the shipping address, the weight of the products or both? Also in here we have to think about several aspects:
Looking at the functions WooCommerce is offering we see a similar screen as used for Payment Methods. There are a couple of settings that we need to check:
At the top of the screen we'll find all settings regarding shipping, which we already discussed during Chapter 1, Setting Up WooCommerce.
Below the settings we'll find all standard available shipping methods. Every Shipping Method has a link on top of the screen that will bring us to the settings page for that Shipping Method. This is what WooCommerce has to offer by default:
You may sort the table by dragging the various shipping methods around. This is useful because the sorting here will also be the sort order of shipping methods the user sees during checkout. Besides that, using the priority field you can control the order in which the shipping methods are selected. If two or more Shipping Methods have the same priority, the one with the lowest cost will be selected first.
Let's take a closer look at the Flat Rate method, just to check how we need to configure it. Just click on the Flat Rate link at the top of your screen. The Flat Rate method will calculate one shipping rate per order, regardless of the weight and dimensions of the products in that order. The Flat Rate cannot differ per country, but the field Costs can contain a calculation, which means that the Flat Rate can also be a percentage of the total order value:
Some examples of a calculated Cost field could be:
Looking at the available Shipping Methods, we can imagine running short on possibilities. What if we need a Shipping Method that calculates the shipping rate based on the country, delivery address and the products that we'll ship? That's no longer a Flat Rate anymore and the other shipping methods do not offer a solution. In such a situation, WooCommerce needs additional extensions. A good and very flexible, but pretty expensive extension would be the Table Rate shipping plugin. It's available for $199 at the WooCommerce store: http://www.woothemes.com/products/table-rate-shipping-2/.
Because of the higher price of the official WooThemes extension, there's room for alternative suppliers in the market. On CodeCanyon, there's a reasonably priced plugin available. http://codecanyon.net/item/table-rate-shipping-for-woocommerce/3796656. It's already been on the market for a while now and has a lot of users.
Nowadays buyers often expect to receive free shipping when ordering items in your store. Shipping costs that are too high can be a reason for customers to leave your store and look for an alternative. WooCommerce offers a shipping method that gives the possibility to ship items for free. Let's have a look at the options:
You must have noticed earlier in this book when creating products that there's a field named Shipping class that can be assigned to your products. A shipping class is nothing more than a connection between a product and a certain way of shipping. In other words, a shipping class can be assigned to a product. If we define multiple shipping classes, it becomes easier to use different shipping rates for different types of products. Defining shipping classes is just as easy as creating new categories. Just navigate in your WordPress menu on the left to Products | Shipping classes. Just enter a Name and Description for your class and click the button Add New Shipping Class:
Once done, it's possible to set a rate per shipping class. Whether or not it is possible to set a rate per shipping class also depends on the shipping method. This way of working could be helpful when, for example, you're selling items of a higher value that need additional insurance:
In this example we see that, when an item is part of the shipping class Insurance, there's a cost of $20 for shipping ($5 + $15), instead of the regular $5. The Calculation Type makes sure that the higher cost is only calculated once for the complete order. It's also possible to calculate the additional fee for every item on the order having this specific shipping class.
As with Payment Methods, there are lots of carriers on the market that offer integration with WooCommerce, so that you will not have to handle shipping transactions manually. There are too many possibilities to mention here, but there's always an extension needed to connect WooCommerce to a specific carrier.
If you're in need of integrating a carrier, head back to the WooCommerce website to check if there's an extension available: http://www.woothemes.com/product-category/woocommerce-extensions/. For major player like UPS and FedEx, extensions are available, but these extensions will only calculate the correct shipping rates for these carriers.
There's one more topic we would like to discuss in this chapter. Working with discount coupons gives you the possibility to organize promotions for your existing customers, subscribers, or any other target group. WooCommerce has the basic functionality on board to be able to work with discount coupons. You may find them in the menu by navigating to WooCommerce | Coupons:
To add a new coupon, click on the Add Coupon button at the top of the screen:
In the preceding example above we created a simple coupon that gives a 10% discount on the whole cart. To enable our coupon, we now simply need to hit the Publish button.
The Coupon function delivers several possibilities; let's go through the fields one by one:
At the Cart or Checkout, your customers will be asked to enter a coupon if they have one:
Note that the way this looks like completely depends on the theme you're using. Be aware that as soon as you enable the usage of coupons, potential customers that do not have one might be distracted and leave the cart to start searching for one. Sometimes it's just better to keep the function disabled, if you're not running any promotions where coupons are needed.
Once your customer applies the coupon to the order, the order review section looks as follows:
After adding the coupon, your customer can delete the coupon code again by clicking the Remove link.
Depending on the settings of your coupons, it will be allowed or disallowed to use multiple coupons for the same order.
During this chapter we've learned to work with the default Payment possibilities WooCommerce is offering. However, every country is different and it's important that you use the right payment solution for your area. We've also learned how to use the functions WooCommerce offers to calculate shipping costs. Finally, we've worked with discount coupons, to be used for marketing purposes.
In the next chapter we are going to change the look and feel of our store. We'll have a closer look at WordPress themes, tailored to work with WooCommerce.
So far we've been able to setup our online store, add different type of products and take the necessary steps to add payment and shipping methods. We already installed the free Storefront theme earlier, but our shop still looks very standard though. It's time to change the look and feel of our store!
In this chapter we'll cover:
When you installed WooCommerce, you also received a number of possibilities that you can use to show products to your visitors. Of course there are the default available shop, category and product pages. But sometimes, you need more than that. Let's look at the other options that WooCommerce offers by default.
WooCommerce offers the following widgets, that you can reach from the Theme customizer or via Appearance | Widgets:
The screenshot is as follows:
Using these widgets is easy and works just like any other WordPress widget. Using a couple of these in your sidebar gives your visitors the flexibility they need to find their way in your store. In the example below you see we activated the following widgets: WooCommerce Product Search, WooCommerce Products and WooCommerce Product Categories:
Note that the sidebar is on the right in this example. Generally it makes more sense in an online store to have such a sidebar on the left. This is something you can just set in the Storefront theme. Later on in this chapter we'll give you more information on customizing the Storefront theme.
The look and feel of your store is completely controlled by your WordPress theme. We already noticed that even a theme like Storefront already delivers good results. It's just better to use a theme that has been created with using WooCommerce in mind. If you would use a standard WordPress theme like Twenty Fifteen or Twenty Sixteen WooCommerce will still work, but layout issues might occur.
We have two possibilities when choosing a design for our store:
To start with the first option, creating a theme ourselves is not something we could do overnight. It requires extensive knowledge of Web design, WordPress, WooCommerce, PHP, HTML, and CSS, Just to name a few. But maybe, if we wanted to have a unique design that no other shop is using, this could still be a good choice. It just requires more time and a large budget to do so. Creating your own WordPress or WooCommerce theme is a learning experience if you never did it before.
The alternative is using a standard theme. These are themes optimized for WooCommerce and available out of the box. Using a standard theme you can start right away. Some of them are even free, like for instance the good Storefront theme. We'll often find that we need a commercial theme though. Commercial or Premium themes can be found in price ranges from $20 to $200, where the majority of the themes will be offered below $100. If we had a small budget this would definitely be the way to go, since there are hundreds of themes to choose from. Remember that it's always possible to make adjustments on these themes, so that the theme of your choice better fits your needs.
If you decided to use a standard theme you'll face a new challenge: which theme will fit your needs? There are free themes available on the market, but most WooCommerce themes are commercial themes you'll have to pay for. Often they are referred to as Premium themes. These themes are supported by the developer and deliver lots of functions in most cases. That's not always a good thing though. Functionality should be provided by plugins and not within the theme itself. Besides that, having too much functions will just slow down your website. As a beginner this is sometimes difficult to judge. Just pick what you really need and do not go for the theme that offers the most functions. Look for themes that make it easy to customize the layout, colors and fonts. There are a number of resources available online to look for WooCommerce-compatible themes:
The image below shows the Integrity theme demo created using the X-theme, one of the many versatile and flexible WooCommerce themes at ThemeForest.com:
Sometimes, you may find free themes as well. The best resources are WooThemes and the WordPress.org website: http://wordpress.org/themes/. Search for WooCommerce if you're searching on WordPress.org. All themes can be used, but using a theme built for WooCommerce often gives better results out of the box. Be careful building your business on a free theme. Although it seems tempting if you're on a low budget, free themes are often not updated or supported. If there's any free theme we can really recommend, then it would be the Storefront theme, that is also used in this book. It is well written, and a good starting point if you want to learn WooCommerce theme development yourself. It is supported by WooThemes as well, which is an important asset for a free theme.
I also wrote a roundup of free WooCommerce themes on my blog. If you need to limit yourself to free themes, you should check it out. You may find it here:
http://www.joomblocks.com/best-free-woocommerce-themes-2015.
If you're not yet very familiar with working with different WordPress themes, then the following guidelines may be helpful to come to a good choice:
There are a lot of things that we have to pay attention to when buying a WooCommerce theme. However, when creating a theme from scratch, we need to pay attention to some of these topics as well. In this case, we must have, or gather, the knowledge to be able to build it correctly.
If you bought a commercial WooCommerce-compatible theme, you will have to install it through the WordPress administrative panel or upload it using FTP. Before we do so, let's first take a look at what we actually received. In almost all cases, you'll receive a ZIP file holding different folders. The content and names of the folders will differ from theme to theme. Still, it's good to have a closer look at it and get familiar with commercial theme packages.
An example of the contents of a downloaded theme can be found in the next screenshot:
Note that this is just an example, coming from a ThemeForest WooCommerce theme named The Retailer. The folder structure of this theme shows that it differs from just a regular WordPress theme. There are separate folders holding Assets, the original Photoshop files and Demo data for instance. The actual theme files we need to install the theme have been placed in the folder theme files and we first need to extract (unzip) the whole package in order to be able to continue with our installation. Although the folder names will differ from theme to theme, this is an approach that you will see with lots of premium themes. Always look for a folder named Documentation and start reading this before doing anything else! Often, you'll see that the documentation is offered in an HTML format, starting with index.html that you should open using your browser. In the following screenshot, there's an example of such a documentation:
To install the theme, we head over to the WordPress administrator and choose Appearance | Themes in the menu. Click on Add New, and then click on the Upload Theme link:
Click on Choose file, and then browse to the folder where you unpacked the theme files a minute ago. We open the file theretailer.zip from the subfolder named Theme files and click on Install Now. Remember to upload the ZIP file and not the theme folder inside it.
Next, since this theme is already delivering a child theme, we'll install that one as well. We repeat the preceding steps for the file theretailer-child.zip. Note that we must do it in this order: first install the main or parent theme and after that the child theme. Besides that not every theme will deliver a child theme as well. Often, you'll just receive a single theme package.
Working with Child theme is a best practice if you need to make changes to your theme. By using a parent and child theme, we'll avoid losing our changes if the developer ever needs to update the theme—and this will happen. If the theme of your choice does not deliver a child theme in the package, it's not very difficult to create one. More on child themes will follow in Chapter 6, Customizing a WooCommerce Theme.
Don't forget to activate the Child theme by clicking on the link after installation! Note that our theme requires us to install a couple of additional plugins. We receive a warning message that we can do this by clicking on the link, as shown in the following screenshot:
You would see the following screen after clicking on the link:
Select the plugins and install them all at the same time.
Whether or not your theme will ask for similar steps completely depends on the way it was set up by the developer. Refer to the documentation for your theme when you're in doubt about the steps to take. Note that after bulk-installing the plugins, we also need to activate them.
Premium themes are regularly delivered including demo content. If you are a beginner and find it difficult to start, it's often a good idea to install the demo content in your WordPress test environment. By combining the theme and demo content, is just gets easier to know the theme and its functions. Use the WordPress importer (Tools | Import in the menu) to import the demo content.
After installing the parent and child themes and activating it, our store page looks as follows on the frontend:
It's functional but still requires additional setup.
WordPress is expanding the standard functions to work with theme settings since WordPress version 3.4. However, we can see that the possibilities have been too limited for premium themes and developers continued to work with their own solutions. This is changing though and WordPress puts in more and more effort on customizing your theme using the default WordPress customizer. In this example, the theme comes with its own solution. We can find the settings of our theme by navigating to Appearance | Theme options, but you might just as well find a new high-level menu item for your theme. The following screenshot shows the options for our theme:
Our theme, The Retailer, offers an extended option panel with lots of options to set up our store and change the look and feel. Of course, we can upload our own logo, but it's also possible to change colors, fonts, the contents of the header and footer, and many more. There's no use in exploring all the possibilities here because they are theme-specific. Your situation will be different depending on the theme that you're using.
In the remaining part of this book, we'll switch back to the free Storefront theme. It gives us possibilities to show theme customization and development examples in a better way.
Do you like the way the theme, The Retailer, looks like and its flexibility to change all the colors just the way you need them? The theme is available for purchase at http://themeforest.net/item/the-retailer-retina-responsive-woocommerce-theme/4287447.
There's one more item that we need to discuss that is generic and not really dependent on the theme you're using. Although it is a basic WordPress setting, we still see lots of users getting confused about it. When you have just installed WordPress, by default it will always show blog items on the Front page. For an online store that isn't suitable. You want to show products, maybe a slider and some other information. But in most cases not the blog. If you don't know how to change that here' how:
Homepage. Do not fill any content, just publish it. Note that sometimes, you'll have to set the page template to home page or front page, depending on your theme. Refer to your theme documentation if you're not sure.Blog.The Storefront theme is definitely one of the better free themes. That makes sense because it was developed by the creators of WooCommerce.
The functionality of Storefront is a bit limited. However, you can expand the functionality by installing additional plugins for Storefront, which you have to pay for. Let's first take a look at the changes that you can make by default.
After activating the theme, it will add additional menu items to the Appearance menu in WordPress. Here, you'll find several shortcuts for additional possibilities. WooThemes is a commercial company after all, so there are plenty of links here for more options, which you have to pay for.
Whether you click on the link to Configure menus or Open the Customizer, in both cases the WordPress customizer will be opened. Since WordPress 4.3, you can change your menus from within the customizer, but the old function using Appearance | Menus is still available:
Just navigate the various options to change the items that you need, for example, the background and font colors.
Note that the Layout option on the left gives the possibility to show the sidebar on the left, which makes sense for a typical online store.
It's possible to add a header image to the Storefront theme. But strangely enough, Storefront does not offer the possibility to add your company logo, and the header image isn't really meant for this. To solve this problem, you must download and install the Storefront Logo Plugin, which will add the function to the customizer, at https://wordpress.org/plugins/storefront-site-logo/. Alternatively, you may also use the WordPress Jetpack plugin, which also gives you the possibility to change the logo http://jetpack.me/.
Another plugin that you really want to install when working with the Storefront theme is Homepage control. Use it if you decide to use a regular page as a home page for your website instead of the blog. Download it at https://wordpress.org/plugins/homepage-control/. Once activated, navigate to the customizer again to switch off any area that you do not want to include on your homepage:
Did you notice that Storefront also shows an image for your product categories on the home page? You can switch these off, but if you want to keep them, navigate to Products | Categories and add an image for every category.
Let's have a look at our current result using the Storefront theme and without changing a single line of code!
You might want to make more changes to the theme, but changing code is something that we'll discuss in the next chapter. Before we dive into code, please also have a look at the Storefront customization plugin. It's not free, but gives you additional possibilities to change the look and feel of your store (http://www.woothemes.com/products/storefront-woocommerce-customiser/).
There are lots of WooCommerce-compatible themes on the market. We've seen that working with a theme isn't difficult as long as you take the time to read the documentation and get to know your theme. The exact way of working may differ from theme to theme though, especially for premium themes.
The Storefront theme is giving us a good and solid base, and even without changing code, we can already reach a good-looking result.
In the next chapter, we'll have a closer look at the ability to modify the code of the Storefront theme.
Working with standard themes is a quick and effective solution to get your store up and running, but soon you'll feel the need to make changes to the theme that you're using. Or leave the standard theme and create one from scratch yourself. In this book, I cannot offer you a complete development course. I'll discuss the basics that will give you a good start, working with the Storefront theme. In this chapter, we will cover:
First of all, before we do anything at all, you need to be aware of the fact that this chapter is not suitable for the real beginners. Did you ever work with HTML, CSS, and PHP and have some experience in these areas? Good, then you're good to move forward. If you do not yet have knowledge on these topics, it's probably better to skip this chapter and jump to Chapter 7, Running Your Online Store. That will be easier to follow.
If you're not yet familiar with the techniques mentioned, there's plenty of information available on the Internet to get you started. From short tutorials to complete online video training, everything is already there. The following websites are highly recommended:
Would you rather work directly from a book? In that case, we can recommend the following books from Packt Publishing:
This chapter is too short to cover the topic of WordPress theme development completely. As we've seen, there have been complete books written about these topics. For this chapter, we'll stick to the basics and add specific WooCommerce information on top of that.
Before you start making changes to your theme, find out if it's really necessary to do so. WooCommerce comes with a lot of shortcodes that you can easily use on your posts and pages to call WooCommerce functions that you need. See http://docs.woothemes.com/document/woocommerce-shortcodes/ for a full list and examples.
Every web designer or developer has his/her own favorite tools. That's fine; just use what you like. If you're just starting, the minimum that you need is as follows:
WordPress theme development in a short version:
wp-content/themes folder of your WordPress installation.index.php and style.css file. The index.php file determines the way the home page looks like, by the so-called WordPress loop. There are also other possibilities for the home page, which we'll see in a minute. The style.css file contains all the styling or calls for other CSS files. It also contains the name and author of the theme.index.php, lots of different PHP files can be called. Here are a couple of the most common ones, including their meaning:header.php: This contains the logic for the header of your theme, which mostly contains things such as the logo, website name, search bar, and menu. It also contains the necessary HTML head code.sidebar.php: This contains the definition of a sidebar, that is used to display widgets. More complex themes often give the possibility to use multiple sidebars with different content.footer.php: This contains some closing tags for the theme. Besides that, it has become quite common to define additional widget areas in the footer as well.home.php: This file can be used to show the latest blog posts on the landing page for your blog. Often, this is the home page of your website, but it doesn't have to be. If WordPress is set up to use a static page as the home page, then home.php could be used for your blog.front-page.php: If this file exists, it will be used for the home page of the website. If it doesn't exist, WordPress will look for home.php. If both of them don't exist, index.php will be used. For a deeper explanation, have a look at http://codex.wordpress.org/Creating_a_Static_Front_Page.single.php: This is used to display a single post type—often, a single blog item.page.php: This is used to display a single WordPress page.functions.php: This is an important one because, here, you'll define all kinds of different functions for your theme, for instance, the widget positions, theme support for post thumbnails, and so on. Also, when creating WooCommerce themes, functions.php plays an important role. Using functions.php, you are able to add features and functions to your website. Note that for larger changes, creating a plugin is a better option though.Are you making changes to an existing WordPress theme, please always work with a Child theme. The procedure to create one is very simple. I'll show you how to do this later on in this chapter.
There's much, much more, like the comments.php, search.php, author.php, and category.php. Note that you may use these kinds of different content types, but they aren't mandatory. If you want to learn all about these files, we highly recommend reading a book on WordPress Theme Development. Another great online resource is the WordPress codex: http://codex.wordpress.org/Theme_Development. It's also good to have a closer look at the template hierarchy, that describes exactly how all the files in a theme are working together: https://developer.wordpress.org/themes/basics/template-hierarchy.
The image below shows a simplified structure of the way in which a WordPress theme is set up:
Before making any changes to your theme, it's always good to work with a child theme. A Child theme inherits all the functions from the parent theme that it belongs to. This has the following benefits:
The steps that you need to create a child theme for the Storefront theme are as follows:
wp-content/themes folder. In there, every installed theme has its own folder.storefront-child. If you're creating a Child theme for a different theme, just replace storefront with your theme name. The result should look as follows:style.css and functions.php. Use text editor tools like the ones mentioned at the beginning of this chapter.style.css file:/* Theme Name: Storefront Child Theme URI: http://www.woothemes.com/storefront/ Description: Storefront Child Theme Author: Robbert Ravensbergen Author URI: http://www.joomblocks.com Template: storefront Version: 1.0.0 License: GNU General Public License v2 or later License URI: http://www.gnu.org/licenses/gpl-2.0.html Tags: black, white, light, two-columns, left-sidebar, right-sidebar, responsive-layout, custom-background Text Domain: storefront-child */
Of course you should replace the various lines with your own data. Important are the lines with the Template name, which is the name of the parent theme folder.
functions.php:<?php
add_action( 'wp_enqueue_scripts', 'theme_enqueue_styles' );
function theme_enqueue_styles() {
wp_enqueue_style( 'parent-style', get_template_directory_uri() . '/style.css' );
}style.css, you need to include the additional CSS files separately, just like in your parent theme.Note that the Child theme exists, but does not have an image yet. You may copy the existing image from the parent theme to your child theme folder ( named screenshot.png), or create your own.
Your Child theme is now fully up and running, and you can continue to make changes to it.
Note that the functions.php file of your Child theme will be loaded before functions.php of the parent theme. This gives possibilities to override functions in the parent theme, but only if they have been declared correctly in the parent theme. Do not duplicate function names from the parent theme in your child theme. That could cause fatal errors and your website could stop working completely.
Template files like for instance page.php, single.php, and others can be copied from the parent theme to the child theme. This will overwrite the original file, which gives the possibility to create your own version of these files.
Often, you do not need to change the template files of your theme. Being able to change the CSS using a child theme is already a huge benefit. Let's finish with a simple example. In our Storefront theme, we would like to have a smaller header. The current header contains a lot of white space, which we want to decrease, as shown in the following screenshot:
To do that, we simply inspect the elements in the header using the Chrome tools that we saw earlier in this chapter.
We can see that margins have been defined for the site logo in the class site-logo-anchor. There's also a margin at the top of the site header and navigation. Add the following lines of code to style.css of your Child theme:
.site-header {padding-top: 1.3em; }
.site-header .site-logo-anchor { margin-bottom: 0; }
@media screen and (min-width: 768px) {
   .main-navigation { padding-top: 0; }
   .woocommerce-active .site-header .site-header-cart { padding-top: 0; }
}
All that we do here is use smaller margins and paddings. The last two lines of code will only be applied on desktop screen resolutions (larger than 768 pixels in width). We leave the mobile view unchanged for now. Save the file and check the results. Notice that the header is much smaller now:
WooCommerce is delivered by default with a number of page templates that are used to display all shop information in the correct way. Even using the standard Twenty Fifteen theme, the WooCommerce pages already look pretty good. Just adding some additional CSS might be enough for you to get WooCommerce working even on a theme that was never even designed to work with WooCommerce. If you want to go further than that, here are the things that you need to know:
wp-content/plugins/woocommerce/templates.wp-content/themes/child-theme-name/woocommerce. Make sure to place your files here directly; do NOT use the templates subfolder that you can see in the original WooCommerce folder! If you are making changes to an existing WooCommerce theme, you'll already have this structure in place in your Parent theme. In that case, copy the files you want to change to the woocommerce folder within your Child theme.price.php is stored in wp-content/plugins/woocommerce/templates/single-product, the location of your changed version of the file should be wp-content/themes/child-theme-name/woocommerce/single-product.woocommerce/templates folder also contains a subfolder holding e-mails. You may copy and change these in the same way to your Child theme to be able to adjust the content of the e-mail messages.WooCommerce comes with default CSS styles to give the necessary elements at least some styling. These CSS files can be found in /wp-content/plugins/woocommerce/assets/css. Also here, it's better not to change the existing files because your changes will be overwritten in case of an update of the plugin.
You may simply add some CSS styling to the stylesheet of your Child theme in order to change the colors, fonts, and so on. The stylesheet of your child theme should be made available here: wp-content/themes/my-child-theme/style.css.
For example, use the following code to change the color of the buttons:
a.button, button.button, input.button, #review_form #submit { background:green; }If you want to completely disable the WooCommerce CSS styling, you can do this in the following way. Use your theme's functions.php file and add the following:
add_filter( 'woocommerce_enqueue_styles', '__return_empty_array' );
But remember that as a beginner, it's easier to change existing styles than to create everything from scratch.
WooCommerce heavily relies on the usage of Hooks, Actions, and Filters. It gives you the possibility to override the default output of WooCommerce. For instance, if you want to take control of the Checkout page and add or even remove fields in there, hooks and filters are what you need.
Let's first explain this concept. Within the WordPress and WooCommerce code, developers added hooks. On a hook, you can hang your own code so that it changes the original behavior. There are two types of hooks, which are actions and filters:
In other words, using actions you can do something and using a filter you can change the data.
If the topic of using hooks and filters is still new to you, here you may find a good tutorial about it: http://wpcandy.com/teaches/how-to-use-wordpress-hooks. Another good read explaining the concept for non-developers can be found at http://docs.presscustomizr.com/article/26-wordpress-actions-filters-and-hooks-a-guide-for-non-developers.
Now, let's take the following example. In some countries, having the State field on the checkout page doesn't make sense because States are not actively used. In such a case, you might want to remove the field from the checkout page. Here's how to do just that.
Add the following code to your functions.php file in your Child theme:
// Hook in
add_filter( 'woocommerce_checkout_fields' , 'custom_override_checkout_fields' );

// Our hooked in function - note that the $fields is passed via the filter

function custom_override_checkout_fields( $fields ) {
     unset($fields['shippping']['shipping_state']);
     unset($fields['billing']['billing_state']);
     return $fields;
}
So what does this do? First of all, we add our own custom function to the WooCommerce Checkout fields filter. In our custom function, we simply remove two fields by using the unset function. However, please note that this is an example only. Removing the State field might break extensions that rely on it. Besides that, the preceding code does not check if the fields are set before removing them. So, be careful when applying changes like these and always make sure to keep a backup copies of the original files available.
There's more to discover regarding the development of your own WooCommerce theme; especially, when working with hooks and filters. Here are some additional resources to move forward:
We saw earlier that adding a logo to the Storefront theme can be accomplished using an additional plugin. However, such a plugin might not be available for other themes. Besides that, adding more and more plugins is not a good idea for performance reasons. A simple change can just as well be made by a small code change. Let's see how we can add a logo to the Storefront theme without using the plugin. If you installed and used that plugin earlier, please remove it first:
/* Add a logo in the header */
add_action( 'init', 'storefront_logo' );
function storefront_logo() {
  remove_action( 'storefront_header', 'storefront_site_branding', 20 );
  add_action( 'storefront_header', 'storefront_display_logo', 20 );
}

function storefront_display_logo() {
?>
  <a href="<?php echo esc_url( home_url( '/' ) ); ?>" class="site-logo" rel="home">
    <img src="<?php echo get_stylesheet_directory_uri(); ?>/images/logo.png" alt="<?php echo get_bloginfo( 'name' ); ?>" />
  </a>
<?php
}
We also need a small change to the CSS of our child theme because the class used is slightly different compared to the one used in the plugin:
.site-header .site-logo { float: left; margin-bottom: 0; }Leave the remaining part of style.css unchanged. Note that the result of this small piece of code is the same as the one that the plugin offered.
The Storefront theme offers you the possibility to show the sidebar on the right or on the left. But what if you would like to show the sidebar on the category pages, but completely remove it on the (single) product page?
This is also pretty simple to do. With only a few code changes, we'll have more space available for our product images. Add the following to functions.php of your Child theme:
add_action( 'get_header', 'remove_storefront_sidebar' );
function remove_storefront_sidebar() {
  if ( is_product() ) {
    remove_action( 'storefront_sidebar', 'storefront_get_sidebar', 10 );
  }
}
Next, also add a line to style.css:
/* remove sidebar on product page */
body.woocommerce #primary { width: 100%; }
The end result is a much cleaner product page with larger product images:
In this chapter, we've seen the basics of a WordPress theme. Besides this, we've had a look at the specific functions that WooCommerce adds on the top of that and how you can take advantage of the template files included in WooCommerce.
In the next chapter, we'll focus on running our store and working with orders and customer data.
During the former chapters, we've learned to work with WooCommerce themes. We even had a look at changing our WordPress theme, although this is a subject that requires a deeper knowledge of web design and coding techniques.
Once we set up our store, payment methods, products, and theme, we are able to start doing business! But what happens next? As a store owner, it's important to test the purchase process completely. Not only to check what your customers will see and receive, but also to know what will happen once your first orders start rolling in. In this chapter, we'll learn to:
Assuming that, up to this point, you've been setting up your store in a development environment, you're now almost ready to deploy your store.
A topic that we didn't fully discuss during Chapter 1, Setting Up WooCommerce, is e-mail messages. We discussed the basic settings, but what if we wanted to do additional changes? Let's first go back to the WooCommerce Settings page and click on the Emails tab.
Under Email Options, there's a link available that shows a preview of your current e-mail template. We added a logo during Chapter 1, Setting Up WooCommerce and changed some of the colors. Our example currently looks as follows:
Note that, besides the general e-mail settings, every e-mail that WooCommerce can send has its own form with settings. You may use this to disable the e-mail completely or change its subject and title.
WooCommerce seems to offer an invoice possibility because it shows a couple of settings for the invoice e-mail. However, real invoice numbering doesn't exist in WooCommerce. WooCommerce uses post ID's, which means in practice that gaps will appear in your order numbering. In lots of countries, it's mandatory to use a progressive invoice number. You'll need an additional plugin to solve this issue. An example will follow in Chapter 8, More Possibilities Using Plugins.
If you like to have complete control over your e-mail templates, you have the following two possibilities:
In this chapter, we'll take a look at the second option. To be able to change the existing templates, you need to copy the template files to your own theme. By doing so, you will be able to change the HTML of your e-mails completely! Of course, you must have some PHP and HTML knowledge to be able to understand and change the files.
Don't just change the original WooCommerce e-mail templates in the plugin folder because, in that case, your changes will be lost when there's an update of the WooCommerce plugin.
If you want to use this possibility, copy the e-mail templates that you want to change from the following folder:
wp-content/plugins/woocommerce/templates/emails
Copy this to your theme folder:
wp-content/themes/your-theme-name/woocommerce/emails
In our demo store, using the Storefront Child theme, this would be as follows:
wp-content/themes/storefront-child/woocommerce/emails
WooCommerce has a handy function available that copies the necessary file for you. You can find it at the bottom of every individual e-mail settings screen:
When you copy the file to your theme, it will automatically be added to your child theme if you're using one. Next, the view template button shows the code of the template file. It's possible to make changes here immediately and save your changes. Working that way isn't recommended though, because a small mistake in the code might break your website:
If you made any mistakes that break your e-mail, it's always possible to restart. Use the button Delete template file to remove it from your theme, and you can copy the original file again.
Note that you only need to copy the files that you want to change. Don't just copy all of them if you don't need it. That would only become confusing in the future when doing updates.
In the WooCommerce plugin folder, you'll see a PHP file for every e-mail template. There's also a subfolder available named plain. In this folder, the templates for non-HTML e-mails are stored. Depending on the changes that you're making, it can be necessary to copy as well the HTML e-mail templates as the plain versions to your theme folder.
Besides the template files, there are also helper files like email-header.php and email-footer.php. If you want to make a change to these parts of your e-mails, you need to copy these files as well.
For more information, refer to http://docs.woothemes.com/document/template-structure.
Once you've set up your store, added products, and changed e-mails if needed, you're ready to start the deployment process of your store. Assuming that up until now, you've been working in a development environment, there's one more important thing that you need to do before bringing live your online store: test it!
Just use your store as if you are a customer. Is everything clear for the visitor? Are the links to conditions and shipping information easily available? Is it clear what payment methods you're offering? But above all, does the order process work? It's very important to spend some time in your own store and actually create orders yourself. So you are sure that it is working and that the e-mails that the customer receives are clear and correct.
If everything is okay, you can start the deployment process. There are many ways to deploy a website from development to live, but, in this example, we use a basic, simple technique to do it. Note the steps below only work if you're deploying a new website. If you are adding WooCommerce to an existing website, other steps could be needed.
wp-config.php so that it holds the correct values for accessing the database at your hosting provider. If you make changes locally, be sure to upload the file using FTP again.http://localhost/… to http://yourdomain.com. Click the Dry run button to test the result, and use the Live run button to confirm and save the changes:After doing these database changes, your online store will be available on the new domain. Test if it is reachable on your domain, and also test if you can reach the WordPress administrative panel of your site. If something went wrong, your site won't be available. In that case, restore your database and start again.
If you need more information about moving your development website to a live environment, you may find a tutorial including more details on my website: http://www.joomblocks.com/moving-a-wordpress-website.
Now, we will create a couple of sales orders using our own details just to test the process, whether our payment methods are working, and if the e-mails that we're sending are all working as expected.
An order can be created as well from the frontend as from the WordPress administrative panel. Your customers will order from the frontend, of course. After creating an order, a typical confirmation page will look as follows. Besides the information shown on the screen, the customer and store owner will also receive an e-mail:
Once we create a couple of orders, we can find them in the WordPress administrative panel by navigating to WooCommerce | Orders. You will be notified of new orders directly in the menu. A small circle behind the Orders submenu shows the number of new orders:
The Orders screen shows all the sales orders that you received, regardless of their order status. From here, you may continue to process your orders.
Note the following points when working from this screen:
The order detail screen shows a lot of information. You can find all the address information, details of the products ordered, including attributes, and detailed tax information. On the bottom right of this screen, you'll find a list of Order Notes, holding all the status changes and other information about the process that this order went through. It's possible to add manual notes yourself. There are two types of notes. Customer note will be sent to the customer by e-mail. Remember that these e-mails will only be sent if they are enabled. Navigate to WooCommerce | Settings | Emails | Customer note to verify that. It will be visible as well when the customer looks at the order details by logging in again. A private note is for you or your employees only. Your customer will not receive a private note by e-mail.
Further, on the top left of this screen, it's possible to change the Order status. You can set it to completed for instance once you have shipped all the items. Unfortunately, it's not possible to only ship a part of the order! After changing the status of an order, you must click on Save on the top right to make sure that the status change is actually saved. Depending on your e-mail settings, WooCommerce might send out a message to your customer to confirm that the order has been completed:
Note that when setting an order to refunded by changing the status on the top right, there's no direct connection to your payment gateway. You'll have to manually make sure that your customer receives back the paid amount. Most payment service providers offer a function to refund an order amount. However, there's a function available that lets you automatically refund the amount online. To do this, use the Refund button below the order details. Whether or not you are able to refund the amount automatically depends on the payment gateway. Using PayPal, for instance, it is possible to do an automatic refund.
Handling refunds can be overwhelming sometimes, and there are lots of possibilities. If you want to learn more, there's a good article available in the WooCommerce documentation at https://docs.woothemes.com/document/woocommerce-refunds/.
By using Order Actions on the top right, it's possible to manually resend the order e-mails to your customer again. Also in this case, you need to press the Save Order button or the Apply icon on the right to actually send the message:
At the bottom of this page, there's one more function available. When selling digital goods, like for example e-books, the buyer receives the order confirmation including a download link as soon as the status of the order becomes Processing. Sometimes, it's necessary to overrule the default behavior of WooCommerce and grant access to the file manually. You can do that, and it's even possible to grant access to a digital file that wasn't at all on the order. If you want to do that, just type the name of the product in the search box, select the correct product, and click on Grant Access:
After giving access, it's possible to limit the number of downloads for this file or set an expiration date. It's also possible to Revoke Access again.
After creating several sales orders, you'll notice that the sales order numbering isn't always sequential:
Multiple order numbers are sometimes skipped. This is caused by the fact that WordPress saves everything as a post. A page is a post, a product is a post, and sales order is a post. They all use the same, single number sequence and that's why the sales order numbers will not be sequential. There's a plugin available that can solve this issue at https://wordpress.org/plugins/woocommerce-sequential-order-numbers/. This is the free version which is working fine but doesn't give you any options. The premium version is available on WooThemes.com.
Besides handling orders that were created by online customers, it's also possible to manually add a sales order yourself in the WordPress administrator. This is useful for orders that are for example placed by telephone, e-mail, or fax. Situations like this especially appear in business-to-business environments.
You may select the details of an existing customer by just start typing your customer's name in the Customer field. It's also possible to create the order for a Guest, so a customer that does not have an account in your store. This is the default setting. In this case, you have to enter the address details manually:
If you want to use the data of an existing customer, start with typing the name in the Customer field. Otherwise, keep the default setting as Guest.
When adding the address data, the drop-down fields like Country and State can be filled easily. Just start typing in the field and the matching records will appear:
Set Order Status and Payment Method based on the way the customer is going to pay for the order. When adding Shipping Details, it's possible to copy all the data from Billing Details so that you do not have to enter them again.
Click on the button Add line item(s) button, and then, click on Add product(s) to start adding products to your orders:
Next, a search window opens that lets you search and add a product to the order. You may change the quantity if needed.
From the window shown in the preceding screenshot, you may Add shipping cost to your order or add an order fee using the Add fee button. If you're adding the shipping cost, you manually have to select the correct shipping method and amount it will not be filled in automatically.
Click on the Save button on the bottom left once you're finished with adding items. Click on Calculate totals as well to set the total order value.
Don't forget to also click on Save on the top right corner to save your order. Once saved, you can manage this order in exactly the same way as a sales order entered by an online customer.
The WooThemes website is a great and updated resource. If you have additional questions about managing your orders, then this is a good starting point: https://docs.woothemes.com/document/managing-orders/.
By navigating in the main menu to WooCommerce | Reports we'll be able to take a look at the reporting capabilities that WooCommerce has available. It delivers a number of standardized reports that already give a lot of information. But unfortunately, there isn't much flexibility in this area. Just use what is available or find alternative reporting methods. More on reporting possibilities will follow in the next chapter.
When opening the reporting page, we'll see four main areas that are divided by tabs:
Every main area contains several reports. By default, the reporting section always opens with the Sales by date report of the last seven days. The following reports of sales orders are available:
For every Sales report, it is possible to select the date range. By default, this is the Last 7 days, but other possibilities are This Month, Last Month, and the current Year. Besides that it's possible to enter a custom date range. Click on the Go button after entering the start and end date. WooCommerce automatically selects a matching period so that the graph can be drawn. For instance, when selecting a period of a year or more, WooCommerce will show the revenue per month in the graph.
On the top right of the screen, there's a button named Export CSV. If you click it, a file will be created holding the data of your graph so that you can import it to, say, for example Excel. Note that this is already aggregated data per period and no individual sales orders will be exported here.
In the Customers report section, two reports are available:
The customers versus guests reports give the ratio of buyers that did and did not create an account in your store. The second report, customer list, is more interesting because it shows your top buyers. Unfortunately, customers that do not have an account in your store will not be shown on this list.
There are three different stock reports available:
All three reports are generally the same; the only difference is the filter that determines which items will be shown:
The example above shows the Most Stocked report, which sorts all the products with the available stock. The highest stock level shows on top of the report. You may navigate to the product details in as well the frontend as backend by using the icons on the right.
Stores working with lots of products will have an issue with the limitations of these reports. It isn't possible to export the data or search within the report.
The Taxes area contains the following reports:
It shows the sales tax that has been calculated for your orders. For both reports, you can set the date range. The Taxes by code report splits the sales tax per code, which is handy if you're working with different tax rates for your products. The Taxes by date report shows the tax totals per month, regardless of the used tax codes.
In this chapter, we've learned how to adjust the notification e-mails that are generated by WooCommerce. Next, we deployed our store from a development environment to live.
We also had a closer look at the possibilities to manage your orders. Finally, we worked with the reporting possibilities that are available within WooCommerce.
In the next and final chapter, we'll expand the functionality of our online store using additional plugins. We have covered the basics now, but using plugins there's much more that WooCommerce has to offer.
As you know, WooCommerce is a plugin for WordPress. Even though it might sound strange, it's possible to expand the functionality of WooCommerce with additional plugins. Those are regular WordPress plugins as well, just like any other. The only difference is that these plugins will only work if WooCommerce has been installed.
In this chapter, we'll discuss the following topics:
We already noticed earlier in this book that we probably need additional plugins to support the Payment Method or Payment Service Provider of our choice. There are a number of websites that we can check to see if the functionality we need is available:
Besides these resources, there will be other developers offering their products and services. Not all plugins are mentioned on the websites mentioned above. If you cannot find what you're looking for, give Google a try as well. There are developers delivering WooCommerce plugins directly from their own website. If you're looking for an extension to support your Payment Service Provider or Carrier, don't forget to ask them if they have one available! Sometimes, you might even get it for free in this way.
Whatever plugin you choose to use, there are a couple of best practices that you need to pay attention to when working with plugins:
When looking closer at the plugin prices, you may notice that some plugins require a yearly renewal, whereas others deliver free updates forever. Vendors change their pricing model sometimes, but, at this moment, you have to take the following into account:
All other vendors have varying pricing models and their own way of handling support and updates. Always take a close look at the conditions so that you know what you are going to pay in the future. Keeping your store up to date is important, so please do not stop paying for your extensions just to save some money.
Note that all the prices mentioned in the remaining part of this chapter were the actual prices at the moment of writing. The prices of the mentioned extensions are subject to change.
Now that we've seen where to go for WooCommerce extensions, which ones will be useful to our store? Although WooCommerce already offers all the basic functions for an online store, there's always something that we can improve or need to do differently.
Once your store is up and running, it's important to start working on improvements. To be able to do that you first need to collect data about your visitors. Google Analytics is the free and most widely used tool to do so. If you've ever run any website before, you're probably familiar with it.
Unfortunately, even if you have already connected your website to Google Analytics, it will not track e-commerce conversions. Since that is important to have available, we need to take additional steps to solve this issue.
By searching the WordPress.org plugin repository, some plugins are available, but none of these have been actively maintained at the moment of writing.
Therefore, a good combination is the Google Analytics plugin of Yoast (free) combined with the WooCommerce add-on ($49) from https://yoast.com/wordpress/plugins/ga-ecommerce/.
When working with commercial plugins, you'll often find that the plugin cannot be installed by searching the WordPress.org repository from the WordPress administrative panel. On a website like WooThemes.com or CodeCanyon.com, you buy your product and receive a ZIP archive in most cases. Such an archive file contains everything that you need, but you first need to extract (unzip) it before being able to use the plugin. The archive often contains the plugin along with documentation and sometimes, other resources. If you don't extract the files, uploading the complete ZIP archive to your WordPress installation will simply fail. If you need more detailed instructions, you can find them on my blog at http://www.joomblocks.com/how-to-install-a-commercial-wordpress-plugin.
During the last couple of years, the Yoast SEO plugin has, more or less, become the standard SEO plugin available. It's the expertise of the Yoast team on the SEO subject combined with a very user-friendly plugin that makes the plugin so popular. The free version gives more than enough options to start. Use them like you're used to for regular pages and posts.
Below you'll see an example of using the basic fields of the Yoast SEO plugin:
Yoast also offers a paid extension for WooCommerce, which gives some additional possibilities to influence the Twitter, Facebook, and Pinterest integration. It also gives you control over the WooCommerce default breadcrumbs and improves the quality of your sitemap. More information can be found at https://yoast.com/wordpress/plugins/yoast-woocommerce-seo/.
The following screenshot show the additional settings the paid SEO for WooCommerce extension is offering:
Note that to be able to use Schema & OpenGraph additions, you first need to create attributes for your products. After creating attributes for Brand and/or Manufacturer, you'll be able to use them in the WooCommerce SEO plugin as shown in the screenshot above. Refer to Chapter 3, Using Downloadable Products and Variations, for more information about working with attributes.
WooCommerce already provides you with some pretty good possibilities to create different types of products, but sometimes, this isn't enough. If you need more options, have a look at the following plugins.
WooCommerce product add-ons are available from WooThemes for a current price of $49. It gives you the possibility to add custom fields to your product, for example, when you need your customer to add a text to customize a product:
Alternatively, the CodeCanyon plugin, WooCommerce custom fields & Product add-ons, has a similar functionality. On top of that, using this plugin it's also possible to gather additional information from your customer during checkout. The plugin is available here: http://codecanyon.net/item/woocommerce-custom-fields-product-addons/11332742.
Another possibility to change fields on the checkout page, if available through WooThemes: http://www.woothemes.com/products/woocommerce-checkout-field-editor/.
Next, we're going to have a look at some plugins that will help you doing online marketing for your store in various ways.
E-mail marketing is, or should, play an important role in your online business. There are lots of solutions out there, but MailChimp (http://mailchimp.com) is a very popular choice because of the free plan up to 2000 subscribers. Using the MailChimp integration plugin, your customers will be able to sign up to your e-mail list when they go through the checkout. Besides this, the plugin also offers a nice widget for your WordPress dashboard that shows the subscriber statistics. Since it is offered on the WooThemes website, we may assume that it will still work with the latest version of WooCommerce. You may find the plugin here: http://www.Woothemes.com/products/newsletter-subscription/. The plugin is also able to use the Ecommerce360 functionality of Mailchimp that gives you the possibility to track visitors and customers coming from your e-mail campaigns individually. Currently, the price for this extension is $49. It can also be used to connect WooCommerce to the e-mail marketing provider Campaign Monitor (https://www.campaignmonitor.com/), instead of Mailchimp. Both e-mail providers have plenty of functions available. Mailchimp has a pretty good free plan, which makes it easy and accessible for starting sellers.
There's also a cheaper alternative available at CodeCanyon for $19: http://codecanyon.net/item/mailchimp-for-wordpress/11479536, which even includes a visual form designer.
Are you working with a different e-mail marketing solution for your newsletters? There's a good chance that there are integration plugins available. Just check the various extension websites and ask your e-mail provider, if needed.
Having the standard social like and share buttons in your store is something that we cannot do without. We could use the default share buttons you see everywhere, but there are better alternatives available. One of them is the Social coupon for WordPress plugin available on CodeCanyon at http://codecanyon.net/item/social-coupon-for-wordpress/3417466.
What makes this extension so interesting is that our visitors can share the product page on social media networks to obtain a discount coupon code that they can immediately use. This could be the ideal last step to convince visitors to buy. If products get shared a lot, this will automatically drive new traffic to your store! Below you'll find a screenshot of this plugin working on our demo store:
Advertising is going to be important as your store has just gone live and no one will be able to find you through the search engines yet. We recommend having a closer look at this area and learn to use the various possibilities. Besides the well-known regular Google AdWords ads, you could consider using Google shopping as well. More information can be found in Google Merchant Center at http://www.google.com/merchants.
You'll need a plugin for WooCommerce to be able to connect the products in your store automatically to Google. You may buy this plugin here: http://www.woothemes.com/products/google-product-feed/. It's currently priced at $79 for a single website. There are also other alternatives out there, but for those you need to pay. Free plugins to export your products to the Google Merchant Center are often not maintained.
Alternatively, if you do not have a lot of different products, it's also possible to just fill in a Google spreadsheet with your data and upload that one.
On the other side of the spectrum, we see services like the ones offered by http://www.exportfeed.com/. This isn't cheap, but they offer a full service including the possibility to export your products automatically to marketplaces like for instance Amazon and eBay. If you have lots of products and want to be able to sell them everywhere, this is probably a good solution.
Lots of visitors on your website will have the intention to buy something from you but, in the end, they don't. Something else came in between and they got distracted. End of story, and you lost your sale. Fortunately, there's something that you can do to help minimize this. There are plugins available that send your customer an e-mail at a specific time after they have abandoned their cart. You could even include a discount coupon in the reminder message.
There are several plugins on the market that help retrieve abandoned carts. Plugins like these will only work if the customer left their e-mail address, for example by creating an account. To name few possibilities https://www.tychesoftwares.com/store/premium-plugins/woocommerce-abandoned-cart-pro/. With a price of €119, this is a pretty expensive plugin. Luckily, there's also a light version which is available for free at the WordPress.org website (https://wordpress.org/plugins/woocommerce-abandoned-cart/) that gives you the possibility to check the plugin and decide later on if chasing abandoned carts is something that is really going to increase the revenue of your business.
There are lots of additional plugins available to expand the functions that are available in order to run your store. From shipping calculations to invoicing and reporting, there are extensions available in every area.
We mentioned earlier in this book that the possibilities to calculate the shipping costs in WooCommerce are not always enough to suit your needs. Sometimes, you need to be able to store tables with shipping amounts based on volume or weight of the individual products or the total cart. This is where the Table rate shipping extensions will be helpful. There are multiple plugins available on the market. Let's start with the table rate shipping extension offered on the WooThemes website: http://www.woothemes.com/products/table-rate-shipping/.
The screenshot below shows you the table rate shipping plugin. In this example, the shipping fee that the customer pays is based on the country and total weight of the order:
This is a pretty expensive extension with a price of $199 for a single website. The extension is flexible and easy to use, but maybe other alternatives can work just as well. The table rate shipping extension offered at CodeCanyon offers similar functions on a bargain rate of only $22: http://codecanyon.net/item/woocommerce-table-rate-shipping/3796656. However, note that setting up table rate shipping can become complex. The support offered by WooThemes might therefore be one of the reasons to still choose that plugin.
Note: why would you bother with using an extension from WooThemes.com if plugins found elsewhere are much cheaper? The reason is simple: if you're starting an online business, then you are creating something for a longer period. Extensions bought on the WooThemes store probably will be updated for a longer period. We say probably because, even on WooThemes.com, we won't be sure that extensions will always be updated and continue to be supported. Based on our experience, we expect that your chances are better when using the official WooCommerce extensions, but there are no guarantees. And we've also seen examples of extensions on CodeCanyon that are already available for a couple of years and keep on getting updated. It's up to you to decide.
WooCommerce is offering the possibility to generate invoices for your store, but these won't be valid for all countries. Of course, we have the e-mails that will be sent out, but these are order confirmations only. The PDF Invoices extension available on the WooThemes website does just what we need. It's able to create a PDF invoice and use sequential invoice numbers. The invoice file is automatically attached to the e-mail that will be sent when the order is marked as completed.
The plugin is available here: http://www.woothemes.com/products/pdf-invoices/.
The other vendors that we mentioned at the beginning of this chapter are offering invoicing plugins as well. Just check which one fits your needs.
A function that is often asked for is being able to use subscriptions. Let's say that we would offer access to a closed area of our website with very valuable content. We'd like our customers to buy a subscription in this case and charge them every month. By default, that's not possible in WooCommerce. With the subscription extension, we can do so. This plugin can also be bought at the WooThemes website for $199 (http://www.woothemes.com/products/woocommerce-subscriptions/).
To be able to charge customers every month, our payment gateway needs to support such transactions. This isn't always the case. PayPal is supported out of the box by the plugin. For other payment gateways, have a look at this overview: http://docs.woothemes.com/document/payment-gateways/.
Note: More detailed instructions on creating a subscription-based website with WooCommerce can be found in Packt Publishing's book, WooCommerce Cookbook by Patrick Rauland (https://www.packtpub.com/web-development/woocommerce-cookbook).
In Chapter 7, Running Your Online Store, we noticed that the reporting and management possibilities of WooCommerce can sometimes be a bit limited. And even looking at the available extensions, the choice is still very limited.
The Cart reports extension available on the WooThemes website extends the standard functions with a few additional reports. It delivers interesting information about the number of carts that were abandoned and products that were abandoned while in the cart. If the cart was created by a logged-in user, we can even send them an e-mail about it. The extension is available here: http://www.woothemes.com/products/woocommerce-cart-reports/.
Another extension that can get integrated into the reporting function of WooCommerce is the Cost of goods plugin. It gives you the possibility to check your margins by date or product. The extension is available here: http://www.woothemes.com/products/woocommerce-cost-of-goods/.
Finally, we would also like to mention the following reporting plugin: http://woo.report/. At the moment of writing, this extension could be downloaded for free, but it seems that in the near future, a fee will be charged. This extension delivers some really good insights on customer behavior, sales per product, and value of your stock. These things are missing in WooCommerce itself.
WooCommerce can easily be used as an online catalog, but prices will always remain visible. If you want to hide your prices and only show them to authenticated users, this plugin is the one that you need: http://www.woothemes.com/products/catalog-visibility-options/.
This plugin also offers the possibility to hide the e-commerce functionality completely so that your store will only be an online catalog:
If we would already have a product catalog available, WooCommerce is not giving us the possibility to automatically import product data. The Product CSV Import Suite available at WooThemes can be a real time-saver: http://www.woothemes.com/products/product-csv-import-suite/.
If you are moving from another WooCommerce store, you can just export product data from the first site and import them to the new website using the WordPress importer plugin. In other situations where you have to import your products from another software solution, it's better to use a plugin like the one mentioned previously.
At the moment of writing this, this plugin is priced at $199. You can easily create a CSV file using Google Sheets or Microsoft Excel. If you're currently using a different solution to store your product data, then often there's a possibility to export this data using the CSV file format. The plugin offers enough flexibility to map your product fields to the fields available in WooCommerce.
Alternatively, take a look at the WP All Import plugin at http://www.wpallimport.com/.
We've seen during Chapter 1, Setting Up WooCommerce, that the standard available tax calculations are not always flexible enough when you're doing business in the USA.
The TaxNow plugin, using the Avalara service, can overcome this problem, but it is a paid service. More information about TaxNow can be found here: http://www.avalara.com/products/avatax. The WooCommerce plugin can be bought here for $49: http://www.adipietro.com/product/taxnow-for-WooCommerce/.
If you need to run a website in multiple languages, there's one major player in the market that you need to go to: WPML (https://wpml.org/). Unfortunately, WordPress does not support multilingual websites out of the box, so using plugins is always mandatory. Creating a store in multiple languages is a pretty complex process and requires you to thoroughly read the documentation provided by WPML. You'll need the Multilingual CMS plugin that is currently available from $79. Running WPML can become resource-intensive, so keep in mind that it can have consequences for your hosting plan as well:
You'll need to install several plugins offered by WPML:
The WPML plugin offers a pretty good guide for beginners at https://wpml.org/documentation/getting-started-guide/. Besides that, please also read the documentation the was made for WooCommerce users: https://wpml.org/documentation/related-projects/woocommerce-multilingual/.
All the plugins are included when buying the WPML package.
We've seen in this chapter that the majority of WooCommerce plugins are offered by commercial parties. Sometimes, there's a free, limited version of the plugin available. Now, there's nothing wrong with this because if your online business relies on it, it's better to have a developer that is actually maintaining the plugin code. This doesn't mean that with a free plugin the code won't be maintained, but we've seen lots of situations in the past where free plugins were not regularly updated. However, if you're looking for free plugins, here are a couple of examples that are worth checking out:
Of course, the plugins mentioned above just were examples to show you what WooCommerce is capable of doing. There are many, many more possibilities, so always carefully check if your requirements can be met using an existing extension. If the functionality that you need is not available, it sometimes makes sense to have it created just for your situation. In such a case, always ask for programmers that have experience with creating custom WooCommerce plugins!
The functionality of WooCommerce can be easily expanded using plugins. Unless you have a unique requirement, almost everything is already available. Most of the plugins aren't free, but remember that developers will have to be able to deliver continuous support on their products. Although it is tempting to install lots of plugins, we recommend installing only what you really need. The more plugins that you have, the larger the chance of conflicts or problems during WordPress or WooCommerce upgrades.
By now, you should have a good solid knowledge of the possibilities of WooCommerce and the way in which the solution works. Of course, there's more to discover than the topics discussed in this book. The WooThemes website is being updated continuously and is always a good resource for more information. Besides that, continuing with the WooCommerce Cookbook is a good next step as well (https://www.packtpub.com/web-development/woocommerce-cookbook). It contains lots of practical WooCommerce recipes for users and developers.