Table of Contents for
Running Linux, 5th Edition
 Running Linux, 5th Edition
Published by
O'Reilly Media, Inc., 2005
Running Linux, 5th Edition
Published by
O'Reilly Media, Inc., 2005
- Cover
- Running Linux, 5th Edition
- Preface
- Organization of This Book
- Conventions Used in This Book
- Using Code Examples
- How to Contact Us
- Safari® Enabled
- Acknowledgments
- I. Enjoying and Being Productive on Linux
- 1. Introduction to Linux
- 1.1. About This Book
- 1.2. Who’s Using Linux?
- 1.3. System Features
- 1.4. About Linux’s Copyright
- 1.5. Open Source and the Philosophy of Linux
- 1.6. Sources of Linux Information
- 1.7. Getting Help
- 2. Preinstallation and Installation
- 2.1. Distributions of Linux
- 2.2. Preparing to Install Linux
- 2.3. Post-Installation Procedures
- 2.4. Running into Trouble
- 3. Desktop Environments
- 3.1. Why Use a Graphical Desktop?
- 3.2. The K Desktop Environment
- 3.3. KDE Applications
- 3.4. The GNOME Desktop Environment
- 3.5. GNOME Applications
- 4. Basic Unix Commands and Concepts
- 4.1. Logging In
- 4.2. Setting a Password
- 4.3. Virtual Consoles
- 4.4. Popular Commands
- 4.5. Shells
- 4.6. Useful Keys and How to Get Them to Work
- 4.7. Typing Shortcuts
- 4.8. Filename Expansion
- 4.9. Saving Your Output
- 4.10. What Is a Command?
- 4.11. Putting a Command in the Background
- 4.12. Remote Logins and Command Execution
- 4.13. Manual Pages
- 4.14. Startup Files
- 4.15. Important Directories
- 4.16. Basic Text Editing
- 4.17. Advanced Shells and Shell Scripting
- 5. Web Browsers and Instant Messaging
- 5.1. The World Wide Web
- 5.2. Instant Messaging
- 6. Electronic Mail Clients
- 6.1. Using KMail
- 6.2. Using Mozilla Mail & News
- 6.3. Getting the Mail to Your Computer with fetchmail
- 6.4. OpenPGP Encryption with GnuPG
- 7. Games
- 7.1. Gaming
- 7.2. Quake III
- 7.3. Return to Castle Wolfenstein
- 7.4. Unreal Tournament 2004
- 7.5. Emulators
- 7.6. Frozen Bubble
- 7.7. Tux Racer
- 8. Office Suites and Personal Productivity
- 8.1. Using OpenOffice
- 8.2. KOffice
- 8.3. Other Word Processors
- 8.4. Synching PDAs
- 8.5. Groupware
- 8.6. Managing Your Finances
- 9. Multimedia
- 9.1. Multimedia Concepts
- 9.2. Kernel and Driver Issues
- 9.3. Embedded and Other Multimedia Devices
- 9.4. Desktop Environments
- 9.5. Windows Compatibility
- 9.6. Multimedia Applications
- 9.7. Multimedia Toolkits and Development Environments
- 9.8. Solutions to Common Problems
- 9.9. References
- II. System Administration
- 10. System Administration Basics
- 10.1. Maintaining the System
- 10.2. Managing Filesystems
- 10.3. Managing Swap Space
- 10.4. The /proc Filesystem
- 10.5. Device Files
- 10.6. Scheduling Recurring Jobs Using cron
- 10.7. Executing Jobs Once
- 10.8. Managing System Logs
- 10.9. Processes
- 10.10. Programs That Serve You
- 11. Managing Users, Groups, and Permissions
- 11.1. Managing User Accounts
- 11.2. File Ownership and Permissions
- 11.3. Changing the Owner, Group, and Permissions
- 12. Installing, Updating, and Compiling Programs
- 12.1. Upgrading Software
- 12.2. General Upgrade Procedure
- 12.3. Automated and Bulk Upgrades
- 12.4. Upgrading Software Not Provided in Packages
- 12.5. Archive and Compression Utilities
- 13. Networking
- 13.1. Networking with TCP/IP
- 13.2. Dial-Up PPP
- 13.3. PPP over ISDN
- 13.4. ADSL
- 13.5. Cable Modems
- 13.6. Network Diagnostics Tools
- 14. Printing
- 14.1. Printing
- 14.2. Managing Print Services
- 15. File Sharing
- 15.1. Sharing Files with Windows Systems (Samba)
- 15.2. NFS Configuration and NIS
- 16. The X Window System
- 16.1. A History of X
- 16.2. X Concepts
- 16.3. Hardware Requirements
- 16.4. Installing X.org
- 16.5. Configuring X.org
- 16.6. Running X
- 16.7. Running into Trouble
- 16.8. X and 3D
- 17. System Start and Shutdown
- 17.1. Booting the System
- 17.2. System Startup and Initialization
- 17.3. Single-User Mode
- 17.4. Shutting Down the System
- 17.5. A Graphical Runlevel Editor: KSysV
- 18. Configuring and Building the Kernel
- 18.1. Building a New Kernel
- 18.2. Loadable Device Drivers
- 18.3. Loading Modules Automatically
- 19. Text Editing
- 19.1. Editing Files Using vi
- 19.2. The (X)Emacs Editor
- 20. Text Processing
- 20.1. TeX and LaTeX
- 20.2. XML and DocBook
- 20.3. groff
- 20.4. Texinfo
- III. Programming
- 21. Programming Tools
- 21.1. Programming with gcc
- 21.2. Makefiles
- 21.3. Debugging with gdb
- 21.4. Useful Utilities for C Programmers
- 21.5. Using Perl
- 21.6. Java
- 21.7. Python
- 21.8. Other Languages
- 21.9. Introduction to OpenGL Programming
- 21.10. Integrated Development Environments
- 22. Running a Web Server
- 22.1. Configuring Your Own Web Server
- 23. Transporting and Handling Email Messages
- 23.1. The Postfix MTA
- 23.2. Procmail
- 23.3. Filtering Spam
- 24. Running an FTP Server
- 24.1. Introduction
- 24.2. Compiling and Installing
- 24.3. Running ProFTPD
- 24.4. Configuration
- IV. Network Services
- 25. Running Web Applications with MySQL and PHP
- 25.1. MySQL
- 25.2. PHP
- 25.3. The LAMP Server in Action
- 26. Running a Secure System
- 26.1. A Perspective on System Security
- 26.2. Initial Steps in Setting Up a Secure System
- 26.3. TCP Wrapper Configuration
- 26.4. Firewalls: Filtering IP Packets
- 26.5. SELinux
- 27. Backup and Recovery
- 27.1. Making Backups
- 27.2. What to Do in an Emergency
- 28. Heterogeneous Networking and Running Windows Programs
- 28.1. Sharing Partitions
- 28.2. Emulation and Virtual Operating Systems
- 28.3. Remote Desktop Access to Windows Programs
- 28.4. FreeNX: Linux as a Remote Desktop Server
- A. Sources of Linux Information
- A.1. Linux Documentation Project
- A.2. FTP Sites
- A.3. World Wide Web Sites
- About the Authors
- Colophon
- Copyright
To complete our combo of Linux, Apache, PHP, and MySQL, we still need the PHP language interpreter. PHP is a recursive acronym that expands to PHP: Hypertext Preprocessor. It has been in development for several years now; the versions most commonly used are Version 4 and Version 5. We use PHP4 in this chapter, because it was the most often used version at the time of writing. The changes between Versions 4 and 5 are either in underlying implementation or advanced features that will interest you only when you pile up a large number of PHP files.
One of the nice things about PHP is that PHP code can be
entered directly into HTML code. The web server will pass everything
between <?php and ?> to the PHP module, which will
interpret and execute the commands. Here is a very simple example
for some PHP code in an HTML page; if you already have set up PHP,
you could run this directly from your web server (if not, we’ll tell
you how to set up PHP shortly):
<html>
<body>
<?php
echo
 "Hi, ";
?>
LAMP enthusiasts.
</body>
</html>
As you probably already have expected, your browser will output the following text:
Hi, LAMP enthusiasts.
This extremely simple example shows how Apache works together
with the PHP interpreter: the code between <?php and ?> is passed to the PHP interpreter,
which executes the echo command, which in turn
outputs its parameters to the web browser. In addition to this, the
line LAMP enthusiasts is simply
added as ordinary HTML text (and since it doesn’t have any markup,
it doesn’t look like HTML).
Of course, PHP can do much more. Like most programming languages, it can use variables and make decisions, as in the following script (we leave out the HTML framework here for brevity):
<?php
echo "Dear friends, today's date is: ";
echo date("F d, Y")."\n";
echo "<br>";
echo "We are in the ";

if ( date ("m") <= 6 ) {
        echo "first ";
        } else {
        echo "second ";
}
echo "half of the year ".date("Y");
?>
You have probably already guessed that this script makes its
decision in the if statement
depending on the current month. Notice that we have used an HTML tag
(<br>) in the PHP output;
this is completely acceptable and a very common technique when using
PHP. Your web browser will receive the following data (of course,
with other dates, unless your computer clock is wrong or you were
trapped in a time warp):
Dear friends, today's date is: May 04, 2002
<br>We are in the first half of the year of 2002
The web browser will then break the line at the position of
the <br> tab.
In order to modularize your code, PHP also supports functions, as do most other programming languages. These functions enable you to execute a piece of code in many different places without having to rewrite it over and over again.
Tip
PHP comes with very extensive function libraries, and you
can download even more from the Net. To include a function
library, you can use the include() and the require() statements, which differ only
marginally.
If you want to program with PHP, you should familiarize yourself with the documentation of the function libraries that are shipped together with the PHP interpreter, since their use means you do not have to reinvent the wheel when performing common tasks.
Here is the definition of two simple functions--show_date, which outputs the current date
in a hardcoded date format and appends a line break, and show_halfyear, which outputs first or second depending on the current
month:
<?php

function show_date() {
    echo date("F d, Y") . "\n <br>";
}

function show_halfyear() {
    if (date("m") <= 6) {
        echo "first ";
    } else {
        echo "second ";
    }
}

?>
Let’s call this script functions.php and rewrite our initial script using these functions:
<?php

require("functions.php");
echo "Dear friends, the date today is: ";

show_date();

echo "<br>";
echo "We are in the ";

show_semester();

echo "semester of " . date("Y");
?>
The require() statement
tells the PHP interpreter to load our function script and make the
functions contained therein available to the current script.
Of course, we have only scratched the surface of what PHP can do. If this has whetted your appetite, you might want to look into Programming PHP, by Rasmus Lerdorf, the original author of PHP, and Kevin Tatroe (O’Reilly).
Until PHP3, PHP was an interpreted language, the code of which was kept in a buffer. Loops and other often-run pieces of code were parsed over and over again before executing the code. Of course, this led to suboptimal performance.
PHP4 is a complete rewrite and consists of the language core (called “Zend”) and the function modules (which are very flexible and extensible). Unlike PHP3, PHP4 can be used in multithreaded environments, which also makes it possible to use PHP as a module in various web servers. PHP5 was yet another rewrite (using the “Zend2” engine) with a new, more intuitive object model, improved performance, and support for exceptions. http://www.php.net/manual/en/migration5.php gives you the scoop on the differences between PHP4 and PHP5.
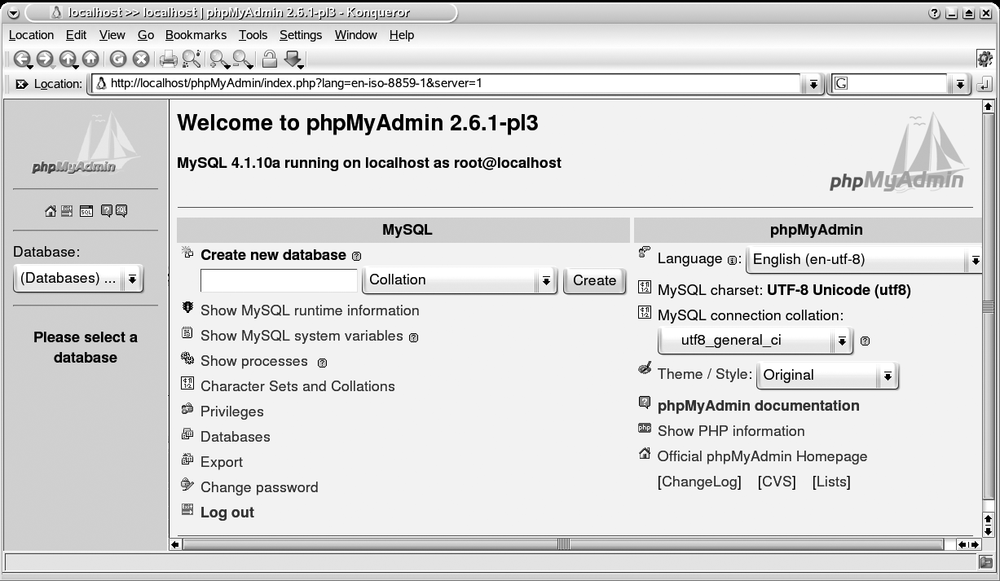
Besides PHP itself, it may be a good idea to download and install phpMyAdmin. phpMyAdmin is a database administration tool written in PHP that simplifies your daily work when it comes to the administration of MySQL, and handles tasks such as creating and dropping databases and tables. It also can manage privileges, keys and fields, and even more. Besides, it is an excellent example of source code that accesses MySQL databases from PHP code! You can download phpMyAdmin from http://www.phpmyadmin.net. When you have installed it according to the instructions, you can open the URL http://localhost/phpMyAdmin in your browser, and you will see the screen shown in Figure 25-3.
In addition to running PHP4 as a module, you can run it as a CGI program started by the web server, at the expense of some additional overhead. When running PHP as a CGI program, each new page that contains PHP code requires starting a new instance of the PHP interpreter, which in turn requires creating a new process and
loading the PHP interpreter into this process. When the interpreter is finished creating the page, its process ends, the memory is freed, all file handles are closed, and all database connections are shut down.
As a web server module, the PHP interpreter becomes part of the web server and is always loaded into memory. In addition, it can keep resources such as database connections alive across different pages, which can bring huge performance benefits.
All big-ticket PHP sites use PHP as a module, mostly because of the better performance it affords.
As we have already said, running the PHP interpreter as a web server module is best for getting good performance. Today, most distributions (including Slackware, Debian, SUSE, and Red Hat) ship both Apache and the PHP4 module for Apache, so it is generally not necessary to build the PHP4 module yourself. It may be a good idea to do so anyway, however.
Because of its vast amount of functionality, the PHP4 module needs quite a number of additional libraries or modules. If you install the module from your installation CDs, the installation program will have automatically installed the necessary modules. However, the modules shipped with distributions are typically loaded with functionality to satisfy all needs and tastes. The result can be a system that’s heavier and slower than it needs to be.
Thus, the advantage of building PHP4 by yourself is that you can decide which functionality you want to go into the module. Check the documentation to see which additional libraries you might need to install.
Since we firmly believe that you should know what goes on behind the scenes, even if you use the more comfortable ready-made solutions, we will give you some hints regarding how to work from scratch and how the pieces work together.
To load the PHP4 module into the Apache web server at runtime, you need to have the Apache module mod_so. You can check whether this module is presented by issuing:
owl$ httpd -l
Compiled-in modules:
        http_core.c
        mod_so.c
If this module is not available, please check whether you may have missed installing some of the additional Apache packages in your distribution. If you have built Apache from scratch, follow the documentation to get this module.
It is also possible to compile the PHP4 module directly into Apache, but this requires some very intertwined building of both Apache and PHP4 and does not really give you a big advantage, so we won’t cover this here.
Now we need to build PHP and make a dynamic shared object (DSO) out of it. Luckily, this is not as involved as it sounds. Download PHP4 from http://www.php.net/download.php. You will end up with a package called php-4.4.0.tar.gz (the actual version number may differ slightly). Unpack the tar file and configure PHP with:
owl$./configure \--with-mysql=/usr/lib/mysql\ --with-ldap=yes\ --with-gd=yes\ --with-zlib=yes\ --with-config-file-path=/etc/\ --with-apxs=/usr/lib/apache/apxs\--enable-versioning\ --enable-track-vars\ --enable-thread-safety
You can read about numerous additional options in the extensive PHP documentation, but for starters, this will do. Note that you might need to replace some of the paths here with the actual locations on your system. After configure is finished, do a make and then a make install to install PHP (you may need to do the make install as root).
Next, edit the httpd.conf file, Apache’s configuration file. If you have installed Apache from your installation CDs, chances are the following lines are already there and you just need to uncomment them. In any case, you should have the following lines in your httpd.conf:
LoadModule php4_module libexec/libphp4.so
AddModule mod_php4.c

AddHandler application/x-httpd-php .php
You may also want to find your existing DirectoryIndex line and change it to allow
PHP files to be used as default pages:
DirectoryIndex index.html index.php
Now restart Apache:
owl# apachectl restart(The command apachectl may be called differently on your distribution; try rcapache.) Once the server is restarted, you should test whether the PHP4 module can be loaded correctly. You can do this by writing a small PHP program, such as the following:
<?php
phpinfo();
?>
Save this file as phpinfo.php in the htdocs directory of your Apache installation (often /usr/local/httpd/htdocs). Now you should be able to browse this file with your web browser by accessing http://localhost/phpinfo.php. If everything is OK, you should see the configuration of the PHP4 module.