Table of Contents for
Running Linux, 5th Edition
 Running Linux, 5th Edition
Published by
O'Reilly Media, Inc., 2005
Running Linux, 5th Edition
Published by
O'Reilly Media, Inc., 2005
- Cover
- Running Linux, 5th Edition
- Preface
- Organization of This Book
- Conventions Used in This Book
- Using Code Examples
- How to Contact Us
- Safari® Enabled
- Acknowledgments
- I. Enjoying and Being Productive on Linux
- 1. Introduction to Linux
- 1.1. About This Book
- 1.2. Who’s Using Linux?
- 1.3. System Features
- 1.4. About Linux’s Copyright
- 1.5. Open Source and the Philosophy of Linux
- 1.6. Sources of Linux Information
- 1.7. Getting Help
- 2. Preinstallation and Installation
- 2.1. Distributions of Linux
- 2.2. Preparing to Install Linux
- 2.3. Post-Installation Procedures
- 2.4. Running into Trouble
- 3. Desktop Environments
- 3.1. Why Use a Graphical Desktop?
- 3.2. The K Desktop Environment
- 3.3. KDE Applications
- 3.4. The GNOME Desktop Environment
- 3.5. GNOME Applications
- 4. Basic Unix Commands and Concepts
- 4.1. Logging In
- 4.2. Setting a Password
- 4.3. Virtual Consoles
- 4.4. Popular Commands
- 4.5. Shells
- 4.6. Useful Keys and How to Get Them to Work
- 4.7. Typing Shortcuts
- 4.8. Filename Expansion
- 4.9. Saving Your Output
- 4.10. What Is a Command?
- 4.11. Putting a Command in the Background
- 4.12. Remote Logins and Command Execution
- 4.13. Manual Pages
- 4.14. Startup Files
- 4.15. Important Directories
- 4.16. Basic Text Editing
- 4.17. Advanced Shells and Shell Scripting
- 5. Web Browsers and Instant Messaging
- 5.1. The World Wide Web
- 5.2. Instant Messaging
- 6. Electronic Mail Clients
- 6.1. Using KMail
- 6.2. Using Mozilla Mail & News
- 6.3. Getting the Mail to Your Computer with fetchmail
- 6.4. OpenPGP Encryption with GnuPG
- 7. Games
- 7.1. Gaming
- 7.2. Quake III
- 7.3. Return to Castle Wolfenstein
- 7.4. Unreal Tournament 2004
- 7.5. Emulators
- 7.6. Frozen Bubble
- 7.7. Tux Racer
- 8. Office Suites and Personal Productivity
- 8.1. Using OpenOffice
- 8.2. KOffice
- 8.3. Other Word Processors
- 8.4. Synching PDAs
- 8.5. Groupware
- 8.6. Managing Your Finances
- 9. Multimedia
- 9.1. Multimedia Concepts
- 9.2. Kernel and Driver Issues
- 9.3. Embedded and Other Multimedia Devices
- 9.4. Desktop Environments
- 9.5. Windows Compatibility
- 9.6. Multimedia Applications
- 9.7. Multimedia Toolkits and Development Environments
- 9.8. Solutions to Common Problems
- 9.9. References
- II. System Administration
- 10. System Administration Basics
- 10.1. Maintaining the System
- 10.2. Managing Filesystems
- 10.3. Managing Swap Space
- 10.4. The /proc Filesystem
- 10.5. Device Files
- 10.6. Scheduling Recurring Jobs Using cron
- 10.7. Executing Jobs Once
- 10.8. Managing System Logs
- 10.9. Processes
- 10.10. Programs That Serve You
- 11. Managing Users, Groups, and Permissions
- 11.1. Managing User Accounts
- 11.2. File Ownership and Permissions
- 11.3. Changing the Owner, Group, and Permissions
- 12. Installing, Updating, and Compiling Programs
- 12.1. Upgrading Software
- 12.2. General Upgrade Procedure
- 12.3. Automated and Bulk Upgrades
- 12.4. Upgrading Software Not Provided in Packages
- 12.5. Archive and Compression Utilities
- 13. Networking
- 13.1. Networking with TCP/IP
- 13.2. Dial-Up PPP
- 13.3. PPP over ISDN
- 13.4. ADSL
- 13.5. Cable Modems
- 13.6. Network Diagnostics Tools
- 14. Printing
- 14.1. Printing
- 14.2. Managing Print Services
- 15. File Sharing
- 15.1. Sharing Files with Windows Systems (Samba)
- 15.2. NFS Configuration and NIS
- 16. The X Window System
- 16.1. A History of X
- 16.2. X Concepts
- 16.3. Hardware Requirements
- 16.4. Installing X.org
- 16.5. Configuring X.org
- 16.6. Running X
- 16.7. Running into Trouble
- 16.8. X and 3D
- 17. System Start and Shutdown
- 17.1. Booting the System
- 17.2. System Startup and Initialization
- 17.3. Single-User Mode
- 17.4. Shutting Down the System
- 17.5. A Graphical Runlevel Editor: KSysV
- 18. Configuring and Building the Kernel
- 18.1. Building a New Kernel
- 18.2. Loadable Device Drivers
- 18.3. Loading Modules Automatically
- 19. Text Editing
- 19.1. Editing Files Using vi
- 19.2. The (X)Emacs Editor
- 20. Text Processing
- 20.1. TeX and LaTeX
- 20.2. XML and DocBook
- 20.3. groff
- 20.4. Texinfo
- III. Programming
- 21. Programming Tools
- 21.1. Programming with gcc
- 21.2. Makefiles
- 21.3. Debugging with gdb
- 21.4. Useful Utilities for C Programmers
- 21.5. Using Perl
- 21.6. Java
- 21.7. Python
- 21.8. Other Languages
- 21.9. Introduction to OpenGL Programming
- 21.10. Integrated Development Environments
- 22. Running a Web Server
- 22.1. Configuring Your Own Web Server
- 23. Transporting and Handling Email Messages
- 23.1. The Postfix MTA
- 23.2. Procmail
- 23.3. Filtering Spam
- 24. Running an FTP Server
- 24.1. Introduction
- 24.2. Compiling and Installing
- 24.3. Running ProFTPD
- 24.4. Configuration
- IV. Network Services
- 25. Running Web Applications with MySQL and PHP
- 25.1. MySQL
- 25.2. PHP
- 25.3. The LAMP Server in Action
- 26. Running a Secure System
- 26.1. A Perspective on System Security
- 26.2. Initial Steps in Setting Up a Secure System
- 26.3. TCP Wrapper Configuration
- 26.4. Firewalls: Filtering IP Packets
- 26.5. SELinux
- 27. Backup and Recovery
- 27.1. Making Backups
- 27.2. What to Do in an Emergency
- 28. Heterogeneous Networking and Running Windows Programs
- 28.1. Sharing Partitions
- 28.2. Emulation and Virtual Operating Systems
- 28.3. Remote Desktop Access to Windows Programs
- 28.4. FreeNX: Linux as a Remote Desktop Server
- A. Sources of Linux Information
- A.1. Linux Documentation Project
- A.2. FTP Sites
- A.3. World Wide Web Sites
- About the Authors
- Colophon
- Copyright
Linux provides various user-level printing options. Traditionally, tools such as the text-mode lpr have been used to print files from the command line. Understanding how to use these and other printing and document formatting commands will enable you to print documents quickly and efficiently. A quick rundown of the enscript and nenscript utilities will help you create good-looking printouts even from basic text documents. GUI programs present their own user interfaces that you can use to control printing options from such programs. Finally, we describe some of the mechanics behind the printing system. This will help you to manage your printing sessions by giving you an understanding of how it all works, enabling you to use the system to its best effect.
The lpr command prints a document in Linux. You might not always invoke this command directly—you may just press a Print button on some glitzy drag-and-drop graphical interface—but ultimately, printing is handled by lpr and the other print management utilities we describe here.
If you want to print a program listing, you might enter the following:
$ lpr myprogram.cInput is also often piped to lpr from another command, as described
later. The lpr program starts the printing
process by storing the data temporarily to a directory called a
print spool . Other parts of the print management system, which
we show you how to set up in "Managing Print Services"
later in this chapter remove files from the print queue in the
correct order, process the files for printing, and control the flow
of data to the printer.
There is at least one print queue for each printer on the
system, but each system has one print queue that’s marked as the
default. (In the old LPD printing systems, this queue was
traditionally called lp, but this
naming convention is less common with computers that run CUPS.) If
you need to specify a queue of a different name, just include a
-P option, as in lpr -Pepson
myprogram.c. If you forget the name of a queue, you can
look at queue names in the /etc/printcap file, access the CUPS web
configuration tool (as described in “Managing Print Services”), or
type lpstat -a to see the status
of all the queues.
Tip
A printer that can be used in different modes of operation, such as for printing faxes as well as letters, may have a separate print queue for each purpose. You can also create multiple queues for a single printer in order to use different resolutions, paper sizes, or other features.
As a user, you do not see whether a printer is connected directly to your computer or somewhere else on the network; all you see and need to know is the name of the printer queue. If you use a printer queue that points to a printer on another machine, the file to print will first be spooled on your machine, then transmitted to the appropriate queue of the machine connected to the printer, and finally be printed. “Managing Print Services” tells you more about setting up printer queues.
Some programs look to the PRINTER
environment variable to determine what queue to use. Thus, if you
want to use a particular printer for most of your printing needs,
you can set this environment variable. For instance, if you are
using the bash shell, you could make epson_360 your personal default queue by
putting this command in your .bashrc file:
$ export PRINTER=epson_360This procedure doesn’t work for all programs, though; many ignore the PRINTER environment variable. Some complex programs enable you to set a default queue in some other way, such as in a GUI dialog box. Consult your program’s documentation for details. In any event, if you use lpr for printing, directly or indirectly, and can change how lpr is called, you can use the -P option to lpr to set the destination queue. This option overrides the PRINTER environment variable.
Once you know how to print a file, the next problem you might face is finding out what is happening if your file doesn’t instantly print as you expect. You can find out the status of files in the print queue by using the lpq command. To find out the status of files sent to your default printer, enter:
    $ lpq
    epson_360 is ready and printing
    Rank    Owner   Job     File(s)         Total Size
    1st     rodsmit 440     (stdin)         2242560 bytes
    2nd     rodsmit 441     (stdin)         5199872 bytes
    3rd     lark    442     (stdin)         1226752 bytes
You see that the printer is running, but large jobs are queued ahead of yours (if you are lark). If you just can’t wait, you might decide to remove the job from the print queue. You can use the job number of the printing task that lpq reported to remove the printing job:
$ lprm 442The spooled print file identified as job 442 is discarded. You
can narrow the lpq report by asking about a
specific print job by task ID (rarely used), by printer, or by user
ID. For example, to get a report that identifies spooled files sent
to a printer named hp4500, you
would enter
    $ lpq hp4500
    ada is ready and printing
    Rank    Owner   Job     File(s)         Total Size
    active  lovelac 788     (stdin)         16713 bytes
    1st     lark    796     (stdin)         70750 bytes
If you are the root user, you can kill all pending printing tasks by entering the command:
# lprm -If you are not the root user, issuing that command kills only the printing tasks you own. This restriction also holds true if you specify a printer:
# lprm adaIf you are root, the print queue is emptied. If you are a normal user, only the print files you own are removed from the specified print spool. The lprm utility reports on the tasks it kills.
The root user can kill all the print tasks issued by any user by specifying:
#lprmusername
If you issue lprm with no argument, it deletes the currently active print jobs that you own. This is equivalent to entering:
$lprmyourusername
If you want to see whether a queue is down, you can use the lpc command:
$ /usr/sbin/lpc status epson_360See "Managing Print
Services" for details. The lpc utility
is usually installed in the /sbin or /usr/sbin directory. Alternatively, the
CUPS lpstat command performs a
task similar to lpc status.
Sometimes you want to do more than just send a file that’s already been prepared for printing to the printer. For instance, you might want to print a manpage or some other document that’s not quite ready for printing. To do so, you can use various Linux utilities, often in pipelines, to do the job. For instance, to get a quick hardcopy printout of the cupsd manual page, enter:
$ man cupsd | col -b | lprThe man command finds, formats, and outputs the cupsd manual page in an enriched ASCII output that uses backspaces to overstrike and underline characters (in place of italics) for highlighting. The output is piped through col, a Unix text filter, whose -b option strips the backspace instructions embedded in the manpage, which results in simple text strings while maintaining the layout of the formatted manpage. The output of col is piped to lpr, which spools the text in a spool directory.
Suppose you want to print the fully enriched manpage with highlighting and all. You might use a command like this:
$ gunzip -c /usr/share/man/man8/cupsd.8.gz | groff -man -Tps | lprThe gunzip -c command uncompresses the
compressed manpage and passes the results to standard output (and
hence to the next command in the pipeline). The
groff command applies the man macros to the file specified, creating
PostScript output (specified by -Tps). This
output is then passed to lpr, which spools it,
and CUPS applies the default print-processing instructions for the
default print queue.
Another useful tool for printing pure-text files is the pr command, which formats files in a number of ways. For instance, you can create multicolumn output, documents with headers, numbered lines, and more. Consult the pr manpage for details.
Most Linux distributions today use CUPS as the default printing system, but older distributions used the LPRng system or the even older BSD LPD system. (Some distributions ship with two or all three of these systems, but CUPS is usually the default choice.) The BSD LPD and LPRng systems use commands similar to those described here, so even if your distribution uses these older systems, you should be able to use these commands. Some Unix printing systems, such as the SysV printing system, use different commands, such as lp for printing. If you’ve installed such an unusual (for Linux) printing system, you may need to look at its documentation to learn how it works.
The nenscript utility, now often called enscript, is a flexible filter that provides good formatted output for PostScript printers, even from ASCII text files. It isn’t a basic Linux utility, but it is included in most Linux distributions and can be retrieved from the usual Linux FTP sites.
Tip
Although nenscript and enscript create PostScript output, they can still be used if you have a non-PostScript printer. As described later in this chapter, a properly configured Linux print queue automatically converts PostScript to the formats required by non-PostScript printers.
Suppose you are printing out a C program and want line numbering and a printout on green-striped fanfold paper (not the same format you’d want when printing those graphics you downloaded from the Internet on your nifty PostScript printer). You need to have the program processed, and then insert the line numbers in front of the lines. The solution is to process the file through a filter such as the enscript utility. After doing its own processing, enscript passes the file to lpr for spooling and printing to your trusty tractor-feed printer (named here):
$ enscript -C -B -L54 -Pdino -M Letter myprogram.cThe enscript filter numbers each line of
the file passed through it when you specify the
-C option. (Earlier versions of enscript used -N
rather than -C for line numbering.) The
-B option suppresses the usual header
information from being printed on each page, and the
-L54 option specifies formatting at 54 lines
per page. The enscript filter
just passes the -Pdino option through to
lpr, which interprets it and
directs the output to dino’s
print spool for printing. The -M
Letter option specifies you want a printout on
letter-size paper. (Depending on compile-time options, enscript may default to European A4
paper.)
When called on the command line, enscript automatically passes output to lpr unless you specify standard output by supplying the -p option. You don’t need to pipe or redirect enscript output to lpr explicitly.
Suppose you are going to print a lot of program listings today. For convenience, you can set an environment variable for enscript to specially process and print your listings each time:
$ export ENSCRIPT=" -C -B -L54 -Pdino -M Letter"Now, to print your listing correctly, all you need enter is:
$ enscript myprogram.censcript optionally sends output to a file, which is often useful for preparing PostScript files on Linux hosts that don’t actually have a PostScript printer available. For example, to convert a text file to a PostScript file, formatted for two-column printing on the standard European A4 paper format in 6-point Courier font, you would type:
$ enscript -2 -f Courier6 -M A4 -p document.ps document.txtThe -2 option overrides the one-column
default, and the -f Courier6 option overrides the
7-point Courier default for two-column output. (The one-column
default is Courier 10; enscript
always uses Courier font when converting plain text into PostScript,
unless told to do otherwise via -f.) The
-M A4 option specifies A4 paper size. (To learn
what options are available, type enscript -
-list-media.) The -p option specifies
that the output should be stored to document.ps, and the filename specified
with no option is the input to enscript. If no
filename had been specified, enscript would have taken standard input
as the filename.
As another example, to print the enscript manual page as basic text on a PostScript printer, enter:
    $ man
 enscript | col -b | enscript
The man command retrieves the manual page and formats it for text display. The col -b command strips the backspace instructions for highlighting and underlining, leaving plain text that is piped to the enscript filter. This turns the plain text into simple PostScript with some “pretty printing” that applies headers, footers, page numbering, and the like. Finally, the file is passed to lpr, which spools the file. CUPS then processes the file in the same way it handles all files, which may involve sending the file directly to a PostScript printer, passing it through Ghostscript, or performing other filtering tasks.
If you specify the -Z option with enscript, it attempts to detect PostScript files passed to it and passes them through unaltered.
Warning
If a PostScript file is passed to enscript and is interpreted as a text file (probably because enscript was not called with the -Z option), enscript will encapsulate it and pass it through to print. This can result in the PostScript code being printed out literally. Even a small PostScript file can use up a lot of paper in this way.
Note that you could specify the default print queue to use
either in PRINTER or as a
-P argument stored to the ENSCRIPT environment variable. If you set
ENSCRIPT to specify a queue to
use, that queue will be used every time enscript filters one of your files. We
recommend that you set PRINTER
rather than -P in ENSCRIPT so that you can change the queue
specification and have it filtered appropriately.
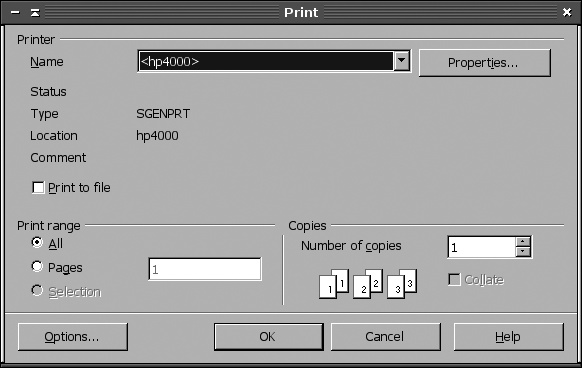
Most GUI programs use the standard printing tools, such as lpr, behind the scenes. These programs display friendly print dialog boxes, such as the one shown in Figure 14-1 (for OpenOffice). Typically, you select your printer from the list near the top (called Name in Figure 14-1). You can also set various program-specific options, such as the number of pages to print and the number of copies. When you’ve set your options, click a button to begin printing, such as the OK button in Figure 14-1.
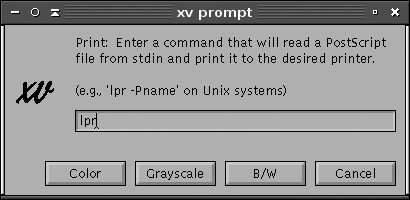
Frequently, there’s little you can do to adjust the way a GUI program prints; there are no options that enable you to tell it to use a variant printing command, so you’re stuck with whatever options the program provides. Other times, though, the program does present such options. One way to do this that’s quite obvious is to present a print dialog box that enables you to enter the print command. For instance, Figure 14-2 shows the xv print dialog box. Rather than select a printer from a drop-down list, you enter the print command, including any printer specification, just as you would at a command prompt.
A few programs combine these two approaches, providing both a drop-down list of printers and a way to specify the print command. Some programs also provide configuration options that enable you to set the printing command you want to use. Such options, if present, are usually accessible from the program’s preferences or configuration dialog box. Consult your program’s documentation if you want to change the way it prints.
Generally, after you have handed your document or file that you want printed over to the printing system, you can forget about it until the printed sheet comes out of the printer. But when things go wrong and the sheet does not appear, or if you are simply curious (like us!), you might want to know what goes on behind the scenes between the lpr command and the output tray of your printer. If you want, you can skip this section and come back here later.
Only the root user has the ability to access printers directly, without using the printing system. (That’s not a wise thing to do, by the way.) Linux doesn’t grant system users the ability to address various physical devices directly because crippling conflicts could result, and also because it’s just too much work for them. Instead, utilities call background system processes to schedule your printing. Among other tasks, these processes convert source file data to print to a specific printer using its printer language and protocols, set the print resolution, format the pages, and add (or know not to add) header and footer data and page numbering. Linux configures itself to handle its physical devices when it is booted, including setting up ports and protocols to handle printing.
The print management system is controlled by cupsd, the daemon that has necessary privileges to access printers on behalf of the user. (Older Linux systems used BSD LPD or LPRng. These daemons were called lpd rather than cupsd, but they filled the same basic role.) Once the print management system is installed, cupsd is started every time the Linux system is booted. Files in /etc/cups provide the control information cupsd needs to manage the files the user wants to print.
Two paths exist for printing on a Linux system that runs CUPS. The first path involves lpr or lp. These programs are named after the utilities in BSD printing systems (BSD LPD and LPRng) or SysV printing systems, respectively. They accept a file that’s to be printed and behave much like their namesakes in the older printing systems, at least as far as the calling application or user is concerned. Behind the scenes, though, these programs are really just gateways into the second printing path.
This second printing path involves CUPS-specific system calls. Applications that use this path can communicate bidirectionally with CUPS. In addition to passing plain-text, PostScript, or other files to the print daemon (as in old-style printing systems), applications can query CUPS about a printer’s capabilities. CUPS can then deliver a PostScript Printer Definition (PPD) file to applications. These files describe a PostScript printer’s features: its page sizes, printable area, color capabilities, and so on. As described in "Managing Print Services,” PPD files are key components of Linux printer driver packages, even for non-PostScript printers. (For such printers, Linux printer driver packages include PPD files that describe the printer’s capabilities as driven via Ghostscript.) Because of this bidirectional communication, CUPS-aware programs can set more printer features, such as printer resolution, than can older programs that are not CUPS-aware.
Tip
You can turn some old-style (CUPS-unaware) applications into CUPS-aware applications by changing their printing paths. Specifically, if you call kprinter rather than lpr, the result is that print jobs will be processed by KDE’s printing system, which is CUPS-aware. You can then set CUPS-specific options, such as changing the printer resolution. This option works best for GUI programs because kprinter is an X-based application. You could also use this approach for printing from text-mode programs run from within an xterm terminal program.
Whether the program is CUPS-aware or not, once cupsd has received a print job, it’s stored in the print spool directory (usually /var/spool/cups), along with a file that describes the print job. CUPS then orders the list of print jobs and sends them to the printer in an organized fashion, preventing conflicts in accessing the printer. Each print queue has associated with it a set of filters, which are programs that process files of particular types. The details of print filter configuration are hidden from view, even from system administrators, unless you dig pretty deeply into the CUPS workings. Typically, applications deliver plain text or PostScript to CUPS. Plain text may be sent on to the printer without processing, but PostScript is usually processed through Ghostscript, which converts the PostScript into a format that the printer can understand.