Table of Contents for
Running Linux, 5th Edition
 Running Linux, 5th Edition
Published by
O'Reilly Media, Inc., 2005
Running Linux, 5th Edition
Published by
O'Reilly Media, Inc., 2005
- Cover
- Running Linux, 5th Edition
- Preface
- Organization of This Book
- Conventions Used in This Book
- Using Code Examples
- How to Contact Us
- Safari® Enabled
- Acknowledgments
- I. Enjoying and Being Productive on Linux
- 1. Introduction to Linux
- 1.1. About This Book
- 1.2. Who’s Using Linux?
- 1.3. System Features
- 1.4. About Linux’s Copyright
- 1.5. Open Source and the Philosophy of Linux
- 1.6. Sources of Linux Information
- 1.7. Getting Help
- 2. Preinstallation and Installation
- 2.1. Distributions of Linux
- 2.2. Preparing to Install Linux
- 2.3. Post-Installation Procedures
- 2.4. Running into Trouble
- 3. Desktop Environments
- 3.1. Why Use a Graphical Desktop?
- 3.2. The K Desktop Environment
- 3.3. KDE Applications
- 3.4. The GNOME Desktop Environment
- 3.5. GNOME Applications
- 4. Basic Unix Commands and Concepts
- 4.1. Logging In
- 4.2. Setting a Password
- 4.3. Virtual Consoles
- 4.4. Popular Commands
- 4.5. Shells
- 4.6. Useful Keys and How to Get Them to Work
- 4.7. Typing Shortcuts
- 4.8. Filename Expansion
- 4.9. Saving Your Output
- 4.10. What Is a Command?
- 4.11. Putting a Command in the Background
- 4.12. Remote Logins and Command Execution
- 4.13. Manual Pages
- 4.14. Startup Files
- 4.15. Important Directories
- 4.16. Basic Text Editing
- 4.17. Advanced Shells and Shell Scripting
- 5. Web Browsers and Instant Messaging
- 5.1. The World Wide Web
- 5.2. Instant Messaging
- 6. Electronic Mail Clients
- 6.1. Using KMail
- 6.2. Using Mozilla Mail & News
- 6.3. Getting the Mail to Your Computer with fetchmail
- 6.4. OpenPGP Encryption with GnuPG
- 7. Games
- 7.1. Gaming
- 7.2. Quake III
- 7.3. Return to Castle Wolfenstein
- 7.4. Unreal Tournament 2004
- 7.5. Emulators
- 7.6. Frozen Bubble
- 7.7. Tux Racer
- 8. Office Suites and Personal Productivity
- 8.1. Using OpenOffice
- 8.2. KOffice
- 8.3. Other Word Processors
- 8.4. Synching PDAs
- 8.5. Groupware
- 8.6. Managing Your Finances
- 9. Multimedia
- 9.1. Multimedia Concepts
- 9.2. Kernel and Driver Issues
- 9.3. Embedded and Other Multimedia Devices
- 9.4. Desktop Environments
- 9.5. Windows Compatibility
- 9.6. Multimedia Applications
- 9.7. Multimedia Toolkits and Development Environments
- 9.8. Solutions to Common Problems
- 9.9. References
- II. System Administration
- 10. System Administration Basics
- 10.1. Maintaining the System
- 10.2. Managing Filesystems
- 10.3. Managing Swap Space
- 10.4. The /proc Filesystem
- 10.5. Device Files
- 10.6. Scheduling Recurring Jobs Using cron
- 10.7. Executing Jobs Once
- 10.8. Managing System Logs
- 10.9. Processes
- 10.10. Programs That Serve You
- 11. Managing Users, Groups, and Permissions
- 11.1. Managing User Accounts
- 11.2. File Ownership and Permissions
- 11.3. Changing the Owner, Group, and Permissions
- 12. Installing, Updating, and Compiling Programs
- 12.1. Upgrading Software
- 12.2. General Upgrade Procedure
- 12.3. Automated and Bulk Upgrades
- 12.4. Upgrading Software Not Provided in Packages
- 12.5. Archive and Compression Utilities
- 13. Networking
- 13.1. Networking with TCP/IP
- 13.2. Dial-Up PPP
- 13.3. PPP over ISDN
- 13.4. ADSL
- 13.5. Cable Modems
- 13.6. Network Diagnostics Tools
- 14. Printing
- 14.1. Printing
- 14.2. Managing Print Services
- 15. File Sharing
- 15.1. Sharing Files with Windows Systems (Samba)
- 15.2. NFS Configuration and NIS
- 16. The X Window System
- 16.1. A History of X
- 16.2. X Concepts
- 16.3. Hardware Requirements
- 16.4. Installing X.org
- 16.5. Configuring X.org
- 16.6. Running X
- 16.7. Running into Trouble
- 16.8. X and 3D
- 17. System Start and Shutdown
- 17.1. Booting the System
- 17.2. System Startup and Initialization
- 17.3. Single-User Mode
- 17.4. Shutting Down the System
- 17.5. A Graphical Runlevel Editor: KSysV
- 18. Configuring and Building the Kernel
- 18.1. Building a New Kernel
- 18.2. Loadable Device Drivers
- 18.3. Loading Modules Automatically
- 19. Text Editing
- 19.1. Editing Files Using vi
- 19.2. The (X)Emacs Editor
- 20. Text Processing
- 20.1. TeX and LaTeX
- 20.2. XML and DocBook
- 20.3. groff
- 20.4. Texinfo
- III. Programming
- 21. Programming Tools
- 21.1. Programming with gcc
- 21.2. Makefiles
- 21.3. Debugging with gdb
- 21.4. Useful Utilities for C Programmers
- 21.5. Using Perl
- 21.6. Java
- 21.7. Python
- 21.8. Other Languages
- 21.9. Introduction to OpenGL Programming
- 21.10. Integrated Development Environments
- 22. Running a Web Server
- 22.1. Configuring Your Own Web Server
- 23. Transporting and Handling Email Messages
- 23.1. The Postfix MTA
- 23.2. Procmail
- 23.3. Filtering Spam
- 24. Running an FTP Server
- 24.1. Introduction
- 24.2. Compiling and Installing
- 24.3. Running ProFTPD
- 24.4. Configuration
- IV. Network Services
- 25. Running Web Applications with MySQL and PHP
- 25.1. MySQL
- 25.2. PHP
- 25.3. The LAMP Server in Action
- 26. Running a Secure System
- 26.1. A Perspective on System Security
- 26.2. Initial Steps in Setting Up a Secure System
- 26.3. TCP Wrapper Configuration
- 26.4. Firewalls: Filtering IP Packets
- 26.5. SELinux
- 27. Backup and Recovery
- 27.1. Making Backups
- 27.2. What to Do in an Emergency
- 28. Heterogeneous Networking and Running Windows Programs
- 28.1. Sharing Partitions
- 28.2. Emulation and Virtual Operating Systems
- 28.3. Remote Desktop Access to Windows Programs
- 28.4. FreeNX: Linux as a Remote Desktop Server
- A. Sources of Linux Information
- A.1. Linux Documentation Project
- A.2. FTP Sites
- A.3. World Wide Web Sites
- About the Authors
- Colophon
- Copyright
KMail is a very user-friendly, feature-rich mailer that comes with KDE and integrates mail smoothly with other utilities. For example, if an email message you receive contains a link to a web page, you can click this link in the message, and the KDE web browser Konqueror will pop up and display the web page. Or, if the email contains an MP3 file as an attachment, you can click it to play the file with one of KDE’s MP3 players. Figure 6-1 shows a screenshot of KMail at work.
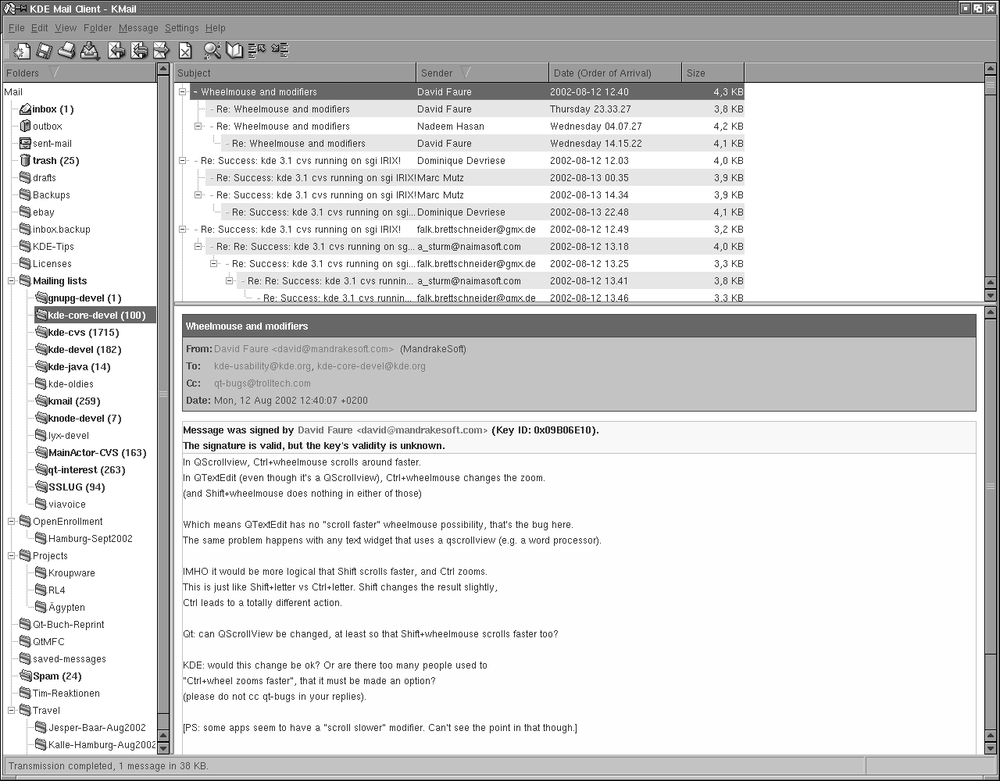
KMail has a lot of features and settings, but we’ll just cover some that get you started quickly and leave it to you to explore KMail further. As you can see in Figure 6-1, the KMail window is divided by default into three parts. On the left, you see a tree of your folders (at first startup, you will have only the default folders, of course). The upper part of the right side shows a listing of messages in the currently selected folder, and the lower part of the right side shows the currently selected message. You can change how the space is distributed between these parts by dragging the separator lines between them. The latest KMail versions even have a fourth part that lets you drill further into the structure of an individual message by displaying the MIME parts the message is composed of. However, this display is turned off by default, as most people do not need it.
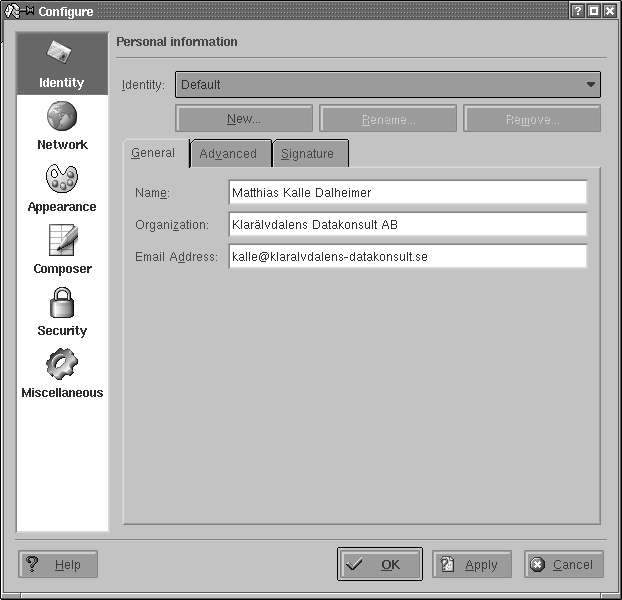
Before you can use KMail, you have to set up some information in it. Select Configure KMail from the Settings menu and then open the configuration group Identities by clicking its icon. You can create a number of different identities here; for example, you may want to use different return addresses when emailing as an employee of your company or as a private person. Click Add to create a new entity; a subsequent dialog lets you choose between starting from scratch, using the settings from the KDE Control Center (useful only if you have configured your email settings there), and copying the values from an existing identity (which of course is possible only if you already have one and only makes sense if you intend to edit the copy afterwards). If you are setting up KMail, you will want to select creating an entirely new identity here. Give the identity a name, such as “Work” or “Home,” and click OK. For starters, it is sufficient to fill in the Name and Email Address fields on the General tab (see Figure 6-2) of the identity editor.
Next, go to the Accounts configuration group. Here, you need to create at least one account for outgoing mail and one for incoming mail.
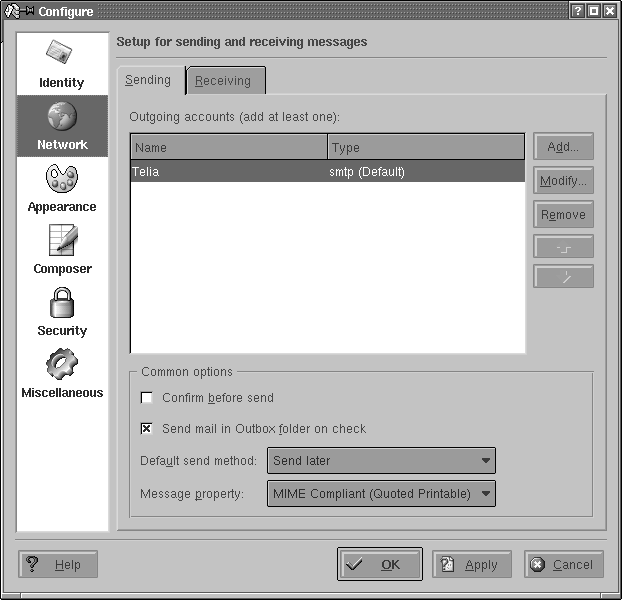
Let’s start with the outgoing mail, which you will find on the
Sending tab of the Configure dialog box (see Figure 6-3.) Click the Add
button. You will be asked whether you want to use SMTP or talk to a
Sendmail installation directly. In almost all
cases, if you have an MTA installed locally, you will want to select
SMTP. Then, on the General tab of the SMTP transport configuration,
give the transport a name (which you can choose arbitrarily because it
exists only for you to recognize the settings later and will not be
used in any network communication). In any case, you need to enter the
hostname of the port. The port is almost always 25; the hostname
should be given to you by your provider. If you have a local MTA
installed and want to use it, simply enter localhost. If your mail server requires
authentication (check with your provider if you are unsure), check the
appropriate checkbox and fill in the login name and password. This is
less common than you would think, however; most ISPs protect
themselves against being used as spam relays either by only accepting
outgoing mail from IP addresses that they have provided themselves, or
by asking you to fetch your email (which always requires a login)
first, and then sending outgoing email within a certain amount of
time.
This should be enough to let you send outgoing email, but we recommend that you take a few additional steps to make this as secure as possible. KMail makes this easy for you by autodetecting the security settings of the SMTP server you are using. Go to the Security tab and click the button labeled “Check what the server supports.” KMail will check the connection to the server and use the settings with the highest supported security and encryption. Alas, many providers run their mail servers without any encryption at all.
Now let’s continue by configuring the receiving end. Close all subdialogs until you are back at the Network configuration group, and select the Receiving tab. Here you can set up a number of accounts to be queried. This can be useful if you have more than one provider that stores email for you. Click the Add button and select the type of mail server. If you run your own MTA locally, you need to select Local Mailbox. Usually, you can then accept the defaults on the next page (but change the name to something more appropriate than “Default”).
If you retrieve your messages directly from your provider’s server, you need to select either POP3 or IMAP, depending on what your provider supports. In the dialog that appears again enter a name of your own choice, then specify your login name, your password, the name of the host that stores your email, and the port (usually 110 for POP3 and 143 for IMAP). All this information should be given to you by your provider or system administrator. You can leave all other options as they are for now, and experiment later with them.
As an aside, recent KMail versions have a feature for retrieving your messages that make it stand apart from many other email clients. Traditionally, the IMAP protocol required an online connection to the IMAP server that is storing your messages because no messages are stored locally. KMail, however, also sports a mode called disconnected IMAP that caches your messages locally so that you can both use the benefits of IMAP, such as having the same view on your mailbox from different computers (e.g., your workstation and your laptop), and still work offline when the need arises. Intelligent synchronization mechanisms make sure that all computers always have the same view of your mailbox (of course, only after you have performed synchronizations).
Close all dialogs with the OK button. You should now be ready to retrieve your email. To do so, select File → Check Mail from the menu. This will retrieve all messages from all incoming mailboxes that you have specified. If it does not work or you get any error messages, check all the values you entered on the various configuration pages again and compare them to the information given to you by your provider or system administrator. The most typical error is a typo in the hostname, username, or password.
If you are using disconnected IMAP, the Check Mail menu item does a lot more than checking the server mailbox for new messages: it ensures that the server and your local mailbox are in the same state, which may include deleting messages from the server, changing flags, and so forth.
To send a message, press Ctrl-N or select Message → New Message. A composer window opens where you can type in the recipient’s address, the subject, and the actual message body. An intelligent autocompletion will come up with suggestions as you type; these suggestions are pulled both from your address book (if you keep one) and from mails you have sent and received recently.
If you have configured more than one identity, you can also select the one to be used for this message. When you are done composing your message, press Ctrl-N. Depending on how you have configured your outgoing mail transport, the message will either be put into the output folder and wait there for further handling (this is the default) or be transmitted directly. If you want to override your setting for a particular email, just select Message → Queue or Message → Send Now from the menu bar of the composer window.
Messages put into the output folder are by default not sent automatically. (You can, however, configure KMail to always send messages in the outbox when it checks for incoming messages.) To send all messages in your outbox, select File → Send Queued from the menu bar of the main KMail menu. We have made it a habit never to send any message automatically and always review our outbox before sending the messages therein, which saves a lot of embarrassment that could result from sending email to the wrong people. Reviewing complaint mails that you have written in anger after your anger has cooled down may also keep you a few more friends and business contacts.
If you have problems sending your messages, check the settings you have made for typos. As mentioned earlier, to prevent the relaying of unsolicited commercial email (so-called spam) via their servers, some providers require that you check your mailbox on the server (providing your username and password as you go) in order to identify yourself before you can send any email via that server. After you have checked your incoming email, you have a certain period of time (often 15 minutes) to send your outgoing email.
You should now know enough about how to use KMail in order to continue exploring the mailer on your own. One of the first things you may want to do (especially if you have a large number of messages to handle everyday) is to create folders by selecting Folder → New Folder and then set up filters by selecting Settings → Configure Filters. This lets you redirect messages with certain characteristics (e.g., certain senders or subjects) to predefined folders. For example, you may want to gate all messages from a mailing list to a folder dedicated to that purpose. If all you want to do is file messages sent to a certain mailing list, recipient, or with a certain subject, you can also right-click on that message header and select Create Filter from the context menu that pops up; a submenu lets you select what to filter on. After selecting this, the filter configuration dialog will pop up with the criteria already filled in correctly; all you have to do is to specify what should happen to that message, such as moving it to a folder or deleting it right away.
If you find you are not only using KMail regularly but also the address book and calendaring components that come with the KDE desktop, KAddressbook and KOrganizer, and if you would like those applications to be integrated into a common main window, you should take a look at Kontact. It is a wrapper application that “swallows” the individual application components using the KParts technology and presents them with a common interface, as shown in Figure 6-4.
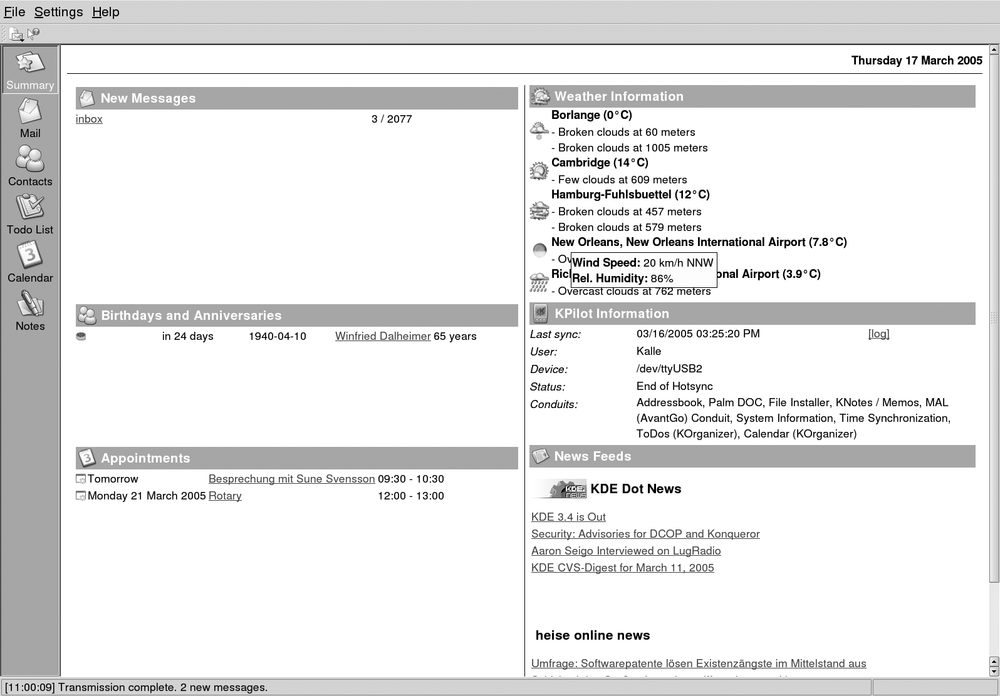
All the individual components that are available appear on the button bar on the left side of the window, where you can click on them to bring the respective component to the front. In most of the Kontact applications, these buttons also act as targets for drag-and-drop operations, which means you can, for example, drag an email message on to the Todo view button to create a new task based on that email. Experiment with dragging things onto the different buttons and see what happens.
It should be noted that the components available inside Kontact are exactly the same applications that are available standalone, such as KMail or KAddressbook. This means that you can start one of them individually, whenever you do not want to start Kontact for some reason, and keep working with the same data and settings. All of the functionality available in Kontact is also available with the standalone applications. Since Kontact uses KParts, it can be extended with other components, not just the ones that are shipped with it; several third-party components already exist, such as a news feed reader component. To find out which components are currently installed and available, use Select Components from the Settings menu.
One of the most prominent integrative features of Kontact is the summary view. Click the Summary button on the sidebar to activate it. The page that appears is filled with information from each of the application components. The mail part shows a configurable summary of folders with unread mail. Clicking one of the listed folders will take you directly into that folder in the mail part. Similarly, the calendaring component shows any upcoming events, birthdays of people in your address book, and currently open tasks. To configure the summary view in detail, select Configure Summary View from the Settings menu. The individual areas of the summary view can be rearranged by dragging them by the header area in recent versions of Kontact.