Table of Contents for
Running Linux, 5th Edition
 Running Linux, 5th Edition
Published by
O'Reilly Media, Inc., 2005
Running Linux, 5th Edition
Published by
O'Reilly Media, Inc., 2005
- Cover
- Running Linux, 5th Edition
- Preface
- Organization of This Book
- Conventions Used in This Book
- Using Code Examples
- How to Contact Us
- Safari® Enabled
- Acknowledgments
- I. Enjoying and Being Productive on Linux
- 1. Introduction to Linux
- 1.1. About This Book
- 1.2. Who’s Using Linux?
- 1.3. System Features
- 1.4. About Linux’s Copyright
- 1.5. Open Source and the Philosophy of Linux
- 1.6. Sources of Linux Information
- 1.7. Getting Help
- 2. Preinstallation and Installation
- 2.1. Distributions of Linux
- 2.2. Preparing to Install Linux
- 2.3. Post-Installation Procedures
- 2.4. Running into Trouble
- 3. Desktop Environments
- 3.1. Why Use a Graphical Desktop?
- 3.2. The K Desktop Environment
- 3.3. KDE Applications
- 3.4. The GNOME Desktop Environment
- 3.5. GNOME Applications
- 4. Basic Unix Commands and Concepts
- 4.1. Logging In
- 4.2. Setting a Password
- 4.3. Virtual Consoles
- 4.4. Popular Commands
- 4.5. Shells
- 4.6. Useful Keys and How to Get Them to Work
- 4.7. Typing Shortcuts
- 4.8. Filename Expansion
- 4.9. Saving Your Output
- 4.10. What Is a Command?
- 4.11. Putting a Command in the Background
- 4.12. Remote Logins and Command Execution
- 4.13. Manual Pages
- 4.14. Startup Files
- 4.15. Important Directories
- 4.16. Basic Text Editing
- 4.17. Advanced Shells and Shell Scripting
- 5. Web Browsers and Instant Messaging
- 5.1. The World Wide Web
- 5.2. Instant Messaging
- 6. Electronic Mail Clients
- 6.1. Using KMail
- 6.2. Using Mozilla Mail & News
- 6.3. Getting the Mail to Your Computer with fetchmail
- 6.4. OpenPGP Encryption with GnuPG
- 7. Games
- 7.1. Gaming
- 7.2. Quake III
- 7.3. Return to Castle Wolfenstein
- 7.4. Unreal Tournament 2004
- 7.5. Emulators
- 7.6. Frozen Bubble
- 7.7. Tux Racer
- 8. Office Suites and Personal Productivity
- 8.1. Using OpenOffice
- 8.2. KOffice
- 8.3. Other Word Processors
- 8.4. Synching PDAs
- 8.5. Groupware
- 8.6. Managing Your Finances
- 9. Multimedia
- 9.1. Multimedia Concepts
- 9.2. Kernel and Driver Issues
- 9.3. Embedded and Other Multimedia Devices
- 9.4. Desktop Environments
- 9.5. Windows Compatibility
- 9.6. Multimedia Applications
- 9.7. Multimedia Toolkits and Development Environments
- 9.8. Solutions to Common Problems
- 9.9. References
- II. System Administration
- 10. System Administration Basics
- 10.1. Maintaining the System
- 10.2. Managing Filesystems
- 10.3. Managing Swap Space
- 10.4. The /proc Filesystem
- 10.5. Device Files
- 10.6. Scheduling Recurring Jobs Using cron
- 10.7. Executing Jobs Once
- 10.8. Managing System Logs
- 10.9. Processes
- 10.10. Programs That Serve You
- 11. Managing Users, Groups, and Permissions
- 11.1. Managing User Accounts
- 11.2. File Ownership and Permissions
- 11.3. Changing the Owner, Group, and Permissions
- 12. Installing, Updating, and Compiling Programs
- 12.1. Upgrading Software
- 12.2. General Upgrade Procedure
- 12.3. Automated and Bulk Upgrades
- 12.4. Upgrading Software Not Provided in Packages
- 12.5. Archive and Compression Utilities
- 13. Networking
- 13.1. Networking with TCP/IP
- 13.2. Dial-Up PPP
- 13.3. PPP over ISDN
- 13.4. ADSL
- 13.5. Cable Modems
- 13.6. Network Diagnostics Tools
- 14. Printing
- 14.1. Printing
- 14.2. Managing Print Services
- 15. File Sharing
- 15.1. Sharing Files with Windows Systems (Samba)
- 15.2. NFS Configuration and NIS
- 16. The X Window System
- 16.1. A History of X
- 16.2. X Concepts
- 16.3. Hardware Requirements
- 16.4. Installing X.org
- 16.5. Configuring X.org
- 16.6. Running X
- 16.7. Running into Trouble
- 16.8. X and 3D
- 17. System Start and Shutdown
- 17.1. Booting the System
- 17.2. System Startup and Initialization
- 17.3. Single-User Mode
- 17.4. Shutting Down the System
- 17.5. A Graphical Runlevel Editor: KSysV
- 18. Configuring and Building the Kernel
- 18.1. Building a New Kernel
- 18.2. Loadable Device Drivers
- 18.3. Loading Modules Automatically
- 19. Text Editing
- 19.1. Editing Files Using vi
- 19.2. The (X)Emacs Editor
- 20. Text Processing
- 20.1. TeX and LaTeX
- 20.2. XML and DocBook
- 20.3. groff
- 20.4. Texinfo
- III. Programming
- 21. Programming Tools
- 21.1. Programming with gcc
- 21.2. Makefiles
- 21.3. Debugging with gdb
- 21.4. Useful Utilities for C Programmers
- 21.5. Using Perl
- 21.6. Java
- 21.7. Python
- 21.8. Other Languages
- 21.9. Introduction to OpenGL Programming
- 21.10. Integrated Development Environments
- 22. Running a Web Server
- 22.1. Configuring Your Own Web Server
- 23. Transporting and Handling Email Messages
- 23.1. The Postfix MTA
- 23.2. Procmail
- 23.3. Filtering Spam
- 24. Running an FTP Server
- 24.1. Introduction
- 24.2. Compiling and Installing
- 24.3. Running ProFTPD
- 24.4. Configuration
- IV. Network Services
- 25. Running Web Applications with MySQL and PHP
- 25.1. MySQL
- 25.2. PHP
- 25.3. The LAMP Server in Action
- 26. Running a Secure System
- 26.1. A Perspective on System Security
- 26.2. Initial Steps in Setting Up a Secure System
- 26.3. TCP Wrapper Configuration
- 26.4. Firewalls: Filtering IP Packets
- 26.5. SELinux
- 27. Backup and Recovery
- 27.1. Making Backups
- 27.2. What to Do in an Emergency
- 28. Heterogeneous Networking and Running Windows Programs
- 28.1. Sharing Partitions
- 28.2. Emulation and Virtual Operating Systems
- 28.3. Remote Desktop Access to Windows Programs
- 28.4. FreeNX: Linux as a Remote Desktop Server
- A. Sources of Linux Information
- A.1. Linux Documentation Project
- A.2. FTP Sites
- A.3. World Wide Web Sites
- About the Authors
- Colophon
- Copyright
Some FPS games attempt to shun the stereotype that FPS games lack depth and generally rely more on quick reflexes than thinking or strategy by adding a basic storyline along with a single-person mode. The storyline usually puts the character in some sort of hostile environment as a pretense to fire at anything that moves. The fact is, however, that while some players might play through the single-person mode now and then, the majority spend their time in a head-to-head deathmatch with other players.
The Unreal Tournament (UT) series has no such pretense, and instead focuses completely on arena-style play. Because of this focus, UT has become the favorite for many players over the Net, as it includes many different arena maps and styles of network play, from basic deathmatch and capture the flag to bombing runs and other games that start to blur the line between an FPS and the sports genre.
Like its predecessors Unreal Tournament and Unreal Tournament 2003, Unreal Tournament 2004 (or UT2K4) has native Linux support both for the client and the server. Unlike many other Linux-native FPSs from other companies, however, UT2K4 ships with the Linux binaries and installer in the same box as the Windows binaries. This means you don’t have to search for a fast mirror and download a large .sh file, much less wait for weeks or months for a Linux port—you can get to gaming immediately.
UT2K4 chooses its installation directory based on what user runs the installer. If a regular user starts the installer, UT2K4 creates a ut2004 directory under the user’s home directory. Although the game will run fine for a single user either way, if you do have root privileges on a machine, it is better to install it for every user in case you decide to switch users. If you run linux-installer.sh as root, it will install to /usr/local/games/ut2004/ by default and be made available to all users on the system.
To install UT2K4, mount CD1, also labeled the Install Disc, on your Linux system and execute the file called linux-installer.sh. Most file managers will execute the file if you click on it; otherwise, you can open a terminal and type:
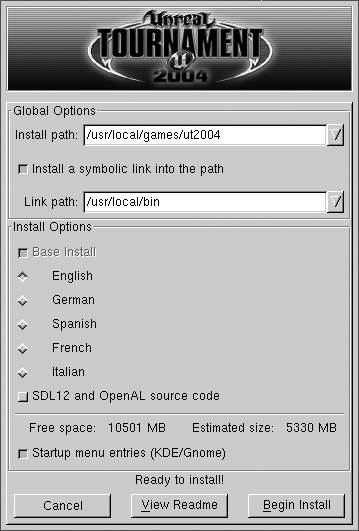
# /mnt/cdrom/linux-installer.sh &After you accept the licensing agreement, you will see the primary screen for the Linux installer, as shown in Figure 7-5.
In this primary screen you can change many of the installation settings, including where to install, what language to use, and whether to add menu entries for KDE and GNOME. The install uses about 5 GB of space, so make sure you have enough free space cleared up; otherwise, the Begin Install button will be disabled. Once you click Begin Install, the installer will prompt you for your CD key and then start copying files from the CD-ROM to the hard drive. If you purchased the default CD edition of UT2K4, you will be prompted to switch CDs throughout the process. If you purchased the DVD special edition, you can install the full game without swapping discs.
Once the install finishes, you can click the Start button in the final window to start the game, you can select it from your KDE or GNOME menu, or you can simply type ut2004 in a terminal. Unlike in Windows, you do not need to have the play disc mounted in the CD-ROM drive to play.
One of the first things you will want to do when you start UT2K4 for the first time is go over all of the configuration settings and key bindings and make sure they are to your liking. All of these settings can be configured in the Settings menu on the main screen. All of the game options, from screen resolution to special visual effects and your player’s skin and name, can be configured here. Your options and saved games are then stored in the ~/.ut2004 directory. You can even tweak the text configuration files (they end in .ini) under ~/.ut2004/System/ by hand if you so choose.
UT2K4 has a variety of play options. The first is to play in single-player mode, which places you as the captain of a team of arena fighters you choose. Your team then moves up the ranks playing different types of team games:
- Capture the Flag
Like traditional capture the flag in other FPSs, your team attempts to penetrate the opposing team’s base, grab its flag, and return it to your flag while preventing them from doing the same to you. You score points for each flag you capture.
- Bombing Run
This game is a bit like basketball. A ball is placed in the middle of the map, and each team has a goal on its side. Points are scored when a player picks up the ball and fires it through the opposing team’s goal. If you kill the player with the ball, the ball is dropped and you can pick it up.
- Double Domination
A variant on capture the flag, in this game the map has two “domination points” that are initially set to neutral. The object is to run over both domination points, which sets them to your side, and keep both domination points set for 10 seconds to score.
- Assault
This game operates with a series of rounds. Each round-one team takes the role of attacker and the other takes the role of defender. The attacker team has a series of goals to accomplish within a time limit, such as reaching a certain location on the map, and the defender team tries to stop them. Once the round is over, the roles reverse.
Single-player mode is useful to get acquainted with the different maps and game types, as the game slowly increases in difficulty. Your progress is saved at each point in the game, so you can pick up where you left off last time. If you want to get right to the action instead, try Instant Action. This lets you choose the type of game and map to play on, along with the number of bots and their difficulty. Instant Action is useful to hone skills on a certain map or to practice without applying wins or losses to your single-player record.
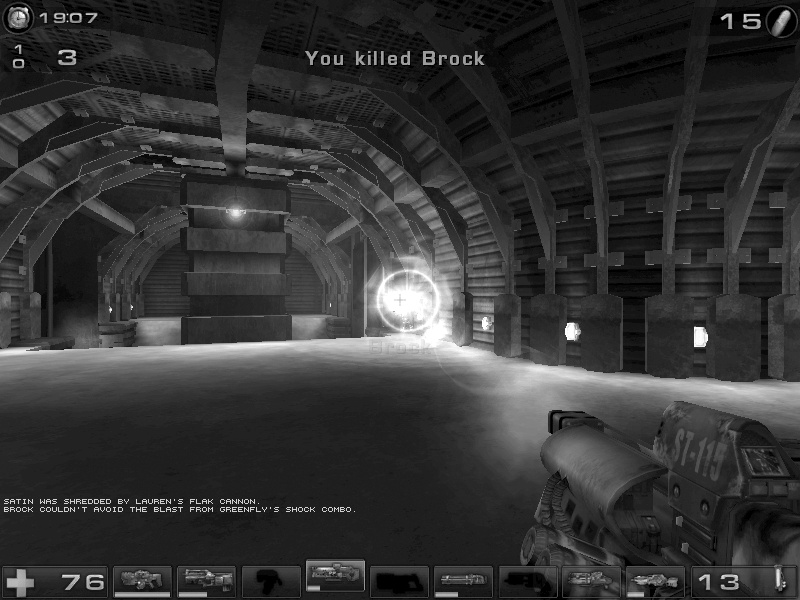
Be sure to become acquainted with each of the different weapons and their alternate firing modes. Also, some weapons offer combos, such as the shock rifle. Fire the alternate fire on the shock rifle to send a plasma charge, and then fire on that charge with the primary fire to create a large explosion that causes a great deal of damage (Figure 7-6). The most successful players are those who have mastered multiple weapons and can quickly switch between them as necessary.
If you are ready to play against others on the Internet or at a LAN party, click Join Game. You can then choose whether to search for LAN or Internet games, and UT2K4 will search and list all the available games. Joining in is as simple as selecting a game and clicking Join, but keep in mind that the lower your ping to a server, the more responsive game play will be.
You can also host your own UT2K4 server as the Host Game option. This lets you configure your own game scenario much like with Instant Action, so you can choose maps, number of players, number of bots, and other settings, and then start your own custom server that others can join whether on the local LAN or on the Internet. Once you have configured your server, you can either click Listen or Dedicated to start the server. Listen starts the server and immediately connects you to it. Dedicated starts the server in the background and exits, which is ideal if you want to host a server but not play yourself. You can also start a dedicated server directly from the command line. Change to the ut2004/System directory, and then run ucc with the server argument, and then the name of the map to use:
#cd /usr/local/games/ut2004/System#./ucc server DOM-SunTemple
Another advantage to starting the server this way is that you can run servers on machines with no 3D acceleration or graphics support at all. All of the options you can change inside the GUI can be changed on the command line as well, and there are a number of tutorials on the Internet that cover the different command-line options. If you have configured previous Unreal Tournament servers, you will find that many of the options are the same in UT2K4.
If you intend on playing UT2K4 on the Internet, you will want to keep up with your patches. Sometimes patches fix more than bugs — they prevent cheats, so in that case you will need the latest patch to connect to a server. Patches are announced on the official Unreal Tournament site at www.unrealtournament.com, but check sites such as www.icculus.org and www.linuxgames.com for links to the Linux patches. Click Join Game and you will see your current version in the upper right-hand corner.
These patches come in .tar.bz2 format, and to apply them you will want to first extract the patch directory and then overwite your current files with the patched version:
#tar -xjf ut2004-lnxpatchversion.tar.bz2#cd UT2004-Patch#/bin/cp -a * /usr/local/games/ut2004/