Table of Contents for
Running Linux, 5th Edition
 Running Linux, 5th Edition
Published by
O'Reilly Media, Inc., 2005
Running Linux, 5th Edition
Published by
O'Reilly Media, Inc., 2005
- Cover
- Running Linux, 5th Edition
- Preface
- Organization of This Book
- Conventions Used in This Book
- Using Code Examples
- How to Contact Us
- Safari® Enabled
- Acknowledgments
- I. Enjoying and Being Productive on Linux
- 1. Introduction to Linux
- 1.1. About This Book
- 1.2. Who’s Using Linux?
- 1.3. System Features
- 1.4. About Linux’s Copyright
- 1.5. Open Source and the Philosophy of Linux
- 1.6. Sources of Linux Information
- 1.7. Getting Help
- 2. Preinstallation and Installation
- 2.1. Distributions of Linux
- 2.2. Preparing to Install Linux
- 2.3. Post-Installation Procedures
- 2.4. Running into Trouble
- 3. Desktop Environments
- 3.1. Why Use a Graphical Desktop?
- 3.2. The K Desktop Environment
- 3.3. KDE Applications
- 3.4. The GNOME Desktop Environment
- 3.5. GNOME Applications
- 4. Basic Unix Commands and Concepts
- 4.1. Logging In
- 4.2. Setting a Password
- 4.3. Virtual Consoles
- 4.4. Popular Commands
- 4.5. Shells
- 4.6. Useful Keys and How to Get Them to Work
- 4.7. Typing Shortcuts
- 4.8. Filename Expansion
- 4.9. Saving Your Output
- 4.10. What Is a Command?
- 4.11. Putting a Command in the Background
- 4.12. Remote Logins and Command Execution
- 4.13. Manual Pages
- 4.14. Startup Files
- 4.15. Important Directories
- 4.16. Basic Text Editing
- 4.17. Advanced Shells and Shell Scripting
- 5. Web Browsers and Instant Messaging
- 5.1. The World Wide Web
- 5.2. Instant Messaging
- 6. Electronic Mail Clients
- 6.1. Using KMail
- 6.2. Using Mozilla Mail & News
- 6.3. Getting the Mail to Your Computer with fetchmail
- 6.4. OpenPGP Encryption with GnuPG
- 7. Games
- 7.1. Gaming
- 7.2. Quake III
- 7.3. Return to Castle Wolfenstein
- 7.4. Unreal Tournament 2004
- 7.5. Emulators
- 7.6. Frozen Bubble
- 7.7. Tux Racer
- 8. Office Suites and Personal Productivity
- 8.1. Using OpenOffice
- 8.2. KOffice
- 8.3. Other Word Processors
- 8.4. Synching PDAs
- 8.5. Groupware
- 8.6. Managing Your Finances
- 9. Multimedia
- 9.1. Multimedia Concepts
- 9.2. Kernel and Driver Issues
- 9.3. Embedded and Other Multimedia Devices
- 9.4. Desktop Environments
- 9.5. Windows Compatibility
- 9.6. Multimedia Applications
- 9.7. Multimedia Toolkits and Development Environments
- 9.8. Solutions to Common Problems
- 9.9. References
- II. System Administration
- 10. System Administration Basics
- 10.1. Maintaining the System
- 10.2. Managing Filesystems
- 10.3. Managing Swap Space
- 10.4. The /proc Filesystem
- 10.5. Device Files
- 10.6. Scheduling Recurring Jobs Using cron
- 10.7. Executing Jobs Once
- 10.8. Managing System Logs
- 10.9. Processes
- 10.10. Programs That Serve You
- 11. Managing Users, Groups, and Permissions
- 11.1. Managing User Accounts
- 11.2. File Ownership and Permissions
- 11.3. Changing the Owner, Group, and Permissions
- 12. Installing, Updating, and Compiling Programs
- 12.1. Upgrading Software
- 12.2. General Upgrade Procedure
- 12.3. Automated and Bulk Upgrades
- 12.4. Upgrading Software Not Provided in Packages
- 12.5. Archive and Compression Utilities
- 13. Networking
- 13.1. Networking with TCP/IP
- 13.2. Dial-Up PPP
- 13.3. PPP over ISDN
- 13.4. ADSL
- 13.5. Cable Modems
- 13.6. Network Diagnostics Tools
- 14. Printing
- 14.1. Printing
- 14.2. Managing Print Services
- 15. File Sharing
- 15.1. Sharing Files with Windows Systems (Samba)
- 15.2. NFS Configuration and NIS
- 16. The X Window System
- 16.1. A History of X
- 16.2. X Concepts
- 16.3. Hardware Requirements
- 16.4. Installing X.org
- 16.5. Configuring X.org
- 16.6. Running X
- 16.7. Running into Trouble
- 16.8. X and 3D
- 17. System Start and Shutdown
- 17.1. Booting the System
- 17.2. System Startup and Initialization
- 17.3. Single-User Mode
- 17.4. Shutting Down the System
- 17.5. A Graphical Runlevel Editor: KSysV
- 18. Configuring and Building the Kernel
- 18.1. Building a New Kernel
- 18.2. Loadable Device Drivers
- 18.3. Loading Modules Automatically
- 19. Text Editing
- 19.1. Editing Files Using vi
- 19.2. The (X)Emacs Editor
- 20. Text Processing
- 20.1. TeX and LaTeX
- 20.2. XML and DocBook
- 20.3. groff
- 20.4. Texinfo
- III. Programming
- 21. Programming Tools
- 21.1. Programming with gcc
- 21.2. Makefiles
- 21.3. Debugging with gdb
- 21.4. Useful Utilities for C Programmers
- 21.5. Using Perl
- 21.6. Java
- 21.7. Python
- 21.8. Other Languages
- 21.9. Introduction to OpenGL Programming
- 21.10. Integrated Development Environments
- 22. Running a Web Server
- 22.1. Configuring Your Own Web Server
- 23. Transporting and Handling Email Messages
- 23.1. The Postfix MTA
- 23.2. Procmail
- 23.3. Filtering Spam
- 24. Running an FTP Server
- 24.1. Introduction
- 24.2. Compiling and Installing
- 24.3. Running ProFTPD
- 24.4. Configuration
- IV. Network Services
- 25. Running Web Applications with MySQL and PHP
- 25.1. MySQL
- 25.2. PHP
- 25.3. The LAMP Server in Action
- 26. Running a Secure System
- 26.1. A Perspective on System Security
- 26.2. Initial Steps in Setting Up a Secure System
- 26.3. TCP Wrapper Configuration
- 26.4. Firewalls: Filtering IP Packets
- 26.5. SELinux
- 27. Backup and Recovery
- 27.1. Making Backups
- 27.2. What to Do in an Emergency
- 28. Heterogeneous Networking and Running Windows Programs
- 28.1. Sharing Partitions
- 28.2. Emulation and Virtual Operating Systems
- 28.3. Remote Desktop Access to Windows Programs
- 28.4. FreeNX: Linux as a Remote Desktop Server
- A. Sources of Linux Information
- A.1. Linux Documentation Project
- A.2. FTP Sites
- A.3. World Wide Web Sites
- About the Authors
- Colophon
- Copyright
Python has gained a lot of attention lately because it is a powerful mixture of different programming paradigms and styles. For example, it is one of the very few interpreted object-oriented programming languages (Perl being another example, but only relatively late in its existence). Python fans say it is especially easy to learn. Python was written and designed almost entirely by Guido van Rossum, who chose the name because he wrote the interpreter while watching reruns of the British TV show Monty Python’s Flying Circus. The language is introduced in Learning Python and covered in detail in Programming Python (both published by O’Reilly).
As nice and useful as Perl is, it has one disadvantage—or at least many people think so—namely, that you can write the same code in many different ways. This has given Perl the reputation that it’s easy to write code in Perl, but hard to read it. (The point is that another programmer might do things differently from you, and you might therefore not be used to reading that style.) This means that Perl might not be the right choice for developing code that later must be maintained for years to come.
If you normally develop software in C, C++, or Java, and from time to time you want to do some scripting, you might find that Perl’s syntax is too different from what you are normally used to—for example, you need to type a dollar in front of a variable:
foreach $user ...
Before we look into a bit more detail at what Python is, let us suggest that whether you choose to program in Perl or Python is largely a matter of “religion,” just as it is a matter of “religion” whether you use Emacs or vi, or whether you use KDE or GNOME. Perl and Python both fill the gap between real languages such as C, C++, and Java, and scripting languages such as the language built into bash, tcsh or zsh.
In contrast to Perl, Python was designed from the beginning to be a real programming language, with many of the constructs inspired from C. This does undoubtedly mean that Python programs are easier to read than Perl ones, even though they might come out slightly longer.
Python is an object-oriented language, but you do not need to program in an object-oriented fashion if you do not want to. This makes it possible for you to start your scripting without worrying about object orientation; as you go along and your script gets longer and more complicated, you can easily convert it to use objects.
Python scripts are interpreted, which means that you do not need to wait for a long compilation process to take place. Python programs are internally byte-compiled on the fly, which ensures that they still run at an acceptable speed. In normal daily use, you don’t really notice all this, except for the fact that when you write a .py file, Python will create a .pyc file.
Python has lists, tuples, strings, and associative arrays (or, in Python lingo, dictionaries) built into the syntax of the language, which makes working with these types very easy.
Python comes with an extensive library, similar in power to what we saw previously for Perl. See http://www.python.org/doc/current/lib/lib.html for a complete library reference.
Most programming languages are best explained using examples, so let’s look at a Python version of the last log statistics script we previously developed using Perl. Your first impression of the script might very well be that it is way longer than the Perl script. Remember that we are forcing Python to “compete” here in the area where Perl is most powerful. To compensate, we find that this script is more straightforward to read.
Also notice the indentation. Whereas indentation is optional in most other languages and just makes the code more readable, it is required in Python and is one of its characterizing features.
1    #!/usr/bin/python
2
3    import sys, re, string
4
5    minutes = {  }
6    count = {  }
7    line = sys.stdin.readline()
8    while line:
9      match = re.match( "^(\S*)\s*.*\(([0-9]+):([0-9]+)\)\s*$", line )
10     if match:
11       user = match.group(1)
12       time = string.atoi(match.group(2))*60 + string.atoi(match.group(3))
13       if not count.has_key( user ):
14         minutes[ user ] = 0
15         count[ user ]   = 0
16       minutes[ user ] += time
17       count[user] += 1
18     line = sys.stdin.readline()
19
20   for user in count.keys():
21     hour = `minutes[user]/60`
22     min = minutes[user] % 60
23     if min < 10:
24       minute = "0" + `min`
25     else:
26       minute = `min`
27     print "User " + user + ", total login time " + \
28           hour + ":" + minute + \
29           ", total logins " + `count[user]`
The script should be self-explanatory, with a few exceptions.
On line 3 we import the libraries we want to use. Having imported
string, for instance, we may use
it as in line 12, where we use the method atoi from the library string.
On lines 5 and 6 we initialize two dictionaries. In contrast
to Perl, we need to initialize them before we can assign values to
them. Line 7 reads a line from standard input. When no more lines
can be read, the readline method
returns None, which is the
equivalent to a null pointer.
Line 9 matches the line read from stdin against a regular expression, and
returns a match object as a result of matching. This object contains
a method for accessing the subparts of the match. Line 21 converts
the result of the division minutes[user]/60 to a string. This is done
using two backquotes.
In this section we look into developing a slightly more complicated application, which uses classes. The application is a reverse Polish notation calculator, and can be seen in Figure 21-1. For developing the graphical user interface, we use the Qt library, which is a C++ library wrapped for many different languages, such as Perl, Python, and Java.
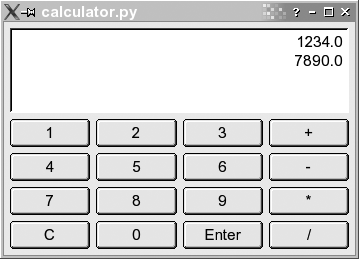
The program consists of two classes: Display, which is the area displaying the
numbers, and Calculator, which is
a class for the calculator:
1   #!/usr/bin/python
2   import sys, string
3   from qt import *
4
5   class Display(QTextEdit):
6     def _ _init_ _( self, parent ):
7       QTextEdit._ _init_ _( self, parent )
8       self.setAlignment( Qt.AlignRight )
9       self.setReadOnly( 1 )
10
11    def pop( self ):
12      lines = self.paragraphs()
13      if lines =  = 0:
14        return 0
15
16      res = QString.stripWhiteSpace(self.text( lines-1 ))
17      self.removeParagraph(lines-1)
18
19      if ( res.isEmpty() ):
20        return 0
21
22      return res.toFloat()[0]
23
24    def push( self, txt ):
25      self.append( `txt` )
26
27  class Calculator(QDialog):
28    # Constructor
29    def _ _init_ _(self, parent):
30      QDialog._ _init_ _(self, parent)
31      vlay = QVBoxLayout( self, 6 )
32      self.insertMode = 0
33
34      # Create display
35      self.edit = Display( self )
36      vlay.addWidget( self.edit )
37
38      # Create button array
39      index = 0
40      for txt in [ "1", "2", "3", "+", "4", "5", "6", "-", "7", "8", "9", \
41                   "*", "C", "0", "Enter", "/" ]:
42        if (index%4) =  = 0:
43          hlay = QHBoxLayout( vlay )
44        index = index+1
45
46        but = QPushButton( txt, self )
47        but.setAutoDefault(0)
48        QObject.connect( but, SIGNAL( "clicked()" ), self.buttonClicked )
49        hlay.addWidget( but )
50
51    # Function reacting on button clicks
52    def buttonClicked(self):
53      txt = self.sender().text() # Text on button pressed.
54      if txt =  = "Enter":
55        self.insertMode = 0
56
57      elif txt in [ "+", "-", "*", "/" ]:
58        val1 = self.edit.pop()
59        val2 = self.edit.pop()
60        self.edit.push( self.evaluate( val2, val1, txt ) )
61        self.insertMode = 0
62
63      elif txt =  = "C":
64        self.edit.pop()
65        self.insertMode = 0
66
67      else: # A number pressed.
68        if self.insertMode:
69          val = self.edit.pop()
70        else:
71          self.insertMode = 1
72          val = 0
73        val = val*10+ txt.toFloat()[0]
74        self.edit.push(val)
75
76    def evaluate( self, arg1, arg2, op ):
77      if ( op =  = "+" ):
78        return arg1 + arg2
79      elif ( op =  = "-" ):
80        return arg1 - arg2
81      elif ( op =  = "*" ):
82        return arg1 * arg2
83      elif (op =  = "/" ):
84        return arg1 / arg2
85
86  # Main
87  app=QApplication(sys.argv)
88  cal = Calculator(None)
89  cal.show()
90  app.exec_loop()
The code may at first look like a lot of work; on the other hand, with only 90 lines of code we have developed a working application with a graphical user interface. Most of the work is really handled by Qt, and since this is not a book on programming with Qt, we will not delve into these issues too much. Let’s have a look at the code snippet by snippet.
Let’s start where execution of our application starts — namely, at lines 86 through 90. Of course execution starts on line 1, but the first 85 lines merely defined the classes, which doesn’t result in any code being executed.
Line 87 creates an instance of the class QApplication, in contrast to other
languages such as Java or C++, you do not use the keyword new to create an instance — you simply
name the class. The class QApplication comes from
qt.py, which we include in a special way on
line 3: we say that all symbols from that module should be included
into our namespace, so we do not need to write qt.QApplication. Doing it this way is
seldom a good idea, but it is OK in our situation, as all classes
from Qt already are namespaced by an initial
letter, namely Q.
The QApplication instance
we create on line 87 is the magical object that makes Qt process
events and so forth. We start this event processing by calling the
method enter_loop() on line 90.
Details on this are beyond the scope of this book and are not needed
for understanding the example.
On line 88 we create an instance of the class Calculator, and on line 89 we call the
method show(), which takes care
of mapping the dialog on the screen.
Now let’s have a look at the class Display on lines 5 to 25. This class
inherits the class QTextEdit,
which is a widget for editing multiple lines of text. Inheriting is
done on line 5, where we specify the superclass in parentheses.
Multiple inheritance is also possible, in which case you would
simply write each superclass as a comma-separated list within the
parentheses.
Line 6 is the constructor of the class. The constructor is implicitly called whenever an instance of the class is created. The first argument is a reference to the instance itself. This reference is needed whenever a method of the instance is to be called.[*]
Line 7 is a call to the constructor of the superclass. We need to call the constructor of the superclass to be able to hand on the parent reference to the superclass. The parent reference is, among other things, needed to get the layout working in our GUI.
On lines 8 and 9 you see methods called on the object itself. These methods are defined in the superclass, but could of course have been from the class itself.[*]
On lines 11 to 22 we have a definition of the method pop(). Again notice how we get a
reference to the object itself as the first argument of the
function. When calling this method, you do not hand it a reference
as the first argument, Python will take care of doing so itself. On
line 58 you can see such a call.
The implementation of the pop() and push() methods involves mostly Qt issues
that we do not care about in this context. So let’s just shortly
outline what they do. The push() method appends a number to the end
of the text edit, whereas pop()
does the opposite — namely taking the last line of the text edit,
converting it into a number, and returning it.
Now let’s turn our focus to the class Calculator, which is our GUI class that
you see on screen. To be a Qt dialog, it must inherit QDialog, as we see it do on line
27.
Once again, the code is mostly about Qt, and as such not too
interesting in this context. There is one Python construct we still
haven’t seen, though: instance variables . On lines 32, 55, 61, 65, and 71 we assign to the
variable self.insertMode, and on
line 68 we read this variable. Due to the self. part of the variable name, it is a
variable that is local to the object, which is called an
instance variable. Had we had several
instances of the Calculator
class, then each of these objects would have had its own copy of the
insertMode variable. In contrast
to languages such as C++ and Java, you do not need to declare an
instance variable. The first time you assign to it, it will jump
into existence, just like local variables do.
You can read all about Python at http://www.python.org or in Learning Python and Programming Python. If you are interested in learning more about Qt, then Programming with Qt (O’Reilly) might be interesting to you. There is also at least one book dedicated to developing Qt programs in Python: Gui Programming With Python: Using the Qt Toolkit (Opendocs).
[*] In languages such as C++ and Java, you do not need to
explicitly specify the object when calling methods on it from
within member functions. This is needed in Python, however,
where we couldn’t have replaced line 8 with setAlignment( Qt.AlignRight ).
[*] All methods in Python are virtual, as is the case in Java, and unlike how it is in C++.