Table of Contents for
Running Linux, 5th Edition
 Running Linux, 5th Edition
Published by
O'Reilly Media, Inc., 2005
Running Linux, 5th Edition
Published by
O'Reilly Media, Inc., 2005
- Cover
- Running Linux, 5th Edition
- Preface
- Organization of This Book
- Conventions Used in This Book
- Using Code Examples
- How to Contact Us
- Safari® Enabled
- Acknowledgments
- I. Enjoying and Being Productive on Linux
- 1. Introduction to Linux
- 1.1. About This Book
- 1.2. Who’s Using Linux?
- 1.3. System Features
- 1.4. About Linux’s Copyright
- 1.5. Open Source and the Philosophy of Linux
- 1.6. Sources of Linux Information
- 1.7. Getting Help
- 2. Preinstallation and Installation
- 2.1. Distributions of Linux
- 2.2. Preparing to Install Linux
- 2.3. Post-Installation Procedures
- 2.4. Running into Trouble
- 3. Desktop Environments
- 3.1. Why Use a Graphical Desktop?
- 3.2. The K Desktop Environment
- 3.3. KDE Applications
- 3.4. The GNOME Desktop Environment
- 3.5. GNOME Applications
- 4. Basic Unix Commands and Concepts
- 4.1. Logging In
- 4.2. Setting a Password
- 4.3. Virtual Consoles
- 4.4. Popular Commands
- 4.5. Shells
- 4.6. Useful Keys and How to Get Them to Work
- 4.7. Typing Shortcuts
- 4.8. Filename Expansion
- 4.9. Saving Your Output
- 4.10. What Is a Command?
- 4.11. Putting a Command in the Background
- 4.12. Remote Logins and Command Execution
- 4.13. Manual Pages
- 4.14. Startup Files
- 4.15. Important Directories
- 4.16. Basic Text Editing
- 4.17. Advanced Shells and Shell Scripting
- 5. Web Browsers and Instant Messaging
- 5.1. The World Wide Web
- 5.2. Instant Messaging
- 6. Electronic Mail Clients
- 6.1. Using KMail
- 6.2. Using Mozilla Mail & News
- 6.3. Getting the Mail to Your Computer with fetchmail
- 6.4. OpenPGP Encryption with GnuPG
- 7. Games
- 7.1. Gaming
- 7.2. Quake III
- 7.3. Return to Castle Wolfenstein
- 7.4. Unreal Tournament 2004
- 7.5. Emulators
- 7.6. Frozen Bubble
- 7.7. Tux Racer
- 8. Office Suites and Personal Productivity
- 8.1. Using OpenOffice
- 8.2. KOffice
- 8.3. Other Word Processors
- 8.4. Synching PDAs
- 8.5. Groupware
- 8.6. Managing Your Finances
- 9. Multimedia
- 9.1. Multimedia Concepts
- 9.2. Kernel and Driver Issues
- 9.3. Embedded and Other Multimedia Devices
- 9.4. Desktop Environments
- 9.5. Windows Compatibility
- 9.6. Multimedia Applications
- 9.7. Multimedia Toolkits and Development Environments
- 9.8. Solutions to Common Problems
- 9.9. References
- II. System Administration
- 10. System Administration Basics
- 10.1. Maintaining the System
- 10.2. Managing Filesystems
- 10.3. Managing Swap Space
- 10.4. The /proc Filesystem
- 10.5. Device Files
- 10.6. Scheduling Recurring Jobs Using cron
- 10.7. Executing Jobs Once
- 10.8. Managing System Logs
- 10.9. Processes
- 10.10. Programs That Serve You
- 11. Managing Users, Groups, and Permissions
- 11.1. Managing User Accounts
- 11.2. File Ownership and Permissions
- 11.3. Changing the Owner, Group, and Permissions
- 12. Installing, Updating, and Compiling Programs
- 12.1. Upgrading Software
- 12.2. General Upgrade Procedure
- 12.3. Automated and Bulk Upgrades
- 12.4. Upgrading Software Not Provided in Packages
- 12.5. Archive and Compression Utilities
- 13. Networking
- 13.1. Networking with TCP/IP
- 13.2. Dial-Up PPP
- 13.3. PPP over ISDN
- 13.4. ADSL
- 13.5. Cable Modems
- 13.6. Network Diagnostics Tools
- 14. Printing
- 14.1. Printing
- 14.2. Managing Print Services
- 15. File Sharing
- 15.1. Sharing Files with Windows Systems (Samba)
- 15.2. NFS Configuration and NIS
- 16. The X Window System
- 16.1. A History of X
- 16.2. X Concepts
- 16.3. Hardware Requirements
- 16.4. Installing X.org
- 16.5. Configuring X.org
- 16.6. Running X
- 16.7. Running into Trouble
- 16.8. X and 3D
- 17. System Start and Shutdown
- 17.1. Booting the System
- 17.2. System Startup and Initialization
- 17.3. Single-User Mode
- 17.4. Shutting Down the System
- 17.5. A Graphical Runlevel Editor: KSysV
- 18. Configuring and Building the Kernel
- 18.1. Building a New Kernel
- 18.2. Loadable Device Drivers
- 18.3. Loading Modules Automatically
- 19. Text Editing
- 19.1. Editing Files Using vi
- 19.2. The (X)Emacs Editor
- 20. Text Processing
- 20.1. TeX and LaTeX
- 20.2. XML and DocBook
- 20.3. groff
- 20.4. Texinfo
- III. Programming
- 21. Programming Tools
- 21.1. Programming with gcc
- 21.2. Makefiles
- 21.3. Debugging with gdb
- 21.4. Useful Utilities for C Programmers
- 21.5. Using Perl
- 21.6. Java
- 21.7. Python
- 21.8. Other Languages
- 21.9. Introduction to OpenGL Programming
- 21.10. Integrated Development Environments
- 22. Running a Web Server
- 22.1. Configuring Your Own Web Server
- 23. Transporting and Handling Email Messages
- 23.1. The Postfix MTA
- 23.2. Procmail
- 23.3. Filtering Spam
- 24. Running an FTP Server
- 24.1. Introduction
- 24.2. Compiling and Installing
- 24.3. Running ProFTPD
- 24.4. Configuration
- IV. Network Services
- 25. Running Web Applications with MySQL and PHP
- 25.1. MySQL
- 25.2. PHP
- 25.3. The LAMP Server in Action
- 26. Running a Secure System
- 26.1. A Perspective on System Security
- 26.2. Initial Steps in Setting Up a Secure System
- 26.3. TCP Wrapper Configuration
- 26.4. Firewalls: Filtering IP Packets
- 26.5. SELinux
- 27. Backup and Recovery
- 27.1. Making Backups
- 27.2. What to Do in an Emergency
- 28. Heterogeneous Networking and Running Windows Programs
- 28.1. Sharing Partitions
- 28.2. Emulation and Virtual Operating Systems
- 28.3. Remote Desktop Access to Windows Programs
- 28.4. FreeNX: Linux as a Remote Desktop Server
- A. Sources of Linux Information
- A.1. Linux Documentation Project
- A.2. FTP Sites
- A.3. World Wide Web Sites
- About the Authors
- Colophon
- Copyright
The original purpose of the computer was to automate routine tasks. If you must back up your disk at 1:00 A.M. every day, why should you have to enter the commands manually each time—particularly if it means getting out of bed? You should be able to tell the computer to do it and then forget about it. On Unix systems, cron exists to perform this automating function. Briefly, you use cron by running the crontab command and entering lines in a special format recognized by cron. Each line specifies a command to run and when to run it.
Behind your back, crontab saves your commands in a file bearing your username in the /var/spool/cron /crontabs directory. (For instance, the crontab file for user mdw would be called /var/spool/cron/crontabs/mdw.) A daemon called crond reads this file regularly and executes the commands at the proper times. One of the rc files on your system starts up crond when the system boots. There actually is no command named cron, only the crontab utility and the crond daemon.
On some systems, use of cron is limited to the root user. In any case, let’s look at a useful command you might want to run as root and show how you’d specify it as a crontab entry. Suppose that every day you’d like to clean old files out of the /tmp directory, which is supposed to serve as temporary storage for files created by lots of utilities.
Notice that cron never writes anything to
the console. All output and error messages are sent as an email
message to the user who owns the corresponding crontab. You can override this setting by
specifying MAILTO=address in
the crontab file before the jobs
themselves.
Most systems remove the contents of /tmp when the system reboots, but if you keep it up for a long time, you may find it useful to use cron to check for old files (say, files that haven’t been accessed in the past three days). The command you want to enter is
ls -l filenameBut how do you know which filename to
specify? You have to place the command inside a
find command, which lists all files beneath a
directory and performs the operation you specify on each one.
Here, we’ll specify /tmp as the directory to search, and use the -atime option to find files whose last access time is more than three days in the past. The -exec option means “execute the following command on every file we find,” the -type d option selects directories, and the \! inverts the selection, just choosing all items except directories (regular files, device files, and so on):
find /tmp \! -type d -atime +3 -exec ls -l { } \;The command we are asking find to execute is ls
-l, which simply shows details about the files. (Many
people use a similar crontab entry to remove
files, but this is hard to do without leaving a security hole.) The
funny string { } is just a way of saying “Do it
to each file you find, according to the previous selection material.”
The string \; tells find that the -exec option
is finished.
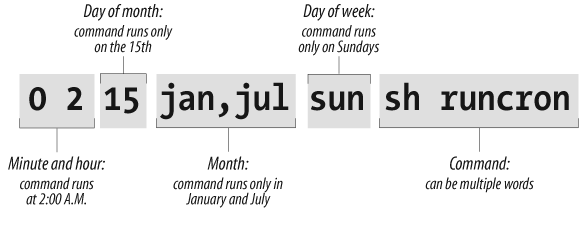
Now we have a command that looks for old files on /tmp. We still have to say how often it runs. The format used by crontab consists of six fields:
          minute
    hour
    day
    month
    dayofweek
    command
Fill the fields as follows:
Minute (specify from 0 to 59)
Hour (specify from 0 to 23)
Day of the month (specify from 1 to 31)
Month (specify from 1 to 12, or a name such as
jan,feb, and so on)Day of the week (specify from 0 to 6, where 0 is Sunday, or a name such as
mon,tue, and so on)Command (can be multiple words)
Figure 10-1 shows a cron entry with all the fields filled in. The command is a shell script, run with the Bourne shell sh. But the entry is not too realistic: the script runs only when all the conditions in the first five fields are true. That is, it has to run on a Sunday that falls on the 15th day of either January or July—not a common occurrence! So this is not a particularly useful example.
If you want a command to run every day at 1:00 A.M., specify the minute as 0 and the hour as 1. The other three fields should be asterisks, which mean “every day and month at the given time.” The complete line in crontab is:
0 1 * * * find /tmp -atime 3 -exec ls -l { } \;Because you can do a lot of fancy things with the time fields, let’s play with this command a bit more. Suppose you want to run the command just on the first day of each month. You would keep the first two fields, but add a 1 in the third field:
0 1 1 * * find /tmp -atime 3 -exec ls -l { } \;To do it once a week on Monday, restore the third field to an
asterisk but specify either 1 or mon as the fifth field:
0 1 * * mon find /tmp -atime 3 -exec ls -l { } \;To get even more sophisticated, there are ways to specify multiple times in each field. Here, a comma means “run on the 1st and 15th day” of each month:
0 1 1,15 * * find /tmp -atime 3 -exec ls -l { } \;A hyphen means “run every day from the 1st through the 15th, inclusive”:
0 1 1-15 * * find /tmp -atime 3 -exec ls -l { } \;A slash followed by a 5 means
“run every fifth day,” which comes out to the 1st, 6th, 11th, and so
on:
0 1 */5 * * find /tmp -atime 3 -exec ls -l { } \;Now we’re ready to actually put the entry in our crontab file. Become root (because this is the kind of thing root should do) and enter the crontab command with the -e option for “edit”:
rutabaga# crontab -eBy default, this command starts a vi edit session. If you’d like to use XEmacs instead, you can specify this before you start crontab. For a Bourne-compliant shell, enter the command:
rutabaga# export VISUAL=xemacs
For the C shell, enter:
rutabaga# setenv VISUAL xemacs
The environment variable EDITOR also works in place of VISUAL for some versions of crontab. Enter a line or two beginning with
hash marks (#) to serve as comments explaining what you’re doing, then
put in your crontab entry:
    # List files on /tmp that are 3 or more days old.  Runs at 1:00 AM
    # each morning.
    0 1 * * * find /tmp -atime 3 -exec ls -l {  } \;
When you exit vi, the commands are saved. Look at your crontab entry by entering:
rutabaga# crontab -lWe have not yet talked about a critical aspect of our crontab entry: where does the output go? By default, cron saves the standard output and standard error and sends them to the user as a mail message. In this example, the mail goes to root, but that should automatically be directed to you as the system administrator. Make sure the following line appears in /usr/lib/aliases (/etc/aliases on SUSE, Debian, and RedHat):
root: your-account-nameIn a moment, we’ll show what to do if you want output saved in a file instead of being mailed to you.
Here’s another example of a common type of command used in crontab files. It performs a tape backup of a directory. We assume that someone has put a tape in the drive before the command runs. First, an mt command makes sure the tape in the /dev/qft0 device is rewound to the beginning. Then a tar command transfers all the files from the directory /src to the tape. A semicolon is used to separate the commands; that is standard shell syntax:
    # back up the /src directory once every two months.
          0 2 1 */2 * mt -f /dev/qft0 rewind; tar cf /dev/qft0 /src
The first two fields ensure that the command runs at 2:00 A.M., and the third field specifies the first day of the month. The fourth field specifies every two months. We could achieve the same effect, in a possibly more readable manner, by entering:
    0 2 1 jan,mar,may,jul,sep,nov * mt -f /dev/qft0 rewind; \
          tar cf /dev/qft0 /src
The section “Making Backups” in Chapter 27 explains how to perform backups on a regular basis.
The following example uses mailq every two days to test whether any mail is stuck in the mail queue, and sends the mail administrator the results by mail. If mail is stuck in the mail queue, the report includes details about addressing and delivery problems, but otherwise the message is empty:
    0 6 */2 * * mailq -v | \
          mail -s "Tested Mail Queue for Stuck Email" postmaster
Probably you don’t want to receive a mail message every day when everything is going normally. In the examples we’ve used so far, the commands do not produce any output unless they encounter errors. But you may want to get into the habit of redirecting the standard output to /dev/null, or sending it to a logfile like this (note the use of two > signs so that we don’t wipe out previous output):
0 1 * * * find /tmp -atime 3 -exec ls -l { } \; >> /home/mdw/logIn this entry, we redirect the standard output, but allow the standard error to be sent as a mail message. This can be a nice feature because we’ll get a mail message if anything goes wrong. If you want to make sure you don’t receive mail under any circumstances, redirect both the standard output and the standard error to a file:
0 1 * * * find /tmp -atime 3 -exec ls -l { } \; >> /home/mdw/log 2>&1When you save output in a logfile, you get the problem of a file that grows continuously. You may want another cron entry that runs once a week or so, just to remove the file.
Only Bourne shell commands can be used in
crontab entries. That means you can’t use any of
the convenient extensions recognized by bash and other modern shells, such as
aliases or the use of ~ to mean “my
home directory.” You can use $HOME,
however; cron recognizes the
$USER, $HOME, and $SHELL environment variables. Each command
runs with your home directory as its current directory.
Some people like to specify absolute pathnames for commands, such as /usr/bin/find and /bin/rm, in crontab entries. This ensures that the right command is always found, instead of relying on the path being set correctly.
If a command gets too long and complicated to put on a single line, write a shell script and invoke it from cron. Make sure the script is executable (use chmod +x) or execute it by using a shell, such as:
0 1 * * * sh runcron
As a system administrator, you often have to create crontab files for dummy users, such as news or UUCP. Running all utilities as root would be overkill and possibly dangerous, so these special users exist instead.
The choice of a user also affects file ownership: a crontab file for news should run files owned by news, and so on. In general, make sure utilities are owned by the user in whose name you create the crontab file.
As root, you can edit other users’ crontab files by using the
-u option. For example:
tigger # crontab -u news -eThis is useful because you can’t log in as user news, but you still might want to edit this user’s crontab entry.