Table of Contents for
Running Linux, 5th Edition
 Running Linux, 5th Edition
Published by
O'Reilly Media, Inc., 2005
Running Linux, 5th Edition
Published by
O'Reilly Media, Inc., 2005
- Cover
- Running Linux, 5th Edition
- Preface
- Organization of This Book
- Conventions Used in This Book
- Using Code Examples
- How to Contact Us
- Safari® Enabled
- Acknowledgments
- I. Enjoying and Being Productive on Linux
- 1. Introduction to Linux
- 1.1. About This Book
- 1.2. Who’s Using Linux?
- 1.3. System Features
- 1.4. About Linux’s Copyright
- 1.5. Open Source and the Philosophy of Linux
- 1.6. Sources of Linux Information
- 1.7. Getting Help
- 2. Preinstallation and Installation
- 2.1. Distributions of Linux
- 2.2. Preparing to Install Linux
- 2.3. Post-Installation Procedures
- 2.4. Running into Trouble
- 3. Desktop Environments
- 3.1. Why Use a Graphical Desktop?
- 3.2. The K Desktop Environment
- 3.3. KDE Applications
- 3.4. The GNOME Desktop Environment
- 3.5. GNOME Applications
- 4. Basic Unix Commands and Concepts
- 4.1. Logging In
- 4.2. Setting a Password
- 4.3. Virtual Consoles
- 4.4. Popular Commands
- 4.5. Shells
- 4.6. Useful Keys and How to Get Them to Work
- 4.7. Typing Shortcuts
- 4.8. Filename Expansion
- 4.9. Saving Your Output
- 4.10. What Is a Command?
- 4.11. Putting a Command in the Background
- 4.12. Remote Logins and Command Execution
- 4.13. Manual Pages
- 4.14. Startup Files
- 4.15. Important Directories
- 4.16. Basic Text Editing
- 4.17. Advanced Shells and Shell Scripting
- 5. Web Browsers and Instant Messaging
- 5.1. The World Wide Web
- 5.2. Instant Messaging
- 6. Electronic Mail Clients
- 6.1. Using KMail
- 6.2. Using Mozilla Mail & News
- 6.3. Getting the Mail to Your Computer with fetchmail
- 6.4. OpenPGP Encryption with GnuPG
- 7. Games
- 7.1. Gaming
- 7.2. Quake III
- 7.3. Return to Castle Wolfenstein
- 7.4. Unreal Tournament 2004
- 7.5. Emulators
- 7.6. Frozen Bubble
- 7.7. Tux Racer
- 8. Office Suites and Personal Productivity
- 8.1. Using OpenOffice
- 8.2. KOffice
- 8.3. Other Word Processors
- 8.4. Synching PDAs
- 8.5. Groupware
- 8.6. Managing Your Finances
- 9. Multimedia
- 9.1. Multimedia Concepts
- 9.2. Kernel and Driver Issues
- 9.3. Embedded and Other Multimedia Devices
- 9.4. Desktop Environments
- 9.5. Windows Compatibility
- 9.6. Multimedia Applications
- 9.7. Multimedia Toolkits and Development Environments
- 9.8. Solutions to Common Problems
- 9.9. References
- II. System Administration
- 10. System Administration Basics
- 10.1. Maintaining the System
- 10.2. Managing Filesystems
- 10.3. Managing Swap Space
- 10.4. The /proc Filesystem
- 10.5. Device Files
- 10.6. Scheduling Recurring Jobs Using cron
- 10.7. Executing Jobs Once
- 10.8. Managing System Logs
- 10.9. Processes
- 10.10. Programs That Serve You
- 11. Managing Users, Groups, and Permissions
- 11.1. Managing User Accounts
- 11.2. File Ownership and Permissions
- 11.3. Changing the Owner, Group, and Permissions
- 12. Installing, Updating, and Compiling Programs
- 12.1. Upgrading Software
- 12.2. General Upgrade Procedure
- 12.3. Automated and Bulk Upgrades
- 12.4. Upgrading Software Not Provided in Packages
- 12.5. Archive and Compression Utilities
- 13. Networking
- 13.1. Networking with TCP/IP
- 13.2. Dial-Up PPP
- 13.3. PPP over ISDN
- 13.4. ADSL
- 13.5. Cable Modems
- 13.6. Network Diagnostics Tools
- 14. Printing
- 14.1. Printing
- 14.2. Managing Print Services
- 15. File Sharing
- 15.1. Sharing Files with Windows Systems (Samba)
- 15.2. NFS Configuration and NIS
- 16. The X Window System
- 16.1. A History of X
- 16.2. X Concepts
- 16.3. Hardware Requirements
- 16.4. Installing X.org
- 16.5. Configuring X.org
- 16.6. Running X
- 16.7. Running into Trouble
- 16.8. X and 3D
- 17. System Start and Shutdown
- 17.1. Booting the System
- 17.2. System Startup and Initialization
- 17.3. Single-User Mode
- 17.4. Shutting Down the System
- 17.5. A Graphical Runlevel Editor: KSysV
- 18. Configuring and Building the Kernel
- 18.1. Building a New Kernel
- 18.2. Loadable Device Drivers
- 18.3. Loading Modules Automatically
- 19. Text Editing
- 19.1. Editing Files Using vi
- 19.2. The (X)Emacs Editor
- 20. Text Processing
- 20.1. TeX and LaTeX
- 20.2. XML and DocBook
- 20.3. groff
- 20.4. Texinfo
- III. Programming
- 21. Programming Tools
- 21.1. Programming with gcc
- 21.2. Makefiles
- 21.3. Debugging with gdb
- 21.4. Useful Utilities for C Programmers
- 21.5. Using Perl
- 21.6. Java
- 21.7. Python
- 21.8. Other Languages
- 21.9. Introduction to OpenGL Programming
- 21.10. Integrated Development Environments
- 22. Running a Web Server
- 22.1. Configuring Your Own Web Server
- 23. Transporting and Handling Email Messages
- 23.1. The Postfix MTA
- 23.2. Procmail
- 23.3. Filtering Spam
- 24. Running an FTP Server
- 24.1. Introduction
- 24.2. Compiling and Installing
- 24.3. Running ProFTPD
- 24.4. Configuration
- IV. Network Services
- 25. Running Web Applications with MySQL and PHP
- 25.1. MySQL
- 25.2. PHP
- 25.3. The LAMP Server in Action
- 26. Running a Secure System
- 26.1. A Perspective on System Security
- 26.2. Initial Steps in Setting Up a Secure System
- 26.3. TCP Wrapper Configuration
- 26.4. Firewalls: Filtering IP Packets
- 26.5. SELinux
- 27. Backup and Recovery
- 27.1. Making Backups
- 27.2. What to Do in an Emergency
- 28. Heterogeneous Networking and Running Windows Programs
- 28.1. Sharing Partitions
- 28.2. Emulation and Virtual Operating Systems
- 28.3. Remote Desktop Access to Windows Programs
- 28.4. FreeNX: Linux as a Remote Desktop Server
- A. Sources of Linux Information
- A.1. Linux Documentation Project
- A.2. FTP Sites
- A.3. World Wide Web Sites
- About the Authors
- Colophon
- Copyright
As we said, most of the time you can get by with the default security the system gives you. But there are always exceptions, particularly for system administrators. To take a simple example, suppose you are creating a directory under /home for a new user. You have to create everything as root, but when you’re done you have to change the ownership to the user; otherwise, that user won’t be able to use the files! (Fortunately, if you use the adduser command discussed earlier in "Creating Accounts,” it takes care of ownership for you.)
Similarly, certain utilities and programs such as the MySQL database and News have their own users. No one ever logs in as mysql or News, but those users and groups must exist so that the utilities can do their job in a secure manner. In general, the last step when installing software is usually to change the owner, group, and permissions as the documentation tells you to do.
The chown command changes the owner of a file, and the chgrp command changes the group. On Linux, only root can use chown for changing ownership of a file, but any user can change the group to another group to which he belongs.
So after installing some software named sampsoft, you might change both the owner and the group to bin by executing:
#chown bin sampsoft#chgrp bin sampsoft
You could also do this in one step by using the dot notation:
# chown bin.bin sampsoftThe syntax for changing permissions is more complicated. The permissions can also be called the file’s “mode,” and the command that changes permissions is chmod. Let’s start our exploration of this command through a simple example. Say you’ve written a neat program in Perl or Tcl named header, and you want to be able to execute it. You would type the following command:
$ chmod +x headerThe plus sign means “add a permission,” and the x indicates which permission to add.
If you want to remove execute permission, use a minus sign in place of a plus:
$ chmod -x headerThis command assigns permissions to all levels: user, group, and other. Let’s say that you are secretly into software hoarding and don’t want anybody to use the command but yourself. No, that’s too cruel—let’s say instead that you think the script is buggy and want to protect other people from hurting themselves until you’ve exercised it. You can assign execute permission just to yourself through the command:
$ chmod u+x headerWhatever goes before the plus sign is the level of permission,
and whatever goes after is the type of permission. User permission
(for yourself) is u, group permission is g, and other is o. So to assign permission to both yourself
and the file’s group, enter:
$ chmod ug+x headerYou can also assign multiple types of permissions:
$ chmod ug+rwx headerYou can learn a few more shortcuts from the chmod manual page in order to impress someone looking over your shoulder, but they don’t offer any functionality besides what we’ve shown you.
As arcane as the syntax of the mode argument may seem, there’s another syntax that is even more complicated. We have to describe it, though, for several reasons. First of all, there are several situations that cannot be covered by the syntax, called symbolic mode , that we’ve just shown. Second, people often use the other syntax, called absolute mode , in their documentation. Third, there are times you may actually find the absolute mode more convenient.
To understand absolute mode, you have to think in terms of bits and octal notation. Don’t worry, it’s not too hard. A typical mode contains three characters, corresponding to the three levels of permission (user, group, and other). These levels are illustrated in Figure 11-2. Within each level, there are three bits corresponding to read, write, and execute permission.
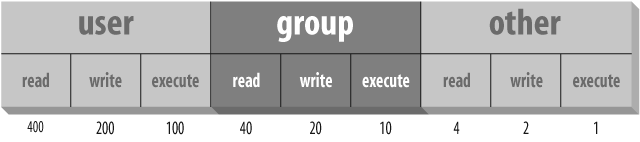
Let’s say you want to give yourself read permission and no permission to anybody else. You want to specify just the bit represented by the number 400. So the chmod command would be:
$ chmod 400 headerTo give read permission to everybody, choose the correct bit from each level: 400 for yourself, 40 for your group, and 4 for other. The full command is:
$ chmod 444 headerThis is like using a mode +r, except that it simultaneously removes any write or execute permission. (To be precise, it’s just like a mode of =r, which we didn’t mention earlier. The equal sign means “assign these rights and no others.”)
To give read and execute permission to everybody, you have to add up the read and execute bits: 400 plus 100 is 500, for instance. So the corresponding command is:
$ chmod 555 headerwhich is the same as =rx. To give someone full access, you would specify that digit as a 7: the sum of 4, 2, and 1.
One final trick: how to set the default mode that is assigned to each file you create (with a text editor, the > redirection operator, and so on). You do so by executing a umask command, or putting one in your shell’s startup file. This file could be called .bashrc, .cshrc, or something else depending on the shell you use (we discussed startup files in Chapter 4).
The umask command takes an argument like the absolute mode in chmod, but the meaning of the bits is inverted. You have to determine the access you want to grant for user, group, and other, and subtract each digit from 7. That gives you a three-digit mask.
For instance, say you want yourself to have all permissions (7), your group to have read and execute permissions (5), and others to have no permissions (0). Subtract each bit from 7 and you get 0 for yourself, 2 for your group, and 7 for other. So the command to put in your startup file is
umask 027
A strange technique, but it works. The chmod command looks at the mask when it interprets your mode; for instance, if you assign execute mode to a file at creation time, it will assign execute permission for you and your group, but will exclude others because the mask doesn’t permit them to have any access.