Table of Contents for
Running Linux, 5th Edition
 Running Linux, 5th Edition
Published by
O'Reilly Media, Inc., 2005
Running Linux, 5th Edition
Published by
O'Reilly Media, Inc., 2005
- Cover
- Running Linux, 5th Edition
- Preface
- Organization of This Book
- Conventions Used in This Book
- Using Code Examples
- How to Contact Us
- Safari® Enabled
- Acknowledgments
- I. Enjoying and Being Productive on Linux
- 1. Introduction to Linux
- 1.1. About This Book
- 1.2. Who’s Using Linux?
- 1.3. System Features
- 1.4. About Linux’s Copyright
- 1.5. Open Source and the Philosophy of Linux
- 1.6. Sources of Linux Information
- 1.7. Getting Help
- 2. Preinstallation and Installation
- 2.1. Distributions of Linux
- 2.2. Preparing to Install Linux
- 2.3. Post-Installation Procedures
- 2.4. Running into Trouble
- 3. Desktop Environments
- 3.1. Why Use a Graphical Desktop?
- 3.2. The K Desktop Environment
- 3.3. KDE Applications
- 3.4. The GNOME Desktop Environment
- 3.5. GNOME Applications
- 4. Basic Unix Commands and Concepts
- 4.1. Logging In
- 4.2. Setting a Password
- 4.3. Virtual Consoles
- 4.4. Popular Commands
- 4.5. Shells
- 4.6. Useful Keys and How to Get Them to Work
- 4.7. Typing Shortcuts
- 4.8. Filename Expansion
- 4.9. Saving Your Output
- 4.10. What Is a Command?
- 4.11. Putting a Command in the Background
- 4.12. Remote Logins and Command Execution
- 4.13. Manual Pages
- 4.14. Startup Files
- 4.15. Important Directories
- 4.16. Basic Text Editing
- 4.17. Advanced Shells and Shell Scripting
- 5. Web Browsers and Instant Messaging
- 5.1. The World Wide Web
- 5.2. Instant Messaging
- 6. Electronic Mail Clients
- 6.1. Using KMail
- 6.2. Using Mozilla Mail & News
- 6.3. Getting the Mail to Your Computer with fetchmail
- 6.4. OpenPGP Encryption with GnuPG
- 7. Games
- 7.1. Gaming
- 7.2. Quake III
- 7.3. Return to Castle Wolfenstein
- 7.4. Unreal Tournament 2004
- 7.5. Emulators
- 7.6. Frozen Bubble
- 7.7. Tux Racer
- 8. Office Suites and Personal Productivity
- 8.1. Using OpenOffice
- 8.2. KOffice
- 8.3. Other Word Processors
- 8.4. Synching PDAs
- 8.5. Groupware
- 8.6. Managing Your Finances
- 9. Multimedia
- 9.1. Multimedia Concepts
- 9.2. Kernel and Driver Issues
- 9.3. Embedded and Other Multimedia Devices
- 9.4. Desktop Environments
- 9.5. Windows Compatibility
- 9.6. Multimedia Applications
- 9.7. Multimedia Toolkits and Development Environments
- 9.8. Solutions to Common Problems
- 9.9. References
- II. System Administration
- 10. System Administration Basics
- 10.1. Maintaining the System
- 10.2. Managing Filesystems
- 10.3. Managing Swap Space
- 10.4. The /proc Filesystem
- 10.5. Device Files
- 10.6. Scheduling Recurring Jobs Using cron
- 10.7. Executing Jobs Once
- 10.8. Managing System Logs
- 10.9. Processes
- 10.10. Programs That Serve You
- 11. Managing Users, Groups, and Permissions
- 11.1. Managing User Accounts
- 11.2. File Ownership and Permissions
- 11.3. Changing the Owner, Group, and Permissions
- 12. Installing, Updating, and Compiling Programs
- 12.1. Upgrading Software
- 12.2. General Upgrade Procedure
- 12.3. Automated and Bulk Upgrades
- 12.4. Upgrading Software Not Provided in Packages
- 12.5. Archive and Compression Utilities
- 13. Networking
- 13.1. Networking with TCP/IP
- 13.2. Dial-Up PPP
- 13.3. PPP over ISDN
- 13.4. ADSL
- 13.5. Cable Modems
- 13.6. Network Diagnostics Tools
- 14. Printing
- 14.1. Printing
- 14.2. Managing Print Services
- 15. File Sharing
- 15.1. Sharing Files with Windows Systems (Samba)
- 15.2. NFS Configuration and NIS
- 16. The X Window System
- 16.1. A History of X
- 16.2. X Concepts
- 16.3. Hardware Requirements
- 16.4. Installing X.org
- 16.5. Configuring X.org
- 16.6. Running X
- 16.7. Running into Trouble
- 16.8. X and 3D
- 17. System Start and Shutdown
- 17.1. Booting the System
- 17.2. System Startup and Initialization
- 17.3. Single-User Mode
- 17.4. Shutting Down the System
- 17.5. A Graphical Runlevel Editor: KSysV
- 18. Configuring and Building the Kernel
- 18.1. Building a New Kernel
- 18.2. Loadable Device Drivers
- 18.3. Loading Modules Automatically
- 19. Text Editing
- 19.1. Editing Files Using vi
- 19.2. The (X)Emacs Editor
- 20. Text Processing
- 20.1. TeX and LaTeX
- 20.2. XML and DocBook
- 20.3. groff
- 20.4. Texinfo
- III. Programming
- 21. Programming Tools
- 21.1. Programming with gcc
- 21.2. Makefiles
- 21.3. Debugging with gdb
- 21.4. Useful Utilities for C Programmers
- 21.5. Using Perl
- 21.6. Java
- 21.7. Python
- 21.8. Other Languages
- 21.9. Introduction to OpenGL Programming
- 21.10. Integrated Development Environments
- 22. Running a Web Server
- 22.1. Configuring Your Own Web Server
- 23. Transporting and Handling Email Messages
- 23.1. The Postfix MTA
- 23.2. Procmail
- 23.3. Filtering Spam
- 24. Running an FTP Server
- 24.1. Introduction
- 24.2. Compiling and Installing
- 24.3. Running ProFTPD
- 24.4. Configuration
- IV. Network Services
- 25. Running Web Applications with MySQL and PHP
- 25.1. MySQL
- 25.2. PHP
- 25.3. The LAMP Server in Action
- 26. Running a Secure System
- 26.1. A Perspective on System Security
- 26.2. Initial Steps in Setting Up a Secure System
- 26.3. TCP Wrapper Configuration
- 26.4. Firewalls: Filtering IP Packets
- 26.5. SELinux
- 27. Backup and Recovery
- 27.1. Making Backups
- 27.2. What to Do in an Emergency
- 28. Heterogeneous Networking and Running Windows Programs
- 28.1. Sharing Partitions
- 28.2. Emulation and Virtual Operating Systems
- 28.3. Remote Desktop Access to Windows Programs
- 28.4. FreeNX: Linux as a Remote Desktop Server
- A. Sources of Linux Information
- A.1. Linux Documentation Project
- A.2. FTP Sites
- A.3. World Wide Web Sites
- About the Authors
- Colophon
- Copyright
OpenOffice is not the only open source office suite available on Linux; the KDE project has also created a fully featured office suite called KOffice, which adheres to standards and fits very well into the KDE desktop.[*]
KOffice is a highly integrated office suite that builds directly on the KDE technology. This has many advantages in terms of integration, features, performance, familiar look and feel, and so on. KOffice can therefore benefit from all of KDE’s advanced technologies such as DCOP, KIO, and KParts. The KParts technology, in particular, is extended for the KOffice components to allow very flexible embedding of documents inside other documents. KOffice components can integrate very well into each other. So basically a spreadsheet can contain anything from charts to presentations, reports and even text documents. Likewise, almost any component can contain almost any other. Components are fully embedded, allowing the user to perform any operations that the standalone application would allow.
Because much technology is already present inside KDE itself, KOffice is a very lightweight office suite, which results in fast application startup and low memory consumption. This makes KOffice a very suitable office suite for older hardware as well, which can save lots of money in some cases.
Still, KOffice is quite rich and extensive in features. It is not limited to word processing, spreadsheets, or presentations, but also has components for image manipulation, flowcharts, business report generation, database management, and project management. Because of KDE’s flexible component integration, smaller utilities, such as the diagram and chart engine, as well as the formula editor, are available as standalone tools. The straightforward and KDE-like approach in look and feel, as well as its familiar usability, make KOffice quite useful for daily office work.
The KOffice office suite is too large to list every detail. General features include document location abstraction, DCOP scripting, parts, and plug-ins. Take a look at the KOffice web site (http://www.koffice.org) to check on the latest state of the application.
KOffice adheres to the OASIS OpenDocument file format, so documents can be exchanged with other standards-conforming utilities, such as OpenOffice.
It is important for an office suite to use standards where possible, especially for the file format. In this way, a business can be sure that it can still open documents many years into the future, regardless of what happens to current tools. The OASIS OpenDocument file format specification is an open standard for office applications. Both KOffice and OpenOffice use the format, which means that files can be exchanged seamlessly between the suites.
KOffice has more components to offer than what is covered by the OASIS specification. Still, all components covered by the specifications actually use the OASIS OpenDocument file format.
Here are the components of KOffice:
- Text processing and desktop publishing: KWord
KWord is designed mainly for text processing, but includes many desktop publishing aspects. This creates a mixture of features that makes interesting layouts easily possible.
- Spreadsheets: KSpread
KSpread is a pretty standard spreadsheet application. It offers many functions as well as formatting, multiple sheets, charts, diagrams and more. Of course it can easily integrate any other KOffice component to extend its abilities.
- Presentations: KPresenter
KPresenter is a presentation component. It can be used to create on-screen presentations or to design and print transparencies.
- Flowcharts and more: Kivio
Kivio can be used for any kind of flowchart or diagram. Additional stencil sets can be used for custom needs. Even UML diagrams are possible.
- Vector graphics: Karbon14
Karbon14 is a vector drawing application.
- Pixmap graphics: Krita
Krita is a tool for creating high-quality pixmap graphics. It offers many plug-ins for image manipulation and supports various formats.
- Business reports: Kugar
Kugar can be used to create business-quality reports. A designer helps to easily design such reports.
- Database management and forms: Kexi
Kexi is a full-blown database management application. You can design forms for working with data. Many backends, such as PostgreSQL or MySQL, are possible. It is even capable of importing MS Access mdb database files.
Each KOffice component comes with its own manual. These manuals offer all the latest information about the various components KOffice has to offer and should be read to learn more about KOffice. The web site is also a good place to find out more.
The primary site on the Internet is http://www.koffice.org. You will also find information there about the user and developer mailing lists, as well as additional developer resources.
The Kexi project has an additional web site, which can be found at http://www.kexi-project.org.
The following two sections, instead of giving you a rundown of the standard features, explore two interesting features in more depth, in the hope that this will be mouthwatering enough to interest you in exploring KOffice further.
Now we will work through some examples with KOffice to get to know the office suite. You are very welcome to actually create the documents yourself and play around with the different components as we go along. The purpose of these examples is to get a feeling for KOffice, without trying to be a complete walkthrough, which would fill a complete book on its own. Remember that the handbooks included in the KOffice installation hold much more information that allows you to learn a lot about all the available components.
You can use tabulators (tabs) to align text horizontally. This is very useful for simple tables or listings, where text needs to be vertically aligned. Tabulators can also be very useful to simply place text at an exact horizontal location.
KWord has various options for tabulators. You can set different alignments, such as left, right, centered, or alignment on a certain character (such as a comma). In particular, the last type is useful for listing numbers and prices.
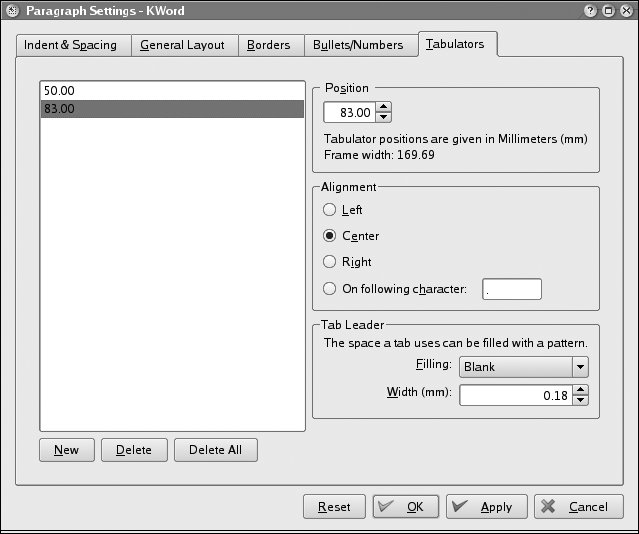
Tabulators are part of the paragraph format. So you can configure everything related to tabulators in the Paragraph Settings dialog (Figure 8-33). This dialog can be reached through the Format → Paragraph menu entry.
Now we will create a couple of tab stops. We start with a very intuitive way of editing tabs and later look at some configuration details.
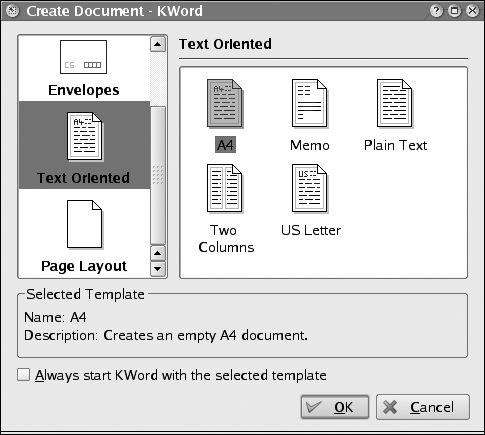
Start up KWord, choose the text-oriented U.S. letter template, and click OK (see Figure 8-34).
Then take a look at the top ruler of your document (Figure 8-35). The white space in the top ruler is exactly the width of the editable area of the document. This space can also be used to enter tab stops. In the top left corner is a small icon that represents the currently selected tab stop type. As already mentioned, tabs can be left aligned, right aligned, centered, or aligned on a certain character. You can change the type by simply clicking on that icon. See how it changes between different types of tab stops. Next you should insert some tab stops by choosing the correct types and placing them at the correct horizontal positions in the top ruler (Figure 8-36).
To do so, first choose the correct type in the upper-left corner and then left-click on the position in the top ruler. Do so for all four tab stops until your upper ruler looks like the one shown in the figure.
To see how the tab stops can be used, simply write some text at each tab stop:
Press the Tab key once. You are now at the first tab stop.
Write a few characters, such as
How. You can see that the text is aligned on the right side with the tab, indicating that the first tab stop is right aligned.Press the Tab key again. You are now at the second tab stop.
Write another word, such as
are. The text is aligned on the left side with the tab, indicating that the second tab stop is left aligned.Press the Tab key again. You are now at the third tab stop.
Write more text, such as
you
                all?
. The text is centered on the tab stop, indicating that the third tab stop is center aligned.Press the Tab key again, to come to the fourth and last tab stop.
Write a number such as
1234.567. Notice how the number is aligned at the decimal point. This type of tab stop is useful for numbers.


The text now looks like Figure 8-37.

To allow many more configuration options, use the paragraph format. A quick way to access these configuration options is to double-click on one of the tab stops in the top ruler. You can do this right away with the document you just created in the previous exercise. You will see the configuration dialog, just as at the beginning of this section. You can also get to the configuration options by choosing Paragraph from the Format menu, and then going to the Tabulators page. Play around with the options, which are pretty self-explanatory. You can also add or delete tab stops in this dialog.
If you need permanent tab stops for a specific style, use the Style Manager to edit the tabulators. You can find it in the Format menu as well.
KSpread is the spreadsheet component of KOffice. As such, it offers lots of calculation features as well as the ability to create charts to visualize data.
KSpread uses the KChart component for data visualization. KChart can also be used as a standalone charting application.
Now we will take a look at how simple charts can be created inside KSpread.
Assume that you are a company that deals with several products, and you want to see how much profit you can make with each product and compare the results. For this a nice chart is very useful.
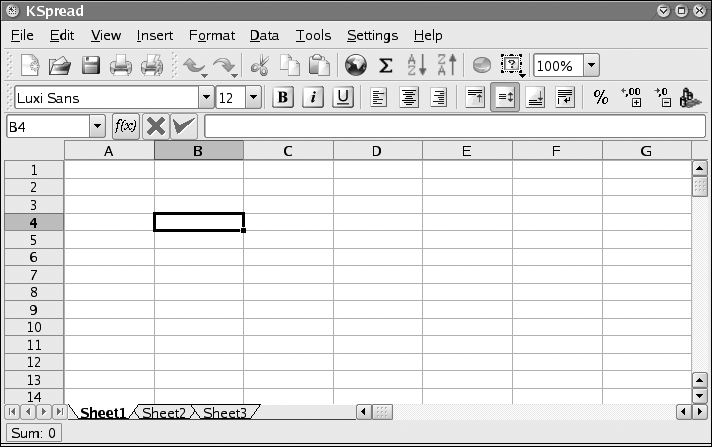
Start KSpread with a blank worksheet. The application should look like Figure 8-38.
Entering data into the table is straightforward: simply go
to the desired cell with the arrow keys or click on it with the
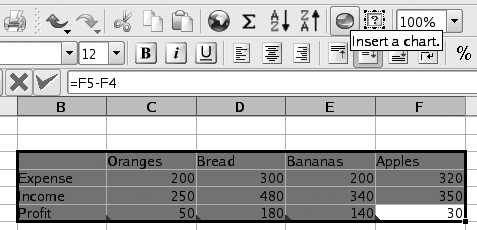
mouse. Now enter data into the table, as shown in Figure 8-39. It does not
matter much where you start. In this example, we have chosen cell
B4 for the Expense text. After
you have entered the data, select the area to create a chart from,
as shown in Figure
8-40.
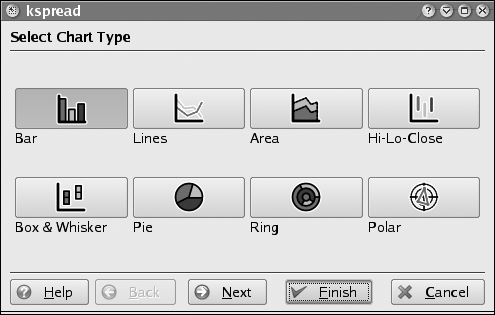
Now click on the Insert Chart toolbar icon, which you can see in Figure 8-40. The mouse cursor changes to a cross, indicating that you now have to select the area where you want to place your chart. Simply draw a rectangle below the table with the left mouse button. After you release the mouse button, a wizard asks you for the chart type you want to insert. Use the default (Bar) and click Finish (Figure 8-41).

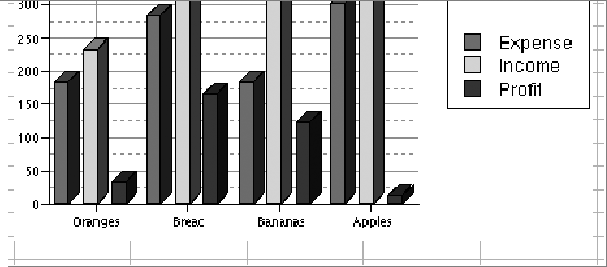
The result will look like Figure 8-42. In this chart you see the expense (red on the screen, although it does not appear in color in the printed book), the income (green), and the profit (blue) for each product. If you would like the percentage shown for each of the products, simply double-click on the chart.
Note how the toolbars and the menu change. This is a good example of the tight integration in KOffice, which allows it to use components inside components very flexibly. The menu and the toolbar shown here are the ones that are relevant for the KChart component.
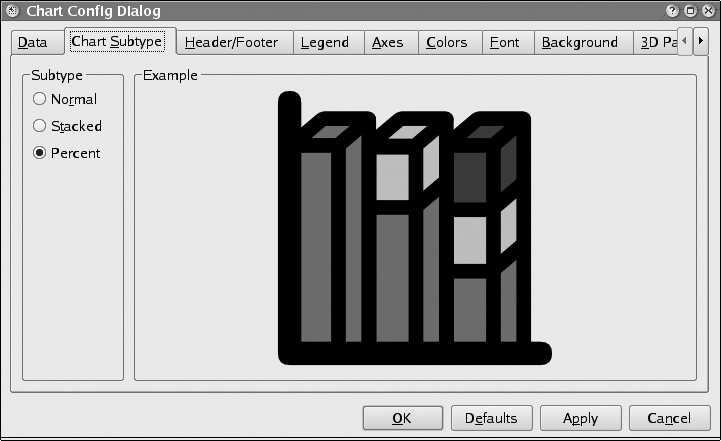
Now right-click on the chart and choose Configure Chart. This brings up a configuration dialog, where you should choose the Chart Subtype configuration page (Figure 8-43). On this page, you can select various subtypes of the current chart type. For this example, select Percent and click OK. The final result will be the nice chart in Figure 8-44. Every product is scaled to fit the 100% mark, and we see how much expenses we have and how much income we get for each product. Finally, the profit shows the difference between income and expense. We can conclude that bananas make the most profit, whereas apples have very little.
Go ahead and try various configurations and see how the data is represented!