Table of Contents for
Running Linux, 5th Edition
 Running Linux, 5th Edition
Published by
O'Reilly Media, Inc., 2005
Running Linux, 5th Edition
Published by
O'Reilly Media, Inc., 2005
- Cover
- Running Linux, 5th Edition
- Preface
- Organization of This Book
- Conventions Used in This Book
- Using Code Examples
- How to Contact Us
- Safari® Enabled
- Acknowledgments
- I. Enjoying and Being Productive on Linux
- 1. Introduction to Linux
- 1.1. About This Book
- 1.2. Who’s Using Linux?
- 1.3. System Features
- 1.4. About Linux’s Copyright
- 1.5. Open Source and the Philosophy of Linux
- 1.6. Sources of Linux Information
- 1.7. Getting Help
- 2. Preinstallation and Installation
- 2.1. Distributions of Linux
- 2.2. Preparing to Install Linux
- 2.3. Post-Installation Procedures
- 2.4. Running into Trouble
- 3. Desktop Environments
- 3.1. Why Use a Graphical Desktop?
- 3.2. The K Desktop Environment
- 3.3. KDE Applications
- 3.4. The GNOME Desktop Environment
- 3.5. GNOME Applications
- 4. Basic Unix Commands and Concepts
- 4.1. Logging In
- 4.2. Setting a Password
- 4.3. Virtual Consoles
- 4.4. Popular Commands
- 4.5. Shells
- 4.6. Useful Keys and How to Get Them to Work
- 4.7. Typing Shortcuts
- 4.8. Filename Expansion
- 4.9. Saving Your Output
- 4.10. What Is a Command?
- 4.11. Putting a Command in the Background
- 4.12. Remote Logins and Command Execution
- 4.13. Manual Pages
- 4.14. Startup Files
- 4.15. Important Directories
- 4.16. Basic Text Editing
- 4.17. Advanced Shells and Shell Scripting
- 5. Web Browsers and Instant Messaging
- 5.1. The World Wide Web
- 5.2. Instant Messaging
- 6. Electronic Mail Clients
- 6.1. Using KMail
- 6.2. Using Mozilla Mail & News
- 6.3. Getting the Mail to Your Computer with fetchmail
- 6.4. OpenPGP Encryption with GnuPG
- 7. Games
- 7.1. Gaming
- 7.2. Quake III
- 7.3. Return to Castle Wolfenstein
- 7.4. Unreal Tournament 2004
- 7.5. Emulators
- 7.6. Frozen Bubble
- 7.7. Tux Racer
- 8. Office Suites and Personal Productivity
- 8.1. Using OpenOffice
- 8.2. KOffice
- 8.3. Other Word Processors
- 8.4. Synching PDAs
- 8.5. Groupware
- 8.6. Managing Your Finances
- 9. Multimedia
- 9.1. Multimedia Concepts
- 9.2. Kernel and Driver Issues
- 9.3. Embedded and Other Multimedia Devices
- 9.4. Desktop Environments
- 9.5. Windows Compatibility
- 9.6. Multimedia Applications
- 9.7. Multimedia Toolkits and Development Environments
- 9.8. Solutions to Common Problems
- 9.9. References
- II. System Administration
- 10. System Administration Basics
- 10.1. Maintaining the System
- 10.2. Managing Filesystems
- 10.3. Managing Swap Space
- 10.4. The /proc Filesystem
- 10.5. Device Files
- 10.6. Scheduling Recurring Jobs Using cron
- 10.7. Executing Jobs Once
- 10.8. Managing System Logs
- 10.9. Processes
- 10.10. Programs That Serve You
- 11. Managing Users, Groups, and Permissions
- 11.1. Managing User Accounts
- 11.2. File Ownership and Permissions
- 11.3. Changing the Owner, Group, and Permissions
- 12. Installing, Updating, and Compiling Programs
- 12.1. Upgrading Software
- 12.2. General Upgrade Procedure
- 12.3. Automated and Bulk Upgrades
- 12.4. Upgrading Software Not Provided in Packages
- 12.5. Archive and Compression Utilities
- 13. Networking
- 13.1. Networking with TCP/IP
- 13.2. Dial-Up PPP
- 13.3. PPP over ISDN
- 13.4. ADSL
- 13.5. Cable Modems
- 13.6. Network Diagnostics Tools
- 14. Printing
- 14.1. Printing
- 14.2. Managing Print Services
- 15. File Sharing
- 15.1. Sharing Files with Windows Systems (Samba)
- 15.2. NFS Configuration and NIS
- 16. The X Window System
- 16.1. A History of X
- 16.2. X Concepts
- 16.3. Hardware Requirements
- 16.4. Installing X.org
- 16.5. Configuring X.org
- 16.6. Running X
- 16.7. Running into Trouble
- 16.8. X and 3D
- 17. System Start and Shutdown
- 17.1. Booting the System
- 17.2. System Startup and Initialization
- 17.3. Single-User Mode
- 17.4. Shutting Down the System
- 17.5. A Graphical Runlevel Editor: KSysV
- 18. Configuring and Building the Kernel
- 18.1. Building a New Kernel
- 18.2. Loadable Device Drivers
- 18.3. Loading Modules Automatically
- 19. Text Editing
- 19.1. Editing Files Using vi
- 19.2. The (X)Emacs Editor
- 20. Text Processing
- 20.1. TeX and LaTeX
- 20.2. XML and DocBook
- 20.3. groff
- 20.4. Texinfo
- III. Programming
- 21. Programming Tools
- 21.1. Programming with gcc
- 21.2. Makefiles
- 21.3. Debugging with gdb
- 21.4. Useful Utilities for C Programmers
- 21.5. Using Perl
- 21.6. Java
- 21.7. Python
- 21.8. Other Languages
- 21.9. Introduction to OpenGL Programming
- 21.10. Integrated Development Environments
- 22. Running a Web Server
- 22.1. Configuring Your Own Web Server
- 23. Transporting and Handling Email Messages
- 23.1. The Postfix MTA
- 23.2. Procmail
- 23.3. Filtering Spam
- 24. Running an FTP Server
- 24.1. Introduction
- 24.2. Compiling and Installing
- 24.3. Running ProFTPD
- 24.4. Configuration
- IV. Network Services
- 25. Running Web Applications with MySQL and PHP
- 25.1. MySQL
- 25.2. PHP
- 25.3. The LAMP Server in Action
- 26. Running a Secure System
- 26.1. A Perspective on System Security
- 26.2. Initial Steps in Setting Up a Secure System
- 26.3. TCP Wrapper Configuration
- 26.4. Firewalls: Filtering IP Packets
- 26.5. SELinux
- 27. Backup and Recovery
- 27.1. Making Backups
- 27.2. What to Do in an Emergency
- 28. Heterogeneous Networking and Running Windows Programs
- 28.1. Sharing Partitions
- 28.2. Emulation and Virtual Operating Systems
- 28.3. Remote Desktop Access to Windows Programs
- 28.4. FreeNX: Linux as a Remote Desktop Server
- A. Sources of Linux Information
- A.1. Linux Documentation Project
- A.2. FTP Sites
- A.3. World Wide Web Sites
- About the Authors
- Colophon
- Copyright
TEX is a professional text processing system for all kinds of documents, articles, and books—especially those that contain a great deal of mathematics. It is a somewhat “low-level” text processing language because it describes to the system how to lay out text on the page, how it should be spaced, and so on. TEX doesn’t concern itself directly with higher-level elements of text such as chapters, sections, footnotes, and so forth (those things that you, the writer, care about the most). For this reason, TEX is known as a functional text-formatting language (referring to the actual physical layout of text on a page) rather than a logical one (referring to logical elements, such as chapters and sections). TEX was designed by Donald E. Knuth, one of the world’s foremost experts in programming. One of Knuth’s motives for developing TEX was to produce a typesetting system powerful enough to handle the mathematics formatting needed for his series of computer science textbooks. Knuth ended up taking an eight-year detour to finish TEX; most would agree the result was well worth the wait.
Of course, TEX is very extensible, and it is possible to write macros for TEX that allow writers to concern themselves primarily with the logical, rather than the physical, format of the document. In fact, a number of such macro packages have been developed—the most popular of which is LATEX, a set of extensions for TEX designed by Leslie Lamport. LATEX commands are concerned mostly with logical structure, but because LATEX is just a set of macros on top of TEX, you can use plain commands as well. LATEX greatly simplifies the use of TEX, hiding most of the low-level functional features from the writer.
In order to write well-structured documents using TEX, you would either have to decide on a prebuilt macro package, such as LATEX, or develop your own (or use a combination of the two). In The TEX Book (Addison Wesley), Knuth presents his own set of macros that he used for production of the book. As you might expect, they include commands for beginning new chapters, sections, and the like—somewhat similar to their LATEX counterparts. In the rest of this section, we concentrate on the use of LATEX, which provides support for many types of documents: technical articles, manuals, books, letters, and so on. As with plain TEX, LATEX is extensible as well.
If you’ve never used a text-formatting system before, there are a number of new concepts of which you should be aware. As we said, text processing systems start with a source document, which you enter with a plain-text editor, such as Emacs. The source is written in a text-formatting language, which includes the text you wish to appear in your document, as well as commands that tell the text processor how to format it.
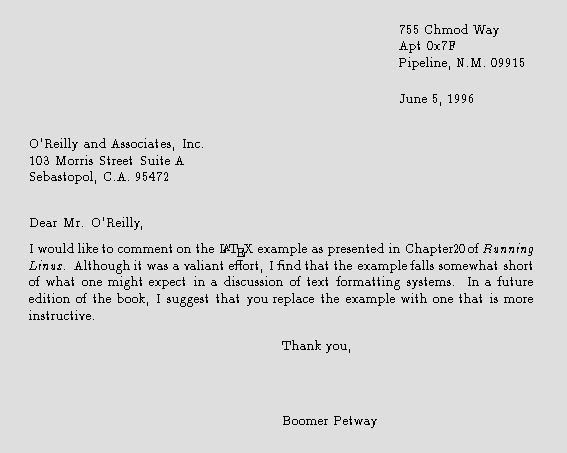
So, without further ado, let’s dive in and see how to write a simple document and format it, from start to finish. As a demonstration, we’ll show how to use LATEX to write a short business letter. Sit down at your favorite text editor, and enter the following text into a file (without the line numbers, of course). Call it letter.tex:
1  \documentclass{letter}
2  \address{755 Chmod Way \\ Apt 0x7F \\
3           Pipeline, N.M. 09915}
4  \signature{Boomer Petway}
5
6  \begin{document}
7  \begin{letter}{O'Reilly and Associates, Inc. \\
8                 1005 Gravenstein Highway North \\
9                 Sebastopol, C.A. 95472}
10
11 \opening{Dear Mr. O'Reilly,}
12
13 I would like to comment on the \LaTeX\ example as presented in
14 Chapter~20 of {\em Running Linux}. Although it was a valiant effort,
15 I find that the example falls somewhat short of what
16 one might expect in a discussion of text-formatting systems.
17 In a future edition of the book, I suggest that you replace
18 the example with one that is more instructive.
19
20 \closing{Thank you,}
21
22 \end{letter}
23 \end{document}
This is a complete LATEX document for the business letter that we wish to send. As you can see, it contains the actual text of the letter, with a number of commands (using backslashes and braces) thrown in. Let’s walk through it.
Line 1 uses the documentclass command to specify the class
of document that we’re producing (which is a letter). Commands in
LATEX begin with a backslash and are followed
by the actual command name, which in this case is documentclass. Following the command name
are any arguments, enclosed in braces. LATEX
supports several document classes, such as article, report, and book, and you can define your own.
Specifying the document class defines global macros for use within
the TEX document, such as the address and signature commands used on lines 2 to 4.
As you might guess, the address
and signature commands specify
your own address and name in the letter. The double backslashes
(\\) that appear in the address command generate line breaks in
the resulting output of the address.
A word about how LATEX processes input: as with most text-formatting systems, whitespace, line breaks, and other such features in the input source are not passed literally into the output. Therefore, you can break lines more or less wherever you please; when formatting paragraphs, LATEX will fit the lines back together again. Of course, there are exceptions: blank lines in the input begin new paragraphs, and there are commands to force LATEX to treat the source text literally.
On line 6, the command \begin{document} signifies the beginning of the document as a whole. Everything enclosed within the \begin{document} and \end{document} on line 22 is considered part of the text to be formatted; anything before \begin{document} is called the preamble and defines formatting parameters before the actual body.
On lines 7 to 9, \begin{letter} begins the actual letter. This is required because you may have many letters within a single source file, and a \begin{letter} command is needed for each. This command takes as an argument the address of the intended recipient; as with the address command, double backslashes signify line breaks in the address.
Line 11 uses the opening command to open
the letter. Following on lines 12 to 18 is the actual body of the
letter. As straightforward as it may seem, there are a few tricks
hidden in the body as well. On line 13 the \LaTeX\ command generates the logo. You’ll
notice that a backslash follows as well as precedes the \LaTeX\ command; the trailing backslash is
used to force a space after the word “LATEX.”
This is because TEX ignores spaces after
command invocations; the command must be followed by a backslash and
a space. Thus, \LaTeX example
would print as LATEXexample.
There are two quirks of note on line 14. First of all, a tilde
(~) is present between Chapter and 9, which causes a space to appear between
the two words, but prevents a line break between them in the output
(that is, to prevent Chapter from
being on the end of a line, and 9
from being on the beginning of the next). You need only use the
tilde to generate a space between two words that should be stuck
together on the same line, as in Chapter~9 and Mr.~Jones. (In retrospect, we could have
used the tilde in the \begin{letter} and
opening commands, although it’s doubtful
TEX would break a line anywhere within the
address or the opening.)
The second thing to take note of on line 14 is the use of
\em to generate
emphasized text in the output.
TEX supports various other fonts , including boldface (\bf) and typewriter (\tt).
Line 20 uses the closing command to close
off the letter. This also has the effect of appending the signature
used on line 4 after the closing in the output. Lines 22 to 23 use
the commands \end{letter} and
\end{document} to end the letter and document environments begun on lines 6 and
7.
You’ll notice that none of the commands in the LATEX source has anything to do with setting up margins, line spacing, or other functional issues of text formatting. That’s all taken care of by the LATEX macros on top of the TEX engine. LATEX provides reasonable defaults for these parameters; if you wanted to change any of these formatting options, you could use other LATEX commands (or lower-level TEX commands) to modify them.
We don’t expect you to understand all the intricacies of using LATEX from such a limited example, although this should give you an idea of how a living, breathing LATEX document looks. Now, let’s format the document in order to print it out.
Believe it or not, the command used to format LATEX source files into something printable is latex. After editing and saving the previous example, letter.tex, you should be able to use the following command:
eggplant$ latex letter
This is pdfeTeX, Version 3.141592-1.21a-2.2 (Web2C 7.5.4)
(letter.tex
LaTeX2e <2003/12/01>
Babel <v3.8d> and hyphenation patterns for american, french, german, ngerman, b
ahasa, basque, bulgarian, catalan, croatian, czech, danish, dutch, esperanto, e
stonian, finnish, greek, icelandic, irish, italian, latin, magyar, norsk, polis
h, portuges, romanian, russian, serbian, slovak, slovene, spanish, swedish, tur
kish, ukrainian, nohyphenation, loaded.
(/usr/share/texmf/tex/latex/base/letter.cls
Document Class: article 2004/02/16 v1.4f Standard LaTeX

 document class
(/usr/share/texmf/tex/latex/base/size10.clo))
No file letter.aux.
[1] (letter.aux) )
Output written on letter.dvi (1 page, 1128 bytes).
Transcript written on letter.log.
eggplant$
latex assumes the extension .tex for source files. Here, LATEX has processed the source letter.tex and saved the results in the file letter.dvi. This is a “device-independent” file that generates printable output on a variety of printers. Various tools exist for converting .dvi files to PostScript, HP LaserJet, and other formats, as we’ll see shortly.
Instead of immediately printing your letter, you may wish to preview it to be sure that everything looks right. If you’re running the X Window System, you can use the xdvi command to preview .dvi files on your screen. If you are also using the KDE desktop environment, kdvi is a more user-friendly version of xdvi. What about printing the letter? First, you need to convert the .dvi to something your printer can handle. DVI drivers exist for many printer types. Almost all the program names begin with the three characters dvi, as in dvips, dvilj, and so forth. If your system doesn’t have one you need, you have to get the appropriate driver from the archives if you have Internet access. See the FAQ for comp.text.tex for details.
If you’re lucky enough to have a PostScript printer (or have a PostScript filter installed in your system), you can use dvips to generate PostScript from the .dvi file:
eggplant$ dvips -o letter.ps letter.dviYou can then print the PostScript using lpr. Or, to do this in one step:
eggplant$ dvips letter.dvi | lprThere are printer-specific DVI drivers such as dvilj for HP LaserJets as well, but most of these are considered obsolete; use dvips and, if necessary, Ghostscript (see below) instead.
It is also possible to ask
dvips to directly send the PostScript output to a printer,
such as to the printer lp in this
example:
eggplant$ dvips -Plp letter.dviIf you can’t find a DVI driver for your printer, you might be able to use Ghostscript to convert PostScript (produced by dvips) into something you can print. Although some of Ghostscript’s fonts are less than optimal, Ghostscript does allow you to use Adobe fonts (which you can obtain for Windows and use with Ghostscript under Linux). Ghostscript also provides an SVGA preview mode you can use if you’re not running X. At any rate, after you manage to format and print the example letter, it should end up looking something like that in Figure 20-1.
Finally, it should be mentioned that you can also use TEX to create PDF files, either using the dvipdf driver or using a special program called pdftex.
If LATEX seems right for your document-processing needs, and you have been able to get at least this initial example working and printed out, we suggest checking into Leslie Lamport’s LATEX User’s Guide and Reference Manual (Addison Wesley), which includes everything you need to know about LATEX for formatting letters, articles, books, and more. If you’re interested in hacking or want to know more about the underlying workings of TEX (which can be invaluable), Donald Knuth’s The TEX Book (Addison-Wesley) is the definitive guide to the system.
comp.text.tex is the Usenet newsgroup for questions and information about these systems, although information found there assumes you have access to TEX and LATEX documentation of some kind, such as the manuals mentioned earlier.