Table of Contents for
Running Linux, 5th Edition
 Running Linux, 5th Edition
Published by
O'Reilly Media, Inc., 2005
Running Linux, 5th Edition
Published by
O'Reilly Media, Inc., 2005
- Cover
- Running Linux, 5th Edition
- Preface
- Organization of This Book
- Conventions Used in This Book
- Using Code Examples
- How to Contact Us
- Safari® Enabled
- Acknowledgments
- I. Enjoying and Being Productive on Linux
- 1. Introduction to Linux
- 1.1. About This Book
- 1.2. Who’s Using Linux?
- 1.3. System Features
- 1.4. About Linux’s Copyright
- 1.5. Open Source and the Philosophy of Linux
- 1.6. Sources of Linux Information
- 1.7. Getting Help
- 2. Preinstallation and Installation
- 2.1. Distributions of Linux
- 2.2. Preparing to Install Linux
- 2.3. Post-Installation Procedures
- 2.4. Running into Trouble
- 3. Desktop Environments
- 3.1. Why Use a Graphical Desktop?
- 3.2. The K Desktop Environment
- 3.3. KDE Applications
- 3.4. The GNOME Desktop Environment
- 3.5. GNOME Applications
- 4. Basic Unix Commands and Concepts
- 4.1. Logging In
- 4.2. Setting a Password
- 4.3. Virtual Consoles
- 4.4. Popular Commands
- 4.5. Shells
- 4.6. Useful Keys and How to Get Them to Work
- 4.7. Typing Shortcuts
- 4.8. Filename Expansion
- 4.9. Saving Your Output
- 4.10. What Is a Command?
- 4.11. Putting a Command in the Background
- 4.12. Remote Logins and Command Execution
- 4.13. Manual Pages
- 4.14. Startup Files
- 4.15. Important Directories
- 4.16. Basic Text Editing
- 4.17. Advanced Shells and Shell Scripting
- 5. Web Browsers and Instant Messaging
- 5.1. The World Wide Web
- 5.2. Instant Messaging
- 6. Electronic Mail Clients
- 6.1. Using KMail
- 6.2. Using Mozilla Mail & News
- 6.3. Getting the Mail to Your Computer with fetchmail
- 6.4. OpenPGP Encryption with GnuPG
- 7. Games
- 7.1. Gaming
- 7.2. Quake III
- 7.3. Return to Castle Wolfenstein
- 7.4. Unreal Tournament 2004
- 7.5. Emulators
- 7.6. Frozen Bubble
- 7.7. Tux Racer
- 8. Office Suites and Personal Productivity
- 8.1. Using OpenOffice
- 8.2. KOffice
- 8.3. Other Word Processors
- 8.4. Synching PDAs
- 8.5. Groupware
- 8.6. Managing Your Finances
- 9. Multimedia
- 9.1. Multimedia Concepts
- 9.2. Kernel and Driver Issues
- 9.3. Embedded and Other Multimedia Devices
- 9.4. Desktop Environments
- 9.5. Windows Compatibility
- 9.6. Multimedia Applications
- 9.7. Multimedia Toolkits and Development Environments
- 9.8. Solutions to Common Problems
- 9.9. References
- II. System Administration
- 10. System Administration Basics
- 10.1. Maintaining the System
- 10.2. Managing Filesystems
- 10.3. Managing Swap Space
- 10.4. The /proc Filesystem
- 10.5. Device Files
- 10.6. Scheduling Recurring Jobs Using cron
- 10.7. Executing Jobs Once
- 10.8. Managing System Logs
- 10.9. Processes
- 10.10. Programs That Serve You
- 11. Managing Users, Groups, and Permissions
- 11.1. Managing User Accounts
- 11.2. File Ownership and Permissions
- 11.3. Changing the Owner, Group, and Permissions
- 12. Installing, Updating, and Compiling Programs
- 12.1. Upgrading Software
- 12.2. General Upgrade Procedure
- 12.3. Automated and Bulk Upgrades
- 12.4. Upgrading Software Not Provided in Packages
- 12.5. Archive and Compression Utilities
- 13. Networking
- 13.1. Networking with TCP/IP
- 13.2. Dial-Up PPP
- 13.3. PPP over ISDN
- 13.4. ADSL
- 13.5. Cable Modems
- 13.6. Network Diagnostics Tools
- 14. Printing
- 14.1. Printing
- 14.2. Managing Print Services
- 15. File Sharing
- 15.1. Sharing Files with Windows Systems (Samba)
- 15.2. NFS Configuration and NIS
- 16. The X Window System
- 16.1. A History of X
- 16.2. X Concepts
- 16.3. Hardware Requirements
- 16.4. Installing X.org
- 16.5. Configuring X.org
- 16.6. Running X
- 16.7. Running into Trouble
- 16.8. X and 3D
- 17. System Start and Shutdown
- 17.1. Booting the System
- 17.2. System Startup and Initialization
- 17.3. Single-User Mode
- 17.4. Shutting Down the System
- 17.5. A Graphical Runlevel Editor: KSysV
- 18. Configuring and Building the Kernel
- 18.1. Building a New Kernel
- 18.2. Loadable Device Drivers
- 18.3. Loading Modules Automatically
- 19. Text Editing
- 19.1. Editing Files Using vi
- 19.2. The (X)Emacs Editor
- 20. Text Processing
- 20.1. TeX and LaTeX
- 20.2. XML and DocBook
- 20.3. groff
- 20.4. Texinfo
- III. Programming
- 21. Programming Tools
- 21.1. Programming with gcc
- 21.2. Makefiles
- 21.3. Debugging with gdb
- 21.4. Useful Utilities for C Programmers
- 21.5. Using Perl
- 21.6. Java
- 21.7. Python
- 21.8. Other Languages
- 21.9. Introduction to OpenGL Programming
- 21.10. Integrated Development Environments
- 22. Running a Web Server
- 22.1. Configuring Your Own Web Server
- 23. Transporting and Handling Email Messages
- 23.1. The Postfix MTA
- 23.2. Procmail
- 23.3. Filtering Spam
- 24. Running an FTP Server
- 24.1. Introduction
- 24.2. Compiling and Installing
- 24.3. Running ProFTPD
- 24.4. Configuration
- IV. Network Services
- 25. Running Web Applications with MySQL and PHP
- 25.1. MySQL
- 25.2. PHP
- 25.3. The LAMP Server in Action
- 26. Running a Secure System
- 26.1. A Perspective on System Security
- 26.2. Initial Steps in Setting Up a Secure System
- 26.3. TCP Wrapper Configuration
- 26.4. Firewalls: Filtering IP Packets
- 26.5. SELinux
- 27. Backup and Recovery
- 27.1. Making Backups
- 27.2. What to Do in an Emergency
- 28. Heterogeneous Networking and Running Windows Programs
- 28.1. Sharing Partitions
- 28.2. Emulation and Virtual Operating Systems
- 28.3. Remote Desktop Access to Windows Programs
- 28.4. FreeNX: Linux as a Remote Desktop Server
- A. Sources of Linux Information
- A.1. Linux Documentation Project
- A.2. FTP Sites
- A.3. World Wide Web Sites
- About the Authors
- Colophon
- Copyright
Modern games with detailed graphics, sophisticated soundtracks, and fast-paced network play are certainly fun, but sometimes you want to hearken back to a simpler time — a time with 8- or 16-bit graphics when arguably gameplay was more important than fancy graphics. Linux has a number of emulators so you can take a trip back to the days of plunking quarters into Pacman — only, as with Linux, the arcade is free. These emulators work from ROM images that have been extracted from the arcade or console game, and emulate the environment necessary for the ROM to function, so you can use your keyboard or even a joystick and play the games directly from your computer.
Probably the most famous and popular console emulator is MAME (Multiple Arcade Machine Emulator) . The focus of the MAME project (www.mame.net) is to create an emulator for the various different arcade platforms that have been in use over the years. In this respect the MAME project is much more complicated than many of the other console emulation projects because it supports many different platforms. Currently MAME supports thousands of arcade titles and the list continues to grow. You can view the list of currently supported titles on www.mame.net/gamelist.html.
MAME was originally a project for the Windows platform only; however, a Linux port, called Xmame , has been created. Xmame is based directly on the MAME source code, with changes being made only when necessary to run under Linux. Because of this you can treat Xmame under Linux like MAME under Windows, and ROMS that work on one will work on the other.
Xmame is a popular program and should already be packaged for your particular distribution, but if it isn’t you can download the latest source from the project’s site at x.mame.net. There are a number of different display options for Xmame , and some distributions package the different display options separately:
- X11
The standard Xmame display option is output to a window under X.
- SVGAlib
Xmame can also use SVGAlib to display to the console, allowing you to use Xmame without running X.
- GL
Xmame can output to an X11 display using OpenGL libraries to take advantage of hardware acceleration on your video card.
- SDL
Xmame can also use SDL libraries for output under an X11 environment. Similar to the OpenGL libraries, SDL lets Xmame take advantage of hardware acceleration where available.
- Glide
As with OpenGL, Xmame can use the Glide libraries for hardware acceleration both under X and with SVGAlib for 3DFX cards.
To start, you will want to use the X11 display method because it is the default and is most likely to work with your system. The first time, just run xmame from the command line without any arguments. Xmame will search /etc/xmame/xmamerc for system-wide defaults and will create a local configuration directory under ~/.xmame. Copy the /etc/xmame/xmamerc file to ~/.xmame so you can tweak settings specific to your user. This file contains all the different settings for Xmame, but the first setting you will probably want to change is rompath. This setting controls in what directory Xmame looks for ROMs, so if your user has a local folder for MAME ROMs, put it here and save the file. Now you will be able to play any game you have a ROM for simply by passing the name of the ROM as an argument to Xmame. ROMs generally come in .zip files that contain a number of different files the emulator needs all in one package. To play your pacman.zip ROM, you would simply run:
$ xmame pacmanon the command line (Figure 7-7).
Now that the game is running, what do you do? Xmame uses the same keybindings as the DOS version of MAME. Table 7-1 lists some of the primary key bindings you will find yourself using.
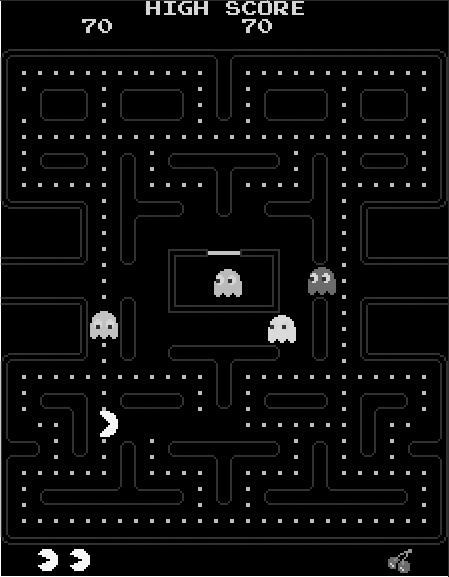
Table 7-1. Xmame key bindings
Key | Action |
|---|---|
P | Pause the game |
F3 | Reset the game |
F8 | Reduce frame skip |
F9 | Increase frame skip (useful to speed up games on slower machines) |
ESC | Exit emulator |
left-Shift + Pgup | Increase scale (makes game larger for higher-resolution displays) |
left-Shift + Pgdn | Decrease scale |
left-Shift + Insert | Normal window |
left-Shift + Home | DGA fullscreen mode |
In addition, individual games have their own key bindings. These vary from game to game, but there are some standard key bindings most games use for common buttons (Table 7-2).
Table 7-2. Common button bindings
Key | Action |
|---|---|
Arrow keys | Move left, right, up, and down |
1 | Select one player |
2 | Select two players |
5 | Insert a coin |
Ctrl | Button 1 |
Alt | Button 2 |
Because some arcade games just have a joystick, and others have six or more buttons, the button mappings to a keyboard will sometimes vary. For basic games, Ctrl and Alt work as the first and second buttons but more complicated games will require some experimentation to discover the key bindings. By default, Xmame will play a game in its original resolution, so on a high-resolution computer screen you might want to increase the scale of the game once or twice with left-Shift and PageUp.
Xmame can use your mouse for applicable games as well. A good example of using a mouse in an arcade game is Centipede , which by default uses a large trackball mouse. You can either use your mouse or the arrow keys for movement.
Xmame also supports use of a joystick, although this isn’t
turned on by default. Either change the joytype option in your
xmamerc file or pass -joytype number
on the command line. The number corresponds to the type of joystick
you use (Table
7-3).
Arcade games are incredibly fun, but there are some games that seem to only exist on certain game consoles, such as the original Nintendo Entertainment System (NES) . As with the MAME project, there is software you can use to emulate the NES hardware and play ROMs directly on your computer. Under Linux, the software is Nestra .
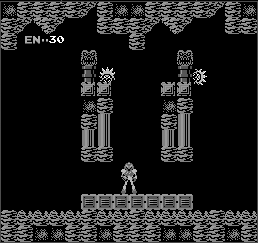
Nestra will already be packaged for you depending on your distribution, but if it isn’t, you can download and build the source directly from nestra.linuxgames.com. Once installed, using Nestra is as simple as running nestra with the path to the ROM you want to play as an argument. So, to play the original Metroid , you would type:
$ nestra Metroid.nesSee Figure 7-8.
Nestra key bindings are the same across games and correspond to the standard NES controller (Table 7-4).
Table 7-4. Nestra key mappings
Key | Function |
|---|---|
Arrow keys | Arrow pad |
Spacebar | Button A |
z, x | Button B |
Enter | Start |
Tab | Select |
Pause, Break | Reset |
Esc | Exit Nestra |
1-9 | Adjust the emulation speed. 1 is the normal speed, 2 is double speed, etc. |
- | Run at half speed |
0 | Pause the emulator |
Some games, such as Zelda, save games on the game cartridge itself. Since you are dealing with ROMs here, Nestra will place saved games in a file in the directory containing the ROM you are running, or will put the saved games in ~/.nestra if the directory exists.
The NES definitely had a lot of fun games, and when the next generation of Nintendo’s consoles was released — the Super Nintendo Entertainment System, or SNES — many of the classics, such as Super Mario Bros, Zelda, and Metroid, found their way onto the new platform. You can play all of your favorite SNES ROMs under Linux using the Snes9x program.
Snes9x is an SNES emulator that runs on Windows, Linux, Mac OSX, and other platforms. The Linux port is packaged by most distributions, or you can download and build the source from the official Snes9x page at www.snes9x.com.
Once installed, running Snes9x is similar to Nestra — simply type snes9x followed by the path to the SNES ROM as an argument. To run Zelda 3, for example, you would type
$ snes9x zelda3.smcUnlike Nestra, Snes9x has a large number of options you can pass on the command line. For instance, the -y option enables “TV mode,” which scales the image by two and inserts an extra blended pixel between each scan line. The end result of TV mode is a larger, easier-to-read screen that looks more like a regular television screen.
Snes9x uses a standard set of key bindings to correspond to the buttons on an SNES controller. The standard key bindings are shown in Table 7-5.
Table 7-5. Snes9x key mappings
Key | Function |
|---|---|
Escape | Quit the emulator |
Pause, Scroll Lock | Pause the emulator |
Up arrow, u | Up direction |
Down arrow, j, n | Down direction |
Left arrow, h | Left direction |
Right arrow, k | Right direction |
a, v, q | TL button |
z, b, w | TR button |
s, m, e | X button |
x, ',', r | Y button |
d, ‘.', t | A button |
c, y | B button |
Enter | Start button |
Spacebar | Select button |
Shift F1-F9 | Save the game in one of nine different slots |
F1-F9 | Restore the saved game in the specified slot |
Snes9x has support for joysticks, and by default will scan for /dev/js0, or you can specify the joystick device to use with the -joydev1 argument. You can also control the mapping for the eight different SNES buttons with the -joymap1 and -joymap2 options (for joystick 1 and joystick 2, respectively) followed by the eight different buttons in order. For instance, the default is 0 1 2 3 4 5 6 7, which corresponds to A B X Y TL TR Start Select.
There are so many different options to Snes9x, in fact, that a couple of graphical frontends have been created to make the process of configuring Snes9x easier. Snes9express is an easy-to-use frontend that makes it easy to organize your SNES ROMs and experiment with different settings. You can download the latest version from www.linuxgames.com/snes9express or use the package that comes with your distribution. Snes9express supports skinning and even includes a skin that makes it look like the original SNES console (Figure 7-9).
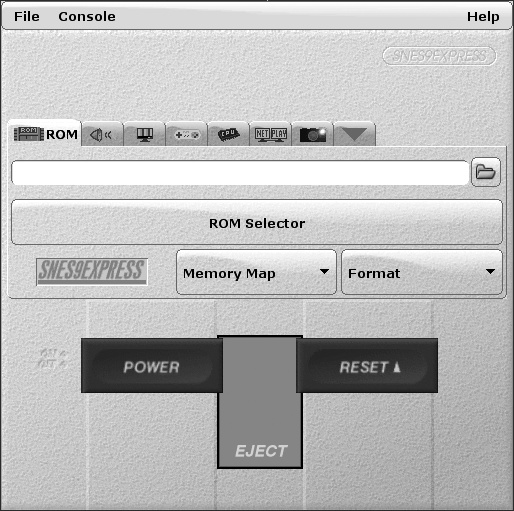
Click Console → Preferences and give snes9express the path to your SNES ROM directory, and then you can click the ROM Selector button for a window to pop up with a full list of available games to run. Select the game you want to play and then click Power to start. The Snes9express window will disappear while the game is running, and reappear once you exit the game.
To change Snes9x settings from within Snes9express, click on the different settings tabs in the the main window. Sound, video, controller, and other settings can be configured in these tabs and the GUI makes it easy to toggle an option, or to change your joystick settings quickly.