Table of Contents for
Running Linux, 5th Edition
 Running Linux, 5th Edition
Published by
O'Reilly Media, Inc., 2005
Running Linux, 5th Edition
Published by
O'Reilly Media, Inc., 2005
- Cover
- Running Linux, 5th Edition
- Preface
- Organization of This Book
- Conventions Used in This Book
- Using Code Examples
- How to Contact Us
- Safari® Enabled
- Acknowledgments
- I. Enjoying and Being Productive on Linux
- 1. Introduction to Linux
- 1.1. About This Book
- 1.2. Who’s Using Linux?
- 1.3. System Features
- 1.4. About Linux’s Copyright
- 1.5. Open Source and the Philosophy of Linux
- 1.6. Sources of Linux Information
- 1.7. Getting Help
- 2. Preinstallation and Installation
- 2.1. Distributions of Linux
- 2.2. Preparing to Install Linux
- 2.3. Post-Installation Procedures
- 2.4. Running into Trouble
- 3. Desktop Environments
- 3.1. Why Use a Graphical Desktop?
- 3.2. The K Desktop Environment
- 3.3. KDE Applications
- 3.4. The GNOME Desktop Environment
- 3.5. GNOME Applications
- 4. Basic Unix Commands and Concepts
- 4.1. Logging In
- 4.2. Setting a Password
- 4.3. Virtual Consoles
- 4.4. Popular Commands
- 4.5. Shells
- 4.6. Useful Keys and How to Get Them to Work
- 4.7. Typing Shortcuts
- 4.8. Filename Expansion
- 4.9. Saving Your Output
- 4.10. What Is a Command?
- 4.11. Putting a Command in the Background
- 4.12. Remote Logins and Command Execution
- 4.13. Manual Pages
- 4.14. Startup Files
- 4.15. Important Directories
- 4.16. Basic Text Editing
- 4.17. Advanced Shells and Shell Scripting
- 5. Web Browsers and Instant Messaging
- 5.1. The World Wide Web
- 5.2. Instant Messaging
- 6. Electronic Mail Clients
- 6.1. Using KMail
- 6.2. Using Mozilla Mail & News
- 6.3. Getting the Mail to Your Computer with fetchmail
- 6.4. OpenPGP Encryption with GnuPG
- 7. Games
- 7.1. Gaming
- 7.2. Quake III
- 7.3. Return to Castle Wolfenstein
- 7.4. Unreal Tournament 2004
- 7.5. Emulators
- 7.6. Frozen Bubble
- 7.7. Tux Racer
- 8. Office Suites and Personal Productivity
- 8.1. Using OpenOffice
- 8.2. KOffice
- 8.3. Other Word Processors
- 8.4. Synching PDAs
- 8.5. Groupware
- 8.6. Managing Your Finances
- 9. Multimedia
- 9.1. Multimedia Concepts
- 9.2. Kernel and Driver Issues
- 9.3. Embedded and Other Multimedia Devices
- 9.4. Desktop Environments
- 9.5. Windows Compatibility
- 9.6. Multimedia Applications
- 9.7. Multimedia Toolkits and Development Environments
- 9.8. Solutions to Common Problems
- 9.9. References
- II. System Administration
- 10. System Administration Basics
- 10.1. Maintaining the System
- 10.2. Managing Filesystems
- 10.3. Managing Swap Space
- 10.4. The /proc Filesystem
- 10.5. Device Files
- 10.6. Scheduling Recurring Jobs Using cron
- 10.7. Executing Jobs Once
- 10.8. Managing System Logs
- 10.9. Processes
- 10.10. Programs That Serve You
- 11. Managing Users, Groups, and Permissions
- 11.1. Managing User Accounts
- 11.2. File Ownership and Permissions
- 11.3. Changing the Owner, Group, and Permissions
- 12. Installing, Updating, and Compiling Programs
- 12.1. Upgrading Software
- 12.2. General Upgrade Procedure
- 12.3. Automated and Bulk Upgrades
- 12.4. Upgrading Software Not Provided in Packages
- 12.5. Archive and Compression Utilities
- 13. Networking
- 13.1. Networking with TCP/IP
- 13.2. Dial-Up PPP
- 13.3. PPP over ISDN
- 13.4. ADSL
- 13.5. Cable Modems
- 13.6. Network Diagnostics Tools
- 14. Printing
- 14.1. Printing
- 14.2. Managing Print Services
- 15. File Sharing
- 15.1. Sharing Files with Windows Systems (Samba)
- 15.2. NFS Configuration and NIS
- 16. The X Window System
- 16.1. A History of X
- 16.2. X Concepts
- 16.3. Hardware Requirements
- 16.4. Installing X.org
- 16.5. Configuring X.org
- 16.6. Running X
- 16.7. Running into Trouble
- 16.8. X and 3D
- 17. System Start and Shutdown
- 17.1. Booting the System
- 17.2. System Startup and Initialization
- 17.3. Single-User Mode
- 17.4. Shutting Down the System
- 17.5. A Graphical Runlevel Editor: KSysV
- 18. Configuring and Building the Kernel
- 18.1. Building a New Kernel
- 18.2. Loadable Device Drivers
- 18.3. Loading Modules Automatically
- 19. Text Editing
- 19.1. Editing Files Using vi
- 19.2. The (X)Emacs Editor
- 20. Text Processing
- 20.1. TeX and LaTeX
- 20.2. XML and DocBook
- 20.3. groff
- 20.4. Texinfo
- III. Programming
- 21. Programming Tools
- 21.1. Programming with gcc
- 21.2. Makefiles
- 21.3. Debugging with gdb
- 21.4. Useful Utilities for C Programmers
- 21.5. Using Perl
- 21.6. Java
- 21.7. Python
- 21.8. Other Languages
- 21.9. Introduction to OpenGL Programming
- 21.10. Integrated Development Environments
- 22. Running a Web Server
- 22.1. Configuring Your Own Web Server
- 23. Transporting and Handling Email Messages
- 23.1. The Postfix MTA
- 23.2. Procmail
- 23.3. Filtering Spam
- 24. Running an FTP Server
- 24.1. Introduction
- 24.2. Compiling and Installing
- 24.3. Running ProFTPD
- 24.4. Configuration
- IV. Network Services
- 25. Running Web Applications with MySQL and PHP
- 25.1. MySQL
- 25.2. PHP
- 25.3. The LAMP Server in Action
- 26. Running a Secure System
- 26.1. A Perspective on System Security
- 26.2. Initial Steps in Setting Up a Secure System
- 26.3. TCP Wrapper Configuration
- 26.4. Firewalls: Filtering IP Packets
- 26.5. SELinux
- 27. Backup and Recovery
- 27.1. Making Backups
- 27.2. What to Do in an Emergency
- 28. Heterogeneous Networking and Running Windows Programs
- 28.1. Sharing Partitions
- 28.2. Emulation and Virtual Operating Systems
- 28.3. Remote Desktop Access to Windows Programs
- 28.4. FreeNX: Linux as a Remote Desktop Server
- A. Sources of Linux Information
- A.1. Linux Documentation Project
- A.2. FTP Sites
- A.3. World Wide Web Sites
- About the Authors
- Colophon
- Copyright
For many gamers, Wolfenstein 3D was their first exposure to a 3D first-person shooter. In the game you are a captured American soldier inside a Nazi prison. Your goal is to escape the prison and shoot any guards who get in your way. Id Software has released an updated version of the classic called Return to Castle Wolfenstein (RTCW) that shares the same basic objectives but expands the game play and provides updated graphics and sounds.
Unfortunately the native Linux client is not included with the Return to Castle Wolfenstein CD, so you will need to download the latest version of the installer from ftp://ftp.idsoftware.com/idstuff/wolf/linux. Updates are also provided in the directory, so be sure to download the full installer (it will be a larger file and not have the word update in the filename).
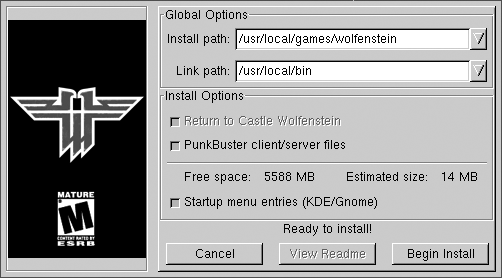
To install RTCW, become root, add executable permissions to the installer with chmod +x filename, and run the installer script. The installer provides a basic GUI that lets you configure a few installation settings, including where to install the binaries (Figure 7-3). By default the installer will put files in /usr/local/games/wolfenstein.
Unlike some Linux game installers, the Wolfenstein installer will not install the compressed game files that are on your CD. The README file that comes with the installer instructs you to copy seven files from your Windows install of the game to the /usr/local/games/wolfenstein/main directory. These files are mp_pak0.pk3, mp_pak1.pk3, mp_pak2.pk3, pak0.pk3, sp_pak1.pk3, and sp_pak2.pk3. If you have not installed the game under Windows, your other option is to run the CD installer under Wine and then copy the files. If you have trouble with the installer, you can check out the official FAQ for the Linux client, found at zerowing.idsoftware.com/linux.
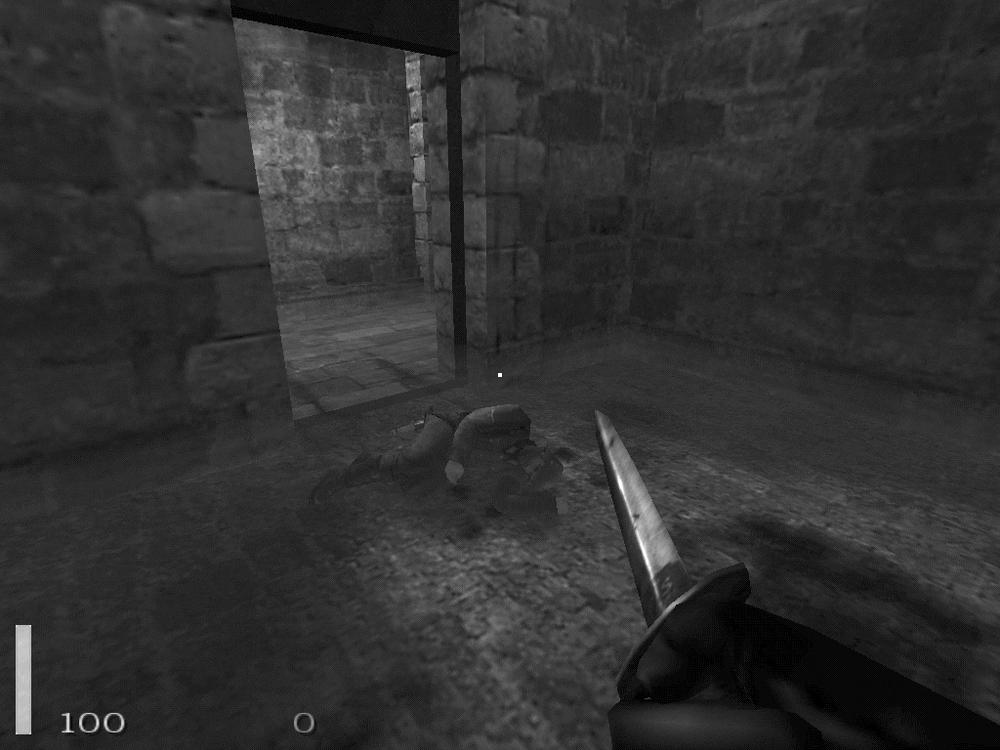
Once you launch RTCW, you will probably want to click on Options and familiarize yourself with and change the default key bindings and other settings to suit you. In the Options section you can also launch various mods you have downloaded and installed for the game. Click Play to start a game. The default mode for RTCW is a single-player game that puts you into a similar situation as the first Wolfenstein 3D — you are freed from your Nazi prison cell when you attack and kill a guard (Figure 7-4). Your goal is to advance through enemy lines and escape prison.
As you move through the game, at different times you will want to employ stealth by walking slowly (hit the Caps Lock key) and peeking around corners (Q and E lean to the left and to the right, respectively), or react quickly without regard to noise and sprint through an area (hold down the Shift key when you move) and kick in doors (the X key) and jump over obstacles (spacebar). When you find items such as weapons or supplies, you can pick them up just by walking over them. Some objects in the game, such as alarms, can be activated and deactivated with the Enter key. Of course, you can also deactivate an alarm by shooting at it.
There are a number of weapons in the game to help you fight the enemy. You start with a basic knife and quickly pick up the guard’s pistol. As you progress in the game you get more powerful weapons, such as submachine guns, rifles, grenades, and rockets. Some of the weapons share ammunition, so be aware of your ammo counts. Also, some of the autofire guns overheat if fired too much in a short time, so be sure to fire them only in short bursts. Certain levels contain mounted machine guns. To use these weapons, step up to them until the hand icon appears on the screen and then press F or Enter to mount or dismount from the machine gun. When mounted, you view through the machine gun’s crosshairs and can aim and fire at your enemies.
RTCW also has a multiplayer mode that is rather different from the single-player game. In multiplayer mode there are two teams—the Axis and the Allies. In the default multiplayer mode both teams have one or more objectives they must accomplish within a time limit. The first team that completes the objective wins the round. In stopwatch mode the game changes a bit. After each round of play, the teams switch sides and must beat the other team’s time for completing the objective. Checkpoint mode is somewhat like capture the flag. There are a number of checkpoint flags scattered across the map. The first team that controls all of the different checkpoints simultaneously wins. If time runs out, the team that controls the most checkpoints wins the round.
Multiplayer mode also differs from single player in that there are four different character classes to choose from, each with different abilities and roles in the game. A successful team will have members from each of the roles working together.
- Soldier
This is a standard fighting role. The soldier can use all of the two-handed weapons, such as the sniper rifle. This is a good default role to pick if you are starting out and aren’t sure what to do.
- Engineer
The engineer’s primary focus is demolitions, and the engineer is the only player who can use dynamite to destroy objectives. In addition, the engineer can repair stationary guns and disarm dynamite that enemies lay.
- Medic
A medic is an important team member. Medics can help heal and even revive dead team members on the battlefield. Medics also are equipped with health packs that they can drop for other teammates to pick up. If you have a medic on the team, then all players will spawn with an additional 10 hits points. Also, the health of a medic slowly regenerates over time.
- Lieutenant
A lieutenant’s primary duties are back a bit from the main battle and involve tactical decisions. A lieutenant can drop a smoke grenade on an area to signal an airstrike. Also, lieutenants can use binoculars to call in artillery attacks on a location. Lieutenants can drop ammo packs for other teammates, much in the way medics drop health packs.
Unlike in some other tactical multiplayer FPSs, in RTCW players have multiple lives and respawn, but with a twist. When a player dies, he is placed in “limbo” and must wait until the next reinforcement period occurs to respawn. During this period he can change character classes and weapons, and even switch teams. You can also choose to wait for a medic to revive you instead of waiting in limbo. In that case, you can get back into the game immediately once a medic revives you.
You can play multiplayer games either locally on a LAN or on servers on the Internet. The multiplayer interface provides a server browser that will scan for currently open servers to connect to, otherwise you can directly enter the IP address of a server. You can also host your own server. Included in the Linux binary is a file called QUICKSTART that goes through the basics of running a dedicated server.
The dedicated server is called wolfded and game options are changed
through arguments on the command line or by specifying a config file
to execute. To get a basic server up, run:
    $ wolfded +set com_hunkmegs 64 +set sv_maxrate 9000 +set com_zonemegs 32 +set \
      dedicated 2 +set sv_hostname "my server" +set g_motd "my motd" +map mp_villiage
Included with the install is a basic map rotation script in main/rotate.cfg. You can specify this on the command line to start a basic server that will cycle through the different maps:
    $ wolfded +set com_hunkmegs 64 +set sv_maxrate 9000 +set com_zonemegs 32 +set \
      dedicated 2 +set sv_hostname "my server" +set g_motd "my motd" +exec rotate.cfg \
      +vstr m_rotate1
Unlike with standard single-player or multiplayer mode, you do not have to have a valid CD key to host a dedicated server.
To update to the latest version of RTCW, download the latest version of the installer (or to save bandwidth, the -update file of the same version) from ftp.idsoftware.com and execute it as root. You will see an interface just like that of the original installer, and updated files will overwrite the old versions once you click Install.