Table of Contents for
Linux in a Windows World
 Linux in a Windows World
Published by
O'Reilly Media, Inc., 2005
Linux in a Windows World
Published by
O'Reilly Media, Inc., 2005
- Cover
- Linux in a Windows World
- Dedication
- Preface
- Contents of This Book
- Conventions Used in This Book
- Using Code Examples
- Comments and Questions
- Safari Enabled
- Acknowledgments
- I. Linux’s Place in a Windows Network
- 1. Linux’s Features
- Linux as a Server
- Linux on the Desktop
- Comparing Linux and Windows Features
- Summary
- 2. Linux Deployment Strategies
- Linux Desktop Migration
- Linux and Thin Clients
- Summary
- II. Sharing Files and Printers
- 3. Basic Samba Configuration
- The Samba Configuration File Format
- Identifying the Server
- Setting Master Browser Options
- Setting Password Options
- Summary
- 4. File and Printer Shares
- Printing with CUPS
- Creating a Printer Share
- Delivering Printer Drivers to Windows Clients
- Example Shares
- Summary
- 5. Managing a NetBIOS Network with Samba
- Enabling NBNS Functions
- Assuming Master Browser Duties
- Summary
- 6. Linux as an SMB/CIFS Client
- Accessing File Shares
- Printing to Printer Shares
- Configuring GUI Workgroup Browsers
- Summary
- III. Centralized Authentication Tools
- 7. Using NT Domains for Linux Authentication
- Samba Winbind Configuration
- PAM and NSS Winbind Options
- Winbind in Action
- Summary
- 8. Using LDAP
- Configuring an OpenLDAP Server
- Creating a User Directory
- Configuring Linux to Use LDAP for Login Authentication
- Configuring Windows to Use LDAPfor Login Authentication
- Summary
- 9. Kerberos Configuration and Use
- Linux Kerberos Server Configuration
- Kerberos Application Server Configuration
- Linux Kerberos Client Configuration
- Windows Kerberos Tools
- Summary
- IV. Remote Login Tools
- 10. Remote Text-Mode Administration and Use
- SSH Server Configuration
- Telnet Server Configuration
- Windows Remote-Login Tools
- Summary
- 11. Running GUI Programs Remotely
- Using Remote X Access
- Encrypting X by SSH Tunneling
- VNC Configuration and Use
- Running Windows Programs from Linux
- Summary
- 12. Linux Thin Client Configurations
- Hardware Requirements
- Linux as a Server for Thin Clients
- Linux as a Thin Client
- Summary
- V. Additional Server Programs
- 13. Configuring Mail Servers
- Configuring Sendmail
- Configuring Postfix
- Configuring POP and IMAP Servers
- Scanning for Spam, Worms, and Viruses
- Supplementing a Microsoft Exchange Server
- Using Fetchmail
- Summary
- 14. Network Backups
- Backing Up the Linux System
- Backing Up with Samba
- Backing Up with AMANDA
- Summary
- 15. Managing a Network with Linux
- Delivering Names with DNS
- Keeping Clocks Synchronized with NTP
- Summary
- VI. Appendixes
- A. Configuring PAM
- The PAM Configuration File Format
- PAM Modules
- Sample PAM Configurations
- Summary
- B. Linux on the Desktop
- Configuring Applications and Environments
- Running Windows Programs in Linux
- File and Filesystem Compatibility
- Font Handling
- Summary
- Index
- Colophon
Linux can run several protocols that can provide important background functionality on networks. These protocols seldom make themselves obvious to users—except if the servers that manage them malfunction. Although most of them are major protocols in the sense that they provide many features and have even spawned entire books, they aren’t tricky enough to configure to deserve entire chapters in this book. Therefore, I cover all of them in this chapter. These protocols are the Dynamic Host Configuration Protocol, which delivers IP addresses and other basic network configuration information to clients; the Domain Name System, which converts hostnames to IP addresses and vice versa; and the Network Time Protocol, which helps keep clocks synchronized on multiple computers.
Although all these protocols can be handled by Windows, doing so with Linux gives you all of Linux’s advantages. The servers that handle these protocols are all small enough and require little enough in the way of CPU time, memory, and other resources that they can be run on a very modest Linux system—perhaps an old 80486 or Pentium system that’s been retired. You can move one or more of these services onto such a Linux system, obviating the need to upgrade your software and hardware to enable the latest version of Windows to do the job.
Networks of all sizes use DHCP to simplify configuration of most computers on the network. A computer configured to use DHCP for basic network configuration tries to locate a DHCP server at startup and, if one is found, sets its basic network options to those specified by the DHCP server. This task may sound impossible because basic network configuration information is delivered via the network before the DHCP client is configured, but it is possible, and understanding the basics of how it’s possible is the first order of business. Next up is an overview of DHCP configuration files. You can use DHCP to assign addresses either so that the same computer is or isn’t guaranteed the same address on each boot, and understanding how to do both is important. Finally, knowing how to tell clients to use DHCP is critically important to this protocol’s successful deployment.
DHCP is an unusual protocol because it uses very low-level network protocols to help a computer “bootstrap” a more sophisticated configuration. When a DHCP client boots or starts its TCP/IP network stack, the client has no IP address, but it does have working hardware, and it can send data over the network wire. The DHCP client therefore sends a network broadcast with a query directed at any DHCP server that might be listening. Although the DHCP client has no IP address, it does have a working low-level hardware address, and the DHCP server is able to direct its reply to this address. The DHCP server’s reply includes information on basic network settings—most importantly, the client’s IP address and network mask, as well as the IP addresses of the subnet’s router and the DNS servers the client should use. Additional information can be delivered, as well, such as the IP addresses of NBNS computers, but this information isn’t delivered by all DHCP servers or used by all clients.
DHCP works by issuing leases on IP addresses. The idea is that, should the client crash or otherwise become inaccessible, the IP address will revert back to the pool of available addresses after a limited time. In this way, a DHCP server can continue delivering addresses from a fixed set of addresses. Clients can also give up their leases voluntarily—say, when they’re shut down. Not all clients do this, though. Leases have fixed terms, and when a lease expires, a client must renew that lease. (Typically, clients attempt to renew their leases halfway through their terms. If the initial renewal attempt fails, subsequent attempts are made.)
Considered on the network as a whole, DHCP simplifies configuration. Instead of entering several IP addresses on each client (for the client itself, including its netmask, the router, DNS servers, and perhaps more), DHCP enables you to set a single option to use DHCP on each client. The details of IP address assignment can then be handled by the server, either automatically or by assigning one address to each computer. This centralized control has a certain appeal by itself, but it’s also helpful because it reduces the risk of a typo causing problems, and it makes it easier to change your network’s configuration. For instance, if you need to change your network’s DNS server address for some reason, you can do so by implementing a change in the DHCP server configuration.
Tip
Because DHCP works by providing leases of fixed length, changes to network features such as DNS and router IP addresses won’t immediately propagate to all DHCP clients. Most clients should update their settings by half the DHCP lease time, though. You can adjust the lease time from the DHCP server.
Because DHCP can assign IP addresses arbitrarily to any computer that asks for one, it can be particularly handy on networks on which computers are frequently added and removed. For instance, if your office hosts a number of notebook computers that are frequently removed and taken on business trips, these computers might not have permanent IP address assignments. A DHCP server can assign addresses to them as they’re used. Furthermore, if a notebook computer is used on two networks, and if both networks use DHCP, the notebook computer can adjust itself automatically to the settings needed by both networks.
Warning
Although enabling DHCP to deliver IP addresses to any new computer it sees, and using notebook computers with any network’s DHCP server are both useful procedures, they’re also both potentially risky. If a new computer on your network is infected with a worm or virus, it might be able to spread locally, bypassing any firewall controls you have on your router. Likewise, a notebook computer can come under attack from worms or viruses if connected to a foreign network. To reduce risk in a security-conscious environment, you might configure DHCP to deliver IP addresses only to known computers. You can do so by referencing specific hardware addresses, as described in the Section 15.1.4.2.
In the Linux world, the Internet Software
Consortium’s (ISC; http://www.isc.org) DHCP server is the
standard one. Most Linux distributions ship with this server under
the package name dhcpd or
dhcp-server. ISC also produces a DHCP client,
which is frequently installed as dhcpcd. Other
DHCP clients, such as pump and
dhcp-client, are also available.
Because the DHCP server must communicate with clients that are not yet fully configured for TCP/IP, the server needs support for packet sockets. This is a way for programs to communicate over the network without using an intervening network protocol, such as TCP/IP. It’s usually enabled by default, but if you’ve rebuilt your kernel yourself, you might want to check for it. In 2.6.x kernels, check Networking Support → Networking Options → Packet Socket. If this option isn’t enabled, enable it and recompile your kernel. This option is also needed by some DHCP clients.
DHCP servers send their responses to clients using a broadcast address. This can be either a global broadcast (255.255.255.255) or a broadcast that reaches all the computers on a particular subnet (such as 172.24.255.255 to reach all the computers on the 172.24.0.0/16 subnet). Unfortunately, some DHCP clients (such as some versions of Windows) expect DHCP servers to deliver global broadcasts, but some Linux configurations convert global broadcasts into local broadcasts. The usual symptom of this problem is that some Windows clients (particularly Windows 9x/Me systems) can’t obtain IP addresses via DHCP, but others (such as Linux clients) can. If this happens, try typing this command on the Linux DHCP server:
# route add -host 255.255.255.255 dev eth0If the DHCP server is delivering addresses on a device other than
eth0, change that part of the command
appropriately. After making this change, try restarting an affected
Windows system; it should now work. If so, add this line to a local
Linux startup script or to the SysV startup script for your DHCP
server.
Tip
This route command adds an explicit route for
traffic destined to 255.255.255.255; without it, Linux changes the IP
address to conform to existing routes. You can check your existing
routing table by typing route
-n. After adding the route as just described,
it should appear as the first entry in the routing table.
The DHCP server’s
configuration file is
/etc/dhcpd.conf
.
Some package distributions include this file in this location, but
some packages instead provide a sample file in another location. For
instance, SuSE’s dhcp-server
package stores a sample file in
/usr/share/doc/packages/dhcp-server/. The ISC
DHCP server also creates a file to track its leases, often called
/var/lib/dhcp/dhcpd.leases. You
shouldn’t need to adjust this file, although
examining it can sometimes be a good way to check the
server’s operation.
Warning
Don’t confuse the DHCP server’s
dhcpd.conf
file with
dhcpcd.conf, which some DHCP
client packages use as a configuration file!
Aside from comments, which are
denoted by hash marks (#),
dhcpd.conf contains two broad types of
statements:
- Parameters
These are relatively simple statements that provide information for clients (such as a router’s IP address) or that tell the server whether or how to do something (such as how long leases should be). Many parameters begin with the keyword
option.- Declarations
These statements describe the network topology, assign IP addresses to clients, or create a grouping of related parameters. Declarations often span multiple lines, in which case the grouped lines are denoted by curly braces (
{ }).
Most dhcpd.conf files begin with a set of
parameters and then move on to declarations. A simple network may
contain just one declaration, which in turn contains multiple
parameters. A more complex network might contain multiple
declarations.
The bulk of DHCP server configuration is in assigning IP addresses. A full configuration file, though, sets assorted other parameters, and it’s best to consider them together. I therefore describe two complete configurations as examples: assigning dynamic IP addresses and assigning fixed IP addresses.
In a dynamic IP address assignment configuration, the DHCP server hands out IP addresses to any computer that asks for them but doesn’t go to any great lengths to track computers and match them with the same IP address every time they boot. Thus, a single computer might receive four different IP addresses over the course of a week, depending on factors such as the lease time, the number of addresses available, the number of computers on the network, and how often the computer reboots or is shut down for an extended period.
Tip
Even when a network uses dynamic IP addresses, a computer’s IP address is unlikely to change unless the computer is shut down for an extended period of time, such that its lease expires and another computer grabs the address. Even when a computer reboots, it typically asks for its old address back, and will probably receive that address if the lease hasn’t expired yet. When the computer stays up continuously, it renews its lease before the lease expires and so keeps the same IP address continuously.
Example 15-1 shows a typical
dhcpd.conf
file for assigning dynamic IP addresses.
Although this example is simple, something like it should be adequate
for many small networks or even simple large networks. Most lines in
this file end in semicolons (;), and omitting that
character is an easy way to create a nonfunctional configuration
file, so be sure to check that detail. Multiline declarations,
however, don’t use a semicolon on lines that end in
either an open or a close curly brace.
Example 15-1. Sample dynamic DHCP server configuration
allow bootp;
default-lease-time 86400;
max-lease-time 172800;
option subnet-mask 255.255.255.0;
option domain-name-servers 192.168.1.7, 172.24.21.7;
option domain-name "example.com";
option netbios-node-type 8;
option netbios-name-servers 192.168.1.7
option ntp-servers 192.168.1.7;
option x-display-manager 192.168.1.3;
option tftp-server-name "mango.example.com";

subnet 192.168.1.0 netmask 255.255.255.0 {
   option routers 192.168.1.1;
   range 192.168.1.50 192.168.1.254;
}
This example begins with several lines that set assorted parameters.
Most of these have fairly descriptive names, such as
default-lease-time or option
subnet-mask. However, some options require some
elaboration:
-
allow bootp This option tells DHCP to respond to BootP requests, which are similar to DHCP requests but designed to be used by computers that boot off the network. Such configurations are often used with thin clients, as described in Chapter 12.
-
default-lease-time You set the default lease time, in seconds, with this option. The lease time is actually determined by negotiation between the client and the server, so you may end up delivering longer leases than you specify with this file, depending on the client’s options.
-
max-lease-time This parameter sets the maximum lease time the server delivers. Even if the client requests a longer time, the server won’t comply.
Tip
When testing a DHCP
configuration, or sometime before making important changes such as
altering a router or NTP server IP address, you may want to reduce
the default-lease-time and
max-lease-time values to something
short—possibly as short as a few minutes (say,
300—five minutes). This action reduces the
amount of time that clients have invalid information, which can speed
up DHCP testing. Using lease times in the range of several minutes to
a few hours can be good on networks that see lots of coming and
going, such as a network to which users frequently attach laptops for
a few minutes at a time. Note that using short lease times will
increase network traffic and load on the DHCP server. Setting lease
times in the range of many hours or days (such as the
86400, or one day, default lease time in Example 15-1), is a better policy for a stable and working
DHCP server on a network that sees few changes to its clients.
-
option subnet-mask As you might guess, this option sets the subnet mask (a.k.a. the network mask or netmask).
-
option domain-name-servers Point to your network’s DNS servers with this option. You can specify multiple servers by separating their values with commas. Most clients accept up to three DNS server addresses, but you can deliver fewer than this number if you like. Example 15-1 specifies DNS servers by IP address, but you can specify hostnames for the DHCP server to resolve when it starts up. (The DHCP server delivers IP addresses to clients in both cases.)
-
option domain-name You can tell clients what domain name to use with this option. Not all clients use this information, but for those that do, it can be a handy feature.
-
option netbios-node-type This option tells Windows clients how they should attempt to resolve names—whether to use a NBNS system, broadcast resolution, or both. A value of
8tells the system to use an NBNS system if possible but to fall back on broadcast name resolution. Chapter 5 describes NBNS configuration in more detail.-
option netbios-name-servers This option is the NetBIOS equivalent of
optiondomain-name-serversand works in a similar way. Linux clients ignore this information, though; it’s useful only for Windows clients.-
option ntp-servers You can point clients at an NTP server with this option; however, many clients ignore this information. Section 15.3, describes NTP in more detail.
-
option x-display-manager This option can point certain X terminal thin clients at an XDMCP server, as described in Chapter 12. Some thin clients ignore this information, however.
-
option tftp-server-name A TFTP server delivers files to computers, such as some thin clients, that boot off of the network. This option points such clients to the TFTP server.
-
option routers Although Example 15-1 shows this option within a declaration block, it can appear outside such a block. It points the clients at the network’s router (a.k.a. the gateway).
DHCP supports many additional parameters, but most of them are quite
obscure. Consult the dhcpd.conf manpage or a
book on DHCP for more information.
The core of the DHCP configuration, and the part that sets the
dynamic addresses it can deliver, is the subnet
declaration in Example 15-1. This declaration begins
with a specification of the numeric subnet it
serves—192.168.1.0 netmask 255.255.255.0.
The curly braces then set off several lines that define features
unique to this declaration. In Example 15-1, the
declaration contains just two parameter lines, but you can add more.
These lines override parameters set outside the declaration body or
set new options. The key to defining a dynamic DHCP definition is the
range parameter:
range 192.168.1.50 192.168.1.254;
This line tells dhcpd what IP addresses it may deliver. In this case, the range includes 205 addresses, from 192.168.1.50 through 192.168.1.254. The server won’t deliver addresses outside of this range, even within the 192.168.1.0/255 subnet. Thus, you can assign IP addresses for some systems without using DHCP. For instance, the DHCP server itself typically has a static IP address. You might also want to give a router or other important server a static IP address outside the DHCP server’s control.
Once you make changes to the DHCP server’s
configuration, you must restart the server. Typically, you do this
using the server’s SysV startup script, as in
/etc/init.d/dhcpd
restart. If the server isn’t
already running, you can start it the same way. Consult
distribution-specific documentation if you need help with SysV
startup scripts.
The leap from dynamic IP address
assignment to fixed address assignment is a matter of adding new
declarations, one for each computer to which you want to assign a
fixed address. These host declarations appear
within the declaration for the dynamic subnet:
subnet 192.168.1.0 netmask 255.255.255.0 {
   option routers 192.168.1.1;
   range 192.168.1.50 192.168.1.254;

   host gingko {
      hardware ethernet 00:0C:76:96:A3:73;
      fixed-address 192.168.1.20;
   }
}
Each host declaration begins with a hostname
(gingko in this case). This hostname may be passed
to the client if you set the use-host-decl-names true parameter, but most clients ignore the name. The
declaration then contains two lines. The first sets the
client’s media type (ethernet in
this case, although token-ring is appropriate for
Token Ring networks) and
media access
control (MAC) address, a.k.a. the hardware address. The DHCP server
then knows to assign the specified fixed-address
as the IP address whenever the computer with the specified MAC
address requests an address.
Warning
The IP address you specify with fixed-address must
be outside the range specified with
range but within the range determined by the
subnet IP address and netmask
declaration.
Of course, on a large network, managing all the computers’ MAC and IP addresses can be tedious. For this reason, assigning fixed IP addresses in this way is best reserved for small networks or for a limited number of computers (say, important servers) on large networks. This type of configuration is also often used when configuring thin clients, which may need to be told on a client-by-client basis what files to use as a boot OS. This topic is described in Chapter 12.
One critical detail about this configuration is locating the target computer’s MAC address. Several approaches to doing so exist:
- Examining board markings
Some network card manufacturers mark the MAC address on their boards, usually by affixing a sticker. This can be a good way to get a MAC address if you’re installing a card, but it can be inconvenient if the computer’s already assembled and has the network card in it. Also, not all manufacturers label their cards this way.
- Client configuration tools
Most clients enable you to view the MAC address in one way or another. On Linux and most other Unix-like clients, you can find the address using ifconfig, as in
ifconfigeth0. The MAC address is called theHWaddrin the output. TypingIPCONFIG/ALLat a DOS prompt on Windows NT/200x/XP systems also displays this information, on a line labelledPhysical Address. Windows 9x/Me systems provide a GUI tool, WINIPCFG, which delivers this information.- Using arp
You can give the client an IP address, either by configuring it statically or by using DHCP without a static IP address defined for the system. You can then use the Linux arp command to find the MAC address. For instance,
arp 192.168.1.78finds the MAC address (and some other information) for 192.168.1.78. You may need to direct some other traffic at the computer first, though; using ping should do the job.- Examining DHCP logs
If you have the client obtain an IP address from the DHCP server’s pool of dynamic addresses, you can then examine the
/var/lib/dhcp/dhcpd.leasesfile to locate the MAC address. This appears in a block named after the IP address given to the client. Similarly, the/var/log/messagesor other system logfile on the DHCP server usually records the MAC address of clients and the assigned IP address. These techniques are both simplest to use on a network with little DHCP activity, such as a small network. Locating the correct entry on a larger network can be trickier.
In all these cases, the exact form of the MAC address can vary. For
inclusion in the dhcpd.conf
file’s host declaration, the
address appears as a series of hexadecimal (base 16) numbers
separated by colons (:). Some utilities may show
the address in another form, such as separated by dashes. If
necessary, make the change. For hexadecimal values between A and F,
the DHCP server doesn’t care about case. For
instance, 5a is exactly equivalent to
5A.
Like any server, the ISC DHCP server is useful only if it has clients. These clients can be Windows, Linux, Mac OS, or just about any other system. The DHCP client sets its own basic TCP/IP features by consulting the DHCP server, so the DHCP client program must run before most other network-related programs on the client.
Tip
A DHCP client can be a server for other protocols. For instance, you might use DHCP to assign an IP address to an SMB/CIFS file or printer server. Some servers work best with fixed IP addresses simply because this makes it easier to enter a name-to-IP-address mapping in your DNS server. For them, you can assign a fixed IP address to the server via DHCP, as just described.
To tell a computer to use a DHCP server, you must typically run the computer’s basic network configuration tools. For instance, you can do this job on a Windows XP system that’s already configured with a static IP address:
Open the Windows Control Panel.
Double-click the Network Connections icon in the Control Panel. This action opens a Network Connections window.
In the Network Connections window, right-click the Local Area Connection icon and select Properties from the resulting context menu. This action opens a Local Area Connection Properties dialog box.
In the Local Area Connection Properties dialog box, select the Internet Protocol (TCP/IP) item and click Properties. This action yields a dialog box called Internet Protocol (TCP/IP) Properties, as shown in Figure 15-1.
In the Internet Protocol (TCP/IP) Properties dialog box, click “Obtain an IP address automatically”. If any are set, the values in the “Use the following IP address” fields should disappear.
If your DHCP server delivers DNS server addresses, click “Obtain DNS server address automatically”. Any addresses you’ve set manually should disappear. (You can continue to set DNS server addresses manually, though, which can be handy if you want to use a nonstandard DNS server for some reason.)
Click OK. This should activate your changes. You then need to close the remaining open dialog boxes and network option windows.
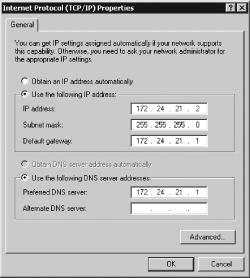
In many cases, you’ll configure the DHCP client when you first set up its networking features. For instance, you might double-click the Network Setup Wizard in Windows XP. This setup procedure will guide you through various network settings, but in all cases, you should be presented with a choice to use DHCP or to set the IP address manually, as in Figure 15-1. (Windows often doesn’t use the term DHCP, though, instead referring to this option as “obtain IP address automatically,” as in Figure 15-1, or something similar.)
Precise details vary from one operating system to another, as well.
Most versions of Windows, Mac OS, and other GUI-oriented OSs provide
a procedure similar to that just described for Windows XP, but many
details differ. Consult the OS’s documentation, or
browse the system configuration options for ones relating to network
configuration. Linux distributions with GUI system administration
tools can usually be configured to use DHCP in much this way, as
well. You can also do so using text-mode tools: install a DHCP client
(usually in a package called dhcpcd,
dhcp-client, or pump), and
use chkconfig or other tools to enable this
package in your default runlevel. Consult distribution-specific
documentation if you need help with this task.