Table of Contents for
Linux in a Windows World
 Linux in a Windows World
Published by
O'Reilly Media, Inc., 2005
Linux in a Windows World
Published by
O'Reilly Media, Inc., 2005
- Cover
- Linux in a Windows World
- Dedication
- Preface
- Contents of This Book
- Conventions Used in This Book
- Using Code Examples
- Comments and Questions
- Safari Enabled
- Acknowledgments
- I. Linux’s Place in a Windows Network
- 1. Linux’s Features
- Linux as a Server
- Linux on the Desktop
- Comparing Linux and Windows Features
- Summary
- 2. Linux Deployment Strategies
- Linux Desktop Migration
- Linux and Thin Clients
- Summary
- II. Sharing Files and Printers
- 3. Basic Samba Configuration
- The Samba Configuration File Format
- Identifying the Server
- Setting Master Browser Options
- Setting Password Options
- Summary
- 4. File and Printer Shares
- Printing with CUPS
- Creating a Printer Share
- Delivering Printer Drivers to Windows Clients
- Example Shares
- Summary
- 5. Managing a NetBIOS Network with Samba
- Enabling NBNS Functions
- Assuming Master Browser Duties
- Summary
- 6. Linux as an SMB/CIFS Client
- Accessing File Shares
- Printing to Printer Shares
- Configuring GUI Workgroup Browsers
- Summary
- III. Centralized Authentication Tools
- 7. Using NT Domains for Linux Authentication
- Samba Winbind Configuration
- PAM and NSS Winbind Options
- Winbind in Action
- Summary
- 8. Using LDAP
- Configuring an OpenLDAP Server
- Creating a User Directory
- Configuring Linux to Use LDAP for Login Authentication
- Configuring Windows to Use LDAPfor Login Authentication
- Summary
- 9. Kerberos Configuration and Use
- Linux Kerberos Server Configuration
- Kerberos Application Server Configuration
- Linux Kerberos Client Configuration
- Windows Kerberos Tools
- Summary
- IV. Remote Login Tools
- 10. Remote Text-Mode Administration and Use
- SSH Server Configuration
- Telnet Server Configuration
- Windows Remote-Login Tools
- Summary
- 11. Running GUI Programs Remotely
- Using Remote X Access
- Encrypting X by SSH Tunneling
- VNC Configuration and Use
- Running Windows Programs from Linux
- Summary
- 12. Linux Thin Client Configurations
- Hardware Requirements
- Linux as a Server for Thin Clients
- Linux as a Thin Client
- Summary
- V. Additional Server Programs
- 13. Configuring Mail Servers
- Configuring Sendmail
- Configuring Postfix
- Configuring POP and IMAP Servers
- Scanning for Spam, Worms, and Viruses
- Supplementing a Microsoft Exchange Server
- Using Fetchmail
- Summary
- 14. Network Backups
- Backing Up the Linux System
- Backing Up with Samba
- Backing Up with AMANDA
- Summary
- 15. Managing a Network with Linux
- Delivering Names with DNS
- Keeping Clocks Synchronized with NTP
- Summary
- VI. Appendixes
- A. Configuring PAM
- The PAM Configuration File Format
- PAM Modules
- Sample PAM Configurations
- Summary
- B. Linux on the Desktop
- Configuring Applications and Environments
- Running Windows Programs in Linux
- File and Filesystem Compatibility
- Font Handling
- Summary
- Index
- Colophon
Sendmail has long been the most common SMTP server. Although its popularity has dropped somewhat in recent years, it remains the dominant mail server on the Internet at large and is the standard mail server installed in many Linux distributions, including Fedora, Red Hat, and Slackware.
To configure sendmail, you must first know where to find its configuration files, understand their formats, and know how to create and modify these files. These tasks are trickier in sendmail than in most other mail servers, which is one of sendmail’s big drawbacks compared to other popular Linux mail servers, especially for new mail administrators. This chapter looks at three particularly important areas of sendmail configuration: address options, relay options, and antispam options.
Tip
Sendmail is an extremely complex server, so this chapter can only begin to scratch its surface. If you need to do more with sendmail than is described here, you should consult its own documentation or a book on sendmail, such as O’Reilly’s sendmail or sendmail Cookbook.
The main sendmail configuration file is called
sendmail.cf
,
and it’s usually located in
/etc, /etc/mail, or some
other subdirectory of /etc. Unfortunately, this
file is very difficult to edit directly because the configuration
options are numerous and have formats that are fairly obtuse. For
this reason, few people even attempt to edit this file directly.
Instead, they use the m4 utility to create a
sendmail.cf file from a file with a simpler
format.
In order to use the m4 utility, though, it must be
installed on your system. What’s more, the utility
relies on a series of support files, which may be installed from yet
another package. In Fedora and Red Hat, for instance, you must
install the sendmail-cf package. Look for the
m4 package on your distribution medium, and also
look for any likely sendmail m4 configuration
packages. (They’re likely to include
sendmail in the package names.)
The m4 tool converts a file with a name that
typically ends in .mc into
sendmail’s sendmail.cf.
Unfortunately, the precise name used varies from one distribution to
another. For instance, in Fedora and Red Hat, it’s
/etc/mail/sendmail.mc, whereas in Slackware
it’s
/usr/share/sendmail/cf/cf/sendmail-slackware.mc.
To perform the conversion, you use the m4 command,
piping the .mc file into this command and
redirecting output to the desired file:
# m4 < /etc/mail/sendmail.mc > /etc/mail/sendmail.cfWarning
This command overwrites the existing
/etc/mail/sendmail.cf file. For safety, you
should back up this file by copying it to another location before
running this command.
Once you’ve rebuilt the configuration file, you must
restart sendmail. In most cases,
this can by done by passing a restart or
reload argument to the sendmail SysV startup
script:
# /etc/rc.d/init.d/sendmail restartAlternatively, you can use kill to send a
SIGHUP signal to the sendmail
process. This procedure can be less disruptive than completely
restarting sendmail, and so it may be preferable.
Before you do this, however, you must make changes to your sendmail
.mc file. Compared to the
.cf file, the .mc file is
simple and comprehensible. Most options are set in parentheses using
a define or FEATURE keyword:
define(`SMART_HOST',`smtp.pangaea.edu')
FEATURE(always_add_domain)
Additional option names exist, but these two account for many of the sendmail features. The parameters passed to these options are sometimes enclosed in single quotes, but unlike most configuration files, the opening and closing quote characters are different: The opening quote is actually a backtick (`), located to the left of the 1 key on most keyboards. The closing quote is an ordinary single quote character ('), located to the right of the semicolon (;) key on most keyboards.
The sendmail .mc file uses the string
dnl to denote a comment. Many sample
configurations include quite a few options that are commented out by
placing this string at the start of the line. Sometimes a hash mark
(#) also appears on the line, but this character
isn’t an actual comment character;
it’s just there for the benefit of users who are
accustomed to seeing a hash mark used as a comment marker.
In addition to the main sendmail .cf and
.mc files, other files serve to hold ancillary
data:
-
access.db This binary file is created by the makemap utility from a plaintext file that often has the same name with a different or no filename extension. This file controls which computers may interact with the sendmail server and in what ways. This information is particularly critical for sendmail relay configurations, as described shortly.
-
aliases.db This file is a binary file created by makemap or newaliases. (Passing the
-bioption to sendmail also does the job.) This file defines aliases—that is, mappings of email addresses onto other email addresses. For instance, most distributions set up an alias of postmaster to root, so that root receives mail addressed to postmaster.
These files usually appear in /etc/mail or
sometimes in /etc. If you examine the
.mc configuration file, you’ll
probably find references to these files. Chances are you
shouldn’t modify these references, although you may
want to adjust the files’ contents, particularly if
you need to adjust your relay configurations.
In a basic sendmail configuration, the
most important settings relate to ports and addressing. Some
distributions ship sendmail configured to bind only to the localhost
(127.0.0.1) address. The result is that the server can be accessed
only from the local computer. This can be a good configuration if
you’re running a desktop system that
shouldn’t accept outside SMTP connections, but for a
mail server, you probably don’t want this
restriction. Check the sendmail .mc file for a
line like this:
DAEMON_OPTIONS(`Port=smtp,Addr=127.0.0.1, Name=MTA')dnl
If this line is present, and you want the server to accept outside
connections, add dnl to the start of the line to
comment out this option. If you don’t see a line
like this, you don’t need to make any changes.
Another address-related option is to set the
server’s hostname. Frequently, the server has a
specific hostname, such as http://smtp.pangaea.edu, but you want mail from your
users to use your domain name only, such as
linnaeus@pangaea.edu, rather than
linnaeus@smtp.pangaea.edu. Frequently, mail clients
can set this address; however, if you find that some of your outgoing
mail sets an incorrect domain or includes a hostname in the address,
you can have sendmail change this by including the following lines in
the .mc file:
MASQUERADE_AS(`pangaea.edu')
FEATURE(masquerade_envelope)
Of course, you’d change
pangaea.edu in the first line to your own domain
name. The first line tells sendmail what should appear to the right
of the at sign (@) in email addresses if
users’ mail clients don’t specify
an address. The FEATURE(masquerade_envelope) line
takes this a step further, by masquerading the address provided in
email headers, which are normally invisible to users. If you
don’t use these options, sendmail assumes that its
hostname is as set on the computer (as determined by the
gethostbyname( ) system call), but sendmail
won’t adjust the address in outgoing email.
Tip
An important part of the email addressing scheme is setting the mail exchanger (MX) entry in your domain’s DNS record. This record tells sending mail servers the name of your domain’s mail server computer, so that mail addressed to linnaeus@pangaea.edu is sent to http://smtp.pangaea.edu. Chapter 15 describes DNS configuration, including setting the MX record.
An important part of any SMTP server configuration is setting mail relay options. A mail server can function as a relay (that is, accept mail that’s destined for another location) or use a relay (that is, send outgoing mail by way of a server other than the ultimate destination). Setting these options so that sendmail does what you need it to do without doing too much can be tricky sometimes.
Warning
If a mail server accepts relays from systems or users who shouldn’t be able to use it for this purpose, the server is known as an open relay . Such mail servers are easily abused by spammers, so open relay configurations should be avoided at all costs.
Sendmail is frequently employed as a mail
relay server for a network. That is, you configure mail clients to
send all outgoing mail via the Linux sendmail server. Out of the box,
though, recent versions of sendmail refuse such relay attempts as an
antispam precaution. You can loosen this configuration using any of
several options, specified within a FEATURE
specification:
-
relay_entire_domain This option tells sendmail to perform a DNS lookup on a sending computer’s IP address and to accept relay attempts if the resulting hostname is within your domain. This is a quick and easy way to enable relaying, but it can be abused; spammers can modify their own networks’ DNS servers to provide a reverse lookup in your domain, thus tricking your system into accepting undesirable relays.
-
relay_local_from If you use this option, sendmail accepts any mail for relay so long as the
From: address in the message is in sendmail’s local domain. This address is very easily forged, though, and so is a poor option in most cases.-
relay_based_on_MX This option is another DNS-based rule. It tells sendmail to accept mail for relaying if the mail is destined for a domain that lists the sendmail server in its MX record.
-
relay_hosts_only With this option, sendmail looks up the sending system in a database (described shortly); if the specific computer that’s attempting to relay mail is listed in the database, the mail is accepted.
-
access_db This option is similar to
relay_hosts_only, but it employs a more flexible interpretation of data in the database, enabling you to list entire domains. Many default sendmail configurations use this option by default, albeit with an empty initial database.
Warning
Another relay option is
promiscuous_relay
,
but this option should never be used. It tells
sendmail to accept all relay attempts. This
configuration is effectively an invitation to spammers to abuse your
system.
As an example, suppose you want to use the
access_db method. You might then include a line
like the following in your sendmail .mc file:
FEATURE(`access_db')
Some configurations add more options within the
parentheses—say, to specify the method of encoding data and the
access database filename (normally
/etc/mail/access.db). The
access_db and relay_hosts_only
options are the safest ways to configure mail relays, and they both
use the same access.db configuration file. This
file is a binary database file that’s built from a
text-mode file, typically called access. This
text-mode file consists of lines that take the following format:
host.specification CODEIn addition to these lines, the file may contain additional
modifiers, as well as comments that begin with hash marks
(#). The
host.specification takes the form of IP
addresses, IP address groups (specified by incomplete IP addresses,
as in 192.168.24 for the 192.168.24.0/24 network),
hostnames, domain names, or email addresses. If you use
relay_hosts_only, though, specifications must
match individual computers, not groups of computers. The
CODE tells sendmail what to do with mail
from the specified computers:
-
OK Sendmail should accept mail for local delivery from the specified host.
-
RELAY Sendmail relays mail that originates from or is addressed to the specified host.
-
REJECT The server should refuse any message from the specified host using a
5xxcode. Many senders generate a bounce message in response to such a code.-
DISCARD The server should accept and then discard any message from the specified host; no bounce message is generated.
As an example of an access file, consider the
following:
localhost.localdomain  RELAY
localhost              RELAY
127.0.0.1              RELAY
spammer@abigisp.net    DISCARD
iamspam.biz            REJECT
192.168.24             RELAY
The first three lines tell sendmail to relay mail that’s generated locally (on the localhost address, using any of three common names for that system). Such lines are common in default sendmail configurations. The next line tells the system to quietly discard mail from spammer@abigisp.net; but this rule has no effect on mail from other users of http://abigisp.net. The fifth line rejects (refuses with a bounce message) mail from the iamspam.biz domain. The last line authorizes sendmail to relay mail that originates from the 192.168.24.0/24 address range, which is presumably the server’s own local network.
Once you’ve created an access
file, you must convert that file to binary form using the
makemap command:
# makemap hash /etc/mail/access.db < /etc/mail/accessMany distributions include an appropriate command as part of their sendmail startup scripts, so you may not need to explicitly enter this command.
Mail relaying involves at least three systems: the source, the destination, and the relay. The destination requires no special configuration, and the last section described the relay itself. On the source side, though, sendmail can require special configuration. Sometimes, the source computer doesn’t run sendmail at all; a source might be a desktop system running a mail client. You can, though, use sendmail as a mail source. For instance, the source system might be a Linux computer that runs programs that assume the local computer is running sendmail and that therefore try to send mail using the server. Another configuration is to have a Linux computer serve as both a relay and a source for another relay. For instance, you might want a Linux server to handle mail for your local network but to relay it through an ISP’s mail server. In either case, you must configure sendmail to use another computer as a relay.
Tip
By default, sendmail looks up the recipient’s address via DNS and attempts to deliver the mail directly. If you configure sendmail to use a relay, as described here, it bypasses this attempt, and instead delivers the mail to the specified relay system.
Most distributions’ default sendmail configurations
don’t use a relay. You can add one to the mix by
adding one or more lines to your .mc
configuration file:
define(`LOCAL_RELAY', `outgoing.mail.relay')
define(`MAIL_HUB', `outgoing.mail.relay')
define(`SMART_HOST', `outgoing.mail.relay')
The first line applies to outgoing mail that lacks a domain or machine name (for instance, mail addressed to ben); the second applies to mail addressed to users on the computer on which sendmail is running (for instance, ben@armonica.pangaea.edu, where sendmail is running on http://armonica.pangaea.edu); and the third applies to mail addressed to all other systems.
A somewhat simpler way to implement relaying is to use another line:
FEATURE(`nullclient', `outgoing.mail.relay')This line, however, is intended for use in otherwise nearly empty
configuration files. Only the
FEATURE(`nocanonify') option should be used with
it.
In all these cases, you must adjust the
outgoing.mail.relay to point to the server
you want to use as a relay.
Particularly when your domain has multiple mail servers or is connected to multiple networks, you may need to configure the system to forward mail in different ways depending on its source or destination. For instance, consider the “gatekeeper” Linux mail server in Figure 13-2. The intent of a configuration like this is to use Linux to provide useful preliminary processing on incoming mail, such as spam filtering and directing email to the correct internal mail server. This server can also pass mail between the two internal servers and filter outgoing mail.
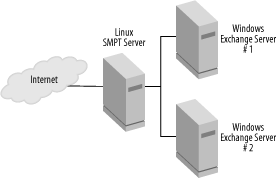
Typically, the Linux SMTP server is listed as the
domain’s MX server, so external systems will deliver
mail to it. Likewise, the internal mail servers, and perhaps
individual client systems, can deliver outgoing mail to the Linux
server. The trick is to configure the Linux server to deliver mail
correctly, without getting into an infinite loop. For instance, you
don’t want the server to attempt to deliver mail for
your domain back to itself, because this creates an infinite loop.
One solution is to use a feature known as a mailer
table. This can be activated with a line like this in the
sendmail .mc file:
FEATURE(`mailertable')
This entry may include additional options, such as a pointer to the
mailer table database file (typically
/etc/mail/mailertable.db). Check your
.mc file for the default entry, if it exists. As
with many other sendmail files, this one relies on a text-mode file
that’s converted into a binary database file. The
text-mode mailertable file contains entries like
this:
.subnet1.pangaea.edu  smtp:exchange1.pangaea.edu
.subnet2.pangaea.edu  procmail:/etc/procmailrcs/exchange2
This configuration tells the server to deliver mail addressed to any
computer in the http://subnet1.pangaea.edu subdomain to http://exchange1.pangaea.edu using SMTP and to
deliver mail addressed to any computer in the http://subnet2.pangaea.edu subdomain using Procmail
and the /etc/procmailrcs/exchange2 Procmail rule
set. The first line results in a simple forwarding and so may not be
extremely useful; you can just set up your DNS MX record to point
directly to that computer. The second line, though, enables you to
employ Procmail, which can be used as an interface to spam filters
and other tools, on mail passed through the server. Procmail is
described in more detail later in this chapter, in Section 13.5.4.