Table of Contents for
Linux in a Windows World
 Linux in a Windows World
Published by
O'Reilly Media, Inc., 2005
Linux in a Windows World
Published by
O'Reilly Media, Inc., 2005
- Cover
- Linux in a Windows World
- Dedication
- Preface
- Contents of This Book
- Conventions Used in This Book
- Using Code Examples
- Comments and Questions
- Safari Enabled
- Acknowledgments
- I. Linux’s Place in a Windows Network
- 1. Linux’s Features
- Linux as a Server
- Linux on the Desktop
- Comparing Linux and Windows Features
- Summary
- 2. Linux Deployment Strategies
- Linux Desktop Migration
- Linux and Thin Clients
- Summary
- II. Sharing Files and Printers
- 3. Basic Samba Configuration
- The Samba Configuration File Format
- Identifying the Server
- Setting Master Browser Options
- Setting Password Options
- Summary
- 4. File and Printer Shares
- Printing with CUPS
- Creating a Printer Share
- Delivering Printer Drivers to Windows Clients
- Example Shares
- Summary
- 5. Managing a NetBIOS Network with Samba
- Enabling NBNS Functions
- Assuming Master Browser Duties
- Summary
- 6. Linux as an SMB/CIFS Client
- Accessing File Shares
- Printing to Printer Shares
- Configuring GUI Workgroup Browsers
- Summary
- III. Centralized Authentication Tools
- 7. Using NT Domains for Linux Authentication
- Samba Winbind Configuration
- PAM and NSS Winbind Options
- Winbind in Action
- Summary
- 8. Using LDAP
- Configuring an OpenLDAP Server
- Creating a User Directory
- Configuring Linux to Use LDAP for Login Authentication
- Configuring Windows to Use LDAPfor Login Authentication
- Summary
- 9. Kerberos Configuration and Use
- Linux Kerberos Server Configuration
- Kerberos Application Server Configuration
- Linux Kerberos Client Configuration
- Windows Kerberos Tools
- Summary
- IV. Remote Login Tools
- 10. Remote Text-Mode Administration and Use
- SSH Server Configuration
- Telnet Server Configuration
- Windows Remote-Login Tools
- Summary
- 11. Running GUI Programs Remotely
- Using Remote X Access
- Encrypting X by SSH Tunneling
- VNC Configuration and Use
- Running Windows Programs from Linux
- Summary
- 12. Linux Thin Client Configurations
- Hardware Requirements
- Linux as a Server for Thin Clients
- Linux as a Thin Client
- Summary
- V. Additional Server Programs
- 13. Configuring Mail Servers
- Configuring Sendmail
- Configuring Postfix
- Configuring POP and IMAP Servers
- Scanning for Spam, Worms, and Viruses
- Supplementing a Microsoft Exchange Server
- Using Fetchmail
- Summary
- 14. Network Backups
- Backing Up the Linux System
- Backing Up with Samba
- Backing Up with AMANDA
- Summary
- 15. Managing a Network with Linux
- Delivering Names with DNS
- Keeping Clocks Synchronized with NTP
- Summary
- VI. Appendixes
- A. Configuring PAM
- The PAM Configuration File Format
- PAM Modules
- Sample PAM Configurations
- Summary
- B. Linux on the Desktop
- Configuring Applications and Environments
- Running Windows Programs in Linux
- File and Filesystem Compatibility
- Font Handling
- Summary
- Index
- Colophon
X enables remote users to access a Linux system, but it’s not the only tool for doing so. VNC can also function as a remote login tool, with a different set of advantages and disadvantages compared to X. One big plus of VNC is that it can provide remote access to Windows, as well, so you can log into Windows from Linux, Windows, or other OSs. Of course, configuring the server is just part of the job; you must know how to handle VNC clients. Fortunately, this task is fairly straightforward.
Tip
VNC runs a client on the computer at which the user sits and a server on the remote computer. Thus, VNC’s client/server terminology is more familiar to most people than is the X terminology.
One of the earliest versions of VNC was released by AT&T. That version is no longer maintained or hosted by AT&T, but it’s available under the name RealVNC from http://www.realvnc.com. Binary versions of RealVNC are available for Windows, Linux, Solaris, and HP-UX, with source code available that will compile for other Unix-like OSs. Many Linux distributions ship with RealVNC.
Another VNC variant is available under the name TightVNC , from http://www.tightvnc.com. This VNC implementation is notable because it includes some improved compression algorithms, which can improve VNC’s speed. TightVNC is available in binary form for Windows and Linux, with source code for other Unix-like systems also available. Many Linux distributions ship with TightVNC in addition to or instead of RealVNC.
If your network houses more unusual operating systems (including some that aren’t particularly exotic, such as Mac OS X), you may want to consult http://www.uk.research.att.com/archive/vnc/platforms.html. This page contains links to VNC implementations for a variety of operating systems.
One other VNC implementation deserves mention: KDE. This Linux desktop environment provides support for VNC’s RFB protocol independent of a separate VNC server. This implementation is described later in this chapter.
VNC servers for Linux are plentiful, and some can be configured in diverse ways. Before delving into server details, though, you should understand something of how X and VNC interact because using VNC doesn’t mean that you’re not using X. Linux GUI programs still expect to connect to an X server, so VNC provides one. Beyond that, several options for running VNC (or other RFB server software) exist, including traditional VNC server launches, linking VNC to an XDMCP login server, and KDE’s built-in tools.
From a user’s perspective, using VNC can seem simpler than at least some methods of using X for remote access; however, VNC actually complicates the internal workings of the system. Figure 11-8 illustrates the relationship between VNC and X. The VNC server is actually two servers in one: it’s a server for the RFB protocol and a server for X. The X client program connects to the VNC server as if it were a local X server. The VNC server then creates a bitmap for display, much as a local X server would, but instead of sending that bitmap to a local screen, it’s sent to the VNC client. This VNC client does double client duty because it’s also a client for the local X server. The VNC client delivers the bitmap to the X server, which displays it on the screen. Similar interactions occur, but in the opposite direction, for delivering keypresses and mouse movements from the user to the target X program on the remote system.
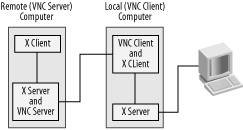
Figure 11-8. On a Linux-to-Linux connection, VNC serves as a double translator between the X client and server
Tip
Because Windows doesn’t use a client/server model for its windowing system, Figure 11-8 is not entirely accurate when a Windows system is involved. In the case of a Windows VNC client, the VNC client delivers data to the Windows display subsystem, but it’s not a client/server relationship in quite the way it is under Linux. A Windows VNC server must intercept display output using various programming tricks, rather than interface in an approved and clean way as an X server allows.
VNC was designed to provide whole-screen displays to its clients. For this reason, it delivers an entire remote desktop, much like to an X server that runs in rooted mode (as in Figure 11-2). VNC has no equivalent to X’s rootless display.
VNC delivers entire bitmaps from the server to the client. By contrast, an X client can and often does deliver shorthand descriptions of operations, which the X server interprets locally. This difference means that VNC must frequently deliver more data across the network than does X, but X’s transactions involve more back-and-forth exchanges. These characteristics give rise to the differing performance limitations of the two protocols, with VNC degrading on low-bandwidth networks and X degrading on high-latency networks.
To use a regular VNC server,
such as RealVNC or TightVNC, you must first install it. You may want
to check your distribution’s package list to see if
it includes a VNC server (probably under a name like
tightvnc or vnc-server). If
you can’t find a VNC package for your distribution,
check the RealVNC and TightVNC web sites. These have source code and
binaries in various formats, such as tarballs and RPMs. Note that
some VNC packages split off the VNC client from the VNC server,
whereas others include everything in a single package.
Once you’ve installed the VNC server, it’s time to configure it. You must do this as an ordinary user—specifically, the one who will be using the server:
Create a
~/.vncdirectory in your home directory to hold VNC configuration files.Create a new VNC password by typing
vncpasswd. By default, VNC doesn’t use the Linux password database, so each user must set a VNC-specific password.Run the server by typing
vncserver. The system should respond with a message like this:New 'pluto:0 (linnaeus)' desktop is pluto:0 Creating default startup script /home/linnaeus/.vnc/xstartup Starting applications specified in /home/linnaeus/.vnc/xstartup Log file is /home/linnaeus/.vnc/nessus:6.log
At this point, the VNC server is running on VNC port 0 (indicated by
the :0 trailing the machine
name—pluto in the preceding example). Be
sure to remember this port number because it’s
necessary for connecting to the VNC server! The VNC port number, like
an X port number, is relative to a larger number—5900, in the
case of VNC—so VNC port 0 is TCP port 5900. You should be able
to connect to the server using the VNC port number in a client, as
described in Section 11.4.4.
When you first start the VNC server, it creates a default startup
script in ~/.vnc/xstartup. This script is
equivalent to a normal X startup script; it launches applications
when the VNC X server starts. The basic configuration, though, is to
launch an extremely primitive window manager called
twm. If you’re used to another
desktop environment or window manager, you should edit this file to
change the reference to twm to something else,
such as startkde to start KDE or
icewm to launch IceWM.
The vncserver command is actually a script that calls the real VNC server program, Xvnc. If you want to make systemwide changes to VNC’s defaults, you must edit the vncserver script. Ordinarily, you’ll do this as root, although you can copy the script to your home directory as an ordinary user and edit it yourself, if you prefer. Options you may want to adjust include:
- The new user startup script
The startup script written by vncserver is contained within it, typically identified as
defaultXStartupor something similar. You can edit this script as you see fit; however, this change will affect only new VNC users, not existing ones.- The font path
Unfortunately, VNC is very sensitive to the font path—the list of directories in which it searches for fonts. This is identified by the
-fpparameter to Xvnc, so if you want to change the font path, you should search for that string and make changes to any variables or Xvnc calls that specify it. The-fpparameter takes a comma-separated list of directories as its option. You may want to try using the font path specified in your/etc/X11/XF86Configor/etc/X11/xorg.conffile, although these files specify the font path in a multiline format rather than as a comma-separated list. Including empty or invalid directories on your font path is likely to cause the VNC server to crash, so if in doubt, start with a shortened font path and add entries to make it work as you like.- Virtual screen size
VNC presents a virtual screen in which it creates your Linux desktop. You can adjust the size of this virtual screen with the
-geometryoption to Xvnc, so look for the line in the vncserver script that sets this option. This is usually set in a variable calledgeometrynear the start of the script.- Color depth
If you want to have VNC deliver more or fewer colors, you can set the color depth option, which is passed to Xvnc via the
-geometryparameter. Most vncserver scripts set this value with thedepthvariable near the start of the script.
Once you as an ordinary user are finished with VNC, you can shut it
down by passing the -kill
:session-number option
to vncserver. For instance,
vncserver
-kill
:0 kills VNC session number 0.
The usual mode of VNC’s operation is peculiar by Linux server standards. Instead of connecting to the server using a fixed port and entering a username and password to gain entry, you must log in using a text-mode tool or run the server while you’re at the console, then connect using a port number that you must remember and enter a password (but no username). This approach certainly works, but it can be a bit awkward if arbitrary users should have access to the VNC server. To work around this problem and create a more typical Linux-style login experience, you can tie VNC to an XDMCP server. The result is that, when users connect to the VNC server, they’ll be greeted by a GUI login screen that’s similar to the one they see when logging in at the console or via an XDMCP-enabled remote X server.
Before proceeding, check the
earlier Section 11.2.5. You
should configure your XDMCP server to accept remote connections, with
one possible exception: you can use Xaccess
rules or firewall rules to restrict XDMCP access to the local
computer itself. Both the XDMCP server and the VNC server will be
running on the same computer, and the XDMCP server only needs to
accept connections from the VNC server. You can configure the XDMCP
server to be more promiscuous in the connections it accepts, but if
this isn’t necessary, it can be a bit of a security
risk, particularly if the computer is accessible to the world at
large, and you use firewall rules or super server security settings
to restrict access to the VNC server.
Once you’ve configured the XDMCP server, you should
edit your /etc/services file. This file gives
names to various TCP and UDP ports. You should add entries for any
ports you want to assign to VNC. The names you use are arbitrary, but
vnc or something related to it is a logical
choice. Note that you can use just one port or many ports. Using many
ports lets you run multiple VNC servers with different
options—for instance, to run servers with different virtual
screen resolutions for the benefit of clients with different screen
resolutions. For example, suppose you intend to run VNC with 760 530
and 950 700 resolutions. First, create two entries in
/etc/services:
vnc-760x530   5900/tcp
vnc-950x700   5901/tcp
This configuration assigns TCP ports 5900 and 5901 to VNC, using names that describe the intended uses for these ports as supporting different resolutions.
Once this is done, edit your super server configuration to call the
Xvnc server. This call must include several
parameters that are normally handled by the
vncserver script, such as
-geometry, -depth, and
-fp. Other options that may be necessary include:
- :
session-num This option specifies the X session number; each unique X session needs its own session number. Note that this is an X session number, not a VNC session number. If your system normally runs a local X server, begin with
:1. You can also begin with:0if no conventional local X server ever runs on the system. Some systems work best if you omit the X session number, enabling VNC to pick one dynamically.-
-ac This option disables access controls in TightVNC—that is, the initial password request. Because XDMCP handles this task, disabling the initial VNC password request is desirable. Some VNC versions don’t need or support this option, though; they use the
-SecurityTypesoption instead or disable access controls as a side effect of other settings necessary for this configuration.-
-SecurityTypes=none This option is RealVNC’s equivalent of TightVNC’s
-acoption.-
-once Ordinarily, a VNC server runs until killed; even if you disconnect from the server, it continues to run. This option causes the server to terminate after a connection is lost. Its behavior is desirable when VNC is used with XDMCP because it better implements the traditional Linux login/logoff procedures.
-
-inetd This option tells Xvnc that it’s running from a super server.
-
-query localhost This option speaks to the VNC server’s X server side; it tells the server to contact a specific computer for an XDMCP login. In this case, the server contacted is
localhost, which should work well. You can use127.0.0.1or your computer’s external IP address or hostname if you prefer. (Usinglocalhostor127.0.0.1may result in slightly better performance, though.)
To produce a xinetd configuration incorporating
these elements, create the file
/etc/xinetd.d/vnc. This file should have one or
more entries like this:
service vnc-760x530
{
   disable      = no
   socket_type  = stream
   protocol     = tcp
   wait         = no
   user         = nobody
   server       = /usr/bin/Xvnc
   server_args  = :1 -inetd -query localhost -geometry 760x530 \
                  -depth 24 -ac -once \
                  -fp /usr/share/fonts/misc/,/usr/share/fonts/100dpi/
}
Tip
The large number of arguments passed to Xvnc
dictates splitting them across three lines in this book; however,
they should all be entered on a single line in reality. Backslash
characters (\) denote continued lines here but
should not be entered in your real configuration files.
You may need to experiment with the -ac and
-SecurityType parameters to get this to work. Your
font path is also likely to be longer than the one shown here. Some
distributions, such as Fedora, provide a font server for local use,
which can greatly shorten the font path entry, but the entry is
likely to read unix/:7100.
After restarting your super server, the VNC server should become available to VNC clients, as described in Section 11.4.4. You’ll notice several differences in how VNC behaves, though:
Multiple users can log into a single VNC port.
Users don’t need to explicitly configure their VNC sessions.
Users’ VNC logins produce their standard desktop environments, as set by X system defaults and users’ own options.
Sessions are destroyed when users log out; they must save open files or their unsaved work will be lost.
Users don’t enter VNC passwords, but they have to enter a password at the XDMCP login prompt.
If you set up multiple VNC ports to accept logins with different parameters, the VNC session number controls access to the options you set. For instance, connecting to pluto:0 could yield a 760 530 display, whereas connecting to pluto:1 can produce a 950 700 display.
Overall, linking VNC to an XDMCP server can be an excellent way to provide remote GUI logins to a Linux system. This approach follows typical expectations for GUI logins and works much like accessing Linux via a rooted X server using XDMCP. VNC client software is inexpensive and easier to configure than X servers, though, which can simplify your overall configuration and education efforts, even if linking VNC with XDMCP is a bit more work.
Warning
One downside to this approach is that usernames and passwords sent to the XDMCP server are unencrypted. (Ordinary VNC passwords are encrypted, although the rest of the session data is not.) Given that most VNC data isn’t encrypted, this isn’t a huge difference, but it is worth noting and may make a difference in your plans, particularly if you want to use VNC across the Internet.
KDE is unusual in that it supports the
VNC protocol, RFB. You can access KDE’s options from
the KDE Control Center (type kcontrol in an
xterm window or locate the Control Center option
in the KDE menu system). The options in question are visible in the
Desktop Sharing area within the Internet & Network option set, as
shown in Figure 11-9. (Specific KDE implementations
vary somewhat in their names for these options; for instance, some
use Network rather than Internet & Network.)
KDE’s Desktop Sharing system works more like VNC
under Windows than under Linux: it shares an existing login session,
rather than create a new session. The intent is that it be used as a
collaborative tool, to enable users to create demonstrations and
presentations for other users at remote locations. For this reason,
it emphasizes use by invitation: click Create & Manage
Invitations to create a time-limited password, which you can give to
another user in some appropriate way, such as over the phone. (You
can also email invitations directly, but this makes them susceptible
to network sniffing.)
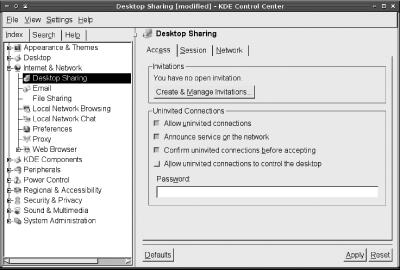
KDE also supports “uninvited” connections, which are essentially time-unlimited invitations. This tool isn’t likely to be useful for providing yourself with remote access, though, because KDE displays a dialog box on its local display whenever a connection attempt is made. If you don’t accept the connection, the remote system is refused access. Thus, remotely accessing the system via KDE’s VNC features requires that somebody be present at the console when a connection attempt is made.
One of VNC’s advantages over X is that you can use VNC to remotely control a Windows computer. Windows wasn’t designed with multiuser access in mind, however, so instead of running a server that creates a virtual session unrelated to anything displayed on the console screen, VNC under Windows copies what’s shown on the computer’s main display to the client. This is similar to the approach taken by KDE with its integrated VNC support, although some details differ. This can be a good way to control your own single-user machine when you’re away from it, but it obviously won’t do if two users want to share a single computer; each user’s actions would battle the other’s.
You can obtain VNC for Windows from the RealVNC and TightVNC web
sites. This chapter uses TightVNC for Windows 1.2.9 as a reference.
The program comes as a Windows self-installing archive, so you can
double-click it to launch an installer, which is typical of this
class of program in Windows. You’ll be asked if you
want to install the client, the server, or both (the default is to
install both). If you install the server on a Windows NT/200x/XP
system, at the end of the process, you’re asked if
you want to register TightVNC as a Windows service. Doing so launches
TightVNC when Windows starts, so you can access it remotely before
any user has logged in. This can be a handy way to provide multiple
users access to the computer, but only one at a time. If you
don’t want to provide this sort of access, TightVNC
will launch only after you explicitly run it. (You can also place a
link to the TightVNC server in a user’s
Startup folder, in which case it runs as soon as
the user logs in.)
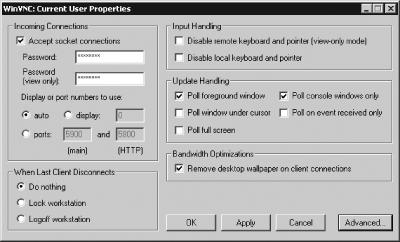
When you first launch the VNC server, it presents the WinVNC: Current User Properties dialog box shown in Figure 11-10. This dialog box enables you to set various options, some of which are equivalent to Linux VNC options and some of which are Windows-specific. The most important of these options is to set the password for VNC access, so enter that immediately. When you’ve set the options you want to use, click OK to launch the server. You should notice a small VNC icon appear in the task bar on the bottom of your screen; double-click it to change your VNC server’s options.
VNC client operation is fairly
straightforward. In Linux, you use the
vncviewer
program. If you type the command name alone, it presents a GUI prompt
for the VNC server. Alternatively, you can pass the server name on
the command line. In either case, you can include the VNC session
number, as in vncviewer
pluto:0. If you don’t include
the session number, the default is 0. This default
works well for most Windows VNC servers and for the first VNC server
launched on a Linux system.
Under Windows, you can launch the VNC client by selecting it from the Windows Start menu. The result is a GUI prompt for the VNC server, similar to the one the Linux VNC client presents. As with that prompt, you may need to enter a session number if the server runs more than one VNC server.
With either OS client, after you enter the server’s name, the client tries to connect. If it succeeds, the client immediately prompts for a password if the session is password-protected; however, if you’ve configured a Linux VNC server to interface to an XDMCP server as described earlier, you’ll see no VNC-specific password prompt. Instead, you’ll see a Linux XDMCP login screen, as shown in Figure 11-11, which shows a Windows VNC client connected to an XDMCP-enabled Linux VNC server. You can then log in as if you were at the console. Thereafter, no matter the type of the server, you can use the system more or less as if you were sitting at the remote computer.
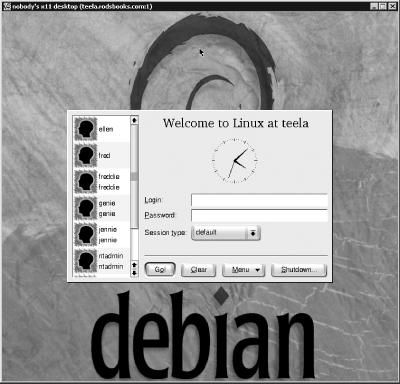
Figure 11-11. VNC can present a close replica of the remote computer’s display, potentially including a GUI login screen
Tip
Some Windows configurations require you to press Ctrl-Alt-Del to log in. To do so from a Linux VNC client, press F8 to obtain a menu of special keystrokes and options. Windows VNC clients provide similar options from their windows’ menus.
VNC isn’t without its flaws. Here are some problems and quirks you may notice when using the server:
Overall system responsiveness may seem sluggish, particularly if you’re using a slow or overburdened network or if your display is quite dynamic.
When connecting to Windows servers, parts of the display may not update in a timely fashion. This is a consequence of VNC’s imperfect interfacing to the Windows display system. Linux servers tend to be better about displaying screen updates as they should appear.
Keyboard mapping may be imperfect, particularly when connecting to or from systems with odd keyboards. Some Macintosh keys may not map sensibly, for instance, if you connect to or from a Mac OS system.
Colors may appear strange. Unfortunately, VNC clients and servers don’t always handle colors in a perfect manner. Changing the server’s color depth can often improve matters.
VNC’s lack of encryption can be a serious drawback. Fortunately, it’s one that can be corrected with the help of additional software—namely, SSH. Using SSH to encrypt VNC can be more complex than using SSH to encrypt X, though. Configuration begins on the VNC server computer, which must run an SSH server in addition to the SSH server. The SSH server must be configured to accept tunneled TCP connections:
AllowTcpForwarding yes
This option, which should appear in the
/etc/ssh/sshd_config file, is the default, so
chances are you won’t need to change it. Once
it’s set, SSH is configured to accept forwarded
connections, and the server-side configuration is done.
The simplest way to use a tunneled connection is to employ the
-via option to TightVNC’s
vncviewer command in Linux. This option takes the
name of an SSH server that forwards the traffic to the ultimate
target system. For full point-to-point encryption, this system would
be the same as the VNC server:
$ vncviewer -via pluto.pangaea.edu pluto.pangaea.edu:0The result will be a prompt for your SSH password on the remote system followed by an ordinary VNC login. Unfortunately, this approach isn’t available in the Windows version of TightVNC or in either version of RealVNC. For these systems, you must set up an explicit SSH tunnel using the SSH client package on the client computer. You do this by using several options to the ssh:
$ ssh -N -f -L 5902:pluto.pangaea.edu:5900 proxy.pangaea.eduThis command tells the SSH client to set up a mapping from the localhost port 5902 to http://pluto.pangaea.edu’s port 5900, using http://proxy.pangaea.edu as the system that passes on the data. (Ordinarily, you’d want to use a single hostname for both the proxy and the target system; I’ve specified two names here just to make it easier to identify what’s doing what. Likewise for the port numbers; chances are you’d use the same one on both systems, although you might use different numbers if your local port 5900 is occupied.) Once you type this command, you’re prompted for a password and then the link is established. To use this link, you can run any VNC client, but you must link to your localhost address on the VNC port specified in the ssh, minus 5900:
$ vncviewer localhost:2When combined with the preceding ssh, this command links to http://pluto.pangaea.edu’s port 5900 (VNC port 0), using http://proxy.pangaea.edu as the SSH proxy. This might be useful if your main concern is with snooping on intermediate systems, and you trust the security of the connection between http://proxy.pangaea.edu and http://pluto.pangaea.edu. You can also specify the same computer as both systems, though, provided you can run both an SSH and a VNC server on that computer.
This approach works with Windows clients and servers as well, although of course some details do differ. In the case of a Windows VNC server, you need to install and configure an SSH server, as described in Chapter 10. Precisely where you’ll find the option to enable TCP forwarding varies from one server to another, so consult your documentation. Likewise, Windows SSH client configuration for this task varies from one client to another. Typically, you must enter the source and destination ports in a special configuration screen, such as the one shown in Figure 11-12 for PuTTY. In PuTTY, after entering the information in the Source Port and Destination fields as shown, you click the Add button to add forwarding, then initiate an ordinary SSH session to the VNC server or the SSH server you intend to use as a proxy. Thereafter, connecting to the localhost address on the specified port with your VNC client forwards the connection.
