Table of Contents for
Linux in a Windows World
 Linux in a Windows World
Published by
O'Reilly Media, Inc., 2005
Linux in a Windows World
Published by
O'Reilly Media, Inc., 2005
- Cover
- Linux in a Windows World
- Dedication
- Preface
- Contents of This Book
- Conventions Used in This Book
- Using Code Examples
- Comments and Questions
- Safari Enabled
- Acknowledgments
- I. Linux’s Place in a Windows Network
- 1. Linux’s Features
- Linux as a Server
- Linux on the Desktop
- Comparing Linux and Windows Features
- Summary
- 2. Linux Deployment Strategies
- Linux Desktop Migration
- Linux and Thin Clients
- Summary
- II. Sharing Files and Printers
- 3. Basic Samba Configuration
- The Samba Configuration File Format
- Identifying the Server
- Setting Master Browser Options
- Setting Password Options
- Summary
- 4. File and Printer Shares
- Printing with CUPS
- Creating a Printer Share
- Delivering Printer Drivers to Windows Clients
- Example Shares
- Summary
- 5. Managing a NetBIOS Network with Samba
- Enabling NBNS Functions
- Assuming Master Browser Duties
- Summary
- 6. Linux as an SMB/CIFS Client
- Accessing File Shares
- Printing to Printer Shares
- Configuring GUI Workgroup Browsers
- Summary
- III. Centralized Authentication Tools
- 7. Using NT Domains for Linux Authentication
- Samba Winbind Configuration
- PAM and NSS Winbind Options
- Winbind in Action
- Summary
- 8. Using LDAP
- Configuring an OpenLDAP Server
- Creating a User Directory
- Configuring Linux to Use LDAP for Login Authentication
- Configuring Windows to Use LDAPfor Login Authentication
- Summary
- 9. Kerberos Configuration and Use
- Linux Kerberos Server Configuration
- Kerberos Application Server Configuration
- Linux Kerberos Client Configuration
- Windows Kerberos Tools
- Summary
- IV. Remote Login Tools
- 10. Remote Text-Mode Administration and Use
- SSH Server Configuration
- Telnet Server Configuration
- Windows Remote-Login Tools
- Summary
- 11. Running GUI Programs Remotely
- Using Remote X Access
- Encrypting X by SSH Tunneling
- VNC Configuration and Use
- Running Windows Programs from Linux
- Summary
- 12. Linux Thin Client Configurations
- Hardware Requirements
- Linux as a Server for Thin Clients
- Linux as a Thin Client
- Summary
- V. Additional Server Programs
- 13. Configuring Mail Servers
- Configuring Sendmail
- Configuring Postfix
- Configuring POP and IMAP Servers
- Scanning for Spam, Worms, and Viruses
- Supplementing a Microsoft Exchange Server
- Using Fetchmail
- Summary
- 14. Network Backups
- Backing Up the Linux System
- Backing Up with Samba
- Backing Up with AMANDA
- Summary
- 15. Managing a Network with Linux
- Delivering Names with DNS
- Keeping Clocks Synchronized with NTP
- Summary
- VI. Appendixes
- A. Configuring PAM
- The PAM Configuration File Format
- PAM Modules
- Sample PAM Configurations
- Summary
- B. Linux on the Desktop
- Configuring Applications and Environments
- Running Windows Programs in Linux
- File and Filesystem Compatibility
- Font Handling
- Summary
- Index
- Colophon
Because of its low cost and flexibility, Linux can make an excellent thin client OS. You can load Linux on computers that aren’t powerful enough to run the latest software, configure Linux to run appropriate thin client software, and the computer can then access more powerful Linux, Windows, or other computers.
In many respects, the simplest thin client configuration is to use a traditional Linux distribution or a dedicated thin client package to run Linux as a thin client, using a basically traditional hardware configuration, including a local hard disk or at least a CD-ROM drive. Perhaps the most appealing way of doing the job is to use a dedicated thin client distribution, which provides you with precisely the tools you need—no more and no less—to use Linux as a thin client. However you do it, you can run Linux without a hard disk using a bootable Ethernet card and configuring a system to deliver Linux OS files to computers that boot with such a card.
Your first choice is what distribution to use on the thin client computers. The needs of a thin client are such that a good desktop or server distribution may not be the best choice for a thin client. Many popular distributions, such as Fedora, Mandrake, and SuSE, install many unnecessary desktop or server applications that, in fact, may be undesirable on a dedicated thin client. These distributions also often require a lot of disk space or memory—features that may be lacking on the older computers you want to convert to thin client status.
Among mainstream Linux distributions, those that install small standard package sets by default are likely to be the best choices for thin client use. For instance, Debian, Gentoo, and Slackware can all be installed in well under 1 GB of disk space, omitting such large packages as GNOME, KDE, Mozilla, and OpenOffice.org. Even if users will ultimately run these packages, they’ll probably be run from the server, not on the thin client. Slimmer Linux installations are likely to lack a few components you need, at least in their minimal installations. Most notably, you’ll probably have to install an X server (XFree86 or X.org-X11). Depending on the protocols used by your server, you may also need to install a thin client package, such as a VNC client.
Another option, and one that’s arguably superior even to the slimmed-down mainstream distribution option, is to use a distribution that’s dedicated to thin client use. Notable in this regard are the PXES (http://pxes.sourceforge.net), LTSP (http://www.ltsp.org), and ThinStation (http://thinstation.sourceforge.net) distributions. These are distributions that support the PXE system, which is a way for computers to boot over a network from a remote server. These distributions are useful tools if you want to divest yourself of a local hard disk, as described in Section 12.4.4, but you can also install these thin client distributions directly on a local hard disk or on a CD-ROM to use on computers with network cards that don’t support direct network boots.
Because
PXES is designed explicitly for thin client use, this section
describes it in more detail. You can download PXES in several forms
from its web site. The CD-R image (.iso) file is
a quick way to get started, particularly for testing its operation.
This image file, though, is very generic; it runs in 800 600 mode by
default and may not take proper advantage of your
network’s resources. To best use PXES, you should
download the pxes-base and
pxesconfig packages, both of which are available
in RPM and tarball forms. You can then create a PXES image
that’s customized for your needs and can be booted
from a hard disk, from a CD-R, or from the network. This section uses
PXES Version 0.8-9 as an example; if you use another version, it may
differ slightly from what’s described here.
Tip
Before you can use PXES (or any other thin client), you need to have a remote login server configured. Chapter 11 describes this topic for Linux systems. Some configurations also require you to run a TFTP server to deliver OS files to the PXES thin clients. (The TFTP server can run on the same computer as the remote login server, or it can be on another system.) The basics of TFTP configuration are described in the earlier Section 12.3.4.
Once you’ve downloaded the base and configuration packages, install them on an existing Linux distribution. (This system doesn’t need to be the same as your ultimate login server; it’s just a platform for customizing the PXES client files.) You can then use the configuration utility to enter details of your network’s configuration and create a custom PXES image, which you can then burn to a CD-R, place on a hard disk, or deliver to thin clients via TFTP. The configuration tool uses a wizard to guide you through the configuration steps:
Create an entry in your
/etc/fstabfile for a special loopback device the configuration tool can use to create a small RAM disk that will hold the PXES distribution:/tmp/pxes.initrd /tmp/pxes ext2 loop,noauto,user,owner 0 0
As root, type
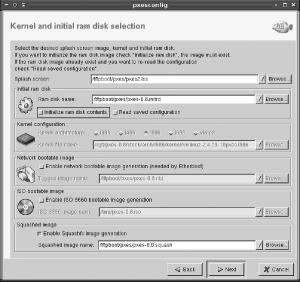
pxesconfigto launch the utility. The first screen of the PXES configuration wizard should appear.Click Next in the wizard’s window. The result should resemble Figure 12-1.
Select the “Initialize ram disk contents” item in the “Initial ram disk” area of the window. The program will warn you that the current RAM disk’s contents will be destroyed. However, because the package doesn’t ship with a default RAM disk, nothing is destroyed unless you’ve already run the program. This action makes a few more options available.
If you want to use a kernel other than the default provided with the package, specify it on the Kernel File Name line. Chances are the default kernel will work fine. Be sure to note the location of the kernel and the other files specified on this page of the wizard.
Check one or both of the “Enable network bootable image generation” or “Enable ISO 9660 bootable image generation” options if you want to use EtherBoot for network booting or a CD-R disc for booting thin clients using local CD-R drives. I recommend you check both options, simply so you’ll have both in case you ever want them. The ISO-9660 image is particularly handy for testing PXES without having to rely on your TFTP server, the client’s ability to boot from the network, and so on.
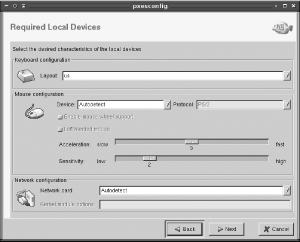
Click Next. The result is a screen for specifying various hardware characteristics, as shown in Figure 12-2. Chances are you can leave all these options alone, and PXES will autodetect the hardware, but if you know what hardware your clients use, you can enter appropriate values.
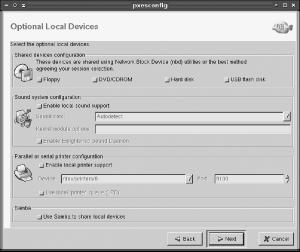
Click Next to configure local hardware, as shown in Figure 12-3. For initial testing, you may want to leave these options disabled; however, if you want to give your users access to their local hardware, enabling these options will be necessary in the long run.
Click Next. The PXES configuration wizard gives you a choice of types of protocols to support. You can specify multiple options, such as an X session using an XDMCP server as well as ICA. One of the selected protocols must be the default. The local X session option provides a minimal local X session, from which you can launch additional sessions. This can be handy if users need to access multiple remote systems simultaneously.
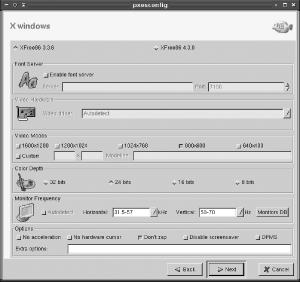
Click Next to configure assorted X options, as shown in Figure 12-4. The default options usually work, but the defaults also support only 800 600 displays. If your thin clients can do better than this, you may want to change this option. When connecting to modern Linux systems, XFree86 4.x often works better than XFree86 3.3.6, as well. If you know the capabilities of your thin client’s monitor (in terms of horizontal and vertical refresh rates), enter the correct values. If you don’t do this, you may not be able to use the monitor in your preferred resolution.
Click Next, and the wizard displays a brief summary of your configuration.
Click Next. At this point, the configuration options diverge depending on the protocol options you selected earlier. For instance, if you chose to support XDMCP, the tool asks you to enter XDMCP options, as described for XDMCP clients in Chapter 11. You may run through several such screens, one for each protocol.
After entering information on your protocols, the configuration tool presents general configuration options. You can have it delay starting X or connecting to remote servers, run a local Telnet server for administrative purposes, and enable the use of per-client configuration files (which can be handy if your thin clients vary substantially in their hardware or other features).
Click Next, and the system informs you that configuration is complete and is about to be saved.
Click Finish to finalize the configuration. The system presents a status dialog box as it prepares an initial RAM disk image and performs various other tasks. When this dialog box reports that configuration is complete, dismiss it, and pxesconfig terminates.
The result of all this processing is one or more files you can use to boot a Linux-based thin client:
- The kernel file
Although it’s delivered with PXES rather than generated by it, you should note the location of the kernel file, particularly if you want to perform a direct network boot of the thin client.
-
pxes-0.8.initrd This file, located in
/tftpboot/pxesby default, holds the initial RAM disk image, which is a tiny but complete bootable Linux filesystem that’s passed to thin clients in one way or another.-
pxes-0.8.squash This file is a compressed read-only filesystem image that’s equivalent to the initrd image. Its advantage is that it’s usually smaller than an initrd image. It’s usually stored in
/tftpboot/pxesby default.-
pxes-0.8.nbi This file is generated only if you select the network bootable image option. It’s stored in
/tftpboot/pxesby default and is necessary for some types of network boots.-
pxes-0.8.iso This file, stored in
/tmpby default, is a CD-R image file and is created only if you chose the ISO image option when configuring PXES. You should burn it to CD-R if you intend to boot your thin client using a CD-ROM drive.
Now that you’ve created a PXES system, it’s time to use it. One good way to test it is to use the CD-R image file. Using a Linux program such as cdrecord or a GUI front-end such as X-CD-Roast, burn the image file to a CD-R disc. (Alternatively, you can transfer the image file to a Windows, Mac OS, or other computer and use its CD-R drive.) You can then place the CD-R you’ve created in the CD-ROM drive of a computer that’s configured to boot from its CD-ROM drive and boot the computer. Testing in this way eliminates the possibility of errors in certain network-specific servers and configurations, such as TFTP. If the CD-R boot works, you can move on to a network configuration and be sure that any problems you encounter there are network-related, rather than problems with the basic PXES configuration.
When booting a PXES image, you’re greeted by a boot
prompt that asks you what protocol you want to use. Type the number
associated with the protocol (such as 2 for
XDMCP), followed by the Enter key. If you just press the Enter key,
PXES boots and runs the default protocol you selected when
configuring the system. Once you select the protocol,
you’ll see typical Linux kernel boot messages scroll
by.
After a few seconds of kernel messages, the system will be booted. Depending on your configuration options for the protocol you selected, you may now be asked for certain details, such as the hostname of the remote system you want to use. After you enter this information, or if you entered this information in the configuration phase, the screen will clear and you’ll see either a system-selection screen (similar to the XDMCP chooser shown earlier in Figure 11-6) or a GUI login screen for the computer you’ve contacted. You should now be able to log in and use the computer as if you were sitting at its console.
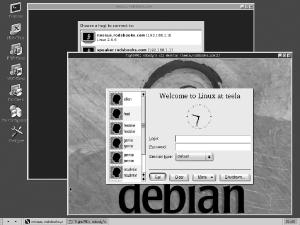
If you pick the screen option when booting PXES or
if you chose Local X Windows Session as your default option and run
this default, PXES boots into a simple Linux desktop with a handful
of icons along the left edge of the screen for initiating various
types of connections. When launched, these tools can open connections
to other computers in their own windows, as shown in Figure 12-5. This figure shows an indirect XDMCP login
session and, in front of that, a VNC session open to a Linux system
that’s configured to interface to its own local
XDMCP server.
When you’re done with a PXES session, log out of the remote system as you normally would. Usually, PXES will then redisplay your login or system-selection menu, enabling you to begin again. If you want to shut off the computer, simply flip its power switch. Unlike normal disk-based Linux systems, a PXES thin client doesn’t need to be shut down with a special command. Although it’s got a local filesystem, it’s a temporary one in a RAM disk, and it will be recreated from the boot medium the next time PXES boots. Thus, you needn’t be concerned about corrupting the local PXES computer’s filesystem.
PXES is a great tool; however, using it by booting off of a CD-R isn’t optimal. After all, much of the appeal of PXES is being able to use it with diskless workstations that can boot automatically from the network, and relying on CD-Rs—which can be lost or damaged, as well as the CD-ROM drives to read them—reduces the appeal of PXES.
As already noted, the PXE part of the PXES name refers to a network boot protocol. This protocol is promoted by Intel as a way to boot diskless workstations; however, PXES uses it to enable network boots of a Linux-based thin client. You should consult the documentation for your thin client’s motherboard to determine if it’s PXE-enabled. If it is, enable the PXE boot option in the BIOS to boot the system from the network. This option also requires a supported Ethernet card; consult your motherboard’s documentation to learn what works.
Tip
Some motherboards’ PXE support requires you to press a key, such as F12, at a specific point in the boot process. This can be tricky to do because it’s easy to miss this point. You might even prefer using a floppy-assisted boot rather than rely on such an unintuitive network boot feature.
If your computer isn’t PXE-enabled, you may still be able to boot from the network, but you’ll need a network card that supports network boots in its own BIOS. Many low-cost cards sold today lack this support, so you may need to replace the card. Sometimes you can add an EPROM chip to the card to add this support; check the EtherBoot project (http://www.etherboot.org) for information on doing this. If your system supports EtherBoot, you need to enable that support when you configure PXES, as described earlier, and specify the EtherBoot files when you configure your DHCP server, as described in the earlier Section 12.3.3.
As a last resort, you may be able to boot partially from the network, by employing a boot floppy that contains the minimal code necessary to have the network card continue the boot process from the network. One way to accomplish this goal is to use the universal boot floppy that’s distributed as part of Thinstation (http://thinstation.sourceforge.net). This floppy disk includes boot code that’s compatible with EtherBoot; when you boot from the floppy, it continues the boot process as if your network had an EtherBoot-compatible network card.
However it’s done on the client side, the client relies on two servers to obtain information and an OS: a DHCP server and a TFTP server. These servers may be your remote login server, but they need not be; you can use some other computer to fill these roles.