Table of Contents for
Linux in a Windows World
 Linux in a Windows World
Published by
O'Reilly Media, Inc., 2005
Linux in a Windows World
Published by
O'Reilly Media, Inc., 2005
- Cover
- Linux in a Windows World
- Dedication
- Preface
- Contents of This Book
- Conventions Used in This Book
- Using Code Examples
- Comments and Questions
- Safari Enabled
- Acknowledgments
- I. Linux’s Place in a Windows Network
- 1. Linux’s Features
- Linux as a Server
- Linux on the Desktop
- Comparing Linux and Windows Features
- Summary
- 2. Linux Deployment Strategies
- Linux Desktop Migration
- Linux and Thin Clients
- Summary
- II. Sharing Files and Printers
- 3. Basic Samba Configuration
- The Samba Configuration File Format
- Identifying the Server
- Setting Master Browser Options
- Setting Password Options
- Summary
- 4. File and Printer Shares
- Printing with CUPS
- Creating a Printer Share
- Delivering Printer Drivers to Windows Clients
- Example Shares
- Summary
- 5. Managing a NetBIOS Network with Samba
- Enabling NBNS Functions
- Assuming Master Browser Duties
- Summary
- 6. Linux as an SMB/CIFS Client
- Accessing File Shares
- Printing to Printer Shares
- Configuring GUI Workgroup Browsers
- Summary
- III. Centralized Authentication Tools
- 7. Using NT Domains for Linux Authentication
- Samba Winbind Configuration
- PAM and NSS Winbind Options
- Winbind in Action
- Summary
- 8. Using LDAP
- Configuring an OpenLDAP Server
- Creating a User Directory
- Configuring Linux to Use LDAP for Login Authentication
- Configuring Windows to Use LDAPfor Login Authentication
- Summary
- 9. Kerberos Configuration and Use
- Linux Kerberos Server Configuration
- Kerberos Application Server Configuration
- Linux Kerberos Client Configuration
- Windows Kerberos Tools
- Summary
- IV. Remote Login Tools
- 10. Remote Text-Mode Administration and Use
- SSH Server Configuration
- Telnet Server Configuration
- Windows Remote-Login Tools
- Summary
- 11. Running GUI Programs Remotely
- Using Remote X Access
- Encrypting X by SSH Tunneling
- VNC Configuration and Use
- Running Windows Programs from Linux
- Summary
- 12. Linux Thin Client Configurations
- Hardware Requirements
- Linux as a Server for Thin Clients
- Linux as a Thin Client
- Summary
- V. Additional Server Programs
- 13. Configuring Mail Servers
- Configuring Sendmail
- Configuring Postfix
- Configuring POP and IMAP Servers
- Scanning for Spam, Worms, and Viruses
- Supplementing a Microsoft Exchange Server
- Using Fetchmail
- Summary
- 14. Network Backups
- Backing Up the Linux System
- Backing Up with Samba
- Backing Up with AMANDA
- Summary
- 15. Managing a Network with Linux
- Delivering Names with DNS
- Keeping Clocks Synchronized with NTP
- Summary
- VI. Appendixes
- A. Configuring PAM
- The PAM Configuration File Format
- PAM Modules
- Sample PAM Configurations
- Summary
- B. Linux on the Desktop
- Configuring Applications and Environments
- Running Windows Programs in Linux
- File and Filesystem Compatibility
- Font Handling
- Summary
- Index
- Colophon
X is Linux’s native GUI system, but unlike the Windows or Mac OS GUIs, X was designed with network access in mind; user programs communicate with the X server using network protocols, even when the computer isn’t connected to a network. This feature makes remote X access easy—at least, in theory. In practice, you must still select an X server (if you’re using a non-Linux/Unix system to access your Linux computer) and know enough about X to initiate the connection. In fact, several methods of initiating that connection exist, and some require special configuration. Most notably, you may want to configure a remote X login server, which is separate from the X server itself, to accept logins. Finally, using X in a Windows/Linux environment presents its own unique challenges.
One unusual detail about using X is the way the client and server roles are assigned. Many people think of servers as powerful computers (or the programs they run) that sit in machine rooms away from users, and clients as being computers (or the programs they run) at which individual users sit. Although this description is often true, it’s not actually a definition of what makes a client a client or a server a server; rather, clients initiate network transfers and servers respond to those requests. In the case of X, the client is the computer or program that does data processing (a word processor, for instance), and the server is the computer or program that provides human input/output for the client. In other words, X reverses the usual configuration; users sit at X server computers and use them to run programs on X client computers. To make sense of this arrangement, think of it from the application program’s point of view. To an X-based word processor, the keyboard and screen are just I/O devices, like a network file share or a network printer. The application program initiates contact with the keyboard and screen (via the X server) in order to do its work. The fact that a human sits at the X server computer is unimportant.
Tip
Because application programs are the X clients, X can’t, by itself, be used as a tool for accessing Windows systems remotely. Most Windows programs aren’t written as X clients but instead use calls to the Windows GUI environment. Some exceptions to this rule do exist, but they’re mostly ports of Unix programs to Windows. Overall, X is a useful tool for running Unix or Linux programs from another computer, which can run Unix, Linux, Mac OS, Windows, or various other operating systems.
When using a single Linux computer, this unusual relationship seldom causes a problem; after all, the client and server computers in this case are one and the same. In network arrangements, though, the odd relationship can become confusing. For instance, to use a Linux computer from a Windows computer, you must obtain an X server for Windows. More importantly, the fact that the client (on the remote computer) initiates the connection with the server (on the user’s local computer) complicates matters. Specifically, the user on the server computer needs a way to signal the client program to begin running and to contact the X server. You can accomplish this task several ways; for example, you can use a remote text-mode login tool or a protocol designed specifically for this purpose. These options are described later in this chapter.
The reversal of client/server roles can have implications on your overall network design. Specifically, many networks use firewalls or Network Address Translation (NAT) tools to isolate desktop systems from the outside world. Users of such systems can often use Telnet, SSH, or other text-mode protocols to reach outside servers, but these tools may need to be reconfigured to permit incoming connections to the X servers running on users’ desktop computers. Precisely how to accomplish this task varies greatly from one firewall or router to another, so you’ll have to consult its documentation (or your network administrator) for advice. X servers typically run on TCP/IP port 6000, though, so that’s the one you’ll have to unblock or forward appropriately.
If you want to use Linux as an X server for another Linux or Unix system, you’ll probably use the standard X server that ships with your Linux distribution. Until 2004, this server was almost always XFree86 (http://www.xfree86.org), which as I write is at Version 4.4.0. The release of this version of the server also saw some subtle changes in the server’s license, and many open source advocates became alarmed because they believed the changes would make distribution of XFree86 in typical Linux distributions difficult. For this reason, 2004 saw a mad rush of Linux distributions to locate another X server, and the easy winner in this contest has been X.org’s X11 (http://www.x.org/). Its first real release, numbered 6.7.0, is a fork of the XFree86 3.3.99 code (the last version released under a license that Linux distribution maintainers found acceptable).
XFree86 and X.org-X11 aren’t the only X servers for Linux. Xi Graphics’ commercial Accelerated-X (http://www.xig.com) is also available. For the most part, there’s little reason to use this server; however, you might find that it supports an exotic feature not supported by XFree86 or X.org-X11, or you might have a video card for which Accelerated-X provides superior support. Thus, if you have unusual needs or if your distribution’s X server just doesn’t seem to work very well, you might want to investigate Accelerated-X.
A trickier decision involves locating an X server for Windows. Quite a few exist, ranging from open source products to extremely expensive commercial offerings. A company that produces one of the lower-cost X servers maintains a list of options at http://www.microimages.com/mix/prices.htm but without direct links to its competitors. Here are some highlights:
- XFree86
This package, although primarily intended for Unix-like systems, has been ported to Windows. Check http://x.cygwin.com for details. This package, like many ports of Unix-like tools to Windows, is associated with the Cygwin project. One of XFree86’s big advantages is that it’s free.
- MI/X
MicroImage’s MI/X (http://www.microimages.com/mix/) are the lowest-cost of the commercial X servers, at $25 per user, or less for site licenses. This server used to be quite spartan, but it’s improved substantially over the past few versions.
- Xmanager
Netsarang’s Xmanager (http://www.netsarang.com/products/xmanager.html) is a bit pricier than MI/X, but at $69 for a single-user license, it’s still fairly inexpensive. In my experience, it works well with most Linux software.
- X-Win32 and X-Win64
Starnet produces a server called X-Win32 (http://www.starnet.com/products/), which sells for $225 in single-user quantities. A 64-bit version for 64-bit versions of Windows is also available, but at a higher price ($325). This server works well, in my experience.
- Exceed
Hummingbird’s Exceed (http://www.hcl.com/products/nc/exceed/) is marketed for large enterprises; I’ve seen it used in universities and other large installations. No single-user price is available on the company’s web site.
Generally speaking, as you move up the price scale, the number of features provided by the X server software also goes up. For instance, X-Win32 provides OpenGL support, which is missing from many lower-cost packages. XFree86 is an exception to this rule; it provides features comparable to or better than those of many of the lower-priced commercial X servers. In any event, if you plan to deploy Windows X servers widely or in any critical roles, you should probably evaluate at least two or three of them. Many publishers make evaluation versions of their X servers available at no cost, typically with a time-limited license, so you should be able to test several without making a huge monetary investment.
As noted earlier, one of the challenges in using X is initiating the initial connection between the X client and the X server. One approach for doing this is to use a text-mode login protocol, such as Telnet or SSH, to initiate a connection from the user’s desktop computer to a remote system, then use that text-mode connection to launch X programs. For instance, suppose you’re sitting at the computer called earth and you want to run programs on pluto. If both systems run Linux or Unix, you can do so as follows:
Start an X server on earth. One may already be running, but if not, and if the X server is properly configured, typing
startxfrom a text-mode login should accomplish this task.Open an xterm or other command-prompt window on earth.
Configure the earth’s X server to accept connections from pluto. You can do this by typing
xhost+pluto. This command tells the local X server to accept all connections from pluto.Using Telnet, SSH, or some other remote-access protocol, log into pluto. For instance, you might type
ssh pluto. Answer any login prompts you receive.Using your remote login session, set the
DISPLAYenvironment variable to point to your X server. This variable includes both the hostname and the X session number, which is the same as the X server’s TCP/IP port number minus 6000—that is, it’s usually0. If you use bash, typeexportDISPLAY=earth:0.Run X programs by typing their names; for instance, type
kmailto launch the KMail program.When you’re done using remote programs, shut them all down and, in an xterm window that’s not linked to pluto, type
xhost-pluto. This command removes pluto’s right to access your local X server, reducing the odds that another user of pluto can wreak havoc with your display.
This procedure works well but is a bit tedious. You can take some
steps to simplify matters, such as creating a script with a simple
name or a command shell alias to simplify typing the awkward
xhost commands and setting the
DISPLAY variable. If you use SSH for the text-mode
connection, you may also be able to simplify things by omitting Steps
3 and 5, and the xhost command in step 7. This
process is described in more detail later, in Section 11.3.
The preceding procedure will work with
Windows X servers; however, most of these servers have few or no
access restrictions by default. Therefore, there’s
no need to type the xhost commands in Steps 3 and
7. Many Windows X servers also provide ways to combine several steps
automatically, which enables you to click a link to log into a remote
server and launch a program you specify (such as an
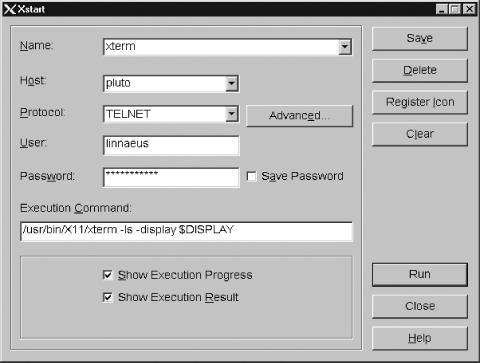
xterm) automatically. For instance, Figure 11-1 shows the dialog box
Xmanager displays
when you launch it via its Xstart program. Enter the relevant login
information, including the command you want to run, and click Run.
Xmanager then executes a series of steps that have an effect similar
to those described earlier. The default command for Xmanager is to
launch an xterm window, using the
-display option to have the
xterm window, and all the programs you launch from
it, run on your Windows X server.
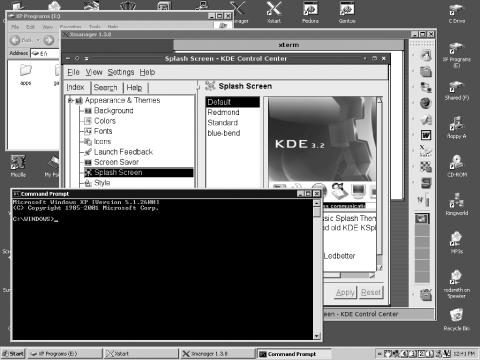
X servers can run in one of two basic modes: rooted or rootless. A rooted X server displays everything in its own window, as illustrated by Figure 11-2, which shows a rooted display on a Linux system running the XFce desktop environment with an xterm window and the KDE Control Panel running. This approach is useful if you want to run an entire Linux desktop environment remotely but don’t want that environment to take over your local computer’s desktop.
A rootless X server displays individual windows from remote applications side-by-side with local windows, as illustrated by Figure 11-3, which shows the same Linux and Windows programs as in Figure 11-2, with the exception of the XFce desktop environment programs. This approach may be easier to manage because you can place local and remote windows more flexibly. Note, for instance, that the KDE Control Panel is sized more comfortably in the rooted display, and local and remote programs can be layered any way you like. On the other hand, a rootless display requires you to launch programs via an xterm window or some other tool that doesn’t take over the whole screen, because your Linux desktop environment can’t run without interfering with your Windows desktop. Many Windows X servers let you choose to run in rooted or rootless mode, so check your documentation to learn how to select the one you want. Sometimes the programs use other terms, such as single window for rooted and multiple window for rootless displays.
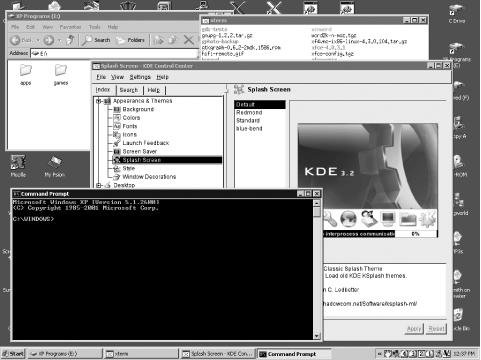
Figure 11-3. A rootless display lets you freely intermix Linux and Windows programs but makes it awkward to run a Linux desktop environment
If you use a rooted X server, you’ll have to start a
window manager or desktop environment as soon as you log in. You can
start GNOME or KDE by typing startgnome or
startkde in your initial
xterm window. Slimmer window managers, such as
IceWM or Blackbox, can also be started by typing their names. In
fact, you might be able to launch your preferred window manager or
desktop environment by providing its name to your X
server’s startup tool. Remember, however, to also
set the DISPLAY environment variable or pass
options to the desktop environment or window manager to have it
access the correct display! (Consult your preferred
environment’s documentation to learn how to do
this.)
One way to simplify the remote X login process is to use a program that implements the X Display Manager Control Protocol (XDMCP). This protocol is essentially a way for an X server to initiate a login connection with a remote computer, enabling an X server user to launch programs on a remote system. Three XDMCP programs are common in Linux: the original X Display Manager (XDM), the KDE Display Manager (KDM), and the GNOME Display Manager (GDM). Of these, XDM provides the fewest features, but all should work for remote logins.
One peculiarity of XDMCP is that it’s used by default for local X logins as well as remote logins. All major Linux distributions run an XDMCP program whenever they’re configured to boot directly into X. The default configuration, though, is to block external access requests. Thus, your task in configuring an XDMCP server is to figure out which one your system uses and reconfigure it to accept remote access, rather than install, configure, and start an entirely new server. (Of course, you can change which server you use by default, if you don’t like your standard one.)
Tracking down the XDMCP server your distribution uses can be tricky.
One way to start is to type ps
ax
|
grep
[xkg]dm after
you’ve configured your system to boot into a GUI
login mode. This command should return information on running
xdm, kdm, or
gdm processes, which will help you locate the
correct configuration files.
Most Linux distributions start the XDMCP server when configured to
run in a particular runlevel—typically runlevel 5. Thus, you
can tell the system whether to run this server by changing your
runlevel, as in telinit
5. A few distributions, such as Debian and
Gentoo, don’t use the runlevel to set the XDMCP
server’s running status; they use a SysV startup
script that’s active (or not active) in all
runlevels, at least by default. You can locate this script and use
normal SysV script handling tools to enable or disable your XDMCP
server.
You also need to tell your system which XDMCP server to run.
Unfortunately, there’s no standardization on this
point, although most distributions use a variable
that’s set in a configuration file. For instance,
Red Hat, Fedora, and Mandrake use the
/etc/sysconfig/desktop file; Gentoo uses
/etc/rc.conf; and SuSE uses the
/etc/sysconfig/displaymanager file. In all these
cases, you can change the default XDMCP server by setting the
DISPLAYMANAGER variable. Depending on the
distribution, you may need to set this variable to the name of the
XDMCP server, as in KDM, or to the associated
desktop environment name, as in KDE. Most
distributions work with either notation; be sure to read any
applicable comments in the configuration files.
Some distributions use another approach to setting the XDMCP server:
they call the server directly in a startup script. Debian uses the
/etc/X11/default-display-manager file, and
Slackware uses /etc/rc.d/rc.4. In Debian, this
file contains the complete path to your preferred XDMCP server
program. The default Slackware script checks for the presence of
several XDMCP servers in sequence and launches the first one it
finds. To change the server your system launches, you must change the
order of these checks or uninstall the servers you
don’t want to use.
XDM is the oldest and least feature-laden of the common XDMCP servers. It provides a simple login prompt for a username and password, with no other user-accessible options. Because most desktop users expect to be able to easily shut down their computers, most distributions have moved away from XDM to KDM or GDM, both of which provide options to display buttons to shut down or restart a computer as part of the XDMCP login display. Nonetheless, XDM configuration is important because KDM borrows some XDM configuration file features.
The primary XDM configuration file is
/etc/X11/xdm/xdm-config. Most lines in this file
set options you shouldn’t need to adjust. To
configure an XDM server to accept remote accesses, though, look for a
line like the following, which is usually near the end of the file:
DisplayManager.requestPort: 0
This line tells XDM not to listen on a regular port. The result is
that your local X server can use the XDM server for login
authentication, but remote systems can’t. To enable
remote servers to connect to the XDM server, either change the port
number from 0 to 177, which is
the default XDMCP port, or comment the line out entirely, which has
the same effect.
This isn’t the only change you need to make, though.
You must also tell XDM what types of services it’s
to offer. To do this, you need to edit another file:
/etc/X11/xdm/Xaccess. This file controls what
clients can use the server and in what ways. A typical configuration
should have lines like this:
*
* CHOOSER BROADCAST
The default configurations often have these lines, but
they’re likely to be commented out by hash marks
(#) at the start of the line, and they may be
separated by intervening comment lines explaining their purpose. In
brief, the first line tells the system to accept logins from any
computer, and the second line tells the system to provide a list of
available local computers to any computer that asks for one. To
improve security, you can specify computers or groups of computers
rather than use asterisks (*) on these lines. For
instance, the following configuration restricts access to computers
in the http://pangaea.edu domain:
*.pangaea.edu
*.pangaea.edu CHOOSER BROADCAST
Finally, recall that the XDMCP server provides local login access by
default. In fact, launching this server typically forces X to start,
and this is how most distributions start X: they start the XDMCP
server. What if you want to provide remote X login service but not
run X locally, though? You can do this by editing the
/etc/X11/xdm/Xservers file, which typically
contains a line like this:
:0 local /usr/X11R6/bin/X -nolisten tcp -br vt7
Details vary from one system to another, but the line is almost
certain to begin with :0 local. Whatever the
precise form of this line, you can comment it out by placing a hash
mark at the start of the line. This action forces XDM to accept
remote accesses without starting X whenever it starts.
Tip
The -nolisten
tcp option causes
X to not accept connections from other systems. This configuration
improves security for a desktop system that
shouldn’t be accessed remotely, but
it’s detrimental for systems that should be remotely
accessible. If you want to leave X running by default but enable
remote logins, you should ensure that this option is
not present in your
/etc/X11/xdm/Xservers file.
Once you’ve made your changes, you have to restart
the XDM server to implement your changes. Precisely how you do this
varies from one distribution to another, but typically, you can
change to a text-only runlevel and then back to your GUI login
runlevel. For instance, typing telinit
3;
telinit
5 accomplishes the job on many distributions.
Some distributions, such as Debian and Gentoo, use the SysV startup
scripts to shut down the XDM server and then restart it.
KDM’s configuration is
modeled after that of XDM, so if you want to configure KDM, you
should begin by reading the previous section on XDM configuration.
Most KDM installations, however, change the names and locations of
some configuration files. In particular, many use
kde-config rather than
xdm-config. KDE configuration files may also
reside in odd places, such as /opt/kde3/bin or
/usr/bin. The Xaccess and
Xservers files may also reside in an
out-of-the-way place, such as
/opt/kde3/share/config/kdm or
/etc/kde/kdm.
Tip
You can use your distribution’s package management
tools to help locate the KDM configuration files. For instance, on an
RPM system, you can type whereis
kdm to locate the kdm
binary, then use rpm’s
-qlf option set rpm
-qlf
/opt/kde3/bin/kdm
|
grep
Xaccess to query the location of that file and
find the Xaccess file, making the necessary
change to the path to kdm on your system, of
course.
To support KDM’s additional features compared to
XDM, extra configuration files are required. The most important of
these is kdmrc, which is likely to be stored in
the same location as the Xaccess file. Use your
package management system or the find or
locate command if you can’t find
it. This file is broken into sections with labels in square brackets,
such as [Xdmcp]. It’s this
section you may need to edit; look for the Enable
and Port lines. These tell the system whether to
enable externally accessible XDMCP functions and on what port to
offer them. In effect, these lines duplicate the purpose of the line
in xdm-config for XDM. (For safety, make changes
to both files.) You should edit these lines so that they look like
this:
Enable=true
Port=177
Once you’ve reconfigured KDM in this way, you must restart it, much as you’d restart XDM if you were using it.
GDM uses its own unique configuration
file, gdm.conf, which usually appears in
/etc/X11/gdm. This file is similar in format to
KDM’s kdmrc, but GDM
doesn’t use the XDM-style configuration files, so
you can ignore the XDM configuration information presented earlier;
gdm.conf handles everything. To enable GDM to
accept remote logins, activate its server features in its
[xmdcp] section, much as you do in
KDM’s kdmrc:
Enable=true
Port=177
These lines may be separated by other lines containing comments and
even other configuration options. If you want to use GDM for remote
logins only and not have it start a local X server, locate the
[servers] section, which should have a line such
as:
0=Standard
This line tells GDM to manage the first X display. If you comment out this option by placing a hash mark at the start of the line, GDM won’t start an X server when it’s run.
Unfortunately, GDM doesn’t provide an easy way to
restrict access to the server akin to XDM’s
Xaccess file; it’s open either
to everybody or to nobody. For this reason, GDM is best used only on
well-secured local networks. If you want to use GDM on a system
that’s exposed to the Internet at large, you may
want to use a firewall to block access to the
server’s UDP port 177 from unauthorized systems.
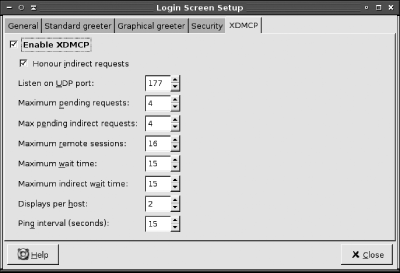
GDM provides a GUI configuration tool that enables you to set many of
its options, including enabling XDMCP. To use this tool, type
gdmsetup in an xterm or
similar command prompt window or select the GDM configuration tool
(often called Login Screen) from
your desktop environment’s menu system. The result
should resemble Figure 11-4. The XDMCP tab contains
the options for XDMCP. Be sure the Enable XDMCP box is checked.
XDMCP server configuration is,
naturally, only half the story. Once your XDMCP server is running,
you must configure a client. These clients are actually X servers.
The X server contacts the XDMCP client to start an X session. When
it’s successful, the remote system then sets its
DISPLAY environment variable and runs its X login
scripts. The result is typically an X session running on your local
computer.
Precisely how you configure an XDMCP client depends on the X server. Windows X servers typically provide a configuration utility that lets you point the X server to an XDMCP server. For instance, Figure 11-5 shows the Xconfig program for Xmanager.
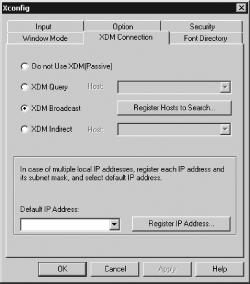
The XDM Connection tab in Xconfig provides the means to handle XDMCP queries. In addition to the option not to use XDMCP, three modes of operation are typically available:
- Query
This option connects directly to a single XDMCP server, which you must specify. If you use an X server to connect to a single system, this can be a good option.
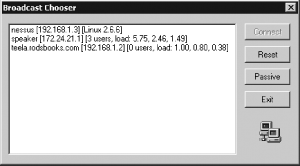
- Broadcast
An XDM broadcast should locate all the appropriately configured XDMCP servers on your local network. You can also usually add off-network systems (by clicking “Register Hosts to Search...” in Figure 11-5), in which case your X server queries them, as well. The result, when you launch your X server, is an XDMCP chooser display similar to the one shown in Figure 11-6. You pick one of the systems, and click Connect to log in to it.
- Indirect
An indirect use of XDMCP works much like a broadcast, but the task of performing the broadcast is handed off to a remote XDMCP server. This feature can be handy if you want to access a remote network; rather than enter each potential hostname or IP address in a broadcast list, you enter a single remote XDMCP server name in the indirect field and let it do the work.
You can use a Linux system and its X server as a GUI terminal for
another computer. To do so, however, you must pass options to the
X program when you start it. These options are
-query
host.name,
-broadcast, and -indirect
host.name, to perform queries, broadcasts,
or indirect broadcasts, respectively. For instance, with X
not running, the following command performs an
indirect connection, presenting a list of available systems:
$ /usr/X11R6/bin/X -indirect mars.pangaea.eduOne notable difference between Linux and Windows X servers is that Linux X servers (XFree86 and X.org-X11) don’t present a chooser if you perform a broadcast query; instead, Linux X servers connect directly to the first XDMCP server that responds. This feature makes indirect connections more desirable under Linux, at least most of the time.
Tip
Chapter 12 describes how to use old computers running Linux as dedicated X servers for more powerful Linux systems. This approach can be a useful way to squeeze extra life out of elderly computers.
Because an XDMCP-mediated login runs the user’s normal startup scripts, it usually starts a full desktop environment. This desktop environment is likely to overlay a Windows desktop if a Windows X server is configured to use a rootless configuration. Alternatively, you can alter the X login scripts to provide an option to not start a full desktop environment.