Table of Contents for
Linux in a Windows World
 Linux in a Windows World
Published by
O'Reilly Media, Inc., 2005
Linux in a Windows World
Published by
O'Reilly Media, Inc., 2005
- Cover
- Linux in a Windows World
- Dedication
- Preface
- Contents of This Book
- Conventions Used in This Book
- Using Code Examples
- Comments and Questions
- Safari Enabled
- Acknowledgments
- I. Linux’s Place in a Windows Network
- 1. Linux’s Features
- Linux as a Server
- Linux on the Desktop
- Comparing Linux and Windows Features
- Summary
- 2. Linux Deployment Strategies
- Linux Desktop Migration
- Linux and Thin Clients
- Summary
- II. Sharing Files and Printers
- 3. Basic Samba Configuration
- The Samba Configuration File Format
- Identifying the Server
- Setting Master Browser Options
- Setting Password Options
- Summary
- 4. File and Printer Shares
- Printing with CUPS
- Creating a Printer Share
- Delivering Printer Drivers to Windows Clients
- Example Shares
- Summary
- 5. Managing a NetBIOS Network with Samba
- Enabling NBNS Functions
- Assuming Master Browser Duties
- Summary
- 6. Linux as an SMB/CIFS Client
- Accessing File Shares
- Printing to Printer Shares
- Configuring GUI Workgroup Browsers
- Summary
- III. Centralized Authentication Tools
- 7. Using NT Domains for Linux Authentication
- Samba Winbind Configuration
- PAM and NSS Winbind Options
- Winbind in Action
- Summary
- 8. Using LDAP
- Configuring an OpenLDAP Server
- Creating a User Directory
- Configuring Linux to Use LDAP for Login Authentication
- Configuring Windows to Use LDAPfor Login Authentication
- Summary
- 9. Kerberos Configuration and Use
- Linux Kerberos Server Configuration
- Kerberos Application Server Configuration
- Linux Kerberos Client Configuration
- Windows Kerberos Tools
- Summary
- IV. Remote Login Tools
- 10. Remote Text-Mode Administration and Use
- SSH Server Configuration
- Telnet Server Configuration
- Windows Remote-Login Tools
- Summary
- 11. Running GUI Programs Remotely
- Using Remote X Access
- Encrypting X by SSH Tunneling
- VNC Configuration and Use
- Running Windows Programs from Linux
- Summary
- 12. Linux Thin Client Configurations
- Hardware Requirements
- Linux as a Server for Thin Clients
- Linux as a Thin Client
- Summary
- V. Additional Server Programs
- 13. Configuring Mail Servers
- Configuring Sendmail
- Configuring Postfix
- Configuring POP and IMAP Servers
- Scanning for Spam, Worms, and Viruses
- Supplementing a Microsoft Exchange Server
- Using Fetchmail
- Summary
- 14. Network Backups
- Backing Up the Linux System
- Backing Up with Samba
- Backing Up with AMANDA
- Summary
- 15. Managing a Network with Linux
- Delivering Names with DNS
- Keeping Clocks Synchronized with NTP
- Summary
- VI. Appendixes
- A. Configuring PAM
- The PAM Configuration File Format
- PAM Modules
- Sample PAM Configurations
- Summary
- B. Linux on the Desktop
- Configuring Applications and Environments
- Running Windows Programs in Linux
- File and Filesystem Compatibility
- Font Handling
- Summary
- Index
- Colophon
If you’re migrating desktop users from Windows to Linux, chances are your users will be familiar with the Windows Network Neighborhood or My Network Places network browsers. These browsers enable users to easily locate network resources in a friendly visual manner. The core Linux SMB/CIFS client tools, though, are purely textual, and hence decidedly unfriendly to users who aren’t comfortable with text-mode commands. Fortunately, some tools exist that provide GUI frontends to the text-based tools or that integrate SMB/CIFS functionality into primarily GUI tools. Installing and configuring such tools can help make former Windows users feel at home on a Linux desktop system.
Fitting with the Unix tradition of creating small programs that work together, many SMB/CIFS network browsers serve as frontends to the text-mode tools. Others use functions that are now provided in Samba libraries to handle much of the grunt work of SMB/CIFS interactions. These tools differ in their levels of sophistication and precise feature sets. Examples include:
- Konqueror
This program is the file manager and web browser in the K Desktop Environment (KDE; http://www.kde.org) package. It supports accessing SMB/CIFS shares when the user enters an SMB/CIFS URI, such as ldap://MANDRAGORA/SHARED, in a window’s path specification. Konqueror doesn’t actually mount shares on the Linux filesystem.
- Nautilus
The GNOME file manager, Nautilus, supports SMB/CIFS access. You may need to select the File → Open Location option in the program and enter a URI for your share. Like Konqueror, Nautilus doesn’t actually mount the SMB/CIFS share, but it does provide drag-and-drop access to files.
- LinNeighborhood
This program provides a GUI frontend to several Samba and related utilities, the end result being a system that’s similar to Network Neighborhood or My Network Places in overall capabilities. It uses smbclient to mount remote shares, so they’re accessible to all programs. If LinNeighborhood doesn’t ship with your distribution, you can obtain it from http://www.bnro.de/~schmidjo/.
- Gnomba
Like LinNeighborhood, Gnomba is an SMB/CIFS network browser that supports mounting shares you discover in the Linux filesystem tree. You can obtain it from its home page, http://gnomba.sourceforge.net.
- xSMBrowser
This program doesn’t actually mount remote shares, but it enables easy browsing of the network. Check the project’s home page, http://www.public.iastate.edu/~chadspen/, for more information.
- SMB2WWW
This tool is unusual in that it’s an interface between HTTP, which is used by web browsers, and SMB/CIFS. The program runs as a Common Gateway Interface (CGI) program from a web server, giving web browsers that access the server the ability to browse the local SMB/CIFS network. You can obtain more information and download the program from http://www.scintilla.utwente.nl/users/frank/smb2www/.
There are several more GUI tools for Linux SMB/CIFS interfacing, including some very specialized ones. Check http://www.samba.org/samba/GUI/ for brief descriptions and links to those tools that have been registered with the main Samba project.
LinNeighborhood provides fairly typical network-browsing features, although its user interface isn’t quite as polished as some users might expect. Still, it works with a variety of desktop environments, which can be a big plus. Before you can use it in any significant way, you must install and configure it:
Check your distribution or the LinNeighborhood web site itself for the program. The web page includes binaries in several different formats, or you can download and install the source code.
As an ordinary user, type
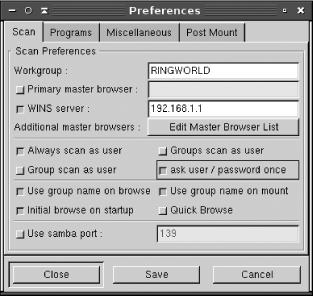
LinNeighborhoodin an xterm or similar window. The result is the main LinNeighborhood window.Click the Prefs button in the LinNeighborhood window. LinNeighborhood displays its main Preferences dialog box, as shown in Figure 6-1.
Enter the information in the Scan tab. The workgroup is particularly important, but you may want to enter the IP address of your NBNS system. LinNeighborhood should be able to find the primary master browser automatically, and because this can change unexpectedly, it’s probably best to leave this field alone. Adjusting the various checkboxes can also help in some cases; for instance, you might want to perform scans as your logon user rather than anonymously.
Click the Programs tab, and check the entries there; they relate to the programs LinNeighborhood uses to do the real work. Chances are you won’t need to adjust these entries.
Click the Miscellaneous tab, and check the items there. Particularly if you checked “Always scan as user” on the Scan tab, you may want to enter a default user. If you enter a default password, be aware that LinNeighborhood will store it in a plain-text file,
~/.LinNeighborhood/password, in your home directory. Be sure that file is readable only to you!Click the Post Mount tab, and adjust the items there. This tab enables you to launch a file manager on shares you mount, or conceivably perform other arbitrary actions.
When you’re done with the Preferences dialog box, click Save, followed by Close.
Tip
The LinNeighborhood configuration files are in the
~/.LinNeighborhood directory, and in particular,
in the preferences file. You can configure
LinNeighborhood as you like and then copy this file to all
users’ home directories. You may need to omit or
customize the default_user line from this file,
though.
LinNeighborhood should now be configured and ready to function. If you don’t yet see a list of systems in the main window, as shown in Figure 6-2, try right-clicking the machine name, and select Rescan Groups from the resulting pop-up menu.
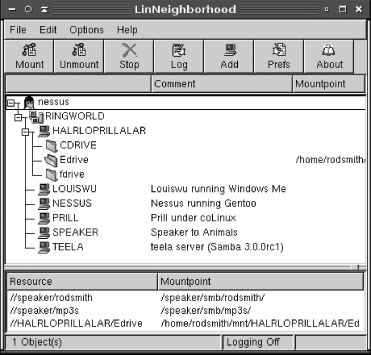
You can browse the network in a way that should be familiar to those with GUI file manager or network browser experience: double-click machine names (such as HALRLOPRILLALAR and LOUISWU in Figure 6-2) to open them, or click the plus or minus symbol next to the name to open or close a machine that’s already been visited. Depending on your settings, you may be asked to enter a username and password when you do this. Double-clicking a share’s folder under a machine (such as CDRIVE or EDRIVE in Figure 6-2) brings up a mount dialog box in which you specify the mount point, username, password, and so on. LinNeighborhood then mounts the share and displays it in the bottom pane of its main window, along with other SMB/CIFS mounts. If you configured LinNeighborhood to launch a file manager after mounting a share, your file manager window should appear.
Tip
To mount shares, LinNeighborhood requires that you either enter the root password in the mount dialog box or set the SUID bit on the smbmount binary, as described in Section 6.2.2.
To unmount a share, right-click the share or its mount point in the bottom pane of the window, and select Unmount from the resulting pop-up menu. LinNeighborhood should unmount the share—if it can. If any programs have open files on the share, LinNeighborhood won’t be able to comply.
Konqueror, the primary web browser and file manager for KDE, also supports SMB/CIFS; however, this support is fairly recent and is still improving. Konqueror’s support also doesn’t actually mount the share in the Linux filesystem. This means that if you attempt to directly access a file (say, by double-clicking it), either Konqueror must copy the file to a temporary local location and then copy it back when you’re through or the application used to access the file must implement its own SMB/CIFS support. Konqueror, like other GUI SMB/CIFS tools, also relies on other support libraries. For the most part, these are installed with your main Samba or Samba clients package.
To use Konqueror’s SMB/CIFS features, you should
first launch it. Most Linux distributions place a link for Konqueror
in a menu or on the desktop, particularly when you run KDE rather
than GNOME or some other desktop environment. If you
can’t find a link, type
konqueror in an xterm or
similar window.
Once Konqueror is running, type a URI (beginning with
smb://) for the machine or share you want to
access in the Location field. If you enter a complete share
specification, Konqueror asks for a username and password, which you
must enter correctly. (If you enter a machine name without a share
name, Konqueror defers asking for a username and password until you
try to access a share.) Konqueror should then present a list of file
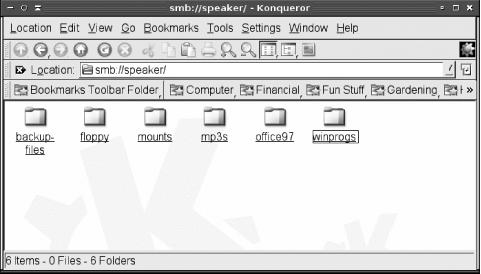
shares on a server or files and folders in a share. For instance,
Figure 6-3 shows Konqueror’s
display of the shares on the SPEAKER server. You can browse your entire
network by entering smb:/ as the device URI (the
number of slashes is critically important: you must place one slash
after smb:).
In theory, you should be able to use an SMB/CIFS share much as you’d use a local directory, by clicking folders to open them and clicking files to launch applications that will read the files. In practice, though, this sometimes doesn’t work correctly. Konqueror may hang during file transfers to temporary locations, or programs may fail to load the files. These problems will likely diminish as Konqueror’s SMB/CIFS support matures.