Table of Contents for
Linux in a Windows World
 Linux in a Windows World
Published by
O'Reilly Media, Inc., 2005
Linux in a Windows World
Published by
O'Reilly Media, Inc., 2005
- Cover
- Linux in a Windows World
- Dedication
- Preface
- Contents of This Book
- Conventions Used in This Book
- Using Code Examples
- Comments and Questions
- Safari Enabled
- Acknowledgments
- I. Linux’s Place in a Windows Network
- 1. Linux’s Features
- Linux as a Server
- Linux on the Desktop
- Comparing Linux and Windows Features
- Summary
- 2. Linux Deployment Strategies
- Linux Desktop Migration
- Linux and Thin Clients
- Summary
- II. Sharing Files and Printers
- 3. Basic Samba Configuration
- The Samba Configuration File Format
- Identifying the Server
- Setting Master Browser Options
- Setting Password Options
- Summary
- 4. File and Printer Shares
- Printing with CUPS
- Creating a Printer Share
- Delivering Printer Drivers to Windows Clients
- Example Shares
- Summary
- 5. Managing a NetBIOS Network with Samba
- Enabling NBNS Functions
- Assuming Master Browser Duties
- Summary
- 6. Linux as an SMB/CIFS Client
- Accessing File Shares
- Printing to Printer Shares
- Configuring GUI Workgroup Browsers
- Summary
- III. Centralized Authentication Tools
- 7. Using NT Domains for Linux Authentication
- Samba Winbind Configuration
- PAM and NSS Winbind Options
- Winbind in Action
- Summary
- 8. Using LDAP
- Configuring an OpenLDAP Server
- Creating a User Directory
- Configuring Linux to Use LDAP for Login Authentication
- Configuring Windows to Use LDAPfor Login Authentication
- Summary
- 9. Kerberos Configuration and Use
- Linux Kerberos Server Configuration
- Kerberos Application Server Configuration
- Linux Kerberos Client Configuration
- Windows Kerberos Tools
- Summary
- IV. Remote Login Tools
- 10. Remote Text-Mode Administration and Use
- SSH Server Configuration
- Telnet Server Configuration
- Windows Remote-Login Tools
- Summary
- 11. Running GUI Programs Remotely
- Using Remote X Access
- Encrypting X by SSH Tunneling
- VNC Configuration and Use
- Running Windows Programs from Linux
- Summary
- 12. Linux Thin Client Configurations
- Hardware Requirements
- Linux as a Server for Thin Clients
- Linux as a Thin Client
- Summary
- V. Additional Server Programs
- 13. Configuring Mail Servers
- Configuring Sendmail
- Configuring Postfix
- Configuring POP and IMAP Servers
- Scanning for Spam, Worms, and Viruses
- Supplementing a Microsoft Exchange Server
- Using Fetchmail
- Summary
- 14. Network Backups
- Backing Up the Linux System
- Backing Up with Samba
- Backing Up with AMANDA
- Summary
- 15. Managing a Network with Linux
- Delivering Names with DNS
- Keeping Clocks Synchronized with NTP
- Summary
- VI. Appendixes
- A. Configuring PAM
- The PAM Configuration File Format
- PAM Modules
- Sample PAM Configurations
- Summary
- B. Linux on the Desktop
- Configuring Applications and Environments
- Running Windows Programs in Linux
- File and Filesystem Compatibility
- Font Handling
- Summary
- Index
- Colophon
Once the server is running, you must populate the directory with information about your network’s users. To do this, you must understand distinguished name notation. Understanding at least the basics of LDIF files, which can be used to enter information into the directory, is also a necessity. With these pieces of information, you can actually begin populating the directory with user accounts.
Distinguished Names (DNs) are the pointers
to data in a directory. They’re similar in many ways
to filenames in hard-disk filesystems. For example, the Linux
filename /etc/X11/xdm/Xaccess refers to the
Xaccess file in the
/etc/X11/xdm directory, which in turn can be
broken down into a series of subdirectories leading to the root
directory of the Linux directory tree. Similarly, DNs are typically
composed of multiple elements that enable an LDAP implementation to
quickly locate the data. In the case of DNs, though, these elements
are labeled according to type. Common types in an
LDAP directory used for authentication
include Domain Class (DC), Common Name (CN), User ID (UID, which is
equivalent to a username rather than a numeric UID), and sometimes
Organizational Unit (OU). Each abbreviation is converted to lowercase
and separated from its value by an equal sign; these are then strung
together with commas and identified as a DN by using the
dn code and a colon:
dn: cn=Carl Linnaeus,dc=pangaea,dc=edu
This example refers to an entry for the common name Carl Linnaeus in the http://www.pangaea.edu domain. You may have noticed that
this notation is similar to the one for the rootdn
item in the slapd.conf file, as illustrated in
Example 8-1. This is no accident; the
rootdn entry identifies a DN for a user with
special privileges on the server.
Tip
Although the DC components of DN frequently combine to form an Internet domain name that’s associated with the LDAP server, this isn’t a requirement.
Occasionally, variants on this notation are necessary. One of these occurs when the CN for a user is not unique. For instance, suppose your organization has two users named Carl Linnaeus, one in the Botany department and one in the Genetics department. You might then create two DNs that add the appropriate OUs:
dn: cn=Carl Linnaeus+ou=Botany,dc=pangaea,dc=edu
dn: cn=Carl Linnaeus+ou=Genetics,dc=pangaea,dc=edu
Tip
In practice, you’ll create these DNs in files with intervening lines that specify other account characteristics, as described in Section 8.3.2.
In this example, the DN begins with a Relative
Distinguished Name (RDN)—cn=Carl Linnaeus+ou=Botany or cn=Carl Linnaeus+ou=Genetics. An RDN uses a plus sign
(+) to separate two attributes, neither of which
is unique by itself. In this example, two users named Carl Linnaeus
exist, and presumably both the Botany and Genetics OUs host other
users.
Tip
The use of the plus sign to separate RDN components means that this
symbol can’t be used within an element without
taking special steps. Specifically, if an element must contain a plus
sign, the plus sign should be preceded by a backslash
(\). Other special characters that should be
preceded by a backslash include a hash mark (#) at
the start of a string, a space at the end of a string, a comma
(,), a double quote (“), a
backslash, a semicolon (;), and angle brackets
(< or >). Chances are you
won’t need to use any of these symbols in the DN
elements for a Unix-based account database, although spaces are
common in databases that originate on Windows systems.
DNs are usually case-insensitive, but case is preserved in storing
them. Thus, cn=carl
linnaeus,dc=pangaea,dc=edu is equivalent to
cn=Carl Linnaeus,dc=pangaea,dc=EDU. This
characteristic is based on matching rules defined in the schema,
though, so it’s not always true.
Behind the scenes,
OpenLDAP
may use any of several databases for data storage; but to examine and
modify data, a common plain-text format is desirable. This is where
LDIF comes into the picture; it represents LDAP directory entries
that are invariant across OpenLDAP backends, and even across LDAP
implementations. For the most part, it consists of a series of
attribute names and values, separated by colons. Entries begin with
the DN entry, as described earlier. Subsequent
entries’ content depend on the schemas a directory
uses. The NIS schema defines several object classes, each of which
defines several attributes. For the purposes of this chapter, the
posixAccount object class is one of the most
important of these object classes. This object
class’s attributes roughly correspond to entries in
the traditional Linux /etc/passwd file, as shown
in Figure 8-2.
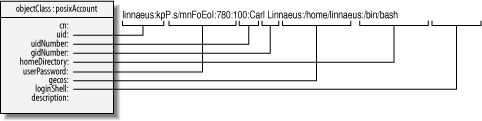
Every field in the /etc/passwd file maps to an
attribute in the posixAccount object class,
although the names aren’t always intuitive. In
particular, the uid attribute maps to the Linux
username; the uidNumber attribute holds the Linux
UID number. The posixAccount object class also
defines two attributes, cn and
description, that aren’t present
in /etc/passwd. Of these, cn
is required and typically holds the user’s real
name.
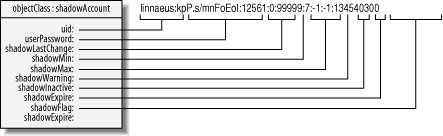
Figure 8-3 shows a mapping of the
shadowAccount object class to entries
traditionally found in /etc/shadow. All these
entries except uid are optional. This attribute,
though, as well as the userPassword and
description attributes, are in fact shared with
the posixAccount object class. Specifying values
for all the required attributes in these two object classes creates a
user account.
Tip
In traditional Linux accounts, using shadow passwords and the
/etc/shadow file increases security. The
equivalent use of the shadowAccount object class
in LDAP does not have this effect, though. When
properly configured, an LDAP account directory should be at least as
secure as a Linux shadow passwords system, whether or not you place
data in the shadowAccount structures. What
shadowAccount does provide is a place to store
password aging and expiration information.
Between these two object classes, you can define an account. To do so
in an LDIF file, you create one line per attribute, plus a few
objectClass attributes pointing to the objects
upon which the posixAccount and
shadowAccount objects rely. The result looks
something like this:
dn: uid=linnaeus,ou=People,dc=pangaea,dc=edu
uid: linnaeus
cn: Carl Linnaeus
objectClass: account
objectClass: posixAccount
objectClass: top
objectClass: shadowAccount
userPassword: {crypt}KpP.s/mnFoEoI
shadowLastChange: 12561
shadowMax: 99999
shadowWarning: 7
loginShell: /bin/bash
uidNumber: 780
gidNumber: 100
homeDirectory: /home/linnaeus
gecos: Carl Linnaeus
Tip
Don’t start generating accounts by copying this entry. As described in Section 8.3.3, there are easier ways to populate your directory than creating LDIF files by hand.
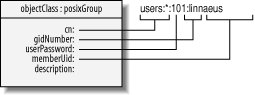
Figure 8-4 shows a mapping of the
posixGroup object class to entries traditionally
found in /etc/group. These entries are necessary
if the server is to deliver group information as well as account
information to clients. Note that these objects are not directly
related to accounts, although they do refer to accounts; the
memberUid attribute points to user accounts.
(Likewise, the gidNumber field in the
posixAccount object class points to a
posixGroup via its gidNumber
field.)
The NIS schema file defines several object classes in addition to
those described here. These object classes enable an LDAP server to
deliver information that’s traditionally contained
in /etc/fstab, /etc/hosts,
/etc/protocols, and more—in short, the
data that’s normally delivered by an NIS server.
Configuring OpenLDAP to deliver this information is similar to
configuring it to deliver account and group information, but such
configurations are beyond the scope of this chapter.
The simplest way to populate an OpenLDAP directory with account and group information is to convert this information from existing account and group files. You can perform this task with scripts available on the Internet. If you’re not migrating accounts directly, you may want to use these tools on a dummy password file to create a template you can use to create new accounts in piecemeal fashion.
The scripts you use to migrate an existing set of Linux accounts can
be obtained from http://www.padl.com/OSS/MigrationTools.html.
The download links at the bottom of this page retrieve a file called
MigrationTools.tgz. This tarball contains a
series of Perl scripts, each of which reads the contents of one or
more system configuration files and creates an equivalent LDIF file.
Tip
The migration tools package described here has a project version
number of 45, as revealed in the
CVSVersionInfo.txt file. If you obtain a more
recent version, you may find that some of the details have changed.
Before running the conversion scripts, you must edit one of them
(migrate_common.ph) so that it holds appropriate
site-specific information. Specifically, change the
$DEFAULT_MAIL_DOMAIN and
$DEFAULT_BASE variables, defined on lines 71 and
74, to point to your DNS domain and your directory’s
base. For instance, to conform to the options shown in Example 8-1, set these options as follows:
$DEFAULT_MAIL_DOMAIN = "pangaea.edu";
$DEFAULT_BASE = "dc=pangaea,dc=edu";
Once this task is done, you can create LDIF files using the
appropriate scripts. Of particular interest are the
migrate_passwd.pl and
migrate_group.pl scripts, which migrate your
account database (including both /etc/passwd and
/etc/shadow) and your
/etc/group file, respectively. Both scripts
accept the name of the source file (just
/etc/passwd in the case of
migrate_passwd.pl) followed by an output file:
#./migrate_passwd.pl /etc/passwd passwd.ldif#./migrate_group.pl /etc/group group.ldif
You can examine the contents of these LDIF files, if you like. At a minimum, you might want to perform a quick check to verify that all your users have entries in the password file. You might also want to eliminate system accounts that don’t require authentication and those that you don’t want to be authenticated via the LDAP server. If you eliminate such accounts, though, be sure that they either exist in your clients’ local account databases or aren’t required by your clients.
Tip
The migration scripts can’t decrypt the already
encrypted passwords in the password database. Therefore,
they’re entered into the LDIF file using the
{crypt} encoding notation.
These scripts don’t create entries for the top-level DNs. If you haven’t created them already, you should add them to the start of each file. For the password file, the entries for the example domain are these:
dn: dc=pangaea,dc=edu
objectClass: domain
dc: pangaea

dn: ou=People,dc=pangaea,dc=edu
objectClass: organizationalUnit
ou: People
The entry to add to the start of the groups file is similar:
dn: ou=Group,dc=pangaea,dc=edu
objectClass: organizationalUnit
ou: Group
Of course, in both cases, you must make changes to the
dn and dc lines suitable for
your organization. Once you’ve done this,
you’re ready to add the LDIF files to your LDAP
directory. You can do this with either the ldapadd
command or the slapadd command, using the
-f or -l parameters
(respectively) to pass the name of the LDIF file you want to add. You
might also want to use -v, which provides feedback
on the success of the operations. (If you use
ldapadd, though, you’ll first
need to perform additional client configurations, as described in the
next section.) For instance, these commands add both the files
created earlier:
#slapadd -v -l passwd.ldif#slapadd -v -l group.ldif
Account maintenance on an OpenLDAP server uses various utilities
whose names begin with ldap, as described
earlier. Of particular interest are ldapadd, which
adds accounts; ldapmodify, which modifies existing
accounts; and ldapdelete, which deletes accounts.
You can run these commands on any LDAP client computer (including the
LDAP server itself, if it’s properly configured as a
client); they use the network protocol to communicate with the
server.
These tools rely on the /etc/openldap/ldap.conf
configuration file. Before you can use these tools, therefore, you
should edit this file. Normally, you must set the
BASE and URI options, and
possibly point the system to a certificate file:
BASE        dc=pangaea,dc=edu
URI         ldaps://ldap.pangaea.edu
TLS_CACERT  /etc/openldap/ssl/certs/slapd-cert.crt
The first of these entries should be familiar by now;
it’s the root of the LDAP directory
you’ll be using. The URI entry
points to the LDAP server, using a URI format similar to that used to
express web addresses, except that it begins with the
ldaps:// keyword. You can use
ldap:// rather than ldaps:// if
you don’t want to require the use of SSL encryption.
(The system may still negotiate TLS encryption during the session,
however.) If you specify an LDAPS port in the URI, you must point the
server to a file that contains certificates (via
TLS_CACERT) or to a directory that contains
certificate files (via TLS_CACERTDIR). You must
copy the certificate you generated on the server to this location. If
you don’t, the client tools will refuse to
communicate with the server.
In order to perform most account maintenance tasks, you must access
the server with sufficient privileges; by default, the LDAP utilities
perform anonymous accesses. You can specify a suitable high-privilege
DN with the -D option. When you do, you must also
include the -W option to have the utility prompt
you for a password. You can use the administrative DN and password
you specified in your slapd.conf.
To add an account, you should prepare an LDIF file. You can use an
entry from an LDIF file created from /etc/passwd
using migrate_passwd.pl as a model, if you like.
You can then pass this file to ldapadd:
$ ldapadd -D cn=manager,dc=pangaea,dc=edu -W -f acct.ldifTip
Because you’re passing the authentication information to the server, you don’t need type this command as root.
The ldapmodify command works in much the same way,
except that the file you pass to the utility contains modifications
to an existing entry rather than new account information. To delete
an account, you use the ldapdelete command, omit
the -f parameter, and instead pass the DN of the
account you want to delete:
$ ldapdelete -D cn=manager,dc=pangaea,dc=edu -W uid=linnaeus,ou=People, dc=pangaea,dc=eduThis example deletes the linnaeus
account in the People unit on the
LDAP server. Changing a password is similar, but you must also pass
the -S option to be prompted for the new password,
as well as changing the name of the tool:
$ldappasswd -D cn=manager,dc=pangaea,dc=edu -S -W uid=linnaeus,ou=People,dc=pangaea,dc=eduNew password: Re-enter new password: Enter LDAP Password: Result: Success (0)
Unlike the standard Linux passwd command, ldappasswd prompts for the new password before prompting for the administrative LDAP password. As with most password-handling tools, this one doesn’t echo the passwords to the screen.
Tip
The ldappasswd command isn’t
intended as a full replacement for passwd. If you
configure the /etc/pam.d/passwd file to use
LDAP, as described in Section 8.4.4 and Appendix A, the standard Linux
passwd command will change users’
passwords on the LDAP server instead of or in addition to changing
the local password when an ordinary user calls this tool. The
ldappasswd command is useful mainly when a user
has forgotten a password; you can use your LDAP administrative access
to replace the forgotten password.
If you’re used to normal Linux account maintenance tools such as useradd and userdel, these LDAP account maintenance tools may seem awkward at first. If you keep a template LDIF file handy and prepare scripts with the necessary options, DNs can save you a lot of typing and make using these tools far more intuitive.
Various additional tools exist that help manage LDAP accounts. For instance, phpLDAPadmin (http://phpldapadmin.sourceforge.net/) is a web-based tool that provides a point-and-click interface to your account database. You could also write some scripts yourself to help simplify these tasks.