Table of Contents for
Linux in a Windows World
 Linux in a Windows World
Published by
O'Reilly Media, Inc., 2005
Linux in a Windows World
Published by
O'Reilly Media, Inc., 2005
- Cover
- Linux in a Windows World
- Dedication
- Preface
- Contents of This Book
- Conventions Used in This Book
- Using Code Examples
- Comments and Questions
- Safari Enabled
- Acknowledgments
- I. Linux’s Place in a Windows Network
- 1. Linux’s Features
- Linux as a Server
- Linux on the Desktop
- Comparing Linux and Windows Features
- Summary
- 2. Linux Deployment Strategies
- Linux Desktop Migration
- Linux and Thin Clients
- Summary
- II. Sharing Files and Printers
- 3. Basic Samba Configuration
- The Samba Configuration File Format
- Identifying the Server
- Setting Master Browser Options
- Setting Password Options
- Summary
- 4. File and Printer Shares
- Printing with CUPS
- Creating a Printer Share
- Delivering Printer Drivers to Windows Clients
- Example Shares
- Summary
- 5. Managing a NetBIOS Network with Samba
- Enabling NBNS Functions
- Assuming Master Browser Duties
- Summary
- 6. Linux as an SMB/CIFS Client
- Accessing File Shares
- Printing to Printer Shares
- Configuring GUI Workgroup Browsers
- Summary
- III. Centralized Authentication Tools
- 7. Using NT Domains for Linux Authentication
- Samba Winbind Configuration
- PAM and NSS Winbind Options
- Winbind in Action
- Summary
- 8. Using LDAP
- Configuring an OpenLDAP Server
- Creating a User Directory
- Configuring Linux to Use LDAP for Login Authentication
- Configuring Windows to Use LDAPfor Login Authentication
- Summary
- 9. Kerberos Configuration and Use
- Linux Kerberos Server Configuration
- Kerberos Application Server Configuration
- Linux Kerberos Client Configuration
- Windows Kerberos Tools
- Summary
- IV. Remote Login Tools
- 10. Remote Text-Mode Administration and Use
- SSH Server Configuration
- Telnet Server Configuration
- Windows Remote-Login Tools
- Summary
- 11. Running GUI Programs Remotely
- Using Remote X Access
- Encrypting X by SSH Tunneling
- VNC Configuration and Use
- Running Windows Programs from Linux
- Summary
- 12. Linux Thin Client Configurations
- Hardware Requirements
- Linux as a Server for Thin Clients
- Linux as a Thin Client
- Summary
- V. Additional Server Programs
- 13. Configuring Mail Servers
- Configuring Sendmail
- Configuring Postfix
- Configuring POP and IMAP Servers
- Scanning for Spam, Worms, and Viruses
- Supplementing a Microsoft Exchange Server
- Using Fetchmail
- Summary
- 14. Network Backups
- Backing Up the Linux System
- Backing Up with Samba
- Backing Up with AMANDA
- Summary
- 15. Managing a Network with Linux
- Delivering Names with DNS
- Keeping Clocks Synchronized with NTP
- Summary
- VI. Appendixes
- A. Configuring PAM
- The PAM Configuration File Format
- PAM Modules
- Sample PAM Configurations
- Summary
- B. Linux on the Desktop
- Configuring Applications and Environments
- Running Windows Programs in Linux
- File and Filesystem Compatibility
- Font Handling
- Summary
- Index
- Colophon
Name resolution—converting computer names into IP addresses—is a problem that must be solved with any networking system. NetBIOS supports several methods of name resolution. One of these, the use of a NetBIOS Name Server (NBNS) system, is often associated with running a domain controller, although you don’t need a domain configuration to use NBNS. Naturally, Samba can function as an NBNS system. Doing so requires setting just a couple of Samba options; the rest is fairly automatic, from Samba’s perspective. Client configuration may be another matter, though; you must know how to tell clients to use the NBNS system.
NetBIOS and Samba support several methods of name resolution, as described in Chapter 3. The simplest of these to configure is broadcast name resolution , in which computers needing to contact other computers broadcast the names, and the so-named computers respond to these broadcasts. Windows systems use broadcast name resolution by default. Broadcasts work well on small networks with just one subnet, but in a multisubnet configuration, broadcasts are typically blocked at the routers between subnets. Thus, other methods are used in such situations.
One type of solution to this problem is to use an NBNS computer. The NBNS system fills a role similar to that of a DNS server, but the NBNS system is specific to NetBIOS name resolution. It listens for name registrations from clients, caches them, and then delivers those names to other clients who ask for them. Because clients are told where to find NBNS systems, broadcasts aren’t needed in NBNS-based name resolution. This means that NBNS is a superior name resolution system when a network spans multiple subnets.
NBNS-based name resolution is designed to work in a conceptually similar way to broadcast name resolution, in that clients register the names they want to use. Unlike a DNS server (described in Chapter 15), there’s no need to explicitly tell an NBNS system about the names or IP addresses it’s to share. If your network uses the Dynamic Host Configuration Protocol (DHCP) to deliver IP addresses to computers, they may change from time to time. An NBNS system automatically tracks these changes.
Tip
You can configure Linux to use an NBNS system or broadcast NetBIOS name resolution (instead of or, more commonly, in addition to DNS) even for non-Samba name resolution. This can be a convenient way to get name resolution working on a network on which IP addresses are likely to change from time to time. This topic is covered in Chapter 6.
Because the name resolution features of SMB/CIFS, including NBNS functions, were designed to work fairly automatically, Samba provides relatively few options related to these features. Only one option is required to activate NBNS features, although a few more will help fine-tune the operation:
-
winssupport This global Boolean parameter controls NBNS functions. (Microsoft refers to the NBNS features as the Windows Internet Name Service, or WINS, hence the parameter name.) This option defaults to
No; setting it toYescauses Samba to function as an NBNS system.-
winsproxy This global Boolean parameter tells Samba whether it should respond to broadcast name resolution requests on behalf of its NBNS clients. The default value is
No, which is usually fine, but sometimes setting it toYesimproves the reliability of name resolution; try that if you’re having problems.-
dnsproxy Ordinarily, the NetBIOS and DNS name spaces are logically distinct, although most administrators prefer to use the same names for specific computers in both spaces to avoid confusion. If you specify
dnsproxy=Yes(the default isNo), though, Samba configured as an NBNS system will perform DNS lookups on any names it can’t resolve using its NBNS name cache. This practice can improve reliability in some cases, but it can also slow down lookups, particularly if the DNS server is slow. This feature only works for lookups of file and print servers, though, not for lookups of other types of systems, such as domain controllers.
Warning
If you set wins
support
=
Yes, be sure not to set the
wins
server parameter
(described in Chapter 3). This parameter tells
Samba what computer to refer to as an NBNS system. Ordinarily, an
NBNS system automatically uses itself in this role, so specifying
both parameters will likely result in malfunctions.
Overall, the NBNS system only needs to have wins
support
=
Yes set; additional options just tweak the
operation of the server. You should set this option on one server
only; configuring multiple servers as NBNS systems is likely to cause
confusion unless they can communicate with one another, which Samba
doesn’t support—at least as of the early 3.0.x
versions. If two different clients are configured to use two
different NBNS servers, they won’t be able to locate
each other via these servers, and possibly not at all if they
aren’t configured to use broadcasts as fallback or
if they aren’t on the same subnet.
Just as with DNS, the clients of NBNS systems must know how to contact their servers. Also just as with DNS, this task is accomplished by giving the clients the IP addresses of their servers. You can do this by entering the information on each client manually, but if your network uses DHCP, a simpler solution is to deliver the information via DHCP. (Even in this case, some client configuration may be necessary.)
Tip
In Linux, you specify the NBNS system using Samba’s
wins
server parameter, as
described in Chapter 3. This is true even if
you use DHCP to configure the Linux system.
If your network uses DHCP for
assigning IP addresses to Windows systems, the simplest way to
configure those systems to use your NBNS system is to deliver the
information via DHCP. Doing so requires modifying your DHCP
server’s configuration, though. Chapter 15 describes DHCP configuration generally, so
you should consult that chapter first if you need to get your DHCP
system operational. This section assumes you’re
using the Internet Software Consortium’s (ISC) DHCP
server, which is the most common one on Linux systems. Its
configuration file is usually called
/etc/dhcpd.conf, although it’s
likely to be stored in /usr/local/etc if you
compile it from source rather than install it via a package for your
Linux distribution.
Tip
Don’t confuse the ISC DHCP server, dhcpd, with the ISC DHCP client, dhcpcd. The one-letter difference in the daemons’ names, and similar differences in their configuration filenames, can be easy to overlook.
The /etc/dhcpd.conf file is composed of several
parts. At the top of the file are a series of global options. Chances
are you’ll include the NBNS options with these. The
configuration file is likely to contain one or more declarations for
particular subnets, which begin with the subnet
keyword and include options for the subnet within lines delimited by
curly braces ({ }). If you want to configure
different NBNS servers for separate domains on different subnets, you
can place the configuration options within these
subnet declarations. In any event, to point DHCP
clients at your NBNS system, add these lines:
option netbios-name-servers 192.168.1.1;
option netbios-node-type 8;
The first of these options specifies the IP addresses of your NetBIOS name servers. You would change the IP address as appropriate for your network, of course. Although the ISC DHCP server supports delivering multiple NBNS addresses (separated by commas), you’re likely to deliver one only if you use Samba as an NBNS system, because Samba doesn’t yet support exchanging NetBIOS name information with other Samba servers, so you’re effectively limited to one NBNS system.
The netbios-node-type option specifies a code for
the order in which the client attempts various lookup methods.
Specifically, passing 1 as this value tells
clients to use broadcasts alone; 2 means to use
the NBNS system alone; 4 means to try broadcasts
first and then to try the NBNS system if the broadcast fails; and
8 means to try the NBNS system and then to use
broadcasts if the NBNS attempt fails. In most cases,
8 is the appropriate option.
Once you’ve made these changes, you need to restart
the DHCP server. In most cases, passing restart to
a SysV startup script, as in /etc/init.d/dhcpd
restart, does the trick.
Unless they’re told otherwise, Windows clients use broadcast name resolution by default. Even if you configure DHCP to deliver NBNS information to clients, Windows 9x/Me systems ignore this information by default, so you must make a change to such systems’ configurations to have them use DHCP-provided information. Windows NT/200x/XP, though, uses DHCP-provided information by default. Thus, you may not need to change these clients’ configurations if you configure a DHCP server to deliver NBNS information.
Tip
If your network is dominated by older Windows 9x/Me systems, you might think that using DHCP to deliver NBNS information is pointless because you must reconfigure clients to use this information. Using DHCP does have certain advantages, though. For one thing, you can’t mistype the IP address on a client, so misconfiguration of individual systems is less likely. Another advantage of using DHCP is that you can easily change the configuration of all clients merely by changing the server, should the NBNS system’s IP address ever change.
To set NBNS information in a Windows 9x/Me client, follow these steps:
Open the Control Panel, and double-click the Network icon. Windows should display a Network dialog box in which you can select various drivers, network stacks, and so on.
Select the TCP/IP network stack for your local network’s network card.
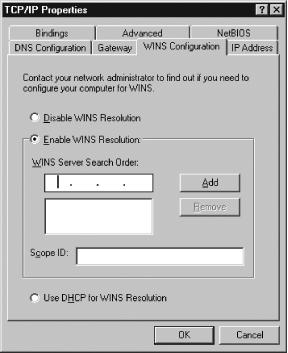
Click Properties. Windows should display a TCP/IP Properties dialog box.
Click the WINS Configuration tab in the TCP/IP Properties dialog box. The result should resemble Figure 5-7.
If you don’t want the client to obtain information from a DHCP server, click the Enable WINS Resolution radio button, enter the IP address for your NBNS system in the WINS Server Search Order box, and click Add.
If you want to have Windows obtain information from the DHCP server, click the “Use DHCP for WINS Resolution” radio button.
Click OK in the TCP/IP Properties dialog box and then in the Network dialog box.
Windows must be restarted for the changes to take effect, and it should prompt you to do so. After the restart, Windows should use your NBNS system for name resolution.
If you use Windows NT 4.0, the method of setting the NBNS system is similar to that in Windows 9x/Me, although there are a few differences. For instance, you must select the tab called WINS Address rather than WINS Configuration, and the field in which you enter an NBNS system’s IP address is configured slightly differently.
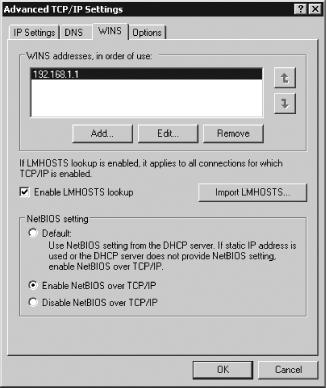
Windows 200x and XP use a substantially different way to specify NBNS information. These OSs use the information delivered by the DHCP server by default, so you shouldn’t need to adjust them if you use this method. If you must specify IP addresses explicitly, though, you can do so:
Open the Control Panel, and then open the Network and Dial-Up Connections (Windows 2000) or Network Connections (Windows XP) object in the Control Panel.
Right-click the Local Area Connections object. This action produces a context menu, in which you should select the Properties item. Windows should now display a Local Area Connection Properties dialog box.
In the Local Area Connection Properties dialog box, select the Internet Protocol (TCP/IP) component and click the Properties button. This action should bring up a new dialog box called Internet Protocol (TCP/IP) Properties.
Click the Advanced button in the Internet Protocol (TCP/IP) Properties dialog box. Windows displays the Advanced TCP/IP Settings dialog box.
In the Advanced TCP/IP Settings dialog box, click the WINS tab. The result should resemble Figure 5-8, although chances are no addresses will appear in the address list. (Some details are different in the Windows 2000 version of this dialog box; Figure 5-8 was taken on a Windows XP system.)
Click the Add button to add an NBNS system to the list. The result is the TCP/IP WINS Server dialog box.
Type your NBNS system’s IP address in the TCP/IP WINS Server dialog box, and click Add.
Click OK or Close in each of the open dialog boxes.