Table of Contents for
Linux in a Windows World
 Linux in a Windows World
Published by
O'Reilly Media, Inc., 2005
Linux in a Windows World
Published by
O'Reilly Media, Inc., 2005
- Cover
- Linux in a Windows World
- Dedication
- Preface
- Contents of This Book
- Conventions Used in This Book
- Using Code Examples
- Comments and Questions
- Safari Enabled
- Acknowledgments
- I. Linux’s Place in a Windows Network
- 1. Linux’s Features
- Linux as a Server
- Linux on the Desktop
- Comparing Linux and Windows Features
- Summary
- 2. Linux Deployment Strategies
- Linux Desktop Migration
- Linux and Thin Clients
- Summary
- II. Sharing Files and Printers
- 3. Basic Samba Configuration
- The Samba Configuration File Format
- Identifying the Server
- Setting Master Browser Options
- Setting Password Options
- Summary
- 4. File and Printer Shares
- Printing with CUPS
- Creating a Printer Share
- Delivering Printer Drivers to Windows Clients
- Example Shares
- Summary
- 5. Managing a NetBIOS Network with Samba
- Enabling NBNS Functions
- Assuming Master Browser Duties
- Summary
- 6. Linux as an SMB/CIFS Client
- Accessing File Shares
- Printing to Printer Shares
- Configuring GUI Workgroup Browsers
- Summary
- III. Centralized Authentication Tools
- 7. Using NT Domains for Linux Authentication
- Samba Winbind Configuration
- PAM and NSS Winbind Options
- Winbind in Action
- Summary
- 8. Using LDAP
- Configuring an OpenLDAP Server
- Creating a User Directory
- Configuring Linux to Use LDAP for Login Authentication
- Configuring Windows to Use LDAPfor Login Authentication
- Summary
- 9. Kerberos Configuration and Use
- Linux Kerberos Server Configuration
- Kerberos Application Server Configuration
- Linux Kerberos Client Configuration
- Windows Kerberos Tools
- Summary
- IV. Remote Login Tools
- 10. Remote Text-Mode Administration and Use
- SSH Server Configuration
- Telnet Server Configuration
- Windows Remote-Login Tools
- Summary
- 11. Running GUI Programs Remotely
- Using Remote X Access
- Encrypting X by SSH Tunneling
- VNC Configuration and Use
- Running Windows Programs from Linux
- Summary
- 12. Linux Thin Client Configurations
- Hardware Requirements
- Linux as a Server for Thin Clients
- Linux as a Thin Client
- Summary
- V. Additional Server Programs
- 13. Configuring Mail Servers
- Configuring Sendmail
- Configuring Postfix
- Configuring POP and IMAP Servers
- Scanning for Spam, Worms, and Viruses
- Supplementing a Microsoft Exchange Server
- Using Fetchmail
- Summary
- 14. Network Backups
- Backing Up the Linux System
- Backing Up with Samba
- Backing Up with AMANDA
- Summary
- 15. Managing a Network with Linux
- Delivering Names with DNS
- Keeping Clocks Synchronized with NTP
- Summary
- VI. Appendixes
- A. Configuring PAM
- The PAM Configuration File Format
- PAM Modules
- Sample PAM Configurations
- Summary
- B. Linux on the Desktop
- Configuring Applications and Environments
- Running Windows Programs in Linux
- File and Filesystem Compatibility
- Font Handling
- Summary
- Index
- Colophon
A prototypical chain of mail delivery uses SMTP from the sender through to the recipient’s mail server, and optionally uses POP or IMAP from the final mail server to the user’s desktop system. Sometimes, though, it’s desirable to use POP or IMAP earlier in the chain. For such situations, a program called Fetchmail comes to the rescue; this program enables you to pull mail from a POP or IMAP server and inject it into your local mail queue; from there it can be delivered to the same or another computer.
Before installing and using Fetchmail, you should understand precisely why it exists and how it can be used. Although it’s a popular and useful tool, it’s not for everybody, so attempting to use it unnecessarily can be a waste of time. If you’re sure you want to use it, you must understand Fetchmail’s configuration file format. Once it’s configured, you can use it, which involves running it as a daemon, running it at scheduled times, or running it as part of a larger task.
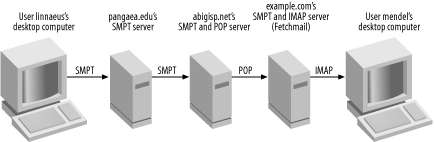
If you own or work for a small business, you might contract with an outside company to host your domain. This domain hosting ISP runs a server that houses your web pages and probably provides another server that can receive your domain’s email. Typically, domain hosting ISPs allow you to connect to their email servers with POP or IMAP to retrieve your mail. You might be content to read your mail more or less directly like this, in which case you don’t need to run any email server at all. On the other hand, you might want to perform additional processing, such as handling your own spam filtering, sorting mail for multiple users into different accounts, supporting IMAP when your domain hosting ISP provides only POP, integrating mail from multiple ISPs, or integrating mail from the Internet with your local network’s mail. Individuals with small home networks often have similar needs, even if they don’t have their own domains. In all these cases, what you need is a way to pull mail from the ISP’s server using POP or IMAP and make it available via your own POP or IMAP server. You might even send the mail from one server to another via SMTP. This configuration is outlined in Figure 13-4. In the figure, your (http://example.com’s) mail server uses Fetchmail to retrieve mail from the http://abigisp.net mail server using POP. Local computers can then retrieve the mail using IMAP.
Because pull mail protocols are initiated by the receiving end, Fetchmail has no way to know when mail is waiting for it to pick up. For this reason, Fetchmail typically polls the remote server; that is, Fetchmail checks for new mail at a regular interval. This can be done either by running Fetchmail as a daemon with a built-in polling interval or by calling Fetchmail in a regular process, such as in a cron job. Alternatively, you can call Fetchmail as part of a regular or irregular process. For instance, if you use a dial-up Internet connection, you can call Fetchmail as part of a connection script. This gives you access to all your accumulated mail as soon as you connect.
The Fetchmail configuration file is located
in the user’s home directory and is called
.fetchmailrc by default (there is no global
Fetchmail configuration file). As with many files, this one uses hash
marks (#) to denote comments. Aside from comments,
the file begins with a number of set directives,
which set various global options. Some of the more important of these
options are summarized in Table 13-1.
Table 13-1. Common Fetchmail global directives
|
Directive name |
Possible options |
Description |
|---|---|---|
|
|
Local username |
Username to which error messages are sent. This user may also receive failed deliveries as a last resort. |
|
|
- |
Tells Fetchmail to send bounce messages to the apparent sender of the message. This practice can be risky because spammers and worms usually forge the return addresses, sometimes to the addresses of legitimate but innocent individuals. |
|
|
- |
Tells Fetchmail to send bounce messages to the address set with
|
|
|
- |
Logs Fetchmail activities through the local syslog daemon. |
|
|
Filename |
Logs Fetchmail activities to the specified file. |
|
|
Time in seconds |
Causes Fetchmail to run in daemon mode, in which it loads but doesn’t exit. Fetchmail then checks for new mail at the specified interval. |
The global options are just the start of Fetchmail configuration,
though. The heart of the configuration lies in the account
specifications. Each begins with the keyword poll
and defines everything Fetchmail needs to know about an account in
order to retrieve mail from it and direct it to an appropriate local
or remote address. Broadly speaking, the poll
lines take the following form:
poll server.hostname server-options user-optionsThe server.hostname is, of course, the
server’s hostname. The
server-options and
user-options both consist of multiple
options, which tell Fetchmail how to interact with the server and
give Fetchmail information on the accounts (both the remote
server’s account and how Fetchmail is to deliver the
mail locally). Tables Table 13-2 and Table 13-3 summarize the most common options for these
two parts of the poll specifications.
Table 13-2. Common Fetchmail server options
|
Option name |
Possible values |
Description |
|---|---|---|
|
|
Protocol name |
The name of the protocol Fetchmail should use to communicate with the
server. Common values are |
|
|
Interface name/IP address/netmask triplet |
An interface that must be active before Fetchmail attempts to connect
to a server. For instance, |
|
|
Interface name |
Fetchmail monitors the specified interface (such as
|
|
|
Integer |
Causes checks to occur only at some polling intervals. For instance,
setting |
Table 13-3. Common Fetchmail user options
|
Option name |
Possible values |
Description |
|---|---|---|
|
|
Username |
A username on the remote server, unless the username is followed by
|
|
|
Password |
The password used to access the remote server. |
|
|
- |
Enables an SSL connection to the remote server. This option isn’t universally supported, but if your server supports it, using SSL can improve security. |
|
|
Filename |
The file in which an SSL certificate is stored. |
|
|
Filename |
The file in which an SSL key is stored. |
|
|
Username |
Links the remote account information with the local account information. |
|
|
- |
This keyword follows a local username to identify it as local. |
|
|
Hostname |
The hostname of the server to which Fetchmail sends mail it receives.
The default is |
|
|
- |
Tells Fetchmail to leave mail on the remote server after fetching it. The default is to delete fetched mail. This option is mostly useful when testing or debugging or new or changed configuration. |
|
|
- |
Retrieves all messages on the remote server, even if Fetchmail has
already fetched them. Used with |
|
|
- |
Technically, email messages should have lines that end in carriage return/line feed (CR/LF) pairs; however, in practice, many messages have only the LF. Some mail servers, such as qmail, react badly to this deviation from the norm, and this option corrects this problem. |
|
|
Local command |
A program that’s run before each connection. This can bring up a network connection, run a program to delete spam from the remote server, or perform any other task you want done just before retrieving mail. |
Tip
The poll specification can be quite long.
Typically, it’s split across two or more lines, with
the second and subsequent lines indented. No line-continuation
characters are required.
In addition to the options shown in Tables Table 13-2 and Table 13-3, Fetchmail
accepts some more exotic options; consult its manpage for details.
Certain keywords, such as and,
has, options,
wants, and with, are ignored by
Fetchmail. These keywords can help you parse the meaning of a
poll statement. Most option values can be enclosed
in quote marks, but this isn’t usually required
unless the value contains an embedded space. Overall, although the
Fetchmail poll options may seem confusing when
listed in tables, in practice they’re designed to be
easy to parse. When strung together, they read almost like an English
sentence, as shown in Example 13-4.
Example 13-4. Sample .fetchmailrc file
set postmaster "linnaeus"
set no bouncemail
set syslog

poll pop.abigisp.net with proto POP3
   user "mendel" there with password "p7Tu$ioP" is gregor here
   options fetchall forcecr preconnect "mailfilter"

poll mail.asmallisp.org with proto IMAP
   user "karl" there with password "QhI04a-23Ybz" is linnaeus here
   options forcecr smtphost mail.example.com
Warning
One of Fetchmail’s
weaknesses is that it requires you to store your remote email
passwords in plain text in its configuration file. Be sure the
configuration file has 0600 or 0400 (rw------- or
r--------) permissions. If the file is readable to
other users, Fetchmail refuses to act on the configuration file.
This configuration shown in Example 13-4 retrieves
mail from two sources: the mendel
account on http://pop.abigisp.net and
the karl account on mail.asmallisp.org. Mail from each account is
directed to a different user. The second poll
statement also directs mail to a specific server (mail.example.com), which might or might not
be the same server on which Fetchmail is running.
If you want to fetch mail from multiple remote accounts or for multiple users, you can use a single Fetchmail configuration, as shown in Example 13-4; by calling Fetchmail from multiple accounts, with one configuration per account; or by creating separate configurations and calling them from a single account by passing special options to Fetchmail to have it consult a nonstandard configuration file for all but one account. The account used to run Fetchmail doesn’t need to be related to those that receive the local mail; for instance, linnaeus can run Fetchmail, which might deliver mail to the gregor account.
Although Fetchmail relies on a text-mode configuration file, you can
use a GUI tool to help you configure Fetchmail. Type
fetchmailconf in an xterm
or other command-line window to run this program, which guides you
through setting the Fetchmail options. This configuration tool is
often installed separately from Fetchmail, though, so you may need to
locate it on your distribution’s installation media.
The simplest way to run Fetchmail is to call it by name from the command line:
$ fetchmail -kIf all goes well, Fetchmail retrieves mail and inserts it into your
local mail queue (or delivers it to another system, if
you’ve so configured it). For testing purposes, you
may want to add the -k option, which has the same
effect as the keep user option. This way, if your
configuration is incorrect, and Fetchmail loses your mail, you can
recover it from the remote server.
For ordinary use, you should probably run Fetchmail constantly (in
daemon mode) or run it periodically. To run the server in daemon
mode, ensure that your .fetchmailrc file has a
set daemon
interval
line. You can then run Fetchmail at system startup via a SysV or
local startup script. Typically, you’ll want to run
the program as a non-root user,
which you can do via the su command in your
startup script:
su -c '/usr/bin/fetchmail -f /home/karl/.fetchmailrc' karl
This command runs Fetchmail as karl, when typed as root or entered into a startup script
that’s run as root. This command also illustrates the use
of -f, which enables you to specify a
configuration file.
If you want to run Fetchmail as part of a network connection procedure, such as that used to initiate a PPP connection, you can place a similar command in your network connection script. If you initiate the connection as an ordinary user, though, you might not need to use su; just call fetchmail as an ordinary user.
Another way to run
Fetchmail is via a
cron job. On most Linux systems, the
cron
process is a daemon that launches programs that should be run on a
periodic basis. These cron jobs are controlled via
a crontab, which is a file
that’s registered with the cron
daemon as a way to run programs on a regular basis. Example 13-5 shows a sample crontab
that runs Fetchmail on a regular basis.
Example 13-5. Sample crontab file for running Fetchmail
SHELL=/bin/bash
PATH=/sbin:/bin:/usr/sbin:/usr/bin
MAILTO=karl
HOME=/home/karl

16,36,56 7-20 * * * /usr/bin/fetchmail > /dev/null
The first few lines of the crontab file set
environment variables, much as they’re set in
bash scripts. The final line in Example 13-5 tells cron to run the
/usr/bin/fetchmail > /dev/null command at a
specific time. The time format is five space-separated fields: the
minute, the hour, the day of the month, the month, and the day of the
week. An asterisk (*) sets a field to match any
value. You can separate multiple values with commas or use a dash
(-) to specify a range of values. Thus, Example 13-5 tells cron to run Fetchmail
the 16th, 36th, and 56th minute of every hour between 7:16 A.M. and
20:56 (that is, 8:56 P.M.) on every day of every month. The
program’s output is redirected to
/dev/null; if it weren’t, the
user who registers this cron job would receive an
email with Fetchmail’s output every time it runs.
Warning
Be sure that the .fetchmailrc file
doesn’t contain a set
daemon line if you call Fetchmail via a
cron job. If it does, the first time Fetchmail is
run, it daemonizes and prevents subsequent runs from succeeding.
To register the crontab file, you must use the
crontab. In the simplest case, you can log in as
the user who you want to run Fetchmail and issue the following
command:
$ crontab crontabThis assumes you’ve called the
crontab file crontab; if
you’ve called it something else,
you’ll need to change the filename passed to the
crontab command.
Warning
If the user who’s to run Fetchmail already has a
crontab file, you should modify it to add the
call to fetchmail. If you type
crontab
crontab, the
new crontab file replaces the old one.
If you create a new non-login account to run Fetchmail, you can use
the root account to enter a
crontab file for this user. Call the
crontab file something distinctive, and use the
-u option to crontab to tell
the program what user’s crontab
you’re entering:
# crontab -u fmail crontab-fmailThis command enters the crontab-fmail file as
the crontab for the fmail user. The result is that Fetchmail will
run as this user, which can be a very low-privilege user. Be sure the
user exists and has a home directory, or at least can read a
configuration file you specify with the -f option
to fetchmail in the
crontab-fmail file.