All our looping controls are simple and we will begin by looking at for loops. The word for is a keyword in bash and in terms of its working, it is similar to if. We can use the command type to verify this, as shown in the following example:
$ type for
for is a shell keyword
As a reserved shell keyword, we can use a for loop both in scripts and directly at the command line. In this way, we can utilize loops within and without the scripts, optimizing the use of the command line. A simple for loop is shown in the following example code:
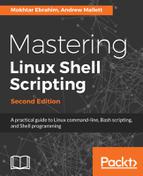
# for u in bob joe ; do
useradd $u
echo '$u:Password1' | chpasswd  #pipe the created user to chpasswd
passwd -e $u
done
The useradd command is used to create users and the chpasswd command is used to update passwords in batch mode.
Within a for loop, we read from the list on the right to populate the variable parameter on the left; in this case, we will read from the list containing bob and joe into the parameter variable u. Each item from the list is inserted into the variable, one item at a time. In this way, as long as there are items to be processed in the list, the loop will execute until the list is exhausted.
Practically, for us, the execution of this loop means that we will do the following:
- Create the user bob
- Set the password for bob
- Expire the password so it will need to be reset on the first login for the user bob
We then loop back and repeat the process for the user joe.
We can view the preceding example in the following screenshot. After having gained root access through sudo -i, we proceeded to run the loop and create the users:
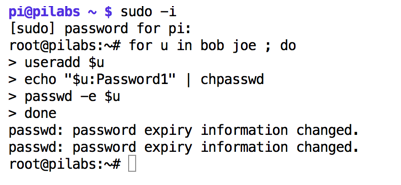
The list that is read in the for loop can be generated dynamically or statically, as shown in the previous example. To create dynamic lists, we could use various globbing techniques to populate the list. As an example, to work with all files in a directory, we could use *, as shown in the following example:
for f in * ; do
stat "$f"
done
In the following examples, we isolate the filenames that begin with ba*. We then use the stat command to print the inode metadata. The code and output are shown in the following screenshot:
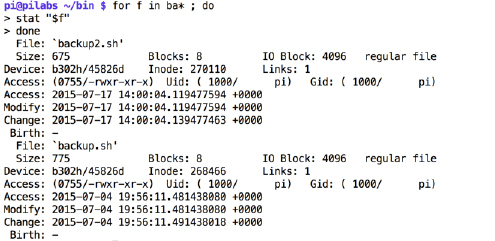
This list can also be generated from the output of another command or a pipeline of commands. For example, if we need to print the current working directory of all logged-in users, we could try something similar to the following:
$ for user in $(who | cut -f1 -d" ") ; do
lsof -u "$user" -a -c bash | grep cwd
done
In the previous example, we can see that the choice of name for the parameter is down to us; we are not limited to a single character and we can use the $user name in this example. By using lowercase, we will not overwrite the system variable $USER. The following screenshot demonstrates the loop and the subsequent output:
The lsof command will list open files; we can search for the files opened by each user in turn and with the bash command as the current working directory.
Working with the scripts that we have created so far, we can create a new script called hello9.sh. If we copy the $HOME/bin/hello2.sh script to the new script, we can edit it to make use of a for loop:
#!/bin/bash
echo "You are using $(basename $0)"
for n in $*
do
    echo "Hello $n"
done
exit 0
The loop is used to iterate through each command-line argument supplied and greet each user individually. When we execute the script, we can see that we can now display the Hello message for each user. This is shown in the following screenshot:

Although what we have seen here is still relatively trivial, we should now realize a little of what we can do with scripts and loops. The arguments of this script can be the usernames that we have already used or anything else. If we stick with the usernames, then it will be very easy to create user accounts and set passwords, as we saw earlier.