Table of Contents for
Mastering Linux Shell Scripting,

Version ebook / Retour

Cover image for bash Cookbook, 2nd Edition Mastering Linux Shell Scripting, by Andrew Mallett Published by Packt Publishing, 2018
  1. Mastering Linux Shell Scripting - Second Edition
  2. Title Page
  3. Copyright and Credits
  4. Mastering Linux Shell Scripting Second Edition
  5. Packt Upsell
  6. Why subscribe?
  7. PacktPub.com
  8. Contributors
  9. About the authors
  10. About the reviewer
  11. Packt is searching for authors like you
  12. Table of Contents
  13. Preface
  14. Who this book is for
  15. What this book covers
  16. To get the most out of this book
  17. Download the example code files
  18. Download the color images
  19. Conventions used
  20. Get in touch
  21. Reviews
  22. The What and Why of Scripting with Bash
  23. Technical requirements
  24. Types of Linux shells
  25. What is bash scripting?
  26. The bash command hierarchy
  27. Command type
  28. Command PATH
  29. Preparing text editors for scripting
  30. Configuring vim
  31. Configuring nano
  32. Configuring gedit
  33. Creating and executing scripts
  34. Hello World!
  35. Executing the script
  36. Checking the exit status
  37. Ensuring a unique name
  38. Hello Dolly!
  39. Running the script with arguments
  40. The importance of correct quotes
  41. Printing the script name
  42. Declaring variables
  43. User-defined variables
  44. Environment variables
  45. Variable scope
  46. Command substitution
  47. Debugging your scripts
  48. Summary
  49. Questions
  50. Further reading
  51. Creating Interactive Scripts
  52. Technical requirements
  53. Using echo with options
  54. Basic script using read
  55. Script comments
  56. Enhancing scripts with read prompts
  57. Limiting the number of entered characters
  58. Controlling the visibility of the entered text
  59. Passing options
  60. Passing parameters with options
  61. Read options values
  62. Try to be standard
  63. Enhancing learning with simple scripts
  64. Backing-up with scripts
  65. Connecting to a server
  66. Version 1 – ping
  67. Version 2 – SSH
  68. Version 3 – MySQL/MariaDB
  69. Reading files
  70. Summary
  71. Questions
  72. Further reading
  73. Conditions Attached
  74. Technical requirements
  75. Simple decision paths using command-line lists
  76. Verifying user input with lists
  77. Using the test shell built-in
  78. Testing strings
  79. Testing integers
  80. Testing file types
  81. Creating conditional statements using if
  82. Extending if with else
  83. Test command with the if command
  84. Checking strings
  85. Checking files and directories
  86. Checking numbers
  87. Combining tests
  88. More conditions with elif
  89. Creating the backup2.sh using elif
  90. Using case statements
  91. Recipe – building a frontend with grep
  92. Summary
  93. Questions
  94. Further reading
  95. Creating Code Snippets
  96. Technical requirements
  97. Abbreviations
  98. Using code snippets
  99. Bringing color to the Terminal
  100. Creating snippets using VS Code
  101. Summary
  102. Questions
  103. Further reading
  104. Alternative Syntax
  105. Technical requirement
  106. Recapping the test command
  107. Testing files
  108. Adding logic
  109. Square brackets as not seen before
  110. Providing parameter defaults
  111. Variables
  112. Special parameters
  113. Setting defaults
  114. When in doubt – quote!
  115. Advanced tests using [[
  116. White space
  117. Other advanced features
  118. Pattern matching
  119. Regular expressions
  120. Regular expression script
  121. Arithmetic operations using ((
  122. Simple math
  123. Parameter manipulation
  124. Standard arithmetic tests
  125. Summary
  126. Questions
  127. Further reading
  128. Iterating with Loops
  129. Technical requirement
  130. for loops
  131. Advanced for loops
  132. The IFS
  133. Counting directories and files
  134. C-style for loops 
  135. Nested loops
  136. Redirecting loop output
  137. Controlling the loop
  138. while loops and until loops
  139. Reading input from files
  140. Creating operator menus
  141. Summary
  142. Questions
  143. Further reading
  144. Creating Building Blocks with Functions
  145. Technical requirements
  146. Introducing functions
  147. Passing parameters to functions
  148. Passing arrays
  149. Variable scope
  150. Returning values from functions
  151. Recursive functions
  152. Using functions in menus
  153. Summary
  154. Questions
  155. Further reading
  156. Introducing the Stream Editor
  157. Technical requirements
  158. Using grep to display text
  159. Displaying received data on an interface
  160. Displaying user account data
  161. Listing the number of CPUs in a system
  162. Parsing CSV files
  163. The CSV file
  164. Isolating catalog entries
  165. Understanding the basics of sed
  166. The substitute command
  167. Global replacement
  168. Limiting substitution
  169. Editing the file
  170. Other sed commands
  171. The delete command
  172. The insert and append commands
  173. The change command
  174. The transform command
  175. Multiple sed commands
  176. Summary
  177. Questions
  178. Further reading
  179. Automating Apache Virtual Hosts
  180. Technical requirements
  181. Apache name-based Virtual Hosts
  182. Creating the virtual host template
  183. First steps
  184. Isolating lines
  185. sed script files
  186. Automating virtual host creation
  187. Prompting for data during site creation
  188. Summary
  189. Questions
  190. Further reading
  191. AWK Fundamentals
  192. Technical requirements
  193. The history behind AWK
  194. Displaying and filtering content from files
  195. AWK variables
  196. User-defined variables
  197. Conditional statements
  198. The if command
  199. while loops
  200. for loops
  201. Formatting output
  202. Further filtering to display users by UID
  203. AWK control files
  204. Built-in functions
  205. Summary
  206. Questions
  207. Further reading
  208. Regular Expressions
  209. Technical requirements
  210. Regular expression engines
  211. Defining BRE patterns
  212. Anchor characters
  213. The dot character
  214. The character class
  215. Ranges of characters
  216. Special character classes
  217. The asterisk
  218. Defining ERE patterns
  219. The question mark
  220. The plus sign
  221. Curly braces
  222. The pipe character
  223. Expression grouping
  224. Using grep
  225. Summary
  226. Questions
  227. Further reading
  228. Summarizing Logs with AWK
  229. Technical requirements
  230. The HTTPD log file format
  231. Displaying data from web logs
  232. Selecting entries by date
  233. Summarizing 404 errors
  234. Summarizing HTTP access codes
  235. Resources hits
  236. Identify image hotlinking
  237. Displaying the highest ranking IP address
  238. Displaying the browser data
  239. Working with email logs
  240. Summary
  241. Questions
  242. Further reading
  243. A Better lastlog with AWK
  244. Technical requirements
  245. Using AWK ranges to exclude data
  246. The lastlog command
  247. Horizontally filtering rows with AWK
  248. Counting matched rows
  249. Conditions based on the number of fields
  250. Manipulating the AWK record separator to report on XML data
  251. Apache Virtual Hosts
  252. XML catalog
  253. Summary
  254. Questions
  255. Further reading
  256. Using Python as a Bash Scripting Alternative
  257. Technical requirements
  258. What is Python?
  259. Saying Hello World the Python way
  260. Pythonic arguments
  261. Supplying arguments
  262. Counting arguments
  263. Significant whitespace
  264. Reading user input
  265. Using Python to write to files
  266. String manipulation
  267. Summary
  268. Questions
  269. Further reading
  270. Assessments
  271. Chapter 1
  272. Chapter 2
  273. Chapter 3
  274. Chapter 4
  275. Chapter 5
  276. Chapter 6
  277. Chapter 7
  278. Chapter 8
  279. Chapter 9
  280. Chapter 10
  281. Chapter 11
  282. Chapter 12
  283. Chapter 13
  284. Chapter 14
  285. Other Books You May Enjoy
  286. Leave a review - let other readers know what you think

Formatting output

We have remained faithful to the print command so far, as we have been limited in what we require from the output. If we want to print out, say, the username, UID, and default shell, we need to start formatting the output just a little. In this case, we can organize the output in well-shaped columns. Without formatting, the command we use will look similar to the following example, where we use commas to separate the field that we want to print:

$ awk ' BEGIN { FS=":" } { print $1,$3,$7 } ' /etc/passwd  

We use the BEGIN block here, as we can make use of it to print column headers later.

To understand the problem a little better, take a look at the following screenshot, which illustrates uneven column widths:

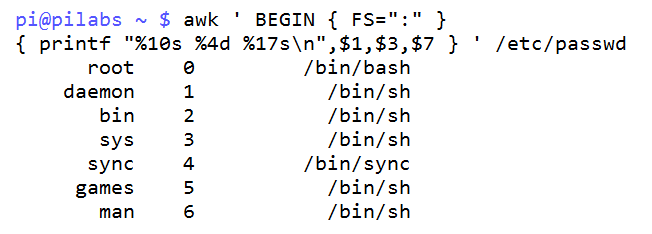
The issue that we have in the output is that the columns do not align, as the username is an inconsistent length. To improve on this, we can use the printf function where we can specify the column width. The syntax for the awk statements will be similar to the following example:

$ awk ' BEGIN { FS=":" }
> { printf "%10s %4d %17s\n",$1,$3,$7 } ' /etc/passwd  

The printf formatting is included within double quotes. We also need to include the newline with theĀ \n. The printf function does not add a newline automatically, whereas the print function does. We print the three fields; the first accepts string values and is set to 10 characters wide. The middle field accepts up to 4 numbers and we finish with the default shell field where we allow up to 17 string characters.

The following screenshot shows how the output can be improved:

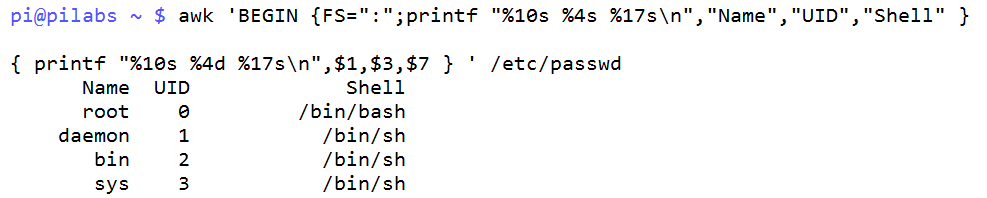
We can further enhance this by adding header information. Although the code starts to look untidy at this stage, we will later see how we can resolve this with AWK control files. The following example shows the header information being added to the Begin block. The semicolon is used to separate the two statements in the BEGIN block:

$ awk 'BEGIN {FS=":" ;printf "%10s %4s %17s\n","Name","UID","Shell" }
> { printf "%10s %4d %17s\n",$1,$3,$7 } ' /etc/passwd

In the following screenshot, we can see how this improves the output even further:

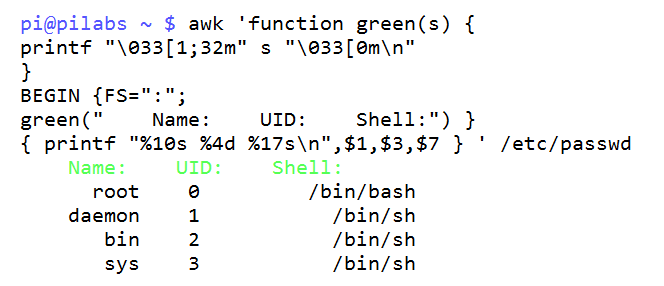
In the previous chapter, we saw how we can augment the output with the use of colors in the shell. We may also use color from within AWK by adding our own functions. In the next code example, you will see that AWK allows us to define our own functions to facilitate more complex operations and isolate the code. We will now modify the previous code to include green output in the header:

$ awk 'function green(s) {
> printf "\033[1;32m" s "\033[0m\n"
> }
> BEGIN {FS=":"; 
green(" Name: UID: Shell:") }
> { printf "%10s %4d %17s\n",$1,$3,$7 } ' /etc/passwd

Creating the function within awk allows color to be added where we require, in this case, green text. It is easy to create functions to define other colors. The code and output are included in the following screenshot: