Now, of course we all want to be able to print a little more than just Hello World. The awk command can be used to filter content from files and, if needed, very large files. We should begin by printing the complete file before filtering it. In this way, we will get a feel for the syntax of the command. Later, we will see how we can add this control information into awk files to ease the command line. Using the following command, we will print all the lines from the /etc/passwd file:
$ awk ' { print } ' /etc/passwd
This is equivalent to using the $0 variable with the print statement:
$ awk ' { print $0 }' /etc/passwd
AWK provides us with some ready-to-use variables to extract data such as:
- $0 for the entire line
- $1 for the first field
- $2 for the second field
- $3 for the third field and so on
However, we will need to specify that in this file the field separator used is a colon, since it's the field separator in /etc/passwd file. The awk default delimiter is a space or any amount of spaces or tabs and newlines. There are two ways to specify the input delimiter; these are displayed in the following examples.
The first example is easy and simple to use. The -F option works well, especially where we do not need any additional header information:
$ awk -F":" '{ print $1 }' /etc/passwd
We could also do this within the BEGIN block; this is useful when we want to use the BEGIN block to display header information:
$ awk ' BEGIN { FS=":" } { print $1 } ' /etc/passwd
We can see this clearly in the preceding example, in which we named the BEGIN block and all of the code within it is corralled by the brace brackets. The main block has no name and is enclosed within the brace brackets.
After seeing the BEGIN block and the main code blocks, we will now look at the END code block. This is often used to display summary data. For example, if we want to print the total lines in the passwd file, we can make use of the END block. The code with the BEGIN and END blocks is processed just once, whereas the main block is processed for each line. The following example adds to the code we have written so far to include the total line count:
$ awk ' BEGIN { FS=":" } { print $1 } END { print NR } ' /etc/passwd
The awk internal variable NR maintains the number of processed lines. If we want, we can add some additional text to this. This can be used to annotate the summary data. We can also make use of the single quotes that are used with the AWK language; they will allow us to spread the code across multiple lines. Once we have opened the single quotes, we can add newlines to the command line right until we close the quote. This is demonstrated in the next example where we have extended the summary information:
$ awk ' BEGIN { FS=":" }
> { print $1 }
> END { print "Total:",NR } ' /etc/passwd
If we do not wish to end our AWK experience here, we can easily display a running line count with each line, as well as the final total. This is shown in the following example:
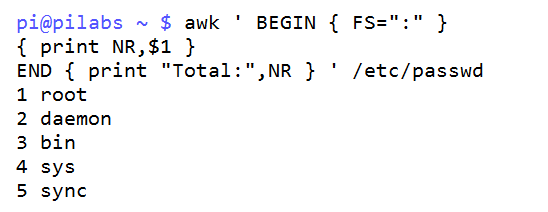
$ awk ' BEGIN { FS=":" }
> { print NR,$1 }
> END { print "Total:",NR } ' /etc/passwd
The following screenshot captures this command and shows a partial output:
In the first example with BEGIN, we saw that there is no reason why we cannot use the END code block in isolation without a main code block. If we need to emulate the wc -l command, we can use the following awk statement:
$ awk ' END { print NR }' /etc/passwd
The output will be the line count from the file. The following screenshot shows both the use of the awk command and the wc command to count the lines in the /etc/passwd file:

As we can see, the output does tally with 28 lines and our code has worked.
Another feature that we can practice with is working on selected lines only. For example, if we want to print only the first five lines, we will use the following statement:
$ awk ' NR < 6 ' /etc/passwd
If we want to print lines 8 through to 12, we can use the following code:
$ awk ' NR==8,NR==12 ' /etc/passwd
We can also use regular expressions to match the text in the lines. Take a look at the following example where we look at the lines that end in the word bash:
$ awk ' /bash$/ ' /etc/passwd
The example and the output it produces are shown in the following screenshot:
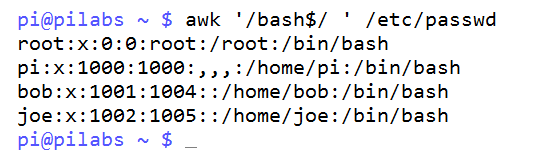
So if you want to use a regex pattern, you should use two slashes and write the pattern between them, /bash$/.