Table of Contents for
Web Design Blueprints
 Web Design Blueprints
Published by
Packt Publishing, 2016
Web Design Blueprints
Published by
Packt Publishing, 2016
- Cover
- Table of Contents
- Web Design Blueprints
- Web Design Blueprints
- Credits
- About the Author
- About the Reviewer
- www.PacktPub.com
- Preface
- What you need for this book
- Who this book is for
- Conventions
- Reader feedback
- Customer support
- 1. Responsive Web Design
- Getting familiar with the basics
- Using media queries for responsive design
- Working with responsive media
- Building responsive layouts
- Summary
- 2. Flat UI
- Flat UI color
- Creating a flat UI layout
- Summary
- 3. Parallax Scrolling
- Color classes
- Using SVG font icons
- Getting the fonts
- That's no moon!
- OMG, it's full of stars!
- Clouds, birds, and airplanes
- The rocket
- Terra firma
- Next up, the CSS
- Styling the objects with CSS
- Styling the ground objects
- Writing the JavaScript effects
- Setting the row height
- Spreading the objects
- Spreading the clouds
- Loading the page functions
- Smoothening the scroll
- Updating elements on the scroller
- Collecting the moving elements
- Creating functions for the element types
- Setting the left positions
- Creating the rocket's movement function
- Finally, moving the earth
- Summary
- 4. Single Page Applications
- Getting to work
- Getting the old files
- Object and function conventions
- Creating utility functions
- Working with the home structure
- Setting up other sections
- Performing housekeeping
- Creating a callBack function for the API
- Summary
- 5. The Death Star Chapter
- Dropping in the parallax game
- Loading elements from JSON
- What can be done in the shared levels service
- Editing the home JavaScript
- Creating the other pages – credits and leaderboard
- Creating the second level
- Summary
- Index
Hi, and welcome back. This is the final chapter. This chapter is a special challenge as I was asked to create a project that integrated all of the previous chapters into one final exciting project. I've come up with a project that is a framework for creating a scrolling game with multiple levels that builds on previous code projects from this book. The editorial team liked the concept enough to call this chapter "The Death Star Chapter."
So with that, let's move forward with creating our Death Star Chapter. This chapter will pick up what we built with the Single Page Application and then shove our parallax scroller into it, and make it a responsive, flat UI, multi-level, single page, parallax scrolling game. We are going to modify the structure and add some new stuff to our stack.
There are so many things to do that you may ask where to even begin. And how can we possibly do it in one chapter? The way to begin a journey is with the first step, so let's get started. The first thing to do will be to get the SPA code open in your IDE. If you don't have it available, and skipped to the last chapter of the book because you just want to do the exciting things, then you could get the code from Packt Publishing, or the GitHib page, https://github.com/benlagrone. I'll begin here with checking out my project, webtrends-SPA, and using that as a beginning framework for the chapter. Once you have that project open, you can begin re-crafting it into its new state. The news directory has some repurposable code we will use as a starting point for the application.
The first task will be to remove the features from the SPA and leave the framework itself. So first, with the exception of the news directory, delete the stocks, tasks, travel, and weather directories. We are left with just this news directory and of course the home directory. We will do something with this soon, so leave this aside and open your routing.js file in the app/ directory. Remove all the entries for the directories we removed. You should leave the home and news registry entries. A registry entry will look like this following code sample:
    services.routing.register( 'weather', function(){
        pageRoute = {
            page: "./app/weather/weather.html",
            partial: "./app/weather/home-weather.html",
            script: "./app/weather/weather.js"
        };
    console.log('weather')
    });
Your routing table should now only have two entries. Start by renaming the news entry to credits, and refactor it to replace every instance of the text news with credits. Including the unchanged home registry; it should look like the following sample:
    services.routing.register( 'home', function(){
        pageRoute = {
            page: "./app/home/home.html",
            partial: "./app/home/home-home.html",
            script: "./app/home/home.js"
            };
    console.log('home')
        });
    services.routing.register( 'credits', function(){
        pageRoute = {
            page: "./app/credits/credits.html",
            partial: "./app/credits/home-credits.html",
            script: "./app/credits/credits.js",
            data: "./app/credits/credits.json"
            };
    console.log('credits')
});Next, add a new registry entry called leaderboard. You can copy the credits registry and paste it below. Then, just replace the text credits with leaderboard. This is fairly simple with the SPA framework we created in the SPA chapter. See the following sample code:
    services.routing.register( 'leaderboard', function(){
        pageRoute = {
            page: "./app/leaderboard/leaderboard.html",
            partial: "./app/leaderboard/home-leaderboard.html",
            script: "./app/leaderboard/leaderboard.js",
            data: "./app/leaderboard/leaderboard.json"
            };
    console.log('leaderboard')
});As you may recall, to make these work, we need to have the directories and content described inside them. As you recall, we left the news directory in place. So, first rename the directory from news to credits. And then edit the filenames from news to credits. You should have in the credits directory: credits.html, credits.js, and home-credits.html.
We want to be able to use a source of data to retrieve leaderboard and credit information. We won't be adding any new data to our storage, as we are creating a client-side only application, so POSTING and PUTTING are currently outside of our scope. You could instead experiment on your own with putting things in your browser's local storage. That's up to you as it's outside the scope of this book. You will see that we added a new path to the registry, so make sure to add the files leaderboard.json and credits.json.
My app directory will look like the following image:
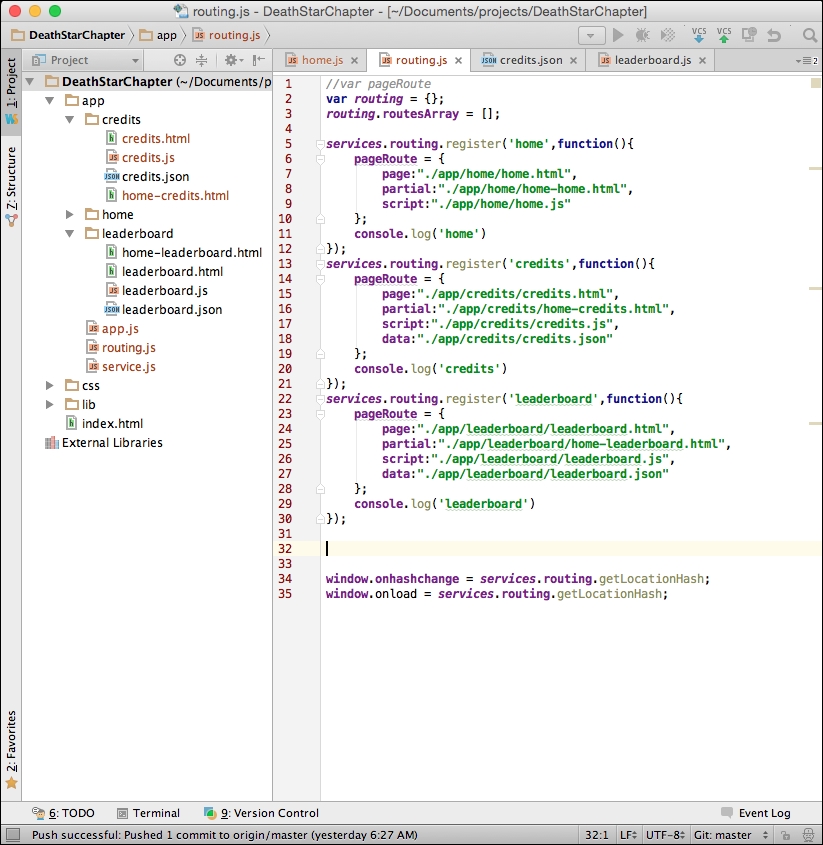
I want to continue with our principle of keeping things in JavaScript separate. So, let's create yet another JavaScript file in the app directory. Name it levels.js. It will be for handling the shared JavaScript specific to the game interaction. We will be creating new code and moving code into this new file. Add a link to the levels.js file in your index.html at the end of the file.
<script src = "app/levels.js"></script>
Inside your levels.js file, start by defining the levels object. We have done this pattern before in the SPA framework, so this should not be a foreign concept. This will use the namespacing conventions to prevent code collisions.
Levels = {};Most of the code to be moved will come from the parallax game JavaScript we created in that chapter. But before we move on, let's modify what we have some more. Go to your home.html file and open it for editing.
The home.html file is nearly what we want, so this will be easy, but will break some of our CSS.
- Inside the top section, change the ID and the class of the news
DIVelement tolevel1. - Next, remove the
weather DIVelement, and remove theDIVelement that wrapped thetravelandstocks DIVelements. - Next, rename the travel
DIVelement's ID and class fromtraveltoleaderboard, and do the same for credits. - Finally, add the
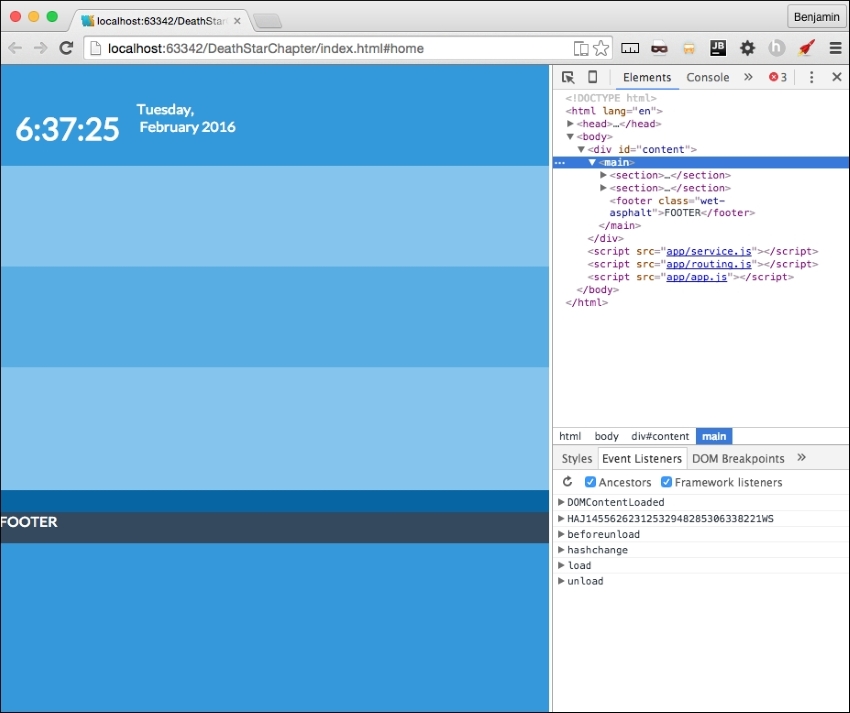
scrollclass to these. You can take a look at the empty application now.
It should look familiar, as we've seen it in this state before.