Table of Contents for
Drupal 8 Quick Start Guide

Version ebook / Retour

Cover image for bash Cookbook, 2nd Edition Drupal 8 Quick Start Guide by J. Ayen Green Published by Packt Publishing, 2018
  1. Drupal 8 Quick Start Guide
  2. Title Page
  3. Copyright and Credits
  4. Drupal 8 Quick Start Guide
  5. Dedication
  6. Packt Upsell
  7. Why subscribe?
  8. Packt.com
  9. Contributors
  10. About the author
  11. About the reviewers
  12. Packt is searching for authors like you
  13. Table of Contents
  14. Preface
  15. Who this book is for
  16. What this book covers
  17. To get the most out of this book
  18. Download the color images
  19. Conventions used
  20. Get in touch
  21. Reviews
  22. Finding Your Way around Drupal
  23. Installing Drupal
  24. Readying the environment
  25. Running the Drupal installation script
  26. Site information
  27. Site maintenance account
  28. Regional settings
  29. Update notifications
  30. The behind-the-scenes tour
  31. Administration menu
  32. Tabs
  33. System message area
  34. Search widget
  35. User menu
  36. Main navigation
  37. Main content area
  38. Summary
  39. Structuring Content Types
  40. What is content?
  41. Content as fields
  42. Understanding content types
  43. Defining the content type
  44. Submission form settings
  45. Publishing options
  46. Display settings
  47. Menu settings
  48. Managing content type fields
  49. Designing a content type
  50. Content type settings
  51. Fielding the content type
  52. Field types
  53. Our content type field
  54. Adding fields to the content type
  55. Summary
  56. Managing Users
  57. User types
  58. User roles
  59. Managing permissions
  60. Users
  61. Creating a user account
  62. Summary
  63. Creating and Editing Content
  64. Using the WYSIWYG editor
  65. Title*
  66. Body
  67. Summary Field
  68. Body text
  69. Text format
  70. Tags
  71. Images
  72. Publishing the content
  73. Additional settings
  74. Revision log message
  75. Menu Settings
  76. Comment Settings
  77. URL Path Settings
  78. Authoring Information
  79. Promotion Options
  80. Completing the process
  81. Summary
  82. Making Drupal Even More Useful
  83. Pathauto
  84. Paragraphs
  85. Content moderation
  86. States
  87. Transitions
  88. Workflow application
  89. Summary
  90. Grabbing Global Readership
  91. Declaring additional languages
  92. Translating content
  93. User language selection
  94. Translating the user interface
  95. Summary
  96. Feeding the Masses – RSS
  97. Why feeds?
  98. Selecting content for a feed
  99. Modifying content for feed selection
  100. Pick-me flags
  101. Tags
  102. Views
  103. Creating the container view
  104. Creating the Pets feed
  105. Display name
  106. Title
  107. Format
  108. Feed settings
  109. Filtering the criteria
  110. Sort criteria
  111. Creating the Travel feed
  112. Title
  113. Feed settings
  114. Format
  115. Filtering criteria
  116. Creating the Leftovers feed
  117. Title
  118. Feed settings
  119. Format
  120. Filtering criteria
  121. Creating the Feed Links block
  122. Summary
  123. Welcome Home!
  124. BAD home page!
  125. Design improvements
  126. Too much content!
  127. No access to content
  128. No RSS feeds menu
  129. We need a Terms and Conditions page
  130. Making the changes
  131. Improving the Frontpage view
  132. Title
  133. Format
  134. Fields
  135. Filtering criteria
  136. Block settings
  137. Pager
  138. Adding an Archive
  139. Adding the RSS Feeds menu
  140. Fixing the Footer menu
  141. Summary
  142. Other Books You May Enjoy
  143. Leave a review - let other readers know what you think

User language selection

Being able to offer content in multiple languages is great, but only if the site visitor can take advantage of it. Drupal makes that easy with a language switcher. 

We need to enable another module. Navigate to Extend (/admin/modules) and enable the Language Icons module. Drupal will let you know that this module depends on the Interface Translation module and will ask whether you want to proceed with enabling both. Go ahead.

The Language Icons module provides flag icons for each language. It does this by way of a block that needs to be placed somewhere on the page. Let's do that.

  1. Navigate to Structure | Block layout (/admin/structure/block). You'll need to choose a region of the screen in which to have the language switcher block appear, such as Header or Sidebar first. I chose the latter.
  2. Click the Place block button beside whichever region you choose. Scroll down to Language switcher and click the Place block button in its row. A configuration screen will appear.
  3. You can leave the Title as Language switcher.
  4. Uncheck the Display title box below it; the icons will speak for themselves without displaying a block title.
  5. The vertical tabs allow constraints to be put on this block. The Language tab can be used to offer only a subset of the configured languages.
  6. The Content types tab can limit which types of content the translation will choose. We don't need to set any limitations.
  7. If we want to limit the appearance of the Language switcher to just the homepage, on the Pages tab, we can enter <front> into the Pages text box.
  8. Click the Save block button and navigate to the homepage.

On my site, I now have a block that looks like what's shown in the following screenshot. Yours will vary based on the language(s) that you chose:

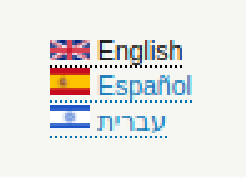
By clicking on one of the links, the site visitor chooses to receive translated content in that language. Content that's not available in the selected language will not be presented.