Table of Contents for
Web Mapping Illustrated
 Web Mapping Illustrated
Published by
O'Reilly Media, Inc., 2005
Web Mapping Illustrated
Published by
O'Reilly Media, Inc., 2005
- Web Mapping Illustrated
- Cover
- Web Mapping Illustrated
- A Note Regarding Supplemental Files
- Foreword
- Preface
- Youthful Exploration
- The Tools in This Book
- What This Book Covers
- Organization of This Book
- Conventions Used in This Book
- Safari Enabled
- Comments and Questions
- Acknowledgments
- 1. Introduction to Digital Mapping
- 1.1. The Power of Digital Maps
- 1.2. The Difficulties of Making Maps
- 1.3. Different Kinds of Web Mapping
- 2. Digital Mapping Tasks and Tools
- 2.1. Common Mapping Tasks
- 2.2. Common Pitfalls, Deadends, and Irritations
- 2.3. Identifying the Types of Tasks for a Project
- 3. Converting and Viewing Maps
- 3.1. Raster and Vector
- 3.2. OpenEV
- 3.3. MapServer
- 3.4. Geospatial Data Abstraction Library (GDAL)
- 3.5. OGR Simple Features Library
- 3.6. PostGIS
- 3.7. Summary of Applications
- 4. Installing MapServer
- 4.1. How MapServer Applications Operate
- 4.2. Walkthrough of the Main Components
- 4.3. Installing MapServer
- 4.4. Getting Help
- 5. Acquiring Map Data
- 5.1. Appraising Your Data Needs
- 5.2. Acquiring the Data You Need
- 6. Analyzing Map Data
- 6.1. Downloading the Demonstration Data
- 6.2. Installing Data Management Tools: GDAL and FWTools
- 6.3. Examining Data Content
- 6.4. Summarizing Information Using Other Tools
- 7. Converting Map Data
- 7.1. Converting Map Data
- 7.2. Converting Vector Data
- 7.3. Converting Raster Data to Other Formats
- 8. Visualizing Mapping Data in a Desktop Program
- 8.1. Visualization and Mapping Programs
- 8.2. Using OpenEV
- 8.3. OpenEV Basics
- 9. Create and Edit Personal Map Data
- 9.1. Planning Your Map
- 9.2. Preprocessing Data Examples
- 10. Creating Static Maps
- 10.1. MapServer Utilities
- 10.2. Sample Uses of the Command-Line Utilities
- 10.3. Setting Output Image Formats
- 11. Publishing Interactive Maps on the Web
- 11.1. Preparing and Testing MapServer
- 11.2. Create a Custom Application for a Particular Area
- 11.3. Continuing Education
- 12. Accessing Maps Through Web Services
- 12.1. Web Services for Mapping
- 12.2. What Do Web Services for Mapping Do?
- 12.3. Using MapServer with Web Services
- 12.4. Reference Map Files
- 13. Managing a Spatial Database
- 13.1. Introducing PostGIS
- 13.2. What Is a Spatial Database?
- 13.3. Downloading PostGIS Install Packages and Binaries
- 13.4. Compiling from Source Code
- 13.5. Steps for Setting Up PostGIS
- 13.6. Creating a Spatial Database
- 13.7. Load Data into the Database
- 13.8. Spatial Data Queries
- 13.9. Accessing Spatial Data from PostGIS in Other Applications
- 14. Custom Programming with MapServer’s MapScript
- 14.1. Introducing MapScript
- 14.2. Getting MapScript
- 14.3. MapScript Objects
- 14.4. MapScript Examples
- 14.5. Other Resources
- 14.6. Parallel MapScript Translations
- A. A Brief Introduction to Map Projections
- A.1. The Third Spheroid from the Sun
- A.2. Using Map Projections with MapServer
- A.3. Map Projection Examples
- A.4. Using Projections with Other Applications
- A.5. References
- B. MapServer Reference Guide for Vector Data Access
- B.1. Vector Data
- B.2. Data Format Guide
- ESRI Shapefiles (SHP)
- PostGIS/PostgreSQL Database
- MapInfo Files (TAB/MID/MIF)
- Oracle Spatial Database
- Web Feature Service (WFS)
- Geography Markup Language Files (GML)
- VirtualSpatialData (ODBC/OVF)
- TIGER/Line Files
- ESRI ArcInfo Coverage Files
- ESRI ArcSDE Database (SDE)
- Microstation Design Files (DGN)
- IHO S-57 Files
- Spatial Data Transfer Standard Files (SDTS)
- Inline MapServer Features
- National Transfer Format Files (NTF)
- About the Author
- Colophon
- Copyright
Converting Raster Data to Other Formats
Raster data, like vector data, can be stored in numerous
formats. Some formats come from certain software requirements or from
certain satellite image sources. Some are more general while others are
better suited for more complex tasks. In this section, you will see how
to use the gdal_translate raster translation utility and its various parameters to
help you draw the most value out of an image.
Translating an Image to Another Format
Just as ogr2ogr has
several conversion options, so does gdal_translate. The syntax for the command
is slightly different but similar in concept. Here is the
usage:
gdal_translate <options> <input_image> <output_image>
The options available can be listed by running the command without any parameters, as in Example 7-5.
> gdal_translate
Usage: gdal_translate [--help-general]
       [-ot {Byte/Int16/UInt16/UInt32/Int32/Float32/Float64/
             CInt16/CInt32/CFloat32/CFloat64}] [-not_strict]
       [-of format] [-b band] [-outsize xsize[%] ysize[%]]
       [-scale [src_min src_max [dst_min dst_max]]]
       [-srcwin xoff yoff xsize ysize] [-a_srs srs_def]
       [-projwin ulx uly lrx lry] [-co "NAME=VALUE"]*
       [-gcp pixel line easting northing]*
       [-mo "META-TAG=VALUE"]* [-quiet]
       src_dataset dst_dataset

GDAL 1.2.1.0, released 2004/06/23
This first part of the output of Example 7-5 shows the various
options. Each item enclosed with brackets [] is optional. Without them, the program
simply converts one image to another, creating the output in GeoTIFF
format by default. Some options are used in the examples of the
following sections and in more depth in other chapters of this book.
Example 7-5 also shows
the software version number and the official release date of the GDAL
project.
Example 7-6 shows a
list of all available image formats. This list will vary depending on
the operating system and (only if you compiled it yourself) the
options you specified during the configuration process. This lists
many formats, though it may actually be able to read more image types.
The list shows only potential output formats that can be used with the
-of option. You supply this option
with the abbreviated name for that format as shown in Example 7-6. For the latest
capabilities, be sure to see the GDAL support formats page http://www.gdal.org/formats_list.html.
The following format drivers are configured and support output:
  VRT: Virtual Raster
  GTiff: GeoTIFF
  NITF: National Imagery Transmission Format
  HFA: Erdas Imagine Images (.img)
  ELAS: ELAS
  AAIGrid: Arc/Info ASCII Grid
  DTED: DTED Elevation Raster
  PNG: Portable Network Graphics
  JPEG: JPEG JFIF
  MEM: In Memory Raster
  GIF: Graphics Interchange Format (.gif)
  XPM: X11 PixMap Format
  BMP: MS Windows Device Independent Bitmap
  PCIDSK: PCIDSK Database File
  PNM: Portable Pixmap Format (netpbm)
  ENVI: ENVI .hdr Labelled
  EHdr: ESRI .hdr Labelled
  PAux: PCI .aux Labelled

  MFF: Atlantis MFF Raster
  MFF2: Atlantis MFF2 (HKV) Raster
  BT: VTP .bt (Binary Terrain) 1.3 Format
  JPEG2000: JPEG-2000 part 1 (ISO/IEC 15444-1)
  FIT: FIT Image
  USGSDEM: USGS Optional ASCII DEM (and CDED)
Keep in mind that any type of image format supported by GDAL can be translated, including digital camera photos or images from a web site. The most basic example of conversion, such as the following example, takes an image in one format and outputs it to another format.
>gdal_translate image1.png image1.tif>gdal_translate -of "PNG" image1.tif image1.png
Warning
Even though you specify the output file format, gdal_translate doesn’t automatically
create a filename suffix/extension for you. Remember to add your own
to the end of the filename.
An image can be translated back to the same format too, if creation of that format is supported by GDAL.
Using gdal_translate to Create a JPEG Preview of a Satellite Image
In Chapter 6,
gdalinfo was used to show the
details of a RADARSAT image of Canada. The image was a whopping 5,700
× 4,800-pixel image and more than 25 MB in size. Only special
image-handling programs like gdal-related tools can handle files that
large. This isn’t an image you would want to send to a friend as an
email attachment! Not only would the file size be a problem but your
friend probably could not use basic image viewers because it is a very
large GeoTIFF file.
The gdal_translate utility is
a handy tool for many things, one of which is reducing the size of an
image and outputting it to a more usable format for the project at
hand. In Example 7-7,
gdal_translate reduces the size of
the image to 5% and creates a small JPEG format file as output.
Running gdalinfo against this new
file shows that the resulting file is now a mere 285 × 240 pixels and
is a JPEG format image. The file size is now less than 20 KB. This is
easily viewable by the simplest image viewer on most personal
computers.
>gdal_translate -of "JPEG" -outsize 5% 5% canada_mosaic_lcc_1000m.tif can_radar.jpg>gdalinfo can_radar.jpgDriver: JPEG/JPEG JFIF Size is 285, 240
Figure 7-1 shows
what the can_radar.jpg image looks
like after Example 7-13.

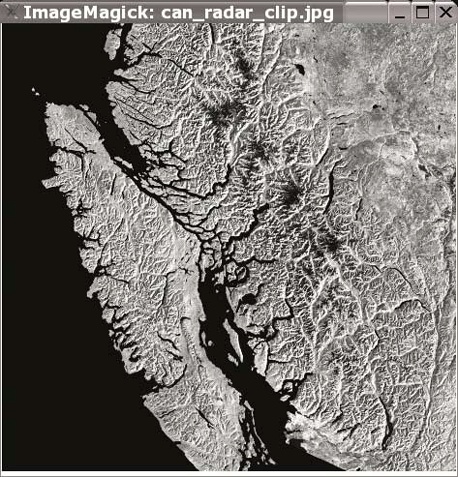
Clipping an Area of Interest and Creating a Small JPEG of a Satellite Image
gdal_translate can
also be used to specify only a portion of an image to be translated.
The result is a clipped portion of the image being put into a new
file. This is done using the -projwin option to specify geographic
coordinates of the area to clip out, or -srcwin if you know which pixels you want to
include. You can use OpenEV to preview the image and get an idea of
what the upper-left and lower-right coordinates are around your area
of interest. Then do the same type of translation as before, but
provide coordinates in the -projwin
parameter. Example 7-8
shows this kind of clipping as well as a conversion, all in one
command.
> gdal_translate -of "JPEG" -projwin -2281300 7464800 -1812300 7001800 canada_mosaic_lcc_1000m.tif can_radar_clip.jpg
Input file size is 5700, 4800
Computed -srcwin 318 3035 469 463 from projected window.
Warning
Depending on the image program you use and the image source,
specifying coordinates for parameters like -projwin can be confusing. For some
applications you specify a rectangle using the lower-left coordinate
first and upper-right coordinates last. But in the previous example,
because the origin pixel is in the upper-left corner, upper-left and
lower-right coordinates must be used. If you mix them up, you will
get strange errors.
Figure 7-2 shows the resulting clipped satellite image.