Let's see how to develop an Reverse Polish Notation (RPN) calculator application that follows the TDD approach. RPN is also known as the postfix notation. The expectation from the RPN Calculator application is to accept a postfix math expression as an input and return the evaluated result as the output.
Step by step, I would like to demonstrate how one can follow the TDD approach while developing an application. As the first step, I would like to explain the project directory structure, then we'll move forward. Let's create a folder named Ex2 with the following structure:
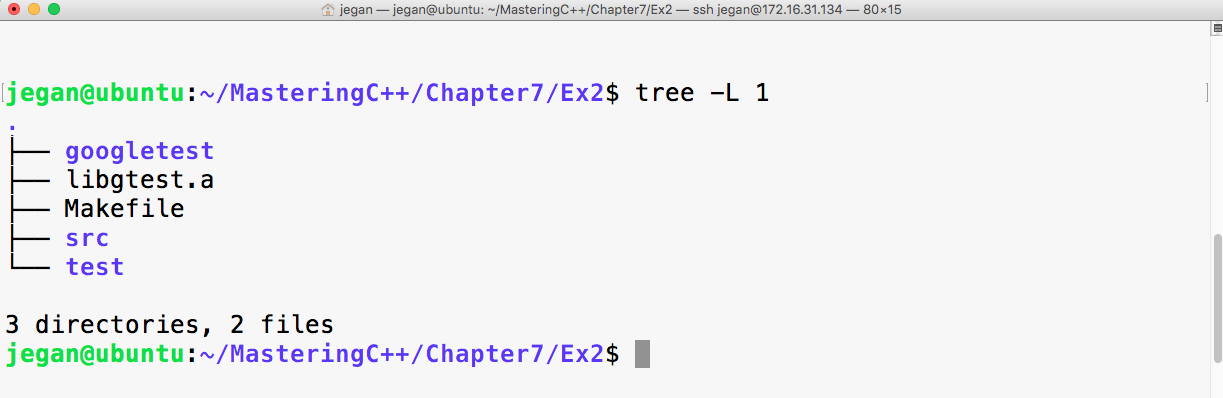
The googletest folder is the gtest test library that has the necessary gtest and gmock header files. Now libgtest.a is the Google test static library that we created in the previous exercise. We are going to use the make utility to build our project, hence I have placed a Makefile in the project home directory. The src directory will hold the production code, while the test directory will hold all the test cases that we are going to write.
Before we start writing test cases, let's take a postfix math "2 5 * 4 + 3 3 * 1 + /" and understand the standard postfix algorithm that we are going to apply to evaluate the RPN math expression. As per the postfix algorithm, we are going to parse the RPN math expression one token at a time. Whenever we encounter an operand (number), we are going to push that into the stack. Whenever we encounter an operator, we are going to pop out two values from the stack, apply the math operation, push back the intermediate result into the stack, and repeat the procedure until all the tokens are evaluated in the RPN expression. At the end, when no more tokens are left in the input string, we will pop out the value and print it as the result. The procedure is demonstrated step by step in the following figure:

To start with, let's take a simple postfix math expression and translate the scenario into a test case:
Test Case : Test a simple addition
Input: "10 15 +"
Expected Output: 25.0
Let's translate the preceding test case as a Google test in the test folder, as follows:
test/RPNCalculatorTest.cpp

TEST ( RPNCalculatorTest, testSimpleAddition ) {
         RPNCalculator rpnCalculator;
         double actualResult = rpnCalculator.evaluate ( "10 15 +" );
         double expectedResult = 25.0;
         EXPECT_EQ ( expectedResult, actualResult );
}
In order to compile the preceding test case, let's write the minimal production code that is required in the src folder, as follows:
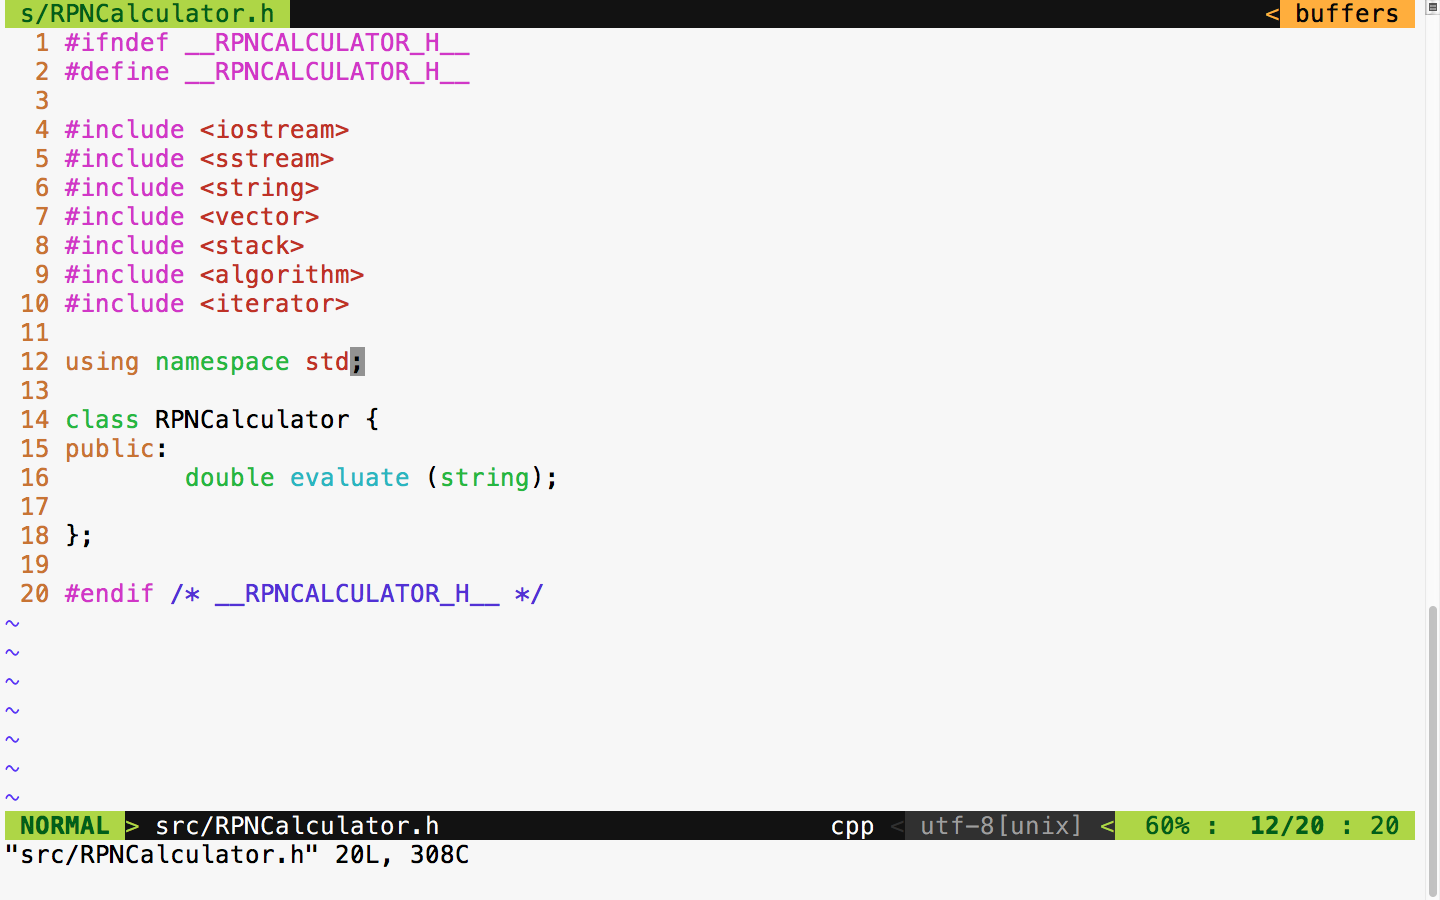
src/RPNCalculator.h

#include <iostream>
#include <string>
using namespace std;

class RPNCalculator {
  public:
      double evaluate ( string );
};
As the RPN math expression will be supplied as a space-separated string, the evaluate method will take a string input argument:
src/RPNCalculator.cpp

#include "RPNCalculator.h"

double RPNCalculator::evaluate ( string rpnMathExpression ) {
    return 0.0;
}
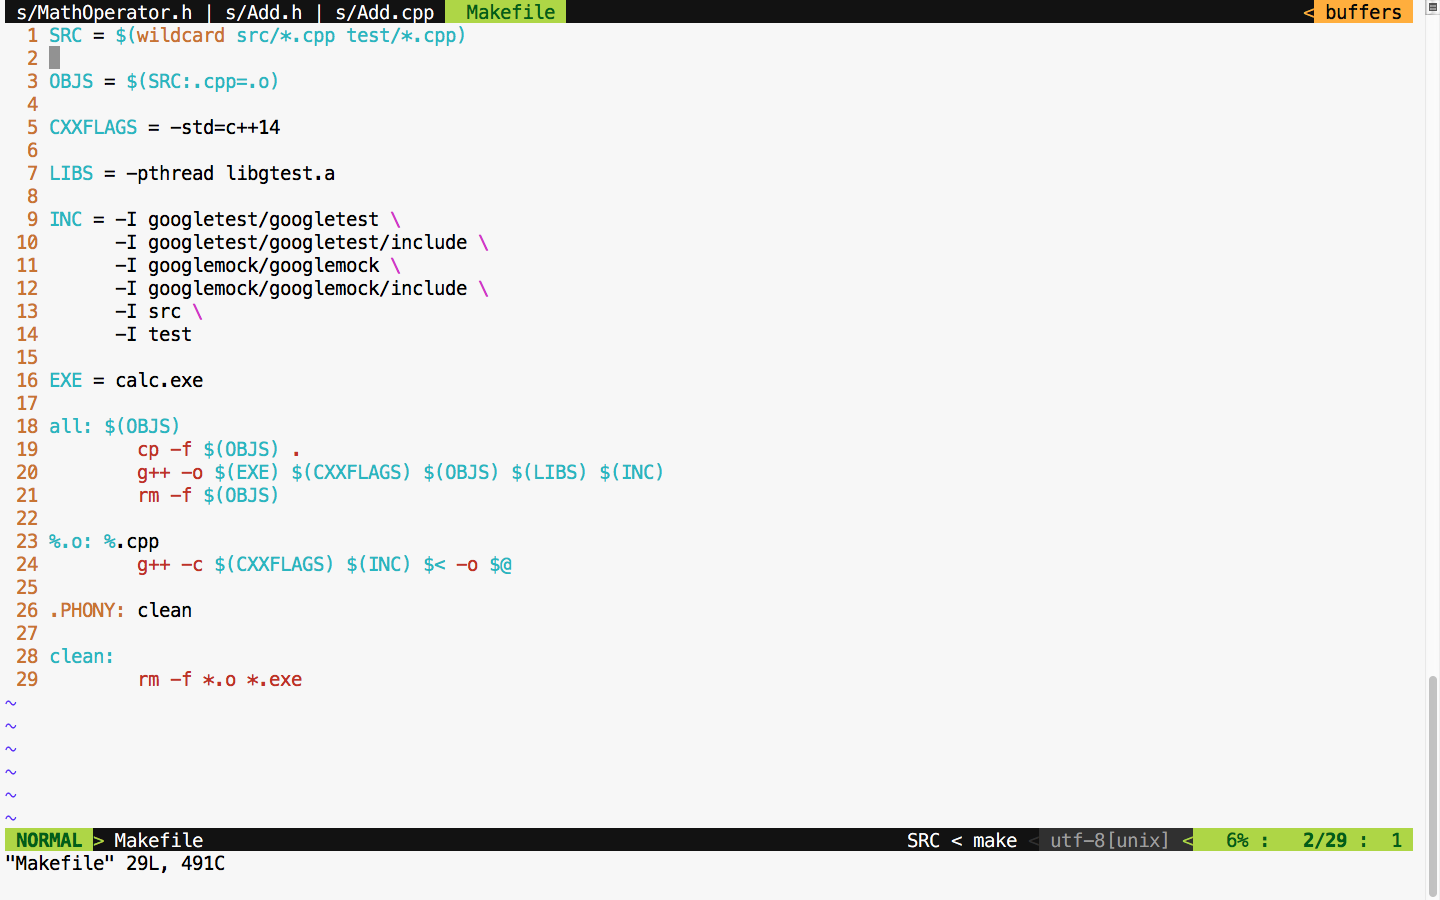
The following Makefile class helps run the test cases every time we compile the production code:
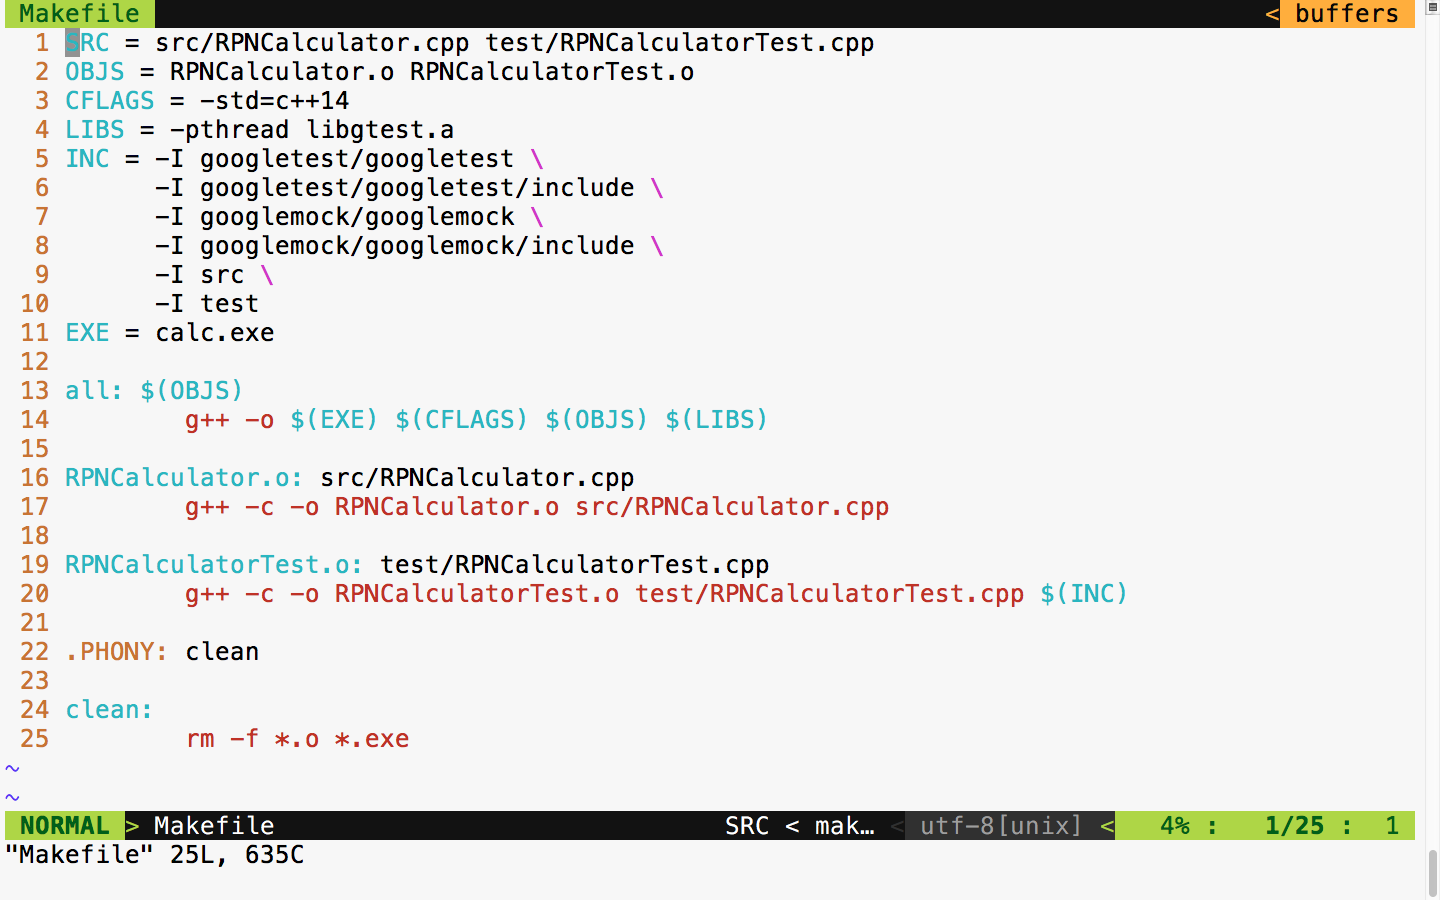
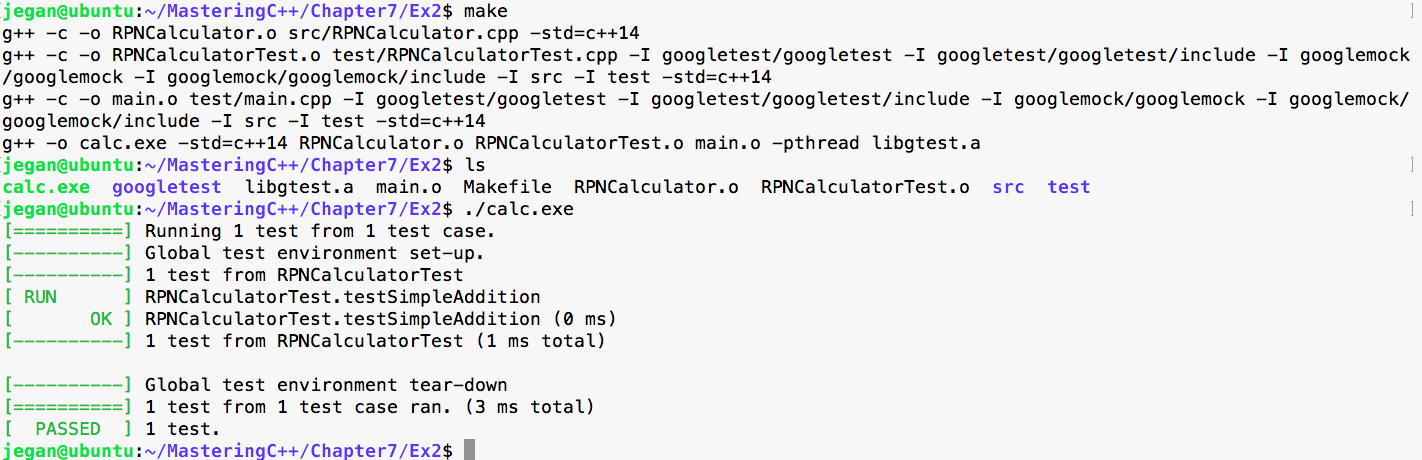
Now let's build and run the test case and check the test case's outcome:
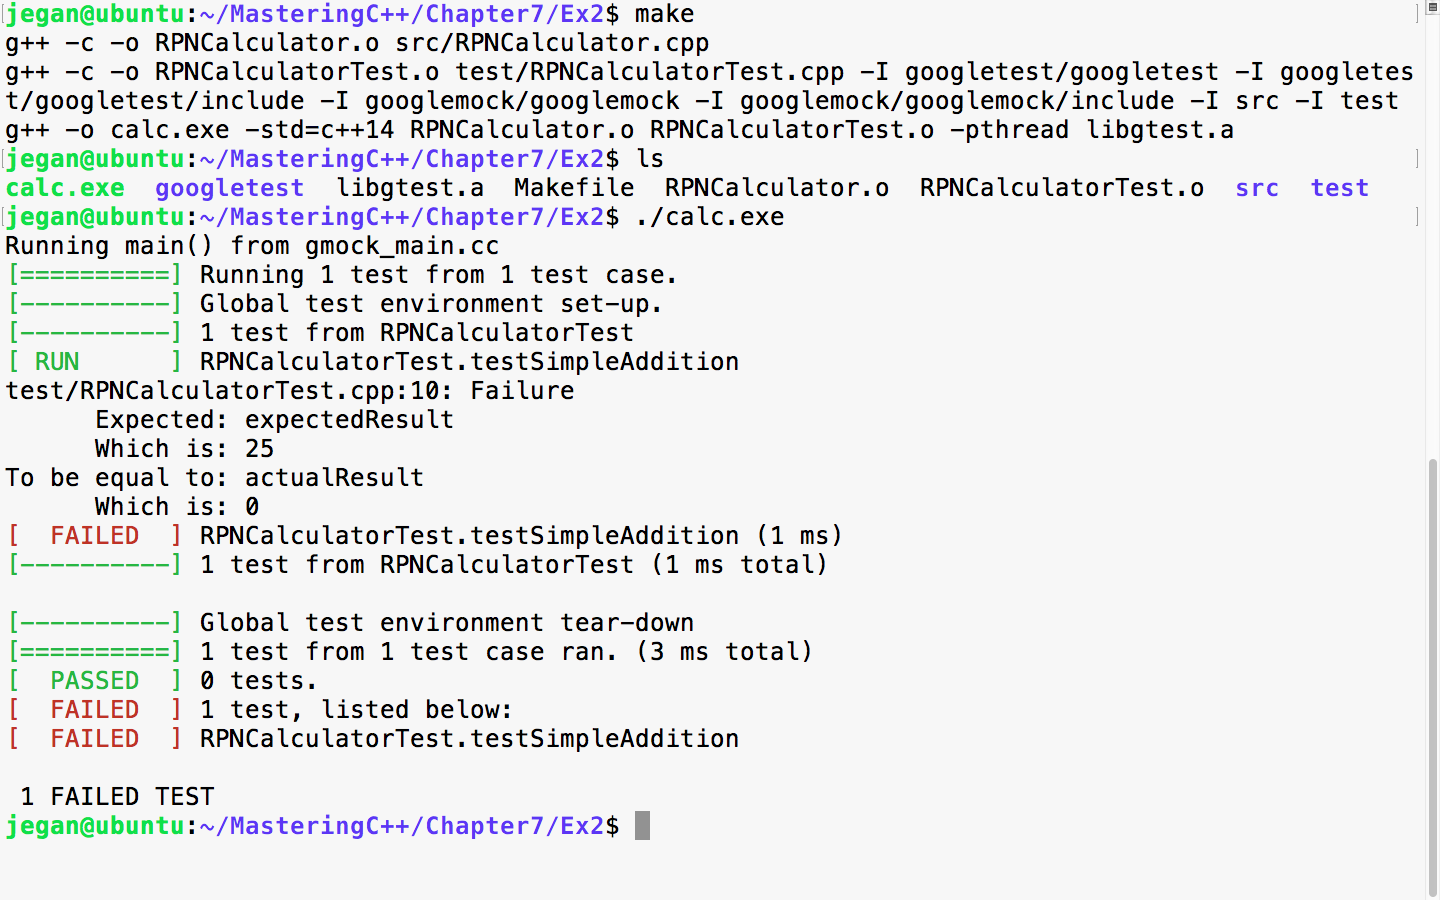
In TDD, we always start with a failing test case. The root cause of the failure is that the expected result is 25, while the actual result is 0. The reason is that we haven't implemented the evaluate method, hence we have hardcoded to return 0, irrespective of any input. So let's implement the evaluate method in order to make the test case pass.
We need to modify src/RPNCalculator.h and src/RPNCalculator.cpp as follows:
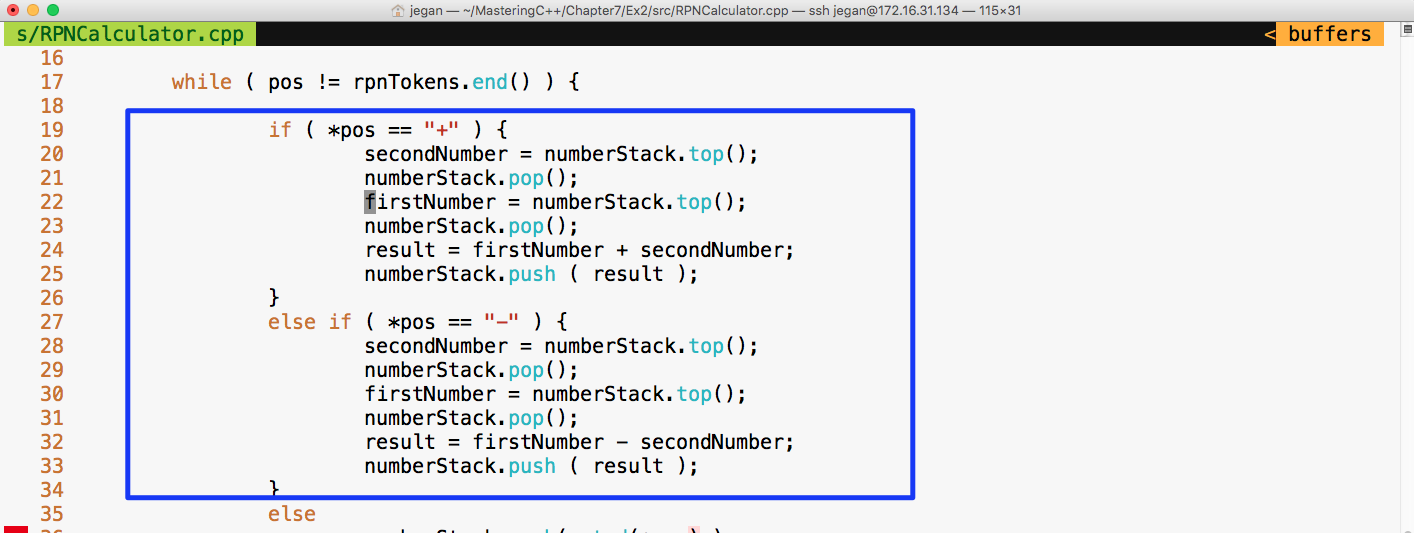
In the RPNCalculator.h header file, observe the new header files that are included to handle string tokenizing and string double conversion and copy the RPN tokens to the vector:
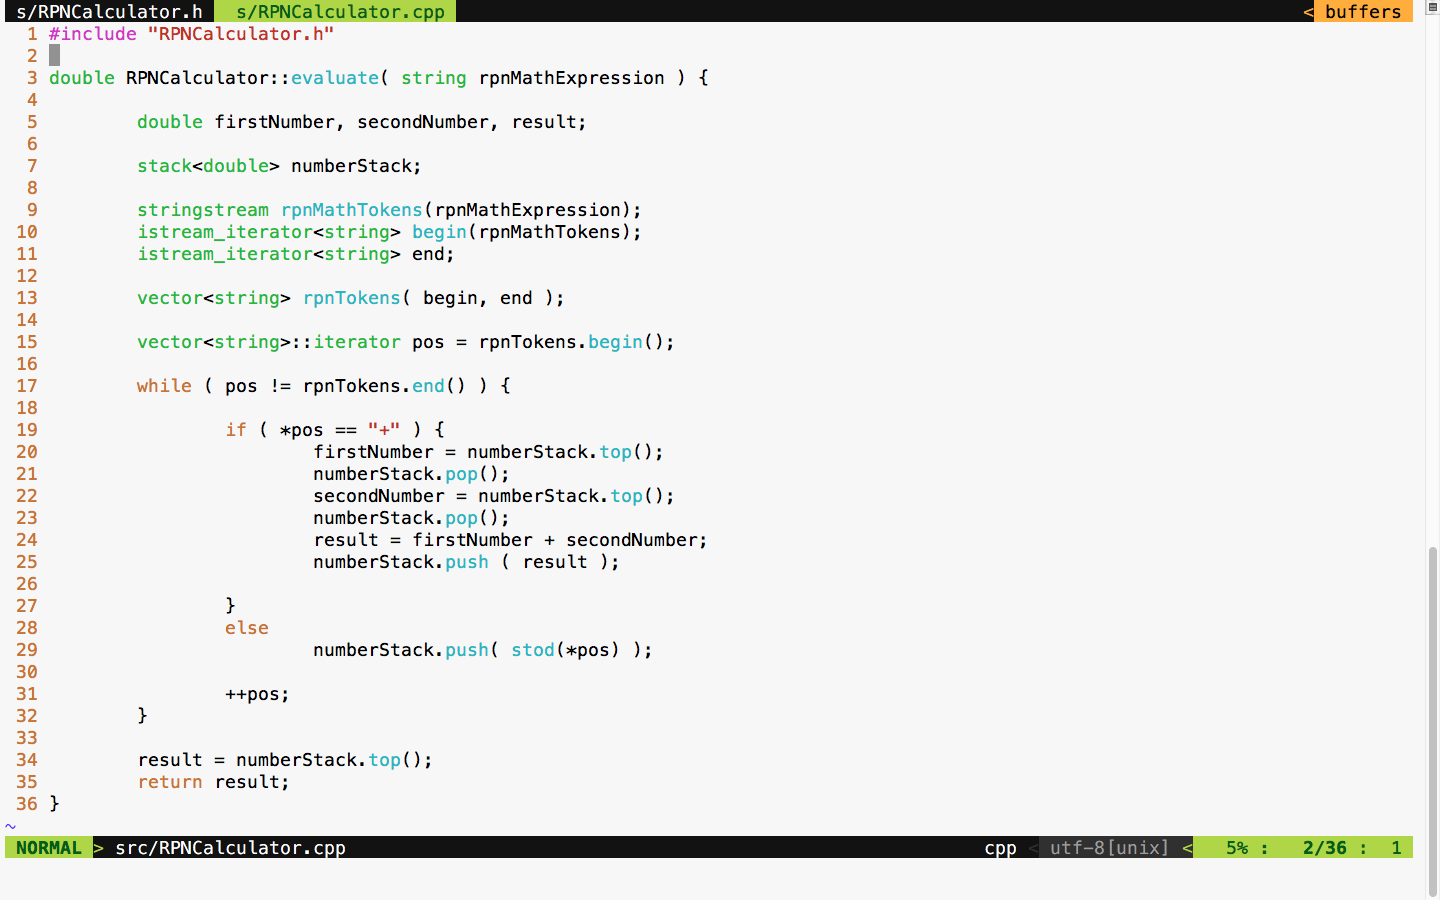
As per the standard postfix algorithm, we are using a stack to hold all the numbers that we find in the RPN expression. Anytime we encounter the + math operator, we pop out two values from the stack and add them and push back the results into the stack. If the token isn't a + operator, we can safely assume that it would be a number, so we just push the value to the stack.
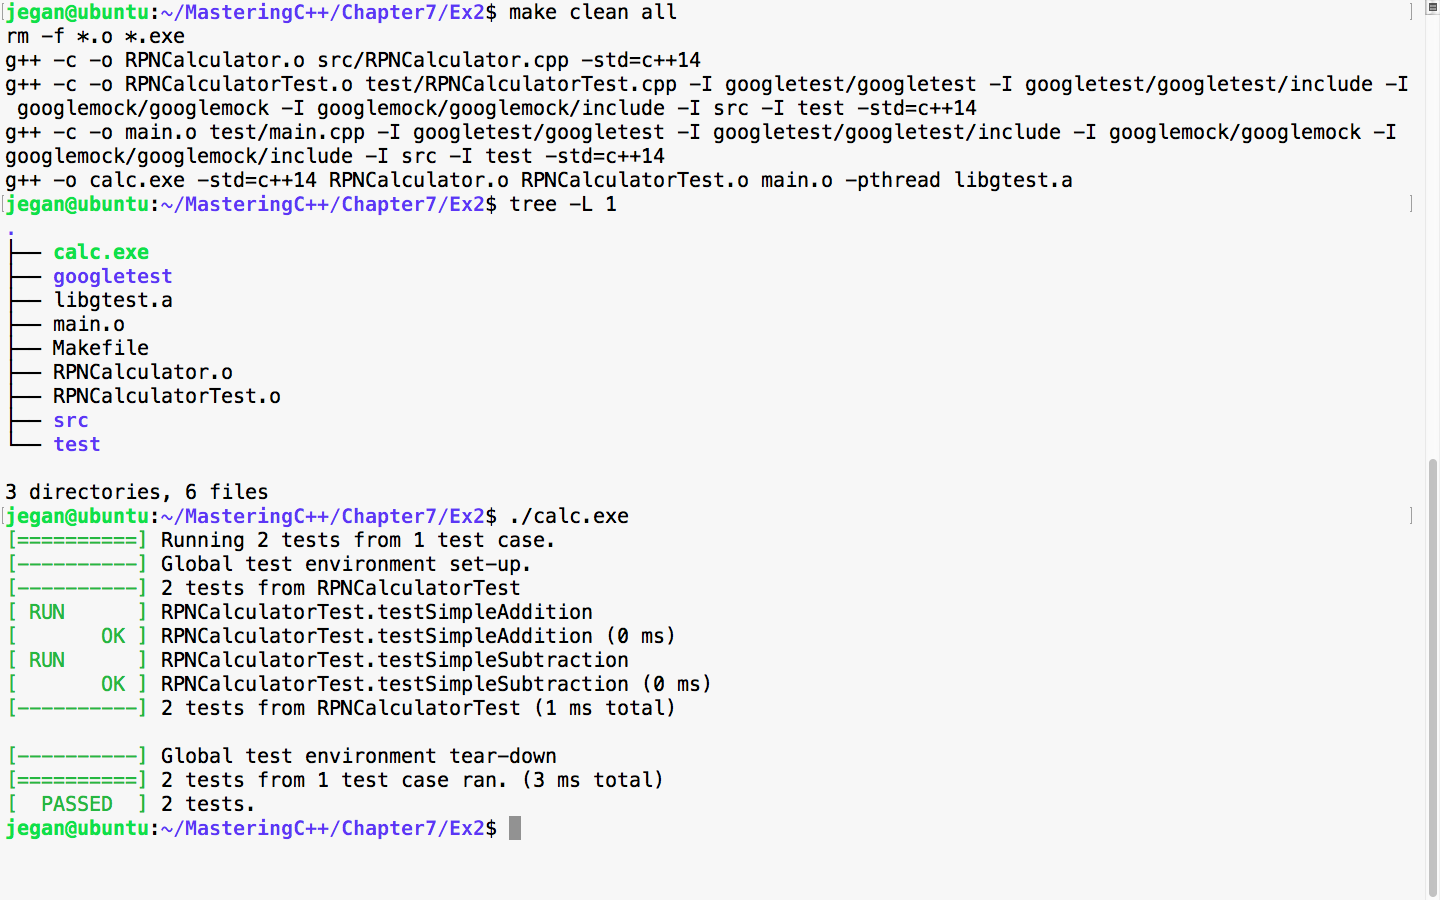
With the preceding implementation in place, let's try the test case and check whether the test case passes:
Cool, our first test case has passed as expected. It's time to think of another test case. This time, let's add a test case for subtraction:
Test Case : Test a simple subtraction
Input: "25 10 -"
Expected Output: 15.0
Let's translate the preceding test case as a Google test in the test folder, as follows:
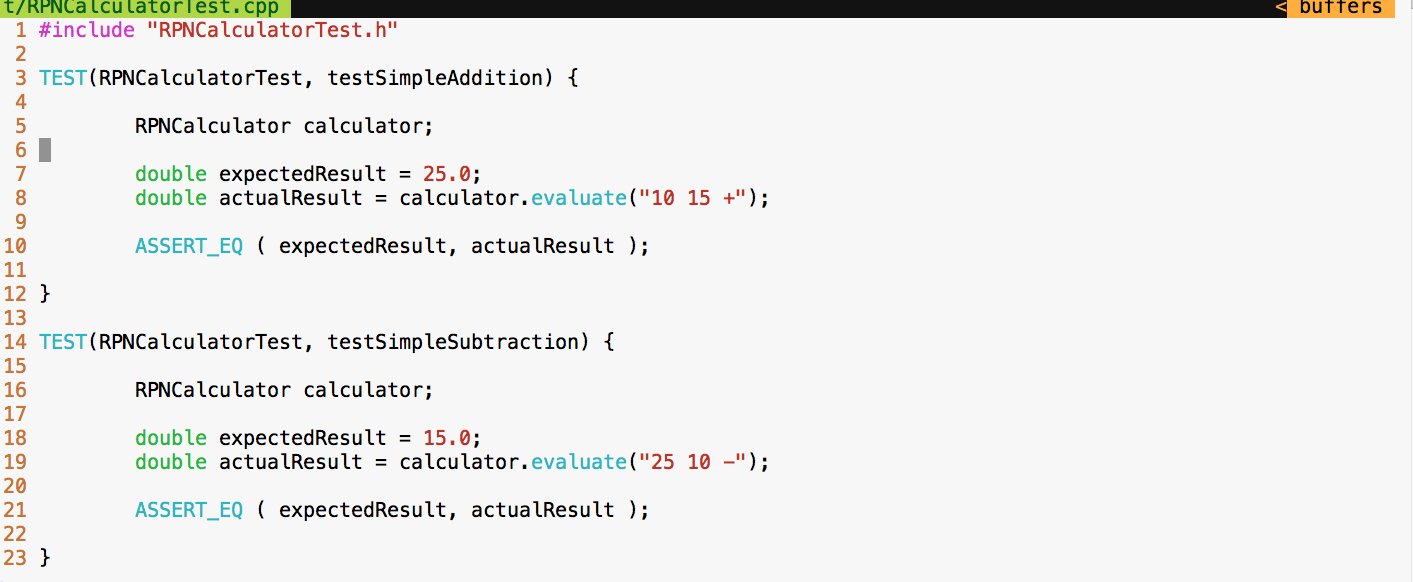
test/RPNCalculatorTest.cpp

TEST ( RPNCalculatorTest, testSimpleSubtraction ) {
         RPNCalculator rpnCalculator;
         double actualResult = rpnCalculator.evaluate ( "25 10 -" );
         double expectedResult = 15.0;
         EXPECT_EQ ( expectedResult, actualResult );
}
With the preceding test case added to test/RPNCalculatorTest, it should now look like this:
Let's execute the test cases and check whether our new test case passes:
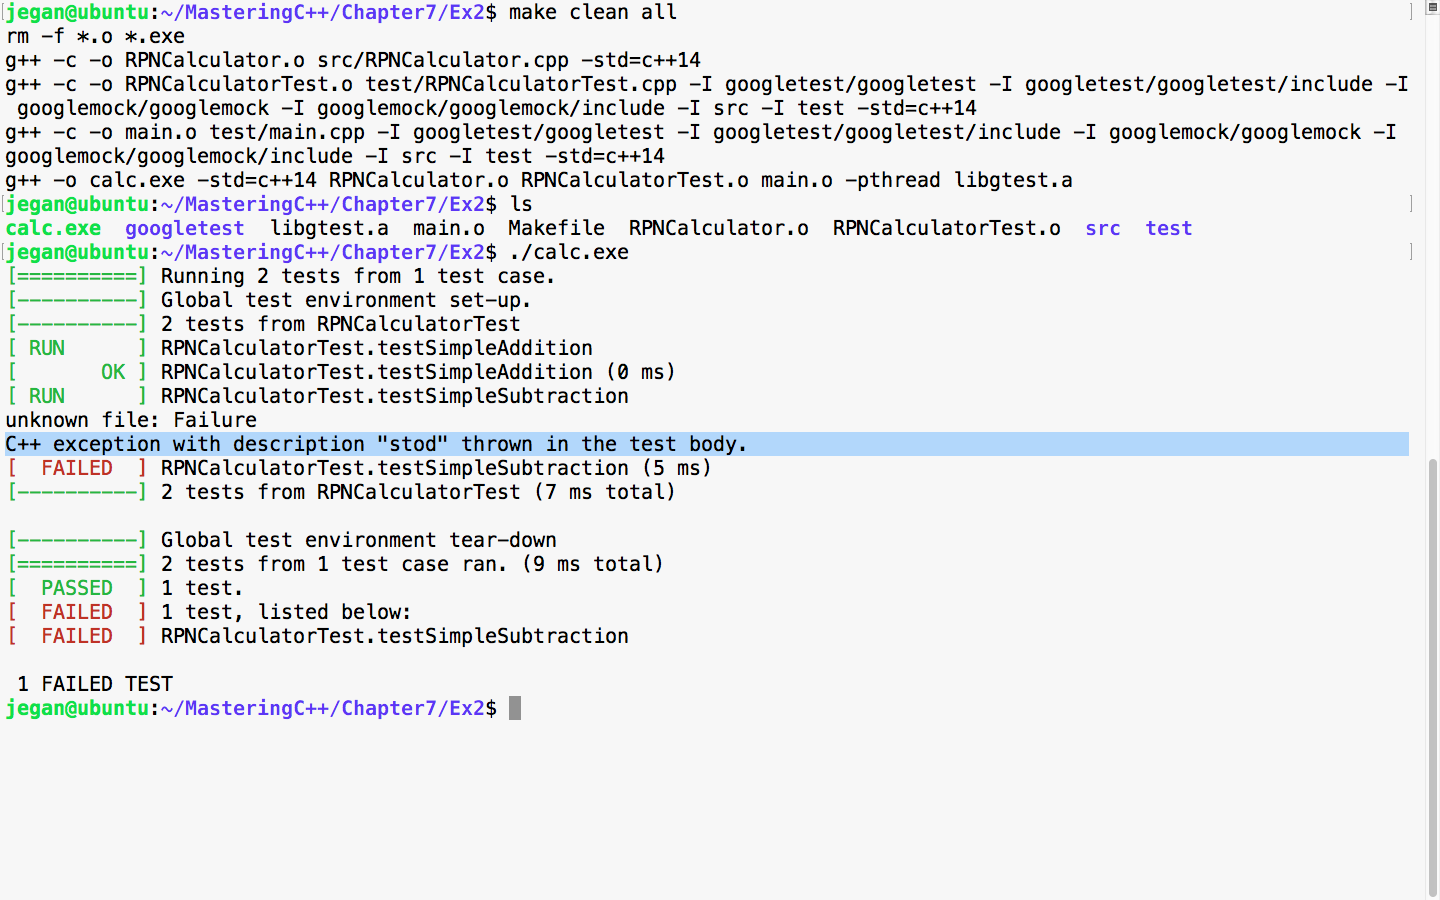
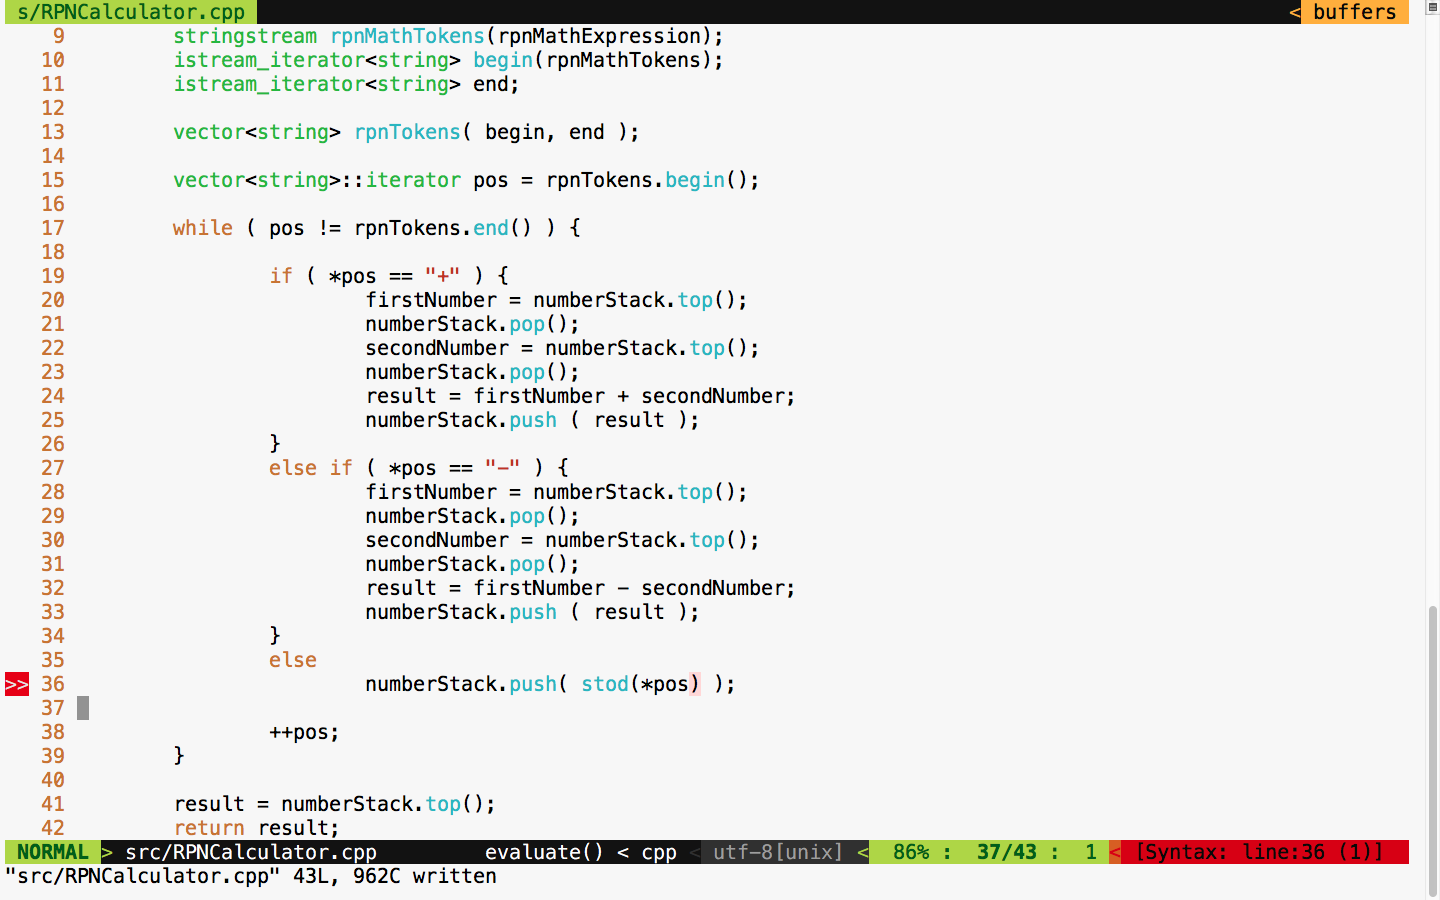
As expected, the new test fails as we haven't added support for subtraction in our application yet. This is very evident, based on the C++ exception, as the code attempts to convert the subtraction - operator into a number. Let's add support for subtraction logic in our evaluate method:
It's time to test. Let's execute the test case and check whether things are working:
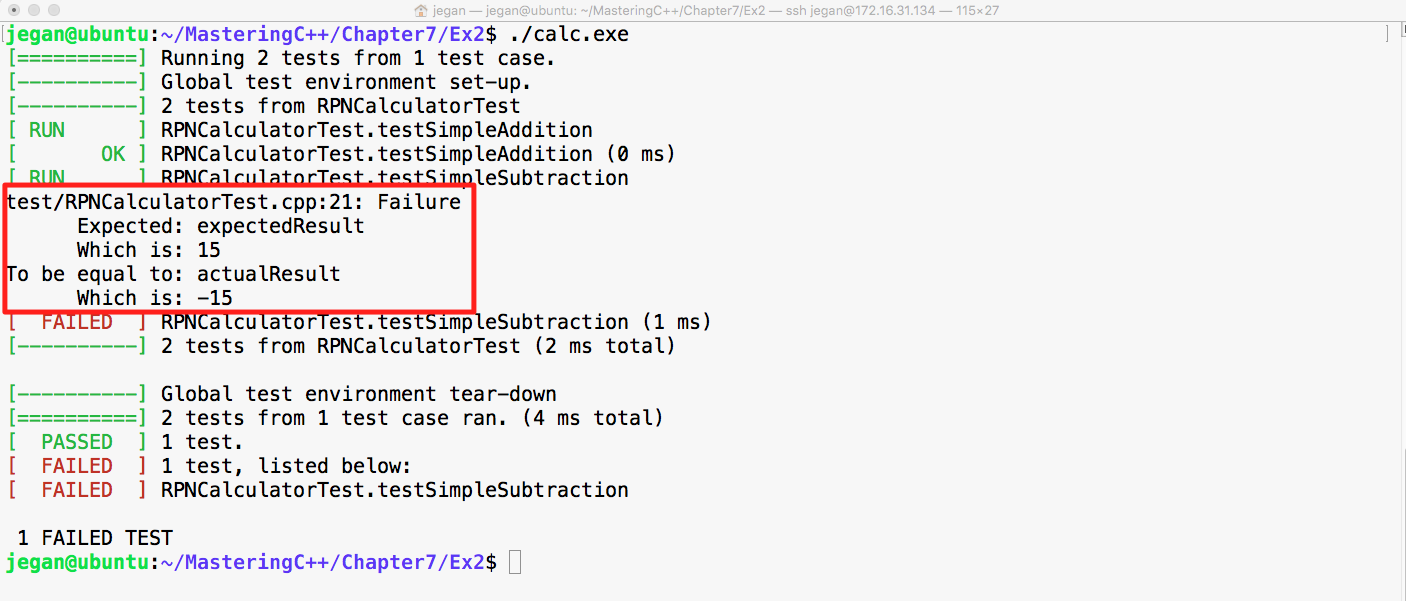
Cool! Did you notice that our test case failed in this instance? Wait a minute. Why are we excited if the test case failed? The reason we should be happy is that our test case found a bug; after all, that is the main intent of TDD, isn't?
The root cause of the failure is that the Stack operates on the basis of Last In First Out (LIFO) whereas our code assumes FIFO. Did you notice that our code assumes that it will pop out the first number first while the reality is that it is supposed to pop out the second number first? Interesting, this bug was there in the addition operation too; however, since addition is associative, the bug was kind of suppressed but the subtraction test case detected it.
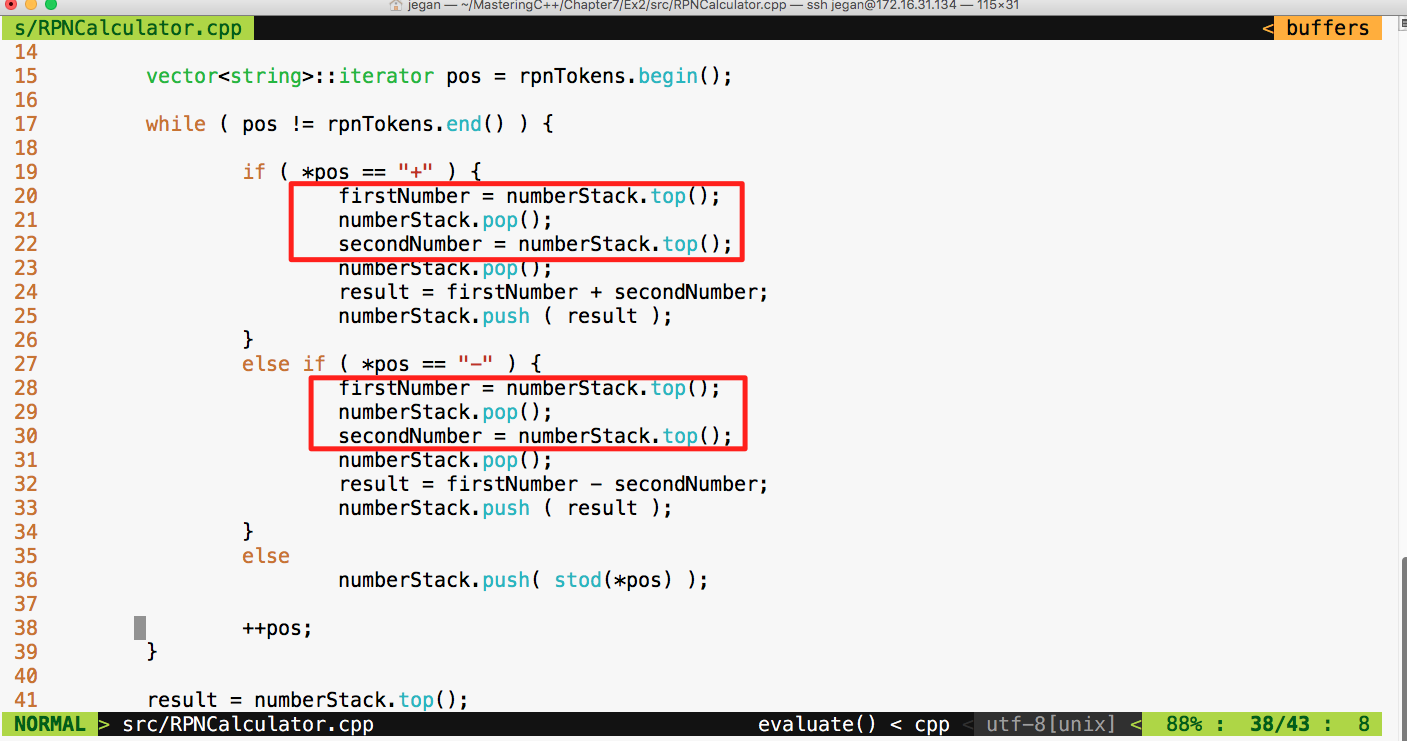
Let's fix the bug as shown in the preceding screenshot and check whether the test cases will pass:
Awesome! We fixed the bug and our test case seems to certify they are fixed. Let's add more test cases. This time, let's add a test case to verify multiplication:
Test Case : Test a simple multiplication
Input: "25 10 *"
Expected Output: 250.0
Let's translate the preceding test case as a google test in the test folder, as follows:
test/RPNCalculatorTest.cpp

TEST ( RPNCalculatorTest, testSimpleMultiplication ) {
         RPNCalculator rpnCalculator;
         double actualResult = rpnCalculator.evaluate ( "25 10 *" );
         double expectedResult = 250.0;
         EXPECT_EQ ( expectedResult, actualResult );
}
We know this time the test case is going to fail, so let's fast forward and take a look at the division test case:
Test Case : Test a simple division
Input: "250 10 /"
Expected Output: 25.0
Let's translate the preceding test case as a google test in the test folder, as follows:
test/RPNCalculatorTest.cpp

TEST ( RPNCalculatorTest, testSimpleDivision ) {
         RPNCalculator rpnCalculator;
         double actualResult = rpnCalculator.evaluate ( "250 10 /" );
         double expectedResult = 25.0;
         EXPECT_EQ ( expectedResult, actualResult );
}
Let's skip the test result and move forward with a final complex expression test case that involves many operations:
Test Case : Test a complex rpn expression
Input: "2  5  *  4  + 7  2 -  1  +  /"
Expected Output: 25.0
Let's translate the preceding test case as a google test in the test folder, as shown here:
test/RPNCalculatorTest.cpp

TEST ( RPNCalculatorTest, testSimpleDivision ) {
         RPNCalculator rpnCalculator;
         double actualResult = rpnCalculator.evaluate ( "250 10 /" );
         double expectedResult = 25.0;
         EXPECT_EQ ( expectedResult, actualResult );
}
Let's check whether our RPNCalculator application is able to evaluate a complex RPN expression that involves addition, subtraction, multiplication, and division in a single expression with the following test case:
test/RPNCalculatorTest.cpp

TEST ( RPNCalculatorTest, testComplexExpression ) {
         RPNCalculator rpnCalculator;
         double actualResult = rpnCalculator.evaluate ( "2  5  *  4  +  7  2 - 1 +  /" );
         double expectedResult = 2.33333;
         ASSERT_NEAR ( expectedResult, actualResult, 4 );
}
In the preceding test case, we are checking whether the expected result matches the actual result to the approximation of up to four decimal places. If the values are different beyond this approximation, then the test case is supposed to fail.
Let's check the test case output now:
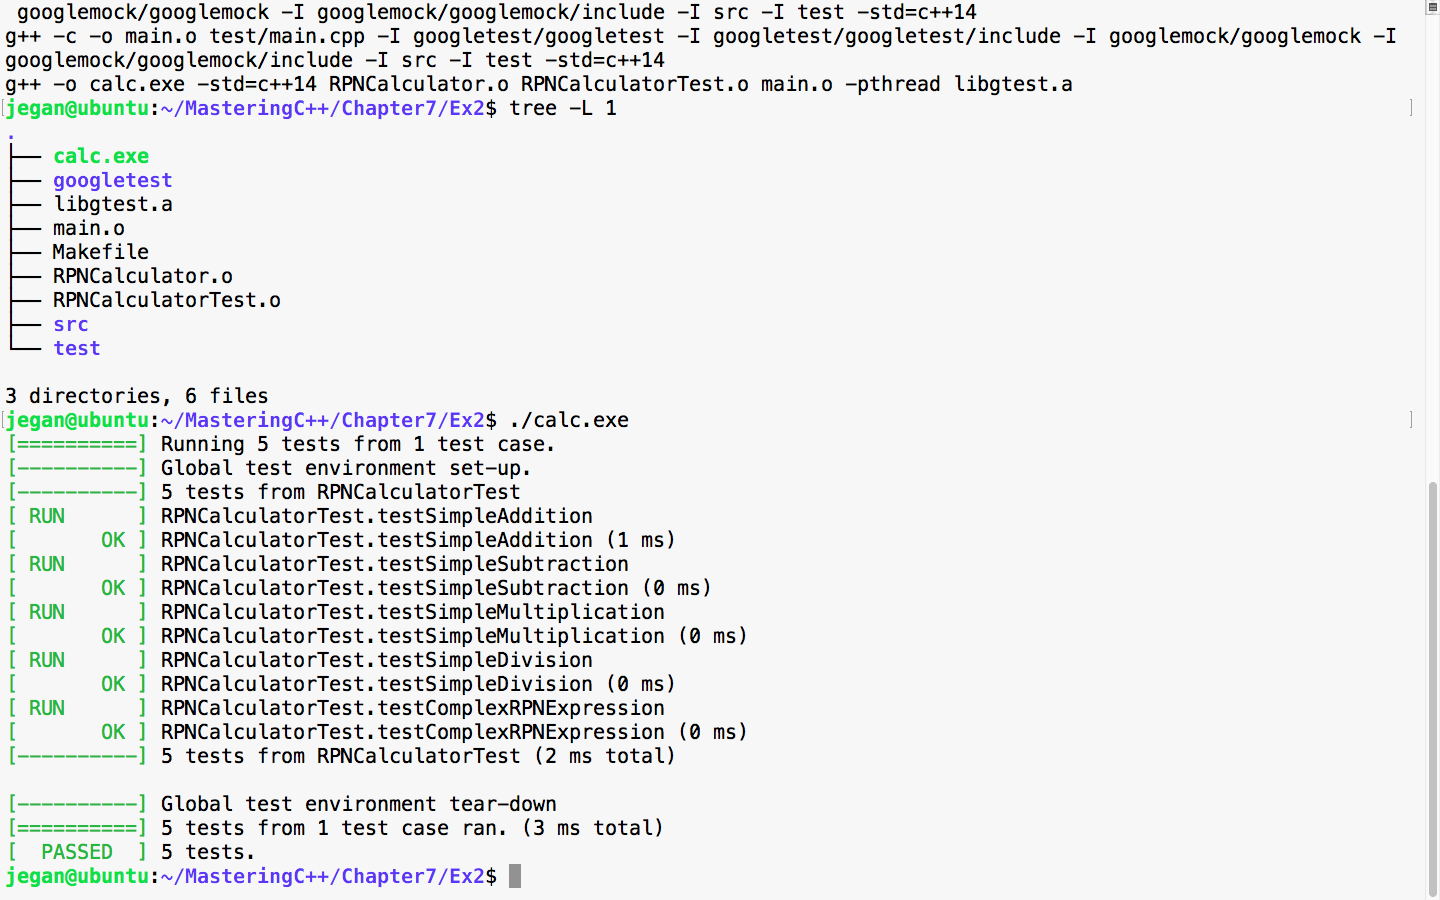
Great! All the test cases are green.
Now let's take a look at our production code and check whether there is any room for improvement:
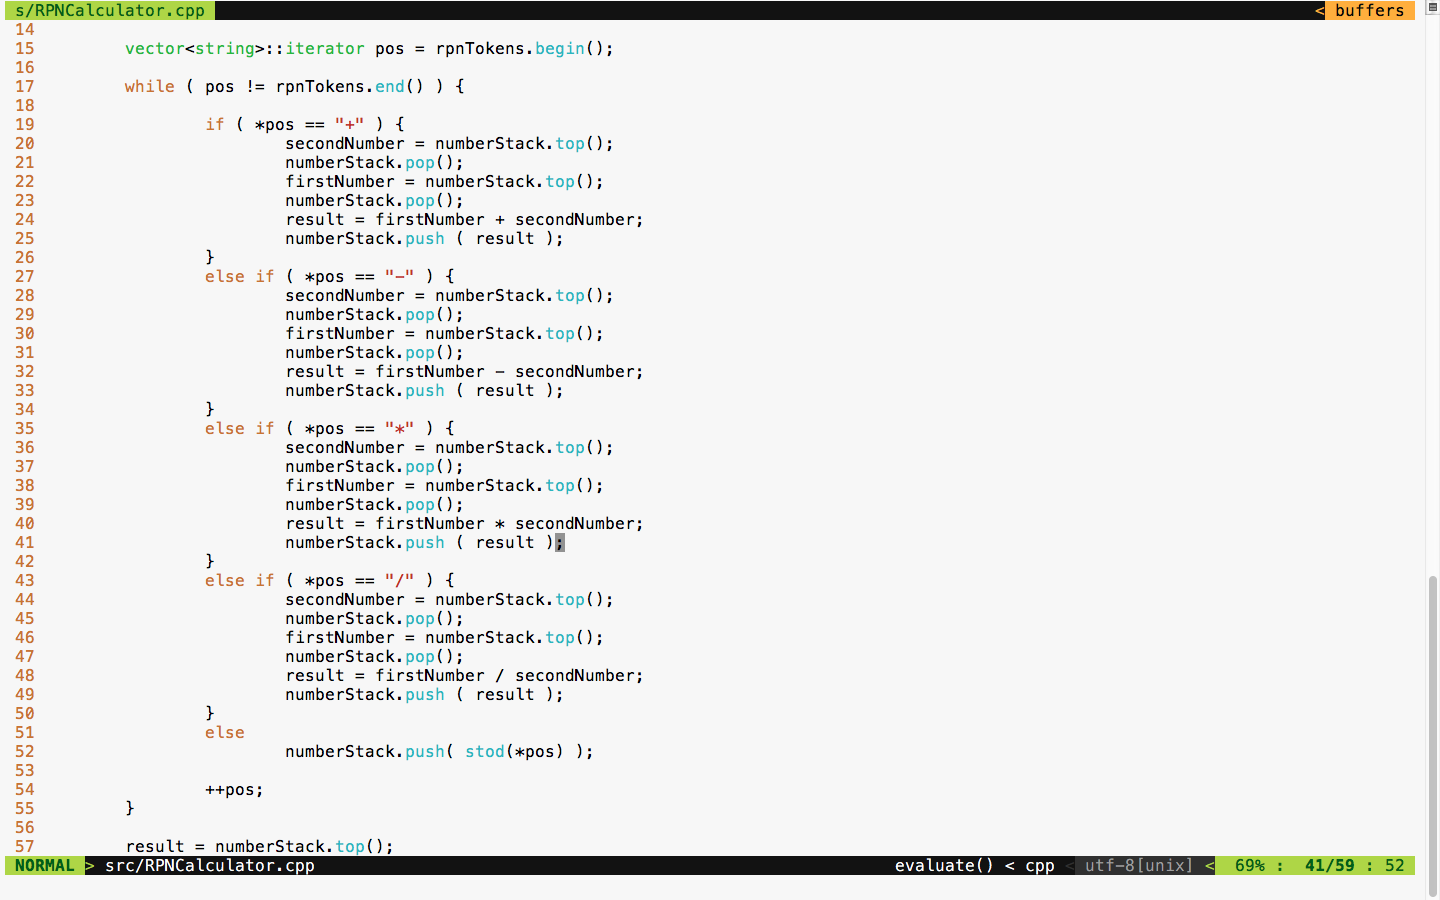
The code is functionally good but has many code smells. It is a long method with the nested if-else condition and duplicate code. TDD is not just about test automation; it is also about writing good code without code smells. Hence, we must refactor code and make it more modular and reduce the code complexity.
We can apply polymorphism or the strategy design pattern here instead of the nested if-else conditions. Also, we can use the factory method design pattern to create various subtypes. There is also scope to use the Null Object Design Pattern.
The best part is we don't have to worry about the risk of breaking our code in the process of refactoring as we have a sufficient number of test cases to give us feedback in case we break our code.
First, let's understand how we could refactor the RPNCalculator design shown in Figure 7.35:
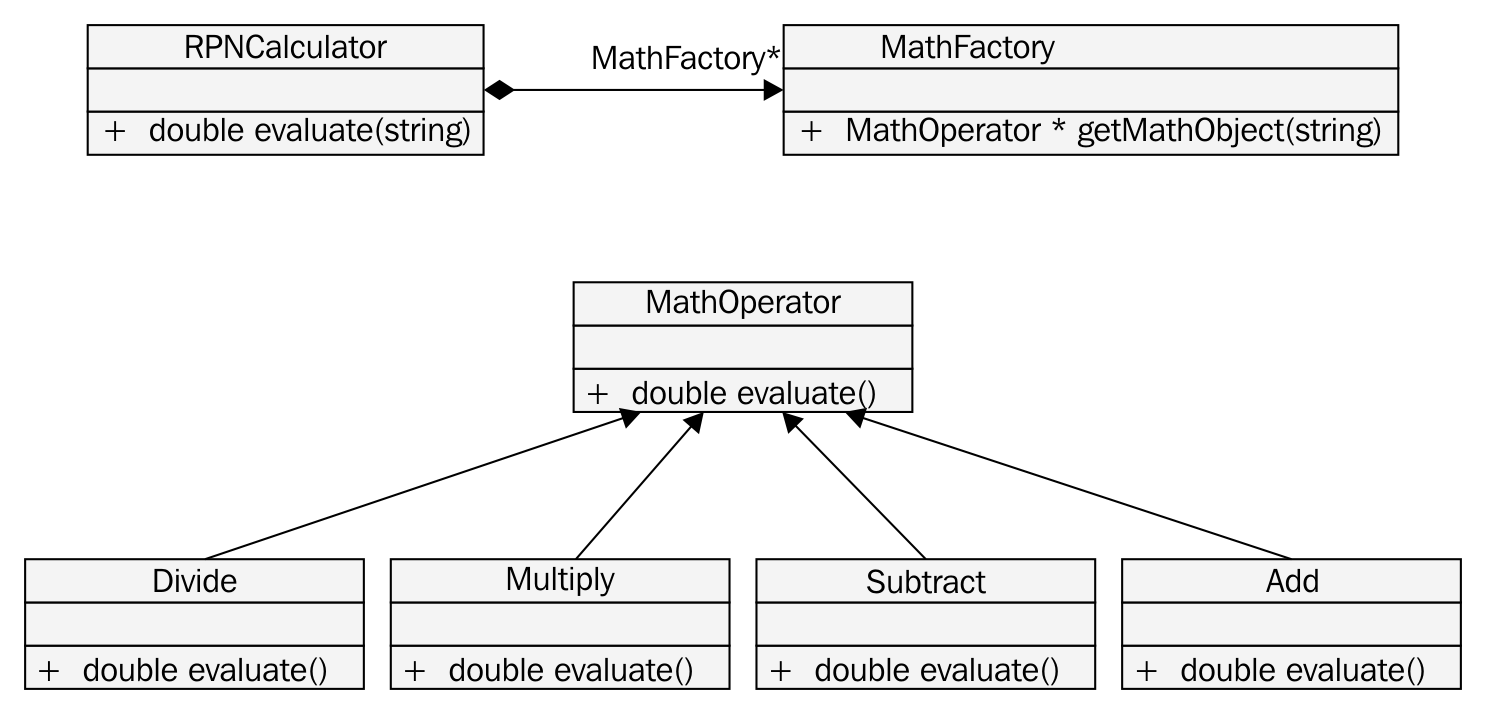
Based on the preceding design refactoring approach, we can refactor RPNCalculator as shown in Figure 7.36:

If you compare the RPNCalculator code before and after refactoring, you'll find that code complexity has reduced to a decent amount after refactoring.
The MathFactory class can be implemented as shown in Figure 7.37:
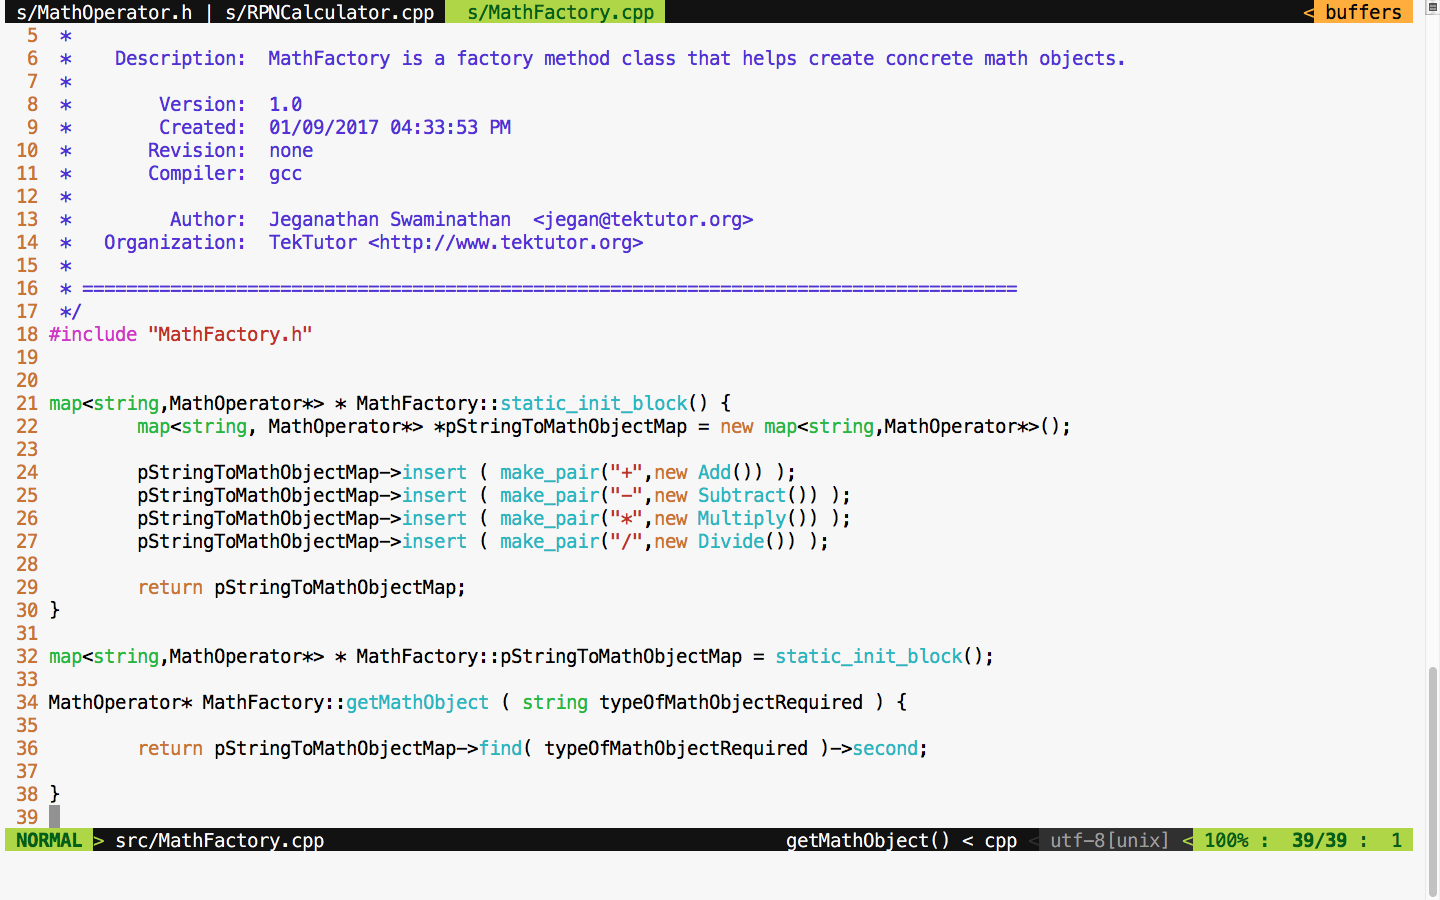
As much as possible, we must strive to avoid if-else conditions, or in general, we must try to avoid code branching when possible. Hence, STL map is used to avoid if-else conditions. This also promotes the reuse of the same Math objects, irrespective of the complexity of the RPN expression.
You will get an idea of how the MathOperator Add class is implemented if you refer to Figure 7.38:
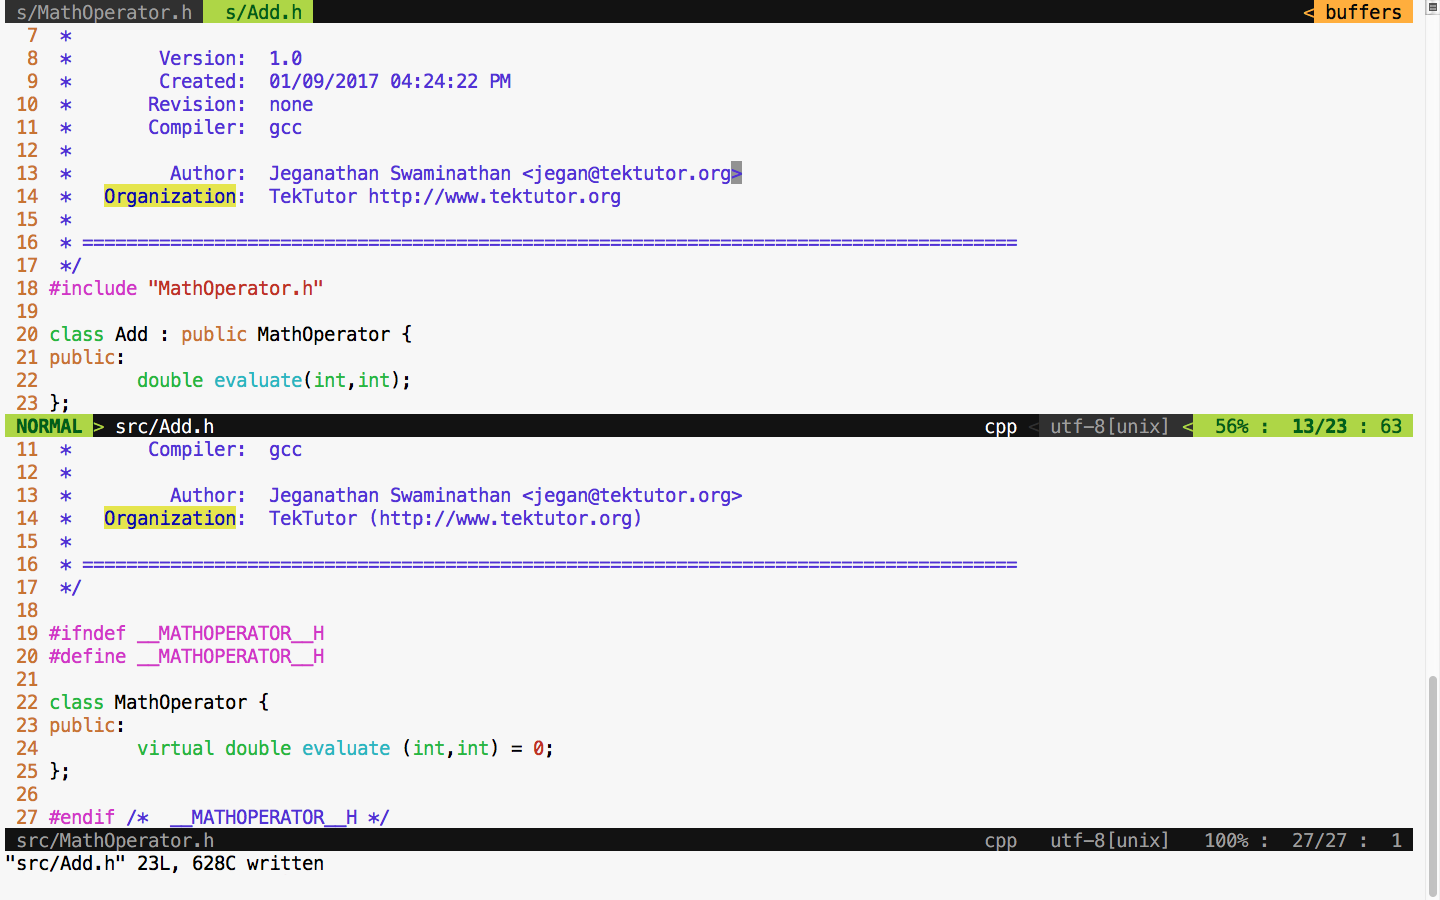
The Add class definition looks as shown in Figure 7.39:
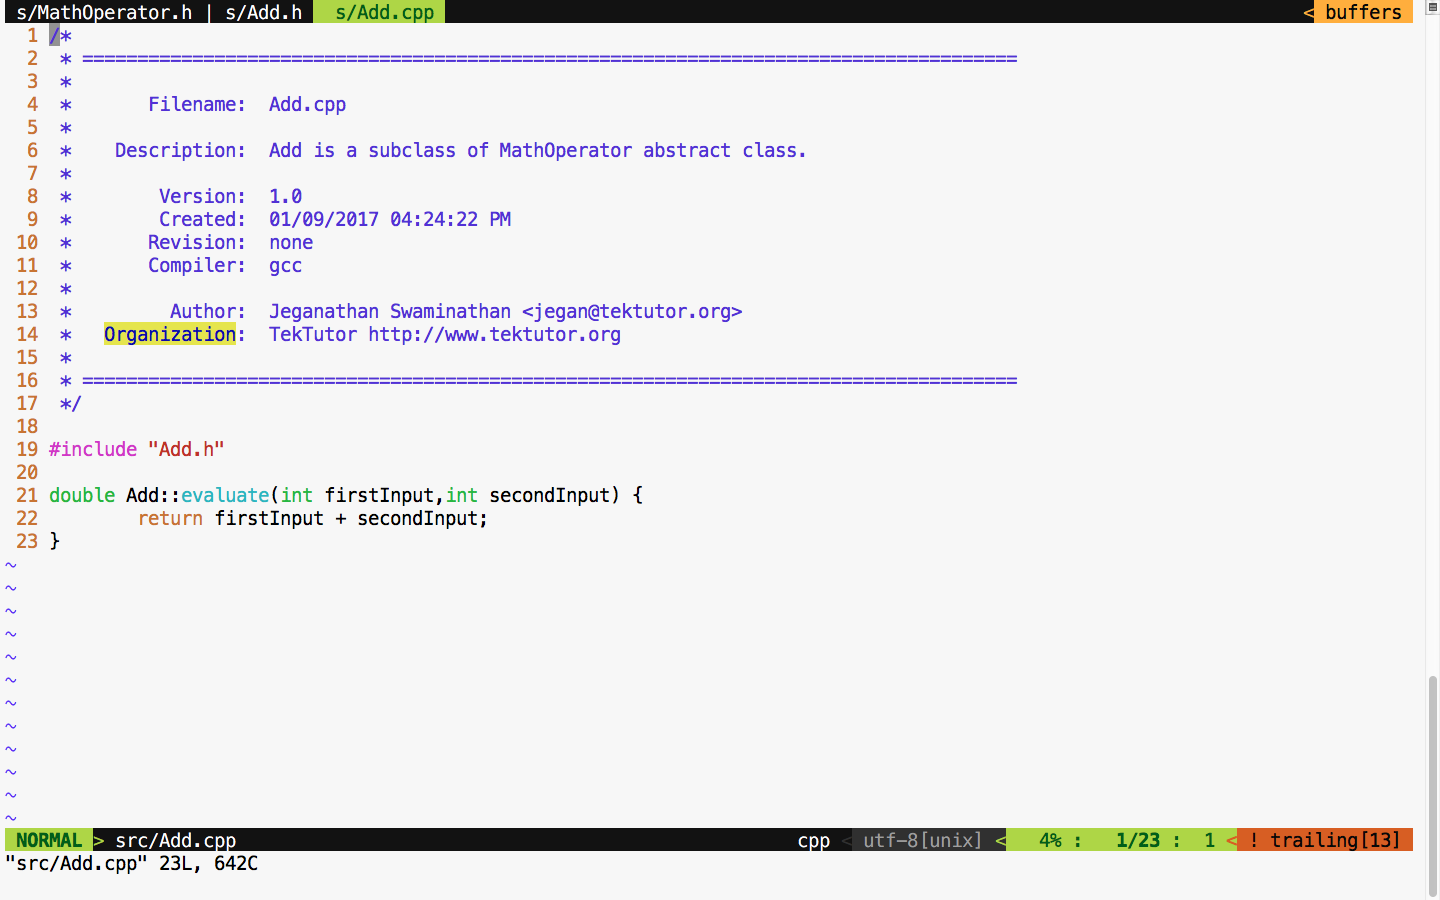
The subtract, multiplication, and division classes can be implemented in the similar fashion, as an Add class. The bottom line is that after refactoring, we can refactor a single RPNCalculator class into smaller and maintainable classes that can be tested individually.
Let's take a look at the refactored Makefile class in Figure 7.40 and test our code after the refactoring process is complete:
If all goes well, we should see all the test cases pass after refactoring if no functionalities are broken, as shown in Figure 7.41:
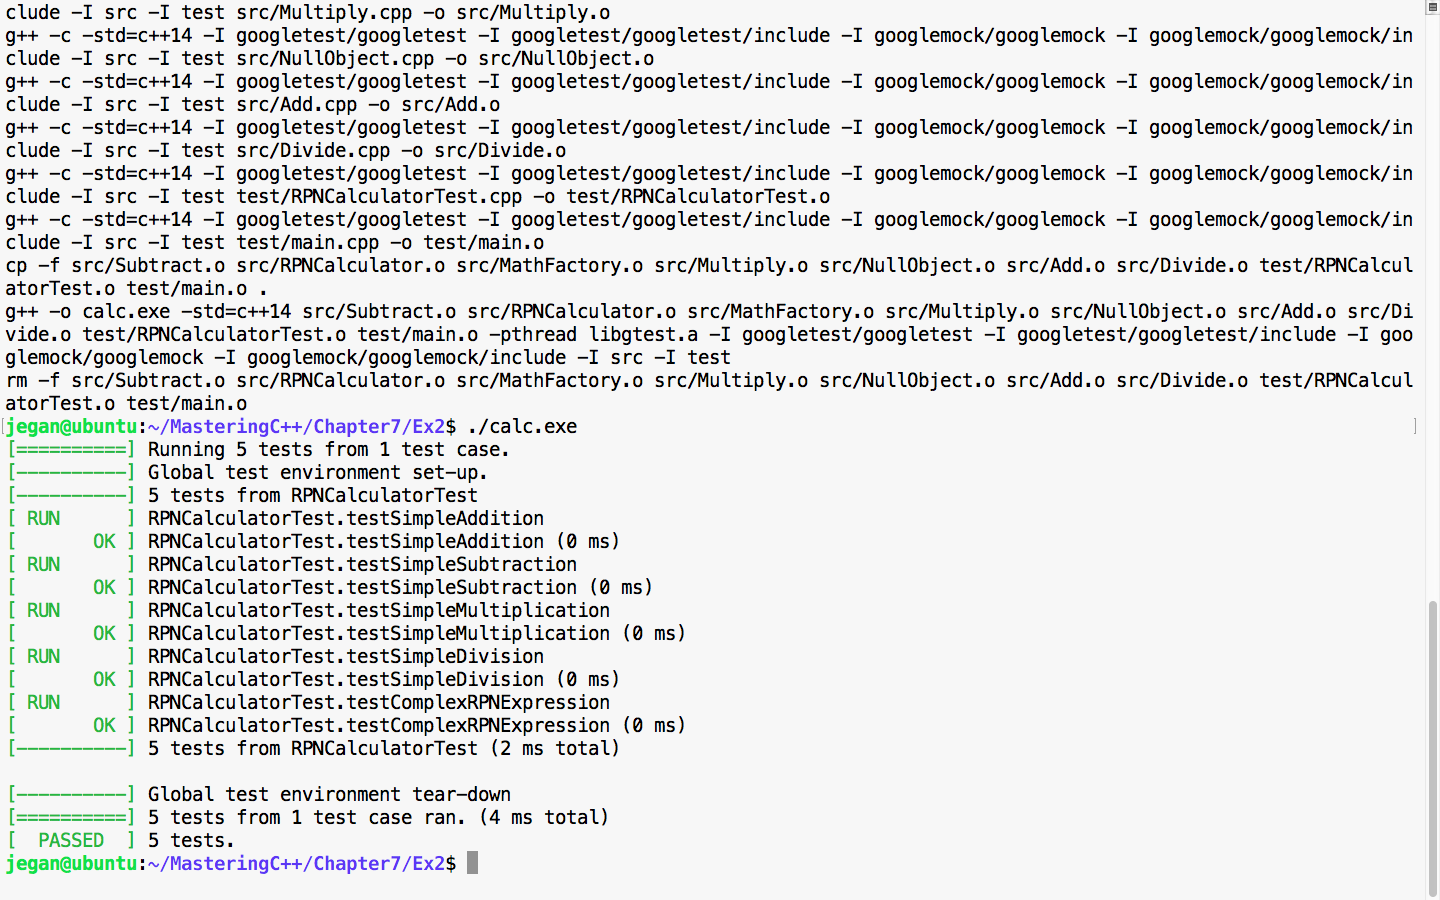
Cool! All the test cases have passed, hence it is guaranteed that we haven't broken the functionality in the process of refactoring. The main intent of TDD is to write testable code that is both functionally and structurally clean.