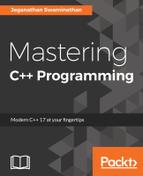
In this section, let's explore how to write a simple math application. As part of this exercise, we will use QLineEdit and QLabel widgets and QFormLayout. We need to design a UI, as shown in the following screenshot:
QLabel is a widget typically used for static text, and QLineEdit will allow a user to supply a single line input. As shown in the preceding screenshot, we will use QVBoxLayout as the main layout in order to arrange QFormLayout and QBoxLayout in a vertical fashion. QFormLayout comes in handy when you need to create a form where there will be a caption on the left-hand side followed by some widget on its right. QGridLayout might also do the job, but QFormLayout is easy to use in such scenarios.
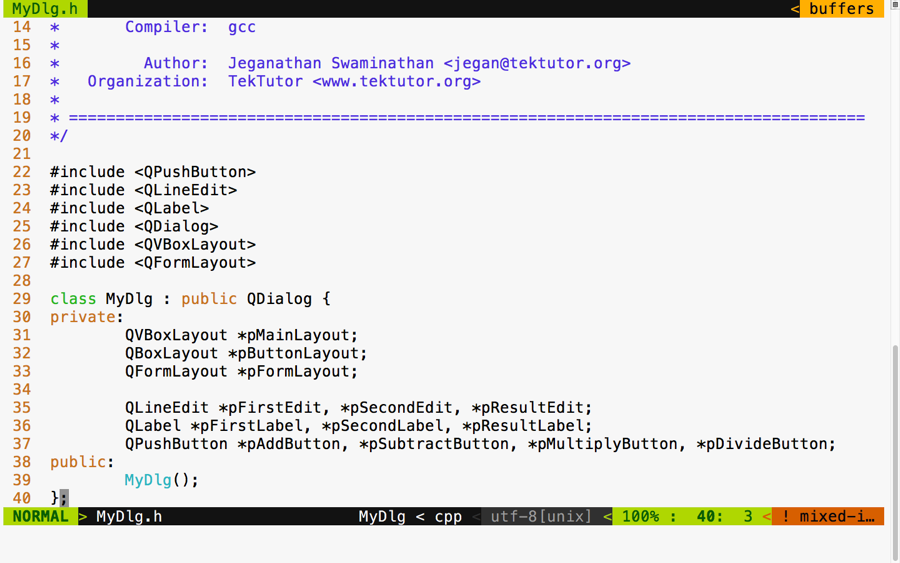
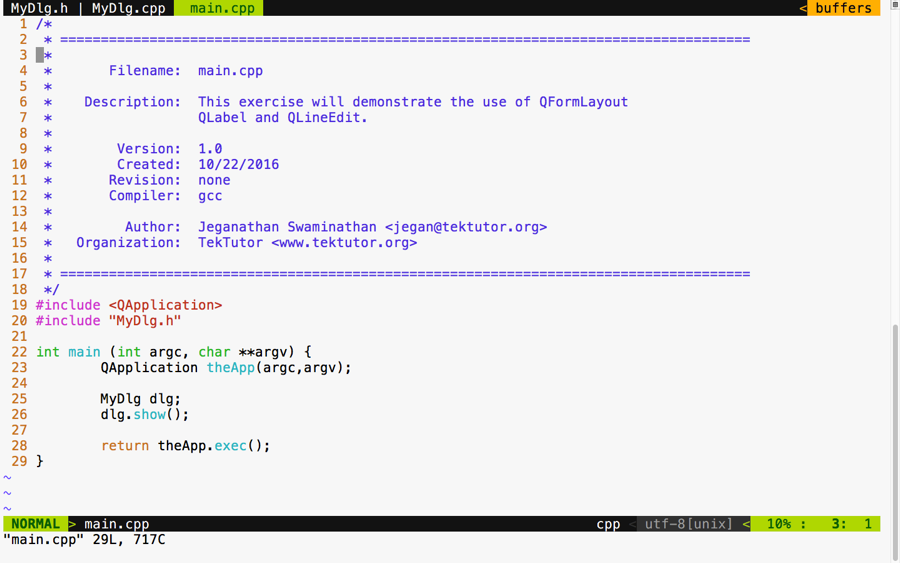
In this exercise, we will create three files, namely MyDlg.h, MyDlg.cpp, and main.cpp. Let's start with the MyDlg.h source code and then move on to other files:
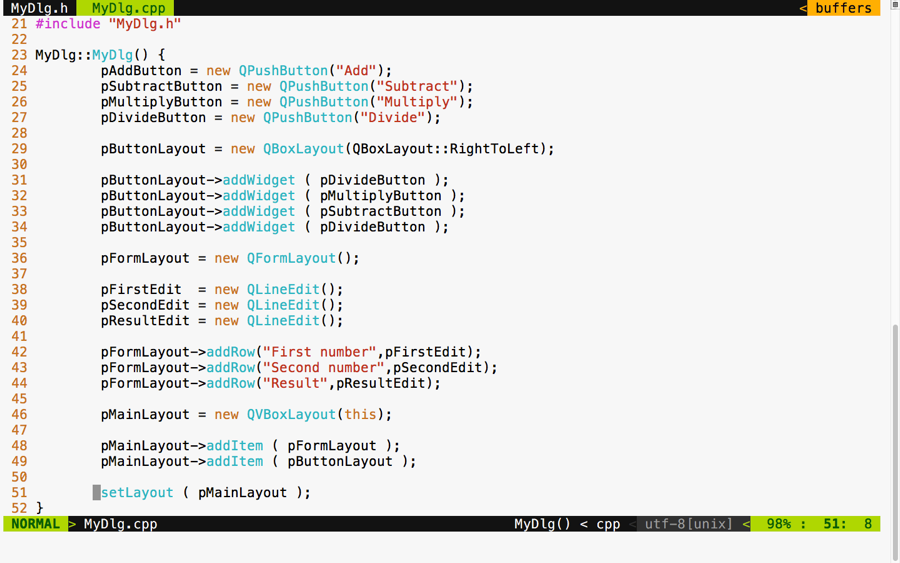
In the preceding figure, three layouts are declared. The vertical box layout is used as the main layout, while the box layout is used to arrange the buttons in the right-aligned fashion. The form layout is used to add the labels, that is, line edit widgets. This exercise will also help you understand how one can combine multiple layouts to design a professional HMI.
Qt doesn't have any documented restriction in the number of layouts that can be combined in a single window. However, when possible, it is a good idea to consider designing an HMI with a minimal number of layouts if you are striving to develop a small memory footprint application. Otherwise, there is certainly no harm in using multiple layouts in your application.
In the following screenshot, you will get an idea of how the MyDlg.cpp source file shall be implemented. In the MyDlg constructor, all the buttons are instantiated and laid out in the box layout for right alignment. The form layout is used to hold the QLineEdit widgets and their corresponding QLabel widgets in a grid-like fashion. QLineEdit widgets typically help supply a single line input; in this particular exercise, they help us supply a number input that must be added, subtracted, and so on, depending on the user's choice.
The best part of our main.cpp source file is that it remains pretty much the same, irrespective of the complexity of our application. In this exercise, I would like to tell you a secret about MyDlg. Did you notice that the MyDlg constructor is instantiated in the stack as opposed to the heap? The idea is that when the main() function exits, the stack used by the main function gets unwinded, eventually freeing up all the stack variables present in the stack. When MyDlg gets freed up, it results in calling the MyDlg destructor. In the Qt Framework, every widget constructor takes an optional parent widget pointer, which is used by the topmost window destructor to free up its child widgets. Interestingly, Qt maintains a tree-like data structure to manage the memory of all its child widgets. So, if all goes well, the Qt Framework will take care of freeing up all its child widgets' memory locations "automagically".
This helps Qt developers focus on the application aspect, while the Qt Framework will take care of memory management.
Aren't you excited to check the output of our new application? If you build and execute the application, then you are supposed to get an output similar to the following screenshot. Of course, we are yet to add signal and slot support, but it's a good idea to design the GUI to our satisfaction and then shift our focus to event handling:
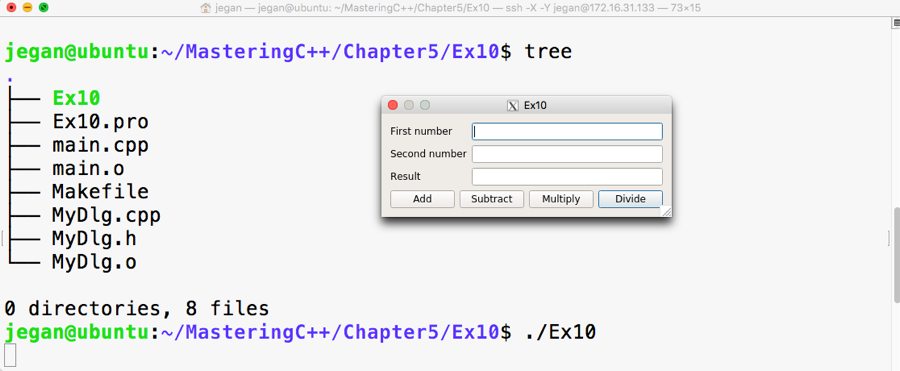
If you observe closely, though the buttons are laid out on QBoxLayout in the right to left direction, the buttons aren't aligned to the right. The reason for this behavior is when the window is stretched out, the box layout seems to have divided and allocated the extra horizontal space available among all the buttons. So let's go ahead and throw in a stretch item to the leftmost position on the box layout such that the stretch will eat up all the extra spaces, leaving the buttons no room to expand. This will get us the right-aligned effect. After adding the stretch, the code will look as shown in the following screenshot:

Go ahead and check whether your output looks as shown in the following screenshot. Sometimes, as developers, we get excited to see the output in a rush and forget to compile our changes, so ensure the project is built again. If you don't see any change in output, no worries; just try to stretch out the window horizontally and you should see the right-aligned effect, as shown in the following screenshot:
Now since we have a decent-looking application, let's add signal and slot support to add the response to button clicks. Let's not rush and include the add and subtract functionalities for now. We will use some qDebug() print statements to check whether the signals and slots are connected properly and then gradually replace them with the actual functionalities.
If you remember the earlier signal and slot exercise, any Qt window that is interested in supporting signals and slots must be QObject and should include the Q_OBJECT macro in the MyDlg.h header file, as shown in the following screenshot:
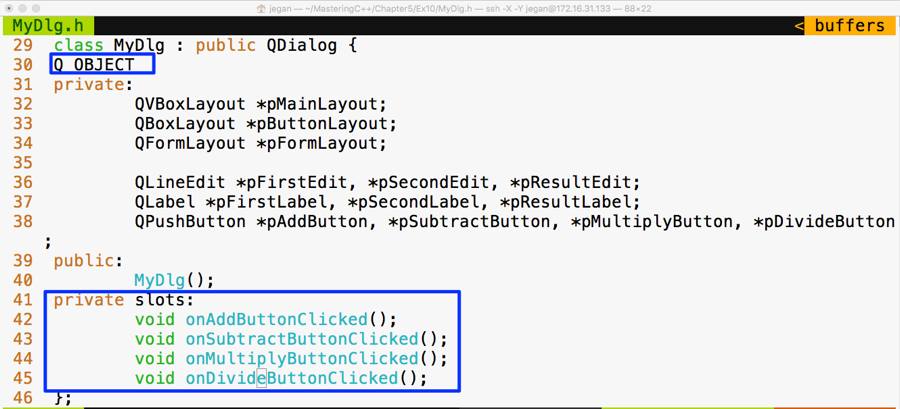
In lines starting from 41 through 45, four slot methods are declared in the private section. Slot functions are regular C++ functions that could be invoked directly just like other C++ functions. However, in this scenario, the slot functions are intended to be invoked only with MyDlg. Hence they are declared as private functions, but they could be made public if you believe that others might find it useful to connect to your public slot.
Cool, if you have come this far, it says that you have understood the things discussed so far. Alright, let's go ahead and implement the definitions for the slot functions in MyDlg.cpp and then connect the clicked() button's signals with the respective slot functions:
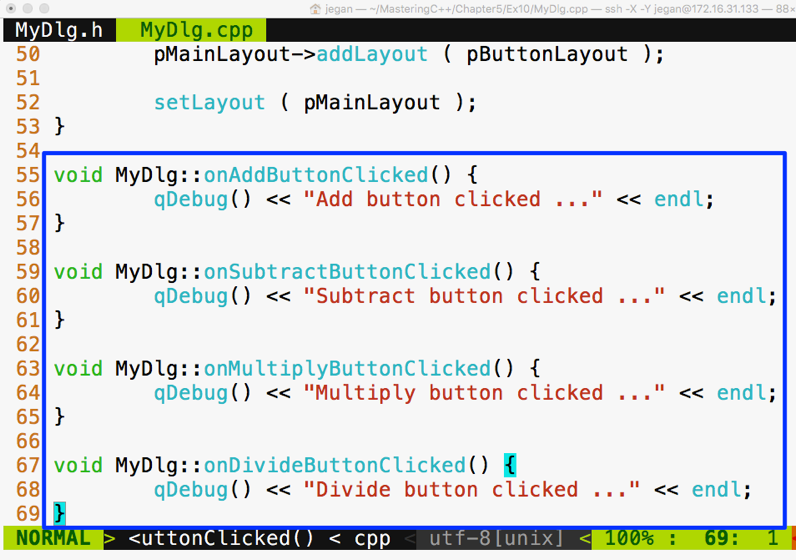
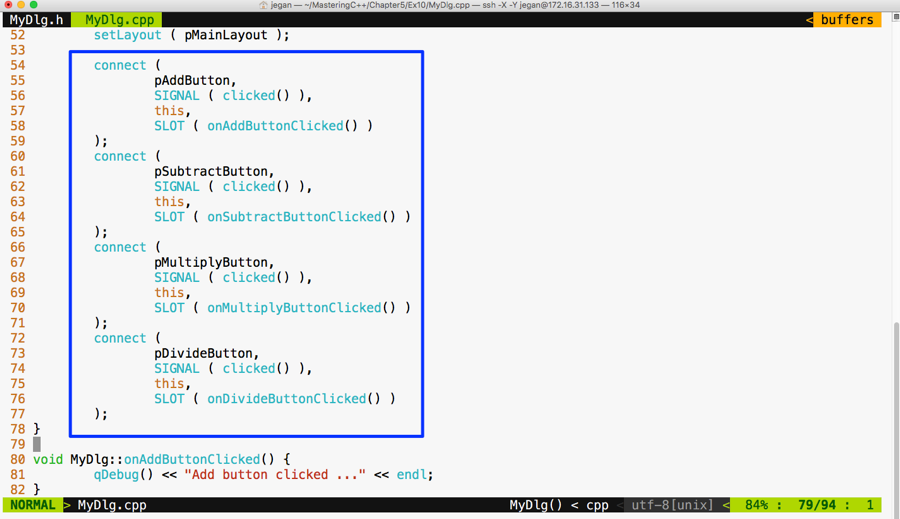
Now it's time to wire up the signals to their respective slots. As you may have guessed, we need to use the connect function in the MyDlg constructor, as shown in the following screenshot, to get the button clicks to the corresponding slots:
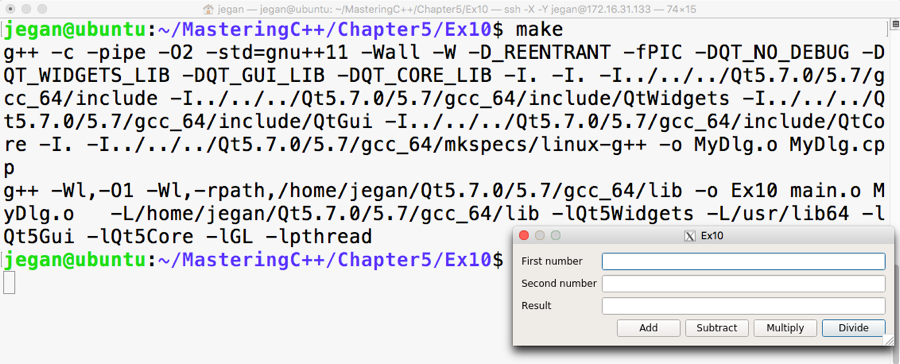
We are all set. Yes, it's showtime now. As we have taken care of most of the stuff, let's compile and check the output of our little Qt application:
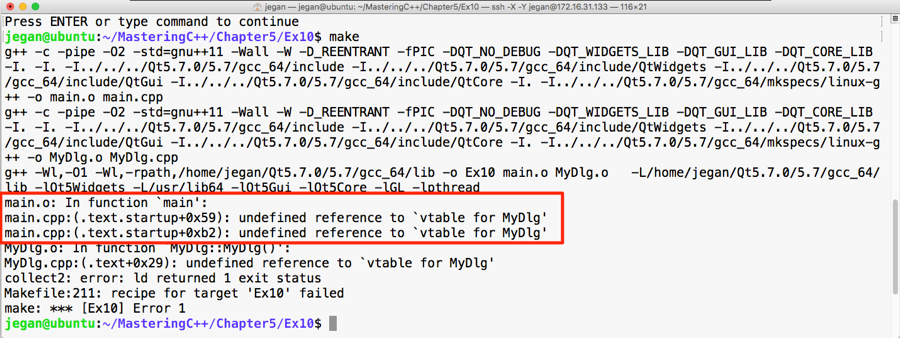
Oops! We got some linker error. The root cause of this issue is that we forgot to invoke qmake after enabling signal and slot support in our application. No worries, let's invoke qmake and make and run our application:
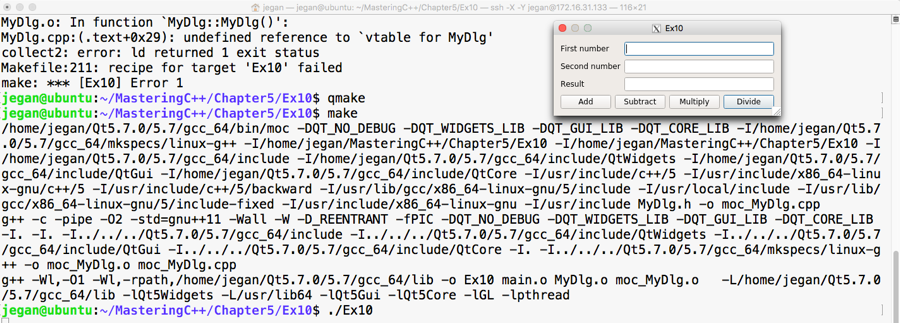
Great, we have fixed the issue. The make utility doesn't seem to make any noise this time and we are able to launch the application. Let's check whether the signals and slots are working as expected. For this, click on the Add button and see what happens:
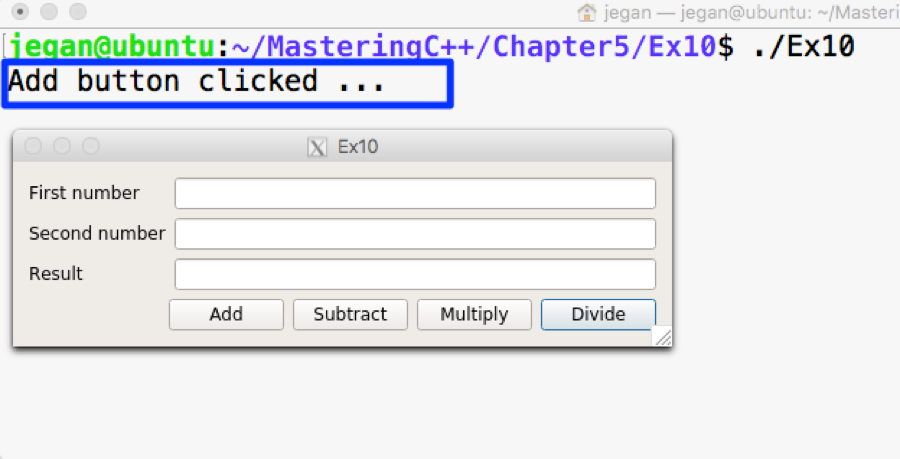
Wow! When we click on the Add button, the qDebug() console message confirms that the MyDlg::onAddButtonClicked() slot is invoked. If you are curious to check the slots of other buttons, go ahead and try clicking on the rest of the buttons.
Our application will be incomplete without business logic. So let's add business logic to the MyDlg::onAddButtonClicked() slot function to perform the addition and display the result. Once you learn how to integrate the added business logic, you can follow the same approach and implement the rest of the slot functions:
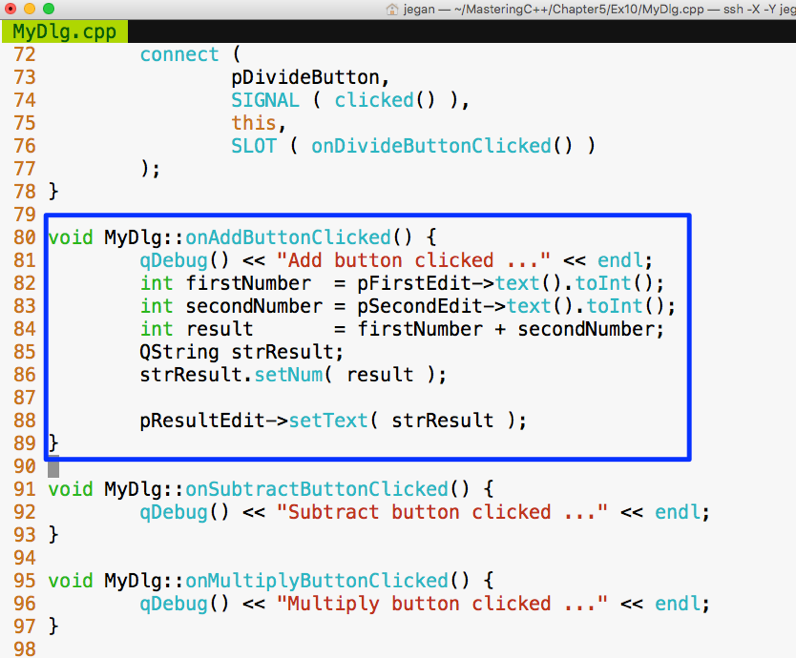
In the MyDlg::onAddButtonClicked() function, the business logic is integrated. In lines 82 and 83, we are trying to extract the values typed by the user in the QLineEdit widgets. The text() function in QLineEdit returns QString. The QString object provides toInt() that comes in handy to extract the integer value represented by QString. Once the values are added and stored in the result variable, we need to convert the result integer value back to QString, as shown in line number 86, so that the result can be fed into QLineEdit, as shown in line number 88.
Similarly, you can go ahead and integrate the business logic for other math operations. Once you have thoroughly tested the application, you can remove the qDebug() console's output. We added the qDebug() messages for debugging purposes, hence they can be cleaned up now.